


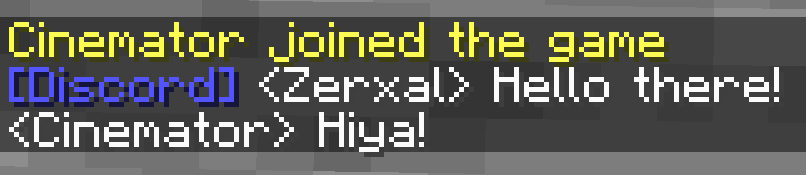
Chatterbox is a convient and dead-simple way to unify a Discord channel and a Minecraft chat, allowing players to seamlessly communicate regardless of their presence in the server.
All features are configurable to modify the plugin to exactly your needs.
- All settings fully configurable
- Compatibility with spigot-based servers
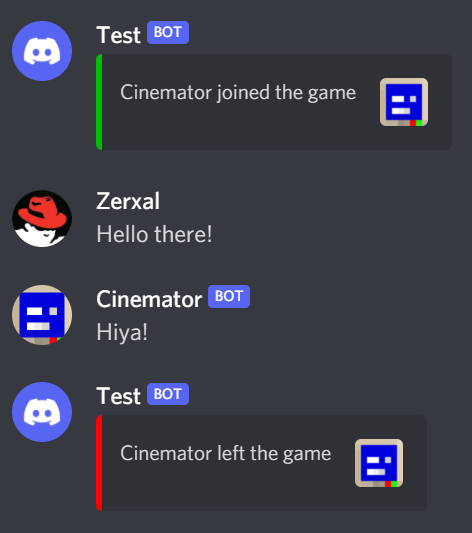
- Ability for users in the Discord to send messages to the Minecraft chat, and vice versa
- Able to ping people in the Discord server from the Minecraft chat
- Notification of server status and restriction of channel when the server is offline
- Notification of player leave and joins
- Notification of player deaths
Chatterbox comes with two parts, a plugin and a companion Discord bot. The two of them communicate over a websocket connection for mutually exchanging information.
The plugin installs into the server and sends chat messages and player events to be sent to a webhook. It listens for messages from the Discord bot to mirror into the server chat.
The Discord bot relays messages from the Discord to the plugin. It listens for messages from the plugin to mirror into the Discord channel. It also keeps track of the health of the websocket connection, and locks the Discord channel if the connection is found to be lost.
The installation guide is split into two parts, the plugin and the Discord bot. Follow the guide in chronological order.
Download the latest release of chatterbox from the releases section. Install the file into your server's plugins folder.
Next, start your server, and then stop it after it has finished starting. This is to generate the configuration file.
Navigate to and open the configuration file at plugins/Chatterbox/config.yml
The config.yml file is for the configuration of the Chatterbox plugin. Any line that has its value listed as true, can be left as is if you would like the described feature to be enabled. If not, you can change it to false to disable the feature. Any line listed as EMPTY must be configured to a value for the plugin to function properly.
Make sure that you have a space between the equals sign and the first character of the specified value.
webhook-urlis the URL to your Discord webhook. You can learn how to quickly create one here. Make sure that the channel is one that you want chat messages to be sent to from the Minecraft server.discord-bot-hostnameis the hostname/URL to the server that you will be hosting the Discord bot at. If it is an IP address, ensure that there is anhttp://in front of the IP address. If the port is not 80 or 443, include a:(port)at the end of the line with the port you are using for the Discord bot.discord-bot-auth-tokenis automatically generated by the plugin on first startup, and it is the authentication string that is used to verify the Discord bot and the plugin are who they say they are. There is no need to edit it, however, you should not share this token with anybody you do not trust. It would allow them to pretend to be the bot or server and perform malicious actions.send-discord-mentionswill enable the ability for players in the Minecraft server to mention people in the Discord with the standard way of@(username)send-join-messageswill enable the Discord bot to send a message in the Discord server when a player joins the Minecraft server.send-quit-messageswill enable the Discord bot to send a message in the Discord server when a player quits the Minecraft server.send-death-messageswill enable the Discord bot to send a message in the Discord server when a player dies in the Minecraft server.
The plugin is now configured correctly.
The recommended way to setup the Discord bot is by using our Docker container on a Linux system, as it is significantly easier. However, it is possible to run the Discord bot outside of a container. Both methods will be given.
The instructions provided will be for UNIX-based operating systems, as it is what the bot is intended to run on. However, there is no reason that non-UNIX operating systems will not work. You will just need to find mirror commands if you plan on using something else to host the bot.
Before starting installation, be sure that Docker is installed on the system that you will be running the Discord bot in. Downloads for Docker can be found below if you do not already have it installed.
You should also create a Discord bot in the Discord Developer Portal. If you do not know how to, you can follow the guide at the top of this DiscordJS article here.
Add the bot to your Discord server with the following URL, replacing (client_ID) with the client ID of your bot. Open this URL in your web browser and add your bot to your Discord server.
https://discord.com/oauth2/authorize?client_id=(client_ID)&permissions=8&scope=bot
Next, pull the image from Docker Hub. This may take a couple minutes depending on the speed of your internet connection, among other factors.
docker pull hwgilbert16/chatterbox
Once the image has been downloaded, create a file named .env
This will be the environment file, where your individual details will be input for the bot to use.
touch .env
Open it with your text editor of choice, and paste in the following lines:
DISCORD_TOKEN=
CHANNEL_ID=
GUILD_ID=
AUTH_TOKEN=
LOCK_ROLE_ID=
LOCK_CHANNEL_WHEN_OFFLINE=
When inputting values into the .env file, input your specific value on the same line after the equals sign. Make sure that there are no spaces between the equals sign and the first character of the value.
DISCORD_TOKENis the token for your Discord bot. Copy your bot token and paste it here.CHANNEL_IDis the ID of the channel in your Discord server that the bot will use for collecting messages to send to the Minecraft server. Make sure you have developer mode turned on, and right click the channel, click copy ID, then paste it onto the line.GUILD_IDis the ID of the guild, your Discord server. Right click on the icon of your server in the server list on the left-hand side, click copy ID, and paste it onto the line.AUTH_TOKENis the authentication token generated by the plugin on first startup. Copy the value from the Minecraft server'sconfig.ymland paste it here.LOCK_ROLE_IDis the role that will be prevented from sending messages in the channel when the Minecraft server is offline. This is a configurable option. If you would like the channel to be locked when the Minecraft server is offline, get the role ID of the role you would like to be locked out. If you want @everyone to be locked out, use your guild ID in theLOCK_ROLE_IDline. If you not like the channel to be locked when the Minecraft server is offline, enterfalseinto the line.
Save the file when you are done.
Next, create the Docker container. Replace (port) with the port that you would like the plugin and the Discord bot to communicate over. Port 3000 is recommended, but you can use any port over port 1024.
If you are using shared hosting, your host may block this port, require you to ask them to open it, or there may be a specific section in your server manager to open ports. If the plugin and bot do not link successfully and you use shared hosting, it is recommended to ask your host to see if they block the port in any way.
If your discord bot server is behind a firewall, ensure that your selected port is opened.
docker create -p (port):3000 hwgilbert16/chatterbox
After you run docker create it will output a line of characters. This is your container ID.
Copy the recently saved .env file to the Docker container. This will allow the bot to see your specific credentials and configuration.
Replace (container id) with the container ID that Docker returned in the previous step.
docker cp .env (container id):/usr/src/app/.env
Start the container. Replace (container id) with the container ID.
docker start (container ID)
After the Docker container starts, start your Minecraft server. After the Minecraft server finishes starting, Chatterbox should be properly working. Send a message in your specified channel or in the Discord to make sure everything is working properly.
You can also check with docker logs to ensure that the bot and the Minecraft server have properly connected. To do this, run:
docker logs (container ID)
In the logs output, there should be an occurance of a line stating "Chatterbox Bot is ready" and a line stating "Client connected", indicating that the Minecraft server has connected to the bot.
Installation is finished.
If you have followed the Docker container bot instructions, you do not need to follow the following instructions.
Create a Discord bot in the Discord Developer Portal before anything else. If you do not know how to, you can follow the guide at the top of this DiscordJS article here.
Add the bot to your Discord server with the following URL, replacing (client_ID) with the client ID of your bot. Open this URL in your web browser and add your bot to your Discord server.
https://discord.com/oauth2/authorize?client_id=(client_ID)&permissions=8&scope=bot
There should also be Node.JS >=16 on the Discord bot server. You can find more information on how to install it here.
Download the latest release of Chatterbox and unzip it. Replace (version number) with what the current version of Chatterbox is. You can find this out in the "releases" section.
wget https://github.com/hwgilbert16/chatterbox/archive/refs/tags/v(version number).tar.gz && tar -xf v(version number).tar.gz && cp -r chatterbox-(version number)/chatterbox-bot . && rm -rf chatterbox-(version number) && rm v(version number).tar.gz && cd chatterbox-bot
Next, install the dependencies of Chatterbox.
npm install && npm build
Run the following command to generate the .env file. This will be the environment file, where your individual details will be input for the bot to use.
npm start
Open the file named .env with your text editor of choice
When inputting values into the .env file, input your specific value on the same line after the equals sign. Make sure that there are no spaces between the equals sign and the first character of the value.
DISCORD_TOKENis the token for your Discord bot. Copy your bot token and paste it here.CHANNEL_IDis the ID of the channel in your Discord server that the bot will use for collecting messages to send to the Minecraft server. Make sure you have developer mode turned on, and right click the channel, click copy ID, then paste it onto the line.GUILD_IDis the ID of the guild, your Discord server. Right click on the icon of your server in the server list on the left-hand side, click copy ID, and paste it onto the line.AUTH_TOKENis the authentication token generated by the plugin on first startup. Copy the value from the Minecraft server'sconfig.ymland paste it here.LOCK_ROLE_IDis the role that will be prevented from sending messages in the channel when the Minecraft server is offline. This is a configurable option. If you would like the channel to be locked when the Minecraft server is offline, get the role ID of the role you would like to be locked out. If you want @everyone to be locked out, use your guild ID in theLOCK_ROLE_IDline. If you not like the channel to be locked when the Minecraft server is offline, enterfalseinto the line.
Save the file when you are done.
It is now time to start the bot. To start the bot, run the following command.
npm start
The bot is now running. Start your Minecraft server, and Chatterbox should be functional. In the output, you should see one occurance of "Chatterbox Bot is ready" and a message stating "Client connected" once your Minecraft server finishes starting.
It is recommended to run the bot in the background, though. Closing the terminal will also turn off the bot. A guide to using GNU Screen, a tool to run commands persistently in the background, can be found here.
Installation is now complete.
Compiling the Chatterbox plugin is relatively simple to do with the help of Apache Maven.
If you would like to compile the bot yourself, simply run tsc in the bot's directory to compile TypeScript files.
These instructions are for a Linux based system as it is what Chatterbox was developed on.
Make sure you've installed Apache Maven. If you haven't installed Maven before, you can find instructions here.
Pull the latest files from GitHub and extrapolate the plugin directory. You can git pull the latest release, or download the source code from the latest release and extract it. The instructions below aree for using git pull.
git pull https://github.com/hwgilbert16/chatterbox.git && mv chatterbox-(version-number)/chatterbox-plugin .. && ls chatterbox-plugin
Once you have done all of the above, you can run one command to compile the Chatterbox plugin. Make sure you're located within the directory which you downloaded the files into.
mvn clean install
The compiled and ready to use jar will be in the target folder. Ensure you use the one that does not include shaded or original in the filename.
If you discover an issue or other flaw in Chatterbox with your use of it, reporting it in issues would be of great help. While there is no specific template for issues, please make sure you describe the issue in detail and verbosely.
Including error logs, plugin output, bot output, and others is helpful to include.
In a pull request, please make sure you are explicitly clear in the feature you are adding and/or the issue you are fixing. Make sure there are no spelling mistakes and that it reads well.