This site has a lot going on so I thought I'd condense it and back it up here. Source is: https://rmprepusb.com/tutorials/124-cold-boot-attack-dump-a-computers-memory-to-a-usb-drive/#Cold_Boot_Attack Linked files are also backed up into this repo.
Documentation:
- Easy2Boot Scraper demonstration YouTube video: https://youtu.be/XfUlRsE3ymQ
- Hak5 - The Cold Boot Hack - https://www.youtube.com/watch?v=WoMFFAS0FHM
- 2015 Reaserch Covering DDR2/DDR3 - https://www.youtube.com/watch?v=ZHq2xG4XJXM
- 2018 Research Media Coverage - https://arstechnica.com/gadgets/2018/09/cold-boot-attacks-given-new-life-with-firmware-attack/
- Patching MOR Bit in UEFI - https://www.youtube.com/watch?t=449&v=RqvPZnLkP70
Software:
- Easy2Boot - https://easy2boot.xyz/download/ / https://www.fosshub.com/Easy2Boot.html
- RMPrepUSB - https://www.fosshub.com/RMPrepUSB.html
- Scaper.zip - https://rmprepusb.com/wp-content/uploads/2021/12/Scraper.zip
- Original Scraper - https://github.com/baselsayeh/coldboot-tools/releases/tag/2
- Defraggler - https://www.ccleaner.com/defraggler
- WinContig - https://wincontig.mdtzone.it/en/index.html
This is based on the work of Princeton University who developed the original code. It is suggested that some RAM retains it’s data for several minutes after switch-off and that you can even remove the DIMMs from a system after using freezer spray, put them in another system and then switch it on and save the memory contents to a USB drive!
WARNING: The code in scraper.bin writes to the drive 0 which will be the boot drive – however, if something goes wrong, there is a small possibility that it may destroy all the partitions on your internal hard disk! It shouldn’t go wrong – but it might! So test this on a system that does not have important files on the hard disk, just in case! You have been warned!
I suggest testing on a Virtual Machine rather than a real system first.
For test purposes, you can reduce the amount of RAM in the system by removing one bank of DIMMs before you start. This will make dumping and analysing faster.
Note: Some modern BIOSes will now wipe memory on power-up to prevent such attacks – in this case you may find that the saved data has been wiped. This can be prevented by plugging the DIMMs into an older system which does not do this or a Win10 system which has been cleanly shut down or by patching the firmware (see the Patching MOR Bit in UEFI video).
Note: If you only have one PC, you can still simulate a cold boot attack using two sets of DIMMs as follows:
- Boot target system – freeze DIMMs – switch off power
- Replace DIMMs – switch on power – boot to Windows – shutdown Windows nicely (MOR bit will be 0) (keep first set of DIMMs cold during this time!).
- Replace memory with first set of DIMMs, Legacy/BIOS boot to USB – UEFI is not supported (must not boot from large and fast USB disk!) and perform cold boot attack.
(You can add also add the files to an Easy2Boot multiboot USB drive by omitting steps 1 and 2.)
-
Select a FAST USB 3.0 drive – preferably a USB SSD or HDD or a SilverStone M.2 USB enclosure + SATA M.2 memory drive is good!
-
Create an NTFS USB drive containing a single large NTFS PRIMARY partition. You can use RMPrepUSB for this or any partition/format tool – e.g. EaseUS Home Partition Master – OR – make an new Easy2Boot USB drive.
-
Download scraper.zip (linked above) which has all the files you need for a grub4dos USB drive (except for ram.img).
Note: The original scraper pre-compiled 32-bit and 64-bit versions of scraper.bin available here on github as a ZIP file (thanks to Basel Sayeh).
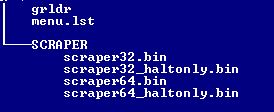
- Extract all the files from the Scraper.ZIP file onto the root of the USB drive. (If using an E2B USB drive, do not overwrite any E2B files – do not overwrite the existing \menu.lst file or \grldr file).
- Run Diskmgmt.msc in Windows and create a new RAM.VHD file on any suitable Windows drive using the Action – Create VHD option (see screenshot below) – use a FIXED VHD type and name it RAM.
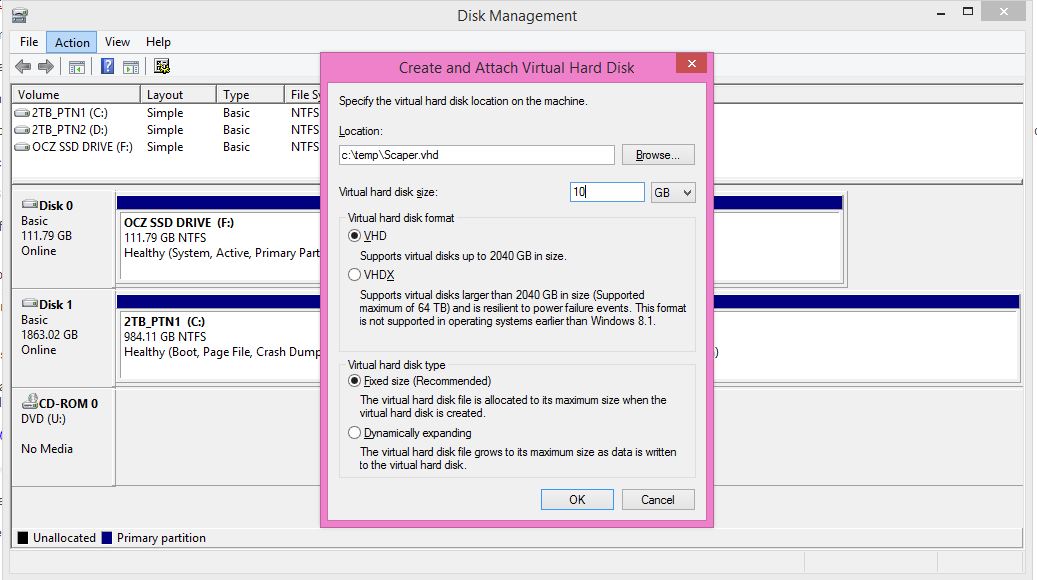
The size should be as large as the largest RAM that you intend to scrape – 16GB is probably large enough for most systems – so increase the size slightly above that.
- Copy the new RAM.VHD file to the USB drive \SCRAPER folder and rename the file to RAM.IMG (not RAM.VHD.IMG or RAM.IMG.VHD but RAM.IMG).
The essential files in the /scraper folder are shown below:
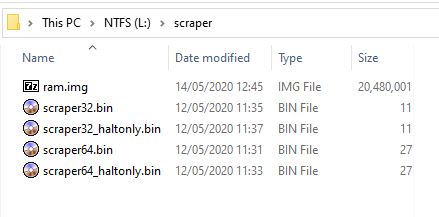
Note: The large ram.img file should be contiguous. Ensure that you run Defraggler or WinContig to make the file contiguous.
The root folder should contain \menu.lst and \grldr.
- If you are using an Easy2Boot USB drive, cut and paste the menu text below (or use the contents of the menu.lst in the Scraper.zip download) to make a new \ISO\UTILITIES\Scraper.mnu file (i.e. extract the \menu.lst to the _ISO\UTILITIES folder and rename the file as Scraper.mnu) – otherwise, if not using an E2B USB drive, just skip down to Step 8.
timeout 10
set ERR=
if not exist (hd0,0)/scraper/ram.img echo (hd0,0)/scraper/ram.img is missing! && set ERR=1
if not exist (hd0,0)/scraper/scraper64_haltonly.bin echo (hd0,0)/scraper/scraper64_haltonly.bin is missing! && set ERR=1
if not exist (hd0,0)/scraper/scraper64.bin echo (hd0,0)/scraper/scraper64.bin is missing! && set ERR=1
if not exist (hd0,0)/scraper/scraper64.bin echo (hd0,0)/scraper/scraper64.bin is missing! && set ERR=1
if not exist (hd0,0)/scraper/scraper32_haltonly.bin echo (hd0,0)/scraper/scraper32_haltonly.bin is missing! && set ERR=1
echo
echo
if "%ERR%"=="1" pause ERROR: Press ENTER to continue...


iftitle [checkrange 2,3 is64bit] Dump the ram (64-bit Halt)
map (hd0) (hd1)
map --hook
chainloader --force --boot-cs=0x7c0 --boot-ip=0x200 (hd1,0)/scraper/scraper64_haltonly.bin
map (hd1,0)/scraper/ram.img (hd0)
map --hook
rootnoverify (hd0,0)


iftitle [checkrange 2,3 is64bit] Dump the ram (64-bit Reboot)
map (hd0) (hd1)
map --hook
chainloader --force --boot-cs=0x7c0 --boot-ip=0x200 (hd1,0)/scraper/scraper64.bin
map (hd1,0)/scraper/ram.img (hd0)
map --hook
rootnoverify (hd0,0)


iftitle [checkrange 2,3 is64bit] --- INFORMATION: 64-bit CPU ---
errorcheck off


iftitle [checkrange 0,1 is64bit] --- INFORMATION: 32-bit CPU ---
errorcheck off


title Dump the ram - max. 4GB (32-bit Halt)
map (hd0) (hd1)
map --hook
chainloader --force --boot-cs=0x7c0 --boot-ip=0x200 (hd1,0)/scraper/scraper32_haltonly.bin
map (hd1,0)/scraper/ram.img (hd0)
map --hook
rootnoverify (hd0,0)


title Dump the ram - max. 4GB (32-bit Reboot)
map (hd0) (hd1)
map --hook
chainloader --force --boot-cs=0x7c0 --boot-ip=0x200 (hd1,0)/scraper/scraper32.bin
map (hd1,0)/scraper/ram.img (hd0)
map --hook
rootnoverify (hd0,0)


title commandline
commandline


title reboot
reboot


title halt
halt
- If NOT using Easy2Boot – run RMPrepUSB.exe – Install grub4dos – Yes (MBR) to install grub4dos onto the USB drive (not required if using an E2B drive).
This step is not required if you have used an E2B USB drive.
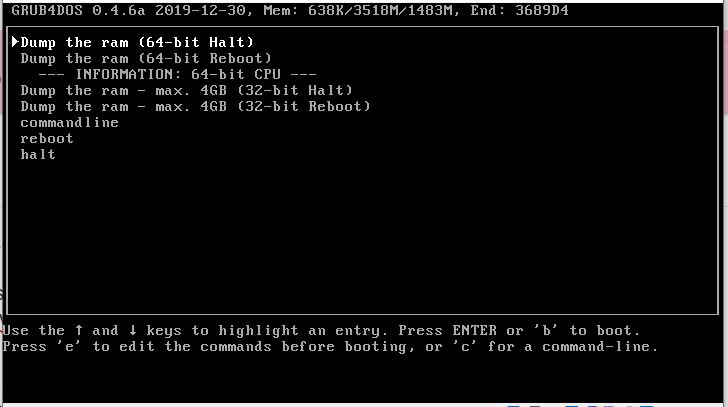
Tip: You can use the QEMU button in RMPrepUSB to test if the USB drive will now boot to the grub4dos menu.
That’s it – now you can boot to the USB drive on a real system and scrape! On an E2B drive, the Scraper menus will be in the Utilities sub-menu.
I suggest you keep a copy of the original RAM.VHD file because it will be ‘clean’ and you can use it again for the next time. Each time you want to do a new ‘scrape’ you should delete the old RAM.IMG file and copy the ‘clean’ RAM.VHD file again and rename it to RAM.IMG.
Note that the E2B menu system uses more memory than a simple grub4dos menu and so it will destroy some more data stored in RAM, so it is better to use a dedicated ‘Scraper’ USB drive.
Some BIOSes do not support writes to USB devices past 137GB (128GiB). So you should ensure that the scraper.vhd file is within 137GB from the start of the USB drive.
If possible. Boot the PC with as little RAM as possible (ideally just one stick).
This article discusses some of the processes in depth and mentions some other points of interest: https://www.linuxjournal.com/magazine/cold-boot-attack-tools-linux
Since the source for all of these tools was released, you can download and use them yourself without too much setup. First, go to citp.princeton.edu/memory/code, and download the latest version of the bios_memimage tarball, or the efi_netboot tarball if you want to image a machine that boots with EFI. Then, unpack the tarball. For my examples in this article, I use the bios_memimage package.
The bios_memimage package contains a doc directory with good documentation on the project and how to build and use the source. The tools support both 32- and 64-bit environments. Although the 32-bit version technically will work on a 64-bit system, it can't address all the 64-bit environment's memory space, so you might not get a complete image. To build for a 32-bit environment, enter the bios_memimage directory and type make. To build for a 64-bit environment, enter the bios_memimage directory and type make -f Makefile.64.
Note: I noticed when I compiled the code on my environment, the build errored out with an undefined reference to __stack_chk_fail. This is due to GCC's new stack protection. As a workaround, edit the pxe/Makefile file and change the line that reads:
CFLAGS= -ffreestanding -Os -Wall -I../include -march=i386
to:
CFLAGS= -ffreestanding -Os -Wall -I../include
 ↪-march=i386 -fno-stack-protector
Once the code has compiled successfully, you are ready to install the tools. The procedure is different for the USB and PXE tools. For the USB tool, you need a USB drive that you are willing to erase and that is big enough to fit the RAM you want to dump. In the usb directory is a bootable image called scraper.bin. Connect your USB disk (in my example, /dev/sdb), and then use the dd tool as root to overwrite the beginning of the drive with the boot image:
$ sudo dd if=scraper.bin of=/dev/sdb
19+1 records in
19+1 records out
9792 bytes (9.8 kB) copied, 0.0101028 s, 969 kB/s
Now the disk is ready. Go to the machine you would like to image, connect the USB drive, and then force a CPU reset or pull and then restore the power quickly. Then, set the BIOS to boot from the USB key. This will vary depending on the computer. On some BIOSes, you will press F12 or some other key to see a list of boot options; others require you to enter the BIOS configuration to change the boot order. In any case, once you boot from the USB key, the scraper tool immediately will start dumping the contents of RAM to the disk. Once it has completed, it will attempt an APM power-off or otherwise will reset the machine. Then you can unplug the USB drive and return to your machine.
You can use the provided usbdump tool under the directory of the same name to dump the RAM from the USB disk to your local drive. Simply specify the USB drive as an argument and then redirect the output to a file of your choice:
$ sudo ./usbdump /dev/sdb > memdump.img
recover segment0 [base: 0x0 size: 653312]
recover segment1 [base: 0x100000 size: 1062993920]
The PXE-based scraper works somewhat differently from the USB-based scraper. First, if you don't already have a PXE server, you need to configure one. That process is out of the scope of this article, but I explained how to set up a PXE server in the article “PXE Magic” in the April 2008 issue of Linux Journal. Once you have a functional PXE server, copy the pxe/scraper binary to your tftp directory and change your pxelinux configuration so that it points to that file.
Next, connect the target system to the network (or if you set up the PXE server on a laptop, just connect the target system to the laptop via a crossover cable). Then, initiate a CPU reset or power off, and then immediately power on the target system. As with USB booting, different BIOSes have different ways to boot from PXE. On some BIOSes, you can press a function key, and others require that you change the boot order from the BIOS configuration.
Once the target machine gets a DHCP address and boots from the network, it will display a status message and then wait for the pxedump utility to connect. Unlike with the USB-based scraper, the PXE scraper doesn't automatically dump the memory over the network. Instead, you need to execute the pxedump binary found under the pxedump directory as follows:
$ ./pxedump target_machine_IP_address > memdump.img
I've duplicated this research to make it easier to find for me and in case it gets lost. Source is: https://citp.princeton.edu/our-work/memory/
J. Alex Halderman, Seth D. Schoen, Nadia Heninger, William Clarkson, William Paul, Joseph A. Calandrino, Ariel J. Feldman, Jacob Appelbaum, and Edward W. Felten.
Abstract Contrary to popular assumption, DRAMs used in most modern computers retain their contents for seconds to minutes after power is lost, even at operating temperatures and even if removed from a motherboard. Although DRAMs become less reliable when they are not refreshed, they are not immediately erased, and their contents persist sufficiently for malicious (or forensic) acquisition of usable full-system memory images. We show that this phenomenon limits the ability of an operating system to protect cryptographic key material from an attacker with physical access. We use cold reboots to mount attacks on popular disk encryption systems — BitLocker, FileVault, dm-crypt, and TrueCrypt — using no special devices or materials. We experimentally characterize the extent and predictability of memory remanence and report that remanence times can be increased dramatically with simple techniques. We offer new algorithms for finding cryptographic keys in memory images and for correcting errors caused by bit decay. Though we discuss several strategies for partially mitigating these risks, we know of no simple remedy that would eliminate them.
- Full research paper http://citpsite.s3.amazonaws.com/wp-content/uploads/2019/01/23195456/halderman.pdf
- Blog Post: https://freedom-to-tinker.com/2008/02/21/new-research-result-cold-boot-attacks-disk-encryption/
Appeared in Proc. 17th USENIX Security Symposium (Sec ’08), San Jose, CA, July 2008.
Advanced users can try to observe memory remanence effects on their own systems by performing this simple experiment. (These instructions are written for Linux machines, but they can be adapted for other operating systems.)
Create a Python program with the following code:
#!/usr/bin/env python
# a pirate's favorite chemical element
a = ""
while 1: a += "ARGON"
This program will fill memory with copies of the word “ARGON”.
Run the sync command to flush any cached data to the hard disk. Start the Python program, and allow it to run for several minutes. It won’t display anything on the screen, but after a while you should see hard drive activity as the memory fills and data gets swapped to disk. Deliberately crash the system by turning the power off and on again or briefly removing the battery and power cord. After the system reboots, look for the “ARGON” pattern in memory. You can use the following command to print strings of text contained in RAM: sudo strings /dev/mem | less
If you see copies of the string “ARGON”, some of the contents of memory survived the reboot. You’ll see many other strings that were loaded into memory when the system restarted, and possibly other data left over from before it rebooted.
If you don’t see any copies of the pattern, possible explanations include (1) you have ECC (error-correcting) RAM, which the BIOS clears at boot; (2) your BIOS clears RAM at boot for another reason (try disabling the memory test or enabling “Quick Boot” mode); (3) your RAM’s retention time is too short to be noticeable at normal temperatures. In any case, your computer might still be vulnerable — an attacker could cool the RAM so that the data takes longer to decay and/or transfer the memory modules to a computer that doesn’t clear RAM at boot and read them there.
Q. Who was responsible for this research?
A. This project is joint work by J. Alex Halderman (Princeton), Seth D. Schoen (Electronic Frontier Foundation), Nadia Heninger (Princeton), William Clarkson (Princeton), William Paul (Wind River Systems), Joseph A. Calandrino (Princeton), Ariel J. Feldman (Princeton), Jacob Appelbaum, and Edward W. Felten (Princeton).
Q. What encryption software is vulnerable to these attacks?
A. We have demonstrated practical attacks against several popular disk encryption systems: BitLocker (a feature of Windows Vista), FileVault (a feature of Mac OS X), dm-crypt (a feature of Linux), and TrueCrypt (a third-party application for Windows, Linux, and Mac OS X). Since these problems result from common design limitations of these systems rather than specific bugs, most similar disk encryption applications, including many running on servers, are probably also vulnerable.
Q. What can users do to protect themselves?
A. The most effective way for users to protect themselves is to fully shut down their computers several minutes before any situation in which the computers’ physical security could be compromised. On most systems, locking the screen or switching to “suspend” or “hibernate” mode does not provide adequate protection. (Exceptions exist; some systems may not be protected even when powered off. Check with the developer of your disk encryption software for further guidance.)
Q. Don’t we already know that someone with physical access to my computer can steal my data?
A. The main purpose of disk encryption is to prevent someone who has physical access to your computer from accessing your data without your key or password. People commonly use these tools with the assumption that they provide substantial protection should their computers be lost or stolen. Unfortunately, we demonstrate that existing disk encryption systems rely on assumptions about computer memory that make them vulnerable to attack under certain common circumstances.
Q. Isn’t this the same as burn-in effects noticed by Gutmann? Can’t encryption programs rotate keys to get around this?
A. Gutmann notes that data written to RAM for extended periods may become “burned in,” allowing it to be easily recovered later. We describe a different effect: data written even momentarily to RAM persists for a non-trivial period of time. We exclusively rely on the latter effect to recover data. This allows us to recover keys even if, following Gutmann’s advice, those keys are stored only briefly at any single location within RAM.
Q. Isn’t your attack difficult to carry out? Don’t you need materials like liquid nitrogen?
A. We found that information in most computers’ RAMs will persist from several seconds to a minute even at room temperature. We also found a cheap and widely available product — “canned air” spray dusters — can be used to produce temperatures cold enough to make RAM contents last for a long time even when the memory chips are physically removed from the computer. The other components of our attack are easy to automate and require nothing more unusual than a laptop and an Ethernet cable, or a USB Flash drive. With only these supplies, someone could carry out our attacks against a target computer in a matter of minutes.
Q. You show specific brands of computers in your video. Why did you pick these brands? Are these brands especially vulnerable?
A. We studied and filmed the computers we had available to us. They were available to us because we previously decided to buy them for our own use. There is no reason to think these brands of computers are more or less vulnerable than any other brand.
Q. What can vendors do to protect against these attacks?
A. We discuss several potential mitigation strategies in our research paper, though many of these would require hardware modifications or substantial changes to the way disk encryption software is designed and used. The best software-only solution would be to encrypt the disk key with a password whenever the computer enters an inactive state, so that it will not be useful to an attacker even if it is copied from RAM. Unfortunately, this means the computer itself would not be able to access the disk until the user enters the password, so this approach might not be practical when the computer is in certain states, such as at a locked screen saver. (Some disk encryption products, including Microsoft’s BitLocker in “advanced mode,” implement a form of this protection when the computer is powered off or hibernating.)
Q. Have you notified vendors about these problems?
A. We provided advance notice of our findings to several affected vendors.
Q. Where does the name “Lest We Remember” come from?
A. This is the name of a short story by Isaac Asimov published in The Winds of Change and Other Stories.
Q. I don’t use disk encryption. Why should I care?
A. Even if you don’t use disk encryption, various parties may possess your sensitive data and use disk encryption to protect that data. In addition, while disk encryption software is our primary focus, our techniques are useful for recovering other data from your computer, such as sensitive data used to perform online transactions.
Q. Why isn’t screen-locking, suspending, or hibernating the computer good enough?
A. Our attacks rely on the ability to learn the contents of RAM, which contains the key used to encrypt your data. When you lock, suspend, or hibernate your computer, the contents of RAM may be preserved–either in RAM itself or elsewhere–and, if necessary, be made accessible from RAM later without a password or other authentication. Therefore, none of these modes prevent us from recovering the desired contents of RAM. (Exceptions exist; check with the developer of your disk encryption software for further guidance.)