- ElWiz - a program to read data from Tibber Pulse
Breaking changes: Users with an existing installation of ElWiz are encouraged to carefully read the Breaking.md document
Tibber Pulse is a microcontroller (MCU) capable of reading power consumption data from an AMS meter. In the following it is referred as Pulse. ElWiz retrieves data from AMS meters by using Pulse.
ElWiz is made for people who want to build a smart home without being dependent of external resources or cloud services. The purpose is to retrieve data from an AMS meter to use in Home Assistant, OpenHAB or a similar system.
The program interprets raw binary data from Pulse and translates it into easy understandable JSON format. The program does not use SSL, and it is therefore easy to use for those who have an extra PC, Raspberry Pi or their own server at home. The program is designed to run continuously 24 hours a day, and is therefore not suitable for running on a laptop or other machine that you like to switch off after use.
ElWiz can also run in a Docker environment along with an MQTT broker and Home Assistant. A separate Docker guide is is found here: docker.md
Users of AMS meters are billed per hour. The program fetchprices.js retrieves spot prices from the Nordpool power exchange and calculates the user's electricity costs hour by hour. To take advantage of this, the configuration file config.yaml must be adjusted according to the power supplier's tariffs. fetchprices.js is described in detail in fetchprices.md.
elwiz-chart is a chart program that is used to visualize the fluctuating price data fetched by the fetchprices program. The program is described in detail in elwiz-chart.md document.
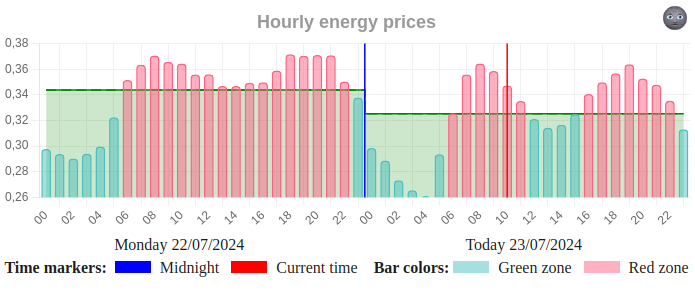
An elwiz-chart example showing two days of prices
ElWiz is written in node.js (javascript) for Linux and it is easy to install and use. A configuration file is available for individual adjustments. Those who want to use it on Mac or Windows may need to make some minor changes to the program. This possibly applies to signals which are described further down.
ElWiz is tested with only access to the Kaifa MA304H3E AMS meter. It is possible that some minor changes may be needed if it is to be used on an AMS meter from another manufacturer.
Below is described what you need to install ElWiz and set up Pulse. You can then send data to Home Assistant, OpenHAB, or similar systems. In Home Assistant mode ElWiz has builtin auto discovery
- a Tibber Pulse
- access to an MQTT broker
- some knowledge of MQTT
- be able to edit simple information in a text file
- access to Home Assistant or another similar platform
- knowledge of programming in node.js (javascript)
- MQTT-controlled coffee maker
For those who don't know git, it is easy to download and install from the ZIP archive here: https://github.com/iotux/Pulse/archive/master.zip Download and extract it in its own directory (folder). Users of git can use git clone as usual. The program needs write access to the directory.
The easiest is to use git clone to install the program:
git clone https://github.com/iotux/ElWiz.git
Then install the program with the following commands:
cd ElWiz
npm install
The following dependencies are thus installed
* axios
* express
* mqtt
* date fns
* xml-js
* node-schedule
* js-yaml
The file config.yaml.sample is copied to config.yaml. If you install programs on the same machine as your local broker, you probably don't need to make any further changes in config.yaml. Otherwise, it will be necessary to enter the IP address and possibly the username and password of your own MQTT broker. The most important parameters in the configuration file look like this:
---
# Replace with your own MQTT broker
mqttUrl: "mqtt://localhost:1883"
mqttOptions:
  username:
  password:


# meterModel can be kaifa, aidon or kamstrup
meterModel: kaifa

# Tibber Pulse listening topic
topic: tibber

# ElWiz publishing topics
pubTopic: meter/ams
pubStatus: meter/status
pubNotice: meter/notice

# Publish options for list 1, 2, 3 & status
list1Retain: false
list1Qos: 0
list2Retain: false
list2Qos: 0
list3Retain: true
list3Qos: 1

statusRetain: false
statusQos: 0

# ElWiz event messages
willMessage: ElWiz has left the building
greetMessage: ElWiz is performing

# Tibber Pulse event messages
onlineMessage: Pulse is talking
offlineMessage: Pulse is quiet

# Debug mode at startup
DEBUG: false
debugTopic: debug/hex

# User has production (solar panels)
hasProduction: false

#############################################
# Pssible cacheType values
#   file
#   redis
cacheType: file

# Possivle storage type
#   mongodb
#   mariadb
#   custom
#   none
storage: none

#############################################
# Possible publishing modes
#   hassPublish
#   basicPublish
#   customPublish
publisher: hassPublish

#############################################
# Publish to Home Assistant (defaults to TRUE)?
hassPublish: true
# Home Assistant sensor base topic (defaults to "elwiz/sensor")
haBaseTopic: elwiz

# Don't change the following topic unless you
# have changed the way HomeAssistant read
# MQTT messages
haAnnounceTopic: homeassistant


# Home Assistant sensor base topic (defaults to "elwiz/sensor")
# This is different from "pubTopic" to separate it from basic use of ElWiz
# A separate topic will also prevent "spamming" of HA
haBaseTopic: elwiz
It is worth noting the following:
topic under # Listening topics must match what is specified in mqtt_topic when configuring Pulse. Other changes should not normally be required.
The program has "ready-made" integration for Home Assistant as configured. For other systems some configuration changes are likely needed. A plugin system is used to transform Pulse messages to other formats.
The ElWiz chart program has its own configuration file chart-config.yaml. This makes it possible to run the program along with fethprices.js without running ElWiz. The file config.yaml.sample is copied to config.yaml. The default parameters should be okay unless you are runnung in a remote environment. If so, you will need to set the chartConfig wsUrl parameter to the IP address of your chart server (server.js). Furthermore, currencyCode and languageCode should be set according to your own currency and language.
---
# The chart server configuration
# Changes will need a server restart
serverConfig:
  debug: false
  savePath: data
  serverPort: 8321
  wsServerPort: 8322
  # MQTT params
  # Replace with your own MQTT broker
  mqttUrl: "mqtt:localhost:1883"
  mqttOptions:
    username:
    password:

  # Priceinfo topic
  priceTopic: elwiz/prices
  chartTopic: elwiz/chart
  # Home Assistant
  hassPublish: true
  haBaseTopic: elwiz
  haAnnounceTopic: homeassistant

  # Factor for calculating green/red zones
  # % added/subracted to/from average price
  # It is permanent until changed here
  fixedAverageOffset: 0.0
  # Used for multiplying the value from the
  # adjustLeftAvgOffset and adjustRightAvgOffset
  # MQTT messages
  adjustmentStepFactor: 1.0

  # Change according to your own language/country
  currencyCode: NOK

# The chart web client configuration
# Reload browser to activate changes
chartConfig:
  # Replace with IP address of server if running remote
  # The port number needs to be
  # equal to the "wsServerPort" above
  wsUrl: "ws://localhost:8322/"

  # Set this to "true" if you want
  # dark mode on mobile devices
  darkMode: false

  # Set true if you want the Y axis to start at 0
  yBeginAtZero: false

  # Web client debug
  debug: false

  # Change according to your own country
  languageCode: nb-NO
currencyCode: NOKThe first step to connect Pulse to your own network is to force it into AP mode. By doing a hard reset, it will appear in the network as an access point. A paper clip is what is needed. Pulse has a small hole for resetting to factory defaults. It is on the opposite side of where the micro-USB connector is. It is usually most appropriate to supply Pulse with power from a mobile charger or similar. When the power is connected, use an unfolded paper clip in the small hole and press until Pulse begins to flash rapidly (after about 5 seconds). It should now be possible to find it in the network with the SSID Tibber Pulse. You must connect a PC or mobile phone to this. The password is on the back of the Pulse in bold text in a frame. When Pulse has accepted the connection, you can reach it in the browser at address http://10.133.70.1. Pulse's website that appears will look like this:

The fields ssid and psk are filled in with the name of your own WiFi router and password.
The fields mqtt_url and mqtt_port are filled in with the IP address of your own broker and port number 1883 for use without SSL. If the broker is set up to require authentication with username and password, this is entered in the field mqtt_url.
If the username is janedoe and the password is secret1, then this is specified like this:
janedoe:secret1@your.broker.address,
where broker-address can be a FQDN hostname or IP adress.
In the field mqtt_topic a freely chosen topic is entered. It should be different from the topic used in the program to send messages. As tibber is preselected in the program, it may be fine to use here.
The mqtt_topic_sub field is a topic that Pulse subscribes to. To indicate that MQTT messages go the opposite way, you can e.g. use rebbit here. This ensures that it does not conflict with other MQTT messages. So far I have found that by sending the message "reboot", Pulse will respond with "Debug: rebooting" and reboot. If you e.g. sends the message "nonsense", then it will respond with "Debug: Unknown command 'nonsense'". There is more about this in the section Controlling Pulse.
The update_url field seems to need a value. I have used the address of my own broker here. The purpose is obviously for upgrading the firmware in Pulse. It would be interesting to get information about this if anyone has.
The other fields can be left empty unless you want to use SSL. When the fields have been filled in and sent to Pulse, a few seconds pass and it starts flashing green. It is a sign that Pulse is connectdto your own network. When that happens, it is no longer in AP mode and access to the web interface is no longer possible. Once this is done, simply plug the Pulse into the HAN connector of the AMS meter and the Pulse will start delivering MQTT messages.
Data from the AMS meter comes in 3 different variants. List 1, List 2, and List 3 refer to NVE's documentation for AMS meters. Briefly described, it is as follows:
-
List 1 contains the relevant power consumption measured in kW, as well as the time. This type is received in 2 or 2.5 second intervals.
-
List 2 also contains power, current and voltage which are received in intervals of 10 seconds
-
List 3 contains, in addition to List 2, accumulated data for electricity used so far. This is received every full hour.
This is described in more detail further down, as well as made visible in the examples below.
From Pulse comes a start-up message, status messages and AMS meter data. Pulse, on the other hand, lacks a LastWill message. Such a message should normally be sent to the broker when the device is started. If the broker loses contact with the device, it will send this message to subscribers. To compensate for this shortcoming, there is a "watchdog" feature in ElWiz. This is a counter that counts down with an interval of 1 second. When the program receives a message from Pulse, the program refreshes this counter. If data from Pulse is missing, the counter will continue to count down. When it gets the value 0, the program will send an MQTT message as a warning that there is no data from Pulse. The counter is initially set to 15 seconds, but this value can be changed in the program code.
// The watchdog timer
const watchValue = 15;
In ElWiz, the raw data from the AMS meter is converted to readable JSON format. It is not a given that the format is suitable for everyone. The possibility of "plugins" for individual adaptations has therefore been created.
Users of fetchprices will have access to spot prices. Prices from own suppliers are entered in config.yaml, and costs are then calculated in ElWiz.
Example of price data from Nord Pool:
"hourly": [
  {
    "startTime": "2024-07-22T11:00:00",
    "endTime": "2024-07-22T12:00:00",
    "spotPrice": 0.3559,
    "gridFixedPrice": 0.1925,
    "supplierFixedPrice": 0.0542
  }
]
See separate documentation in fetchprices.md
A handy tool to use for programs that must be running around the clock is PM2 https://pm2.keymetrics.io/ With PM2 you have control over stop, start, restart, automatic start after starting the PC/server, memory consumption, logging and much more. It's well worth the trouble to take a look.
Pulse has some features that can be controlled using MQTT messages. This is done by sending the messages with the topic specified in the mqtt_topic_sub field in the web interface. This is not documented, but by trying different options, I have found these functions.
- reboot - Restarts Pulse
- update - OTA update of driver software (information about "update_url" is missing)
Those who use the mosquitto broker have access to mosquitto_pub to publish opinions. By using the mqtt_topic_sub that was specified in the setup of Pulse, e.g. rebbit, then a command to Pulse will look like this when you send the message reboot:
mosquitto_pub -h localhost -t rebbit -m reboot
Debug: Reboot
By sending the update command, we saw this response:
mosquitto_pub -h localhost -t rebbit -m "update"
Debug: Update in progress
Debug: Firmware update failed: -1
ElWiz has complete auto discovery integration for HA. A prerequisite for this is that Home Assistant MQTT Integration is installed.
When ElWiz starts up, the program will be "discovered" by HA's auto discovery mechanism. This appears in the list of Devices in HA. There ElWiz presents itself as ElWiz. In the Energy panel, the MQTT lastMeterConsumption message can then be registered as the main source of imported electricity.
The integration with HA is described in a separate document (coming)
In programs that process data, it is mandatory to capture e.g. <Ctrl C> or kill. This also happens when the program is run by PM2 and using the pm2 stop command. The purpose is to save the program state before it is killed.
When the program is started, it is assigned a process ID (PID). This is printed to the console when the program starts and is used to send signals to the program. When the program is started, this message is written to the console:
ElWiz is performing, PID: 32512
During the mapping of data from Tibber Pulse, I have had good help from information from @daniel.h.iversen and @roarfred and other posts in this discussion forum https://www.hjemmeautomasjon.no/forums/topic/ 4255-tibber-pulse-mqtt/.
Below are links with useful information for those interested in the decoding.