IBM App Connect Enterprise - Build and deploy ACE applications for dummies - using Git, Nexus, Tekton and ACE Operator
- Purpose of the document
- Scenario details
- Tekton pipeline details
- ACE applications details
- ACE configuration details
- Steps to configure the environment - SHORT
- Test your work - start the pipeline
- Appendix - detailed instructions and references
- Steps to configure the environment - VERY DETAILED
- Useful links
- Notes and observations
This document describes detailed steps on how to set up an Openshift Tekton pipeline and required environment, which will automatically build the ACE code into a BAR file, generate all the required configuration custom resources and apply them to Openshift, effectively deploying the ACE integration server and associated integration applications.
These are all the steps of the scenario, some done manually (1. and 2. ) , some by ACE Operator (8. and 9.) and the rest by the Tekton pipeline:
- Push ACE code and configuration from the ACE toolkit to the Git repository
- Start an Openshift pipelines (Tekton) pipeline
- Clone a Git repository containing ACE code and ACE configuration
- Build the ACE code to a BAR file
- Upload the BAR file to a Nexus repository
- Generate Custom Resources (CR) YAML files for ACE configuration and ACE integration server, which are used by the ACE Operator in the next steps
- Apply Custom Resource files to the Openshift cluster
- ACE Operator picks up the ACE configuration CRs and creates appropriate configuration and related Openshift resources (secrets, config maps,...)
- ACE Operator picks up the ACE integration server CR and creates ACE server and related Openshift resources (deployment, service, routes,...)

This document is a (functional) work in progress and will continue to be improved along with the code which is located here: https://github.com/isalkovic/ACE_Tekton_Operators
Ideas for improvement:
- add webhook from github (currently starting pipeline manually for better control)
- support more configuration types
- take the version parameter from some property in the code/configuration/git , not fr om the pipeline parameter
- differentiate new deployment from update
- add option to deploy from custom image build (vs standard Operator deployment with BAR+ standard ACE image)
- add a test step to verify that the application has started successfully and serving requests
- add an explanation on how to create ibm-entitlement-key
The Tekton pipeline used in this scenario consists of a "pipeline" definition, 5 "tasks" and a "pipeline run".
Pipeline "ace-build-and-deploy-pipeline" contains the definitions of parameters, references to tasks and their execution order and information about the workspace which the tasks will share.
Pipeline run "ace-build-and-deploy-pipeline-run" specifies the persistent volume claim which will be used to mount the tasks workspace on. PVC is required by the pipeline, since this pipeline needs to exchange data between different pipeline Tasks - i.e. after you clone the repository and it’s files, they are later used in another Task to build the .bar file). To do this, we need persistent storage, since each pipeline Task runs as a separate container instance and as such is ephemeral.
Tasks are the implementation of pipeline steps. They contain parameter definitions for the specific task, a set of commands which will perform the required functionality and a reference to the container image which will be used to execute these commands. Below is a list of tasks which are used by this pipeline:
- ace-git-clone
- ace-build-bar
- ace-nexus-upload-bar
- ace-generate-crs
- ace-deploy-crs
On the image below you can see the order in which steps are executed.
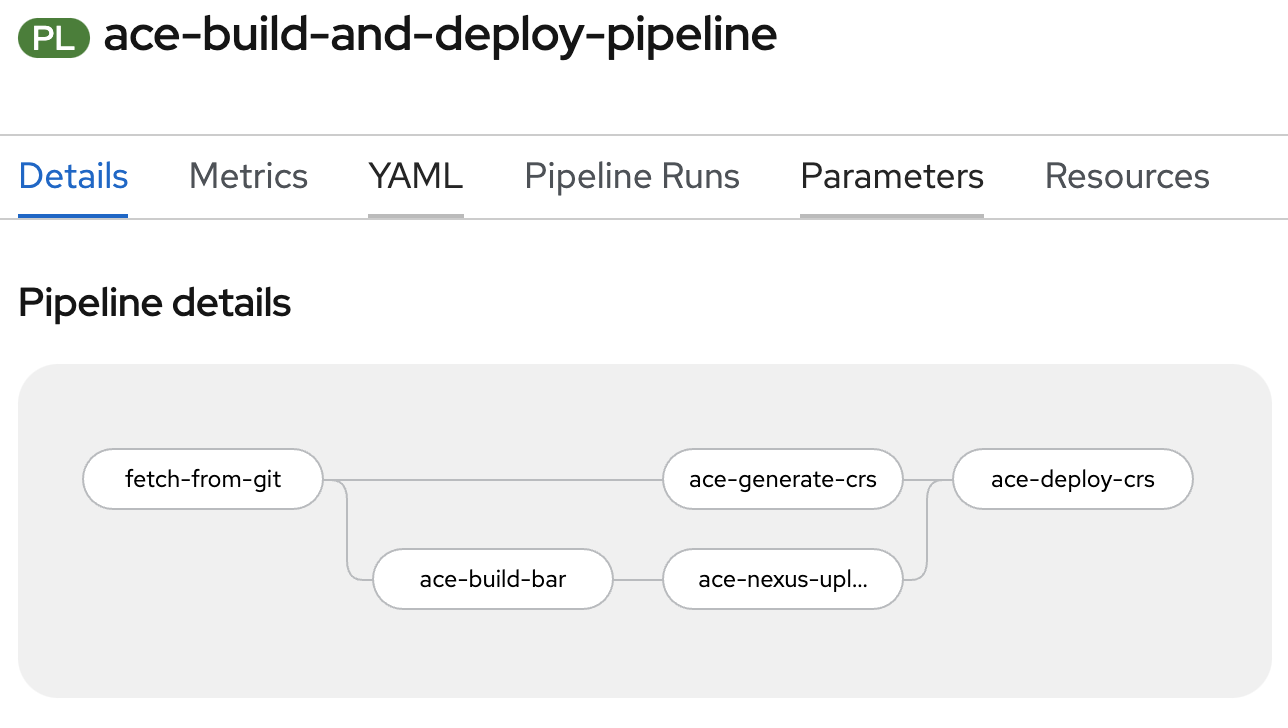
Some tasks are executed in parallel - ace-generate-crs task is executed at the same time as ace-build-bar and ace-nexus-upload tasks. The pipeline was configured in such a way, because parallelism was possible and to speed up the execution of the pipeline, but also to demonstrate this capability of tekton pipelines.
The pipeline is parametrised, and default values are set (some to reuse, some to use as example), which makes it easy to quickly customise the pipeline for any environment.
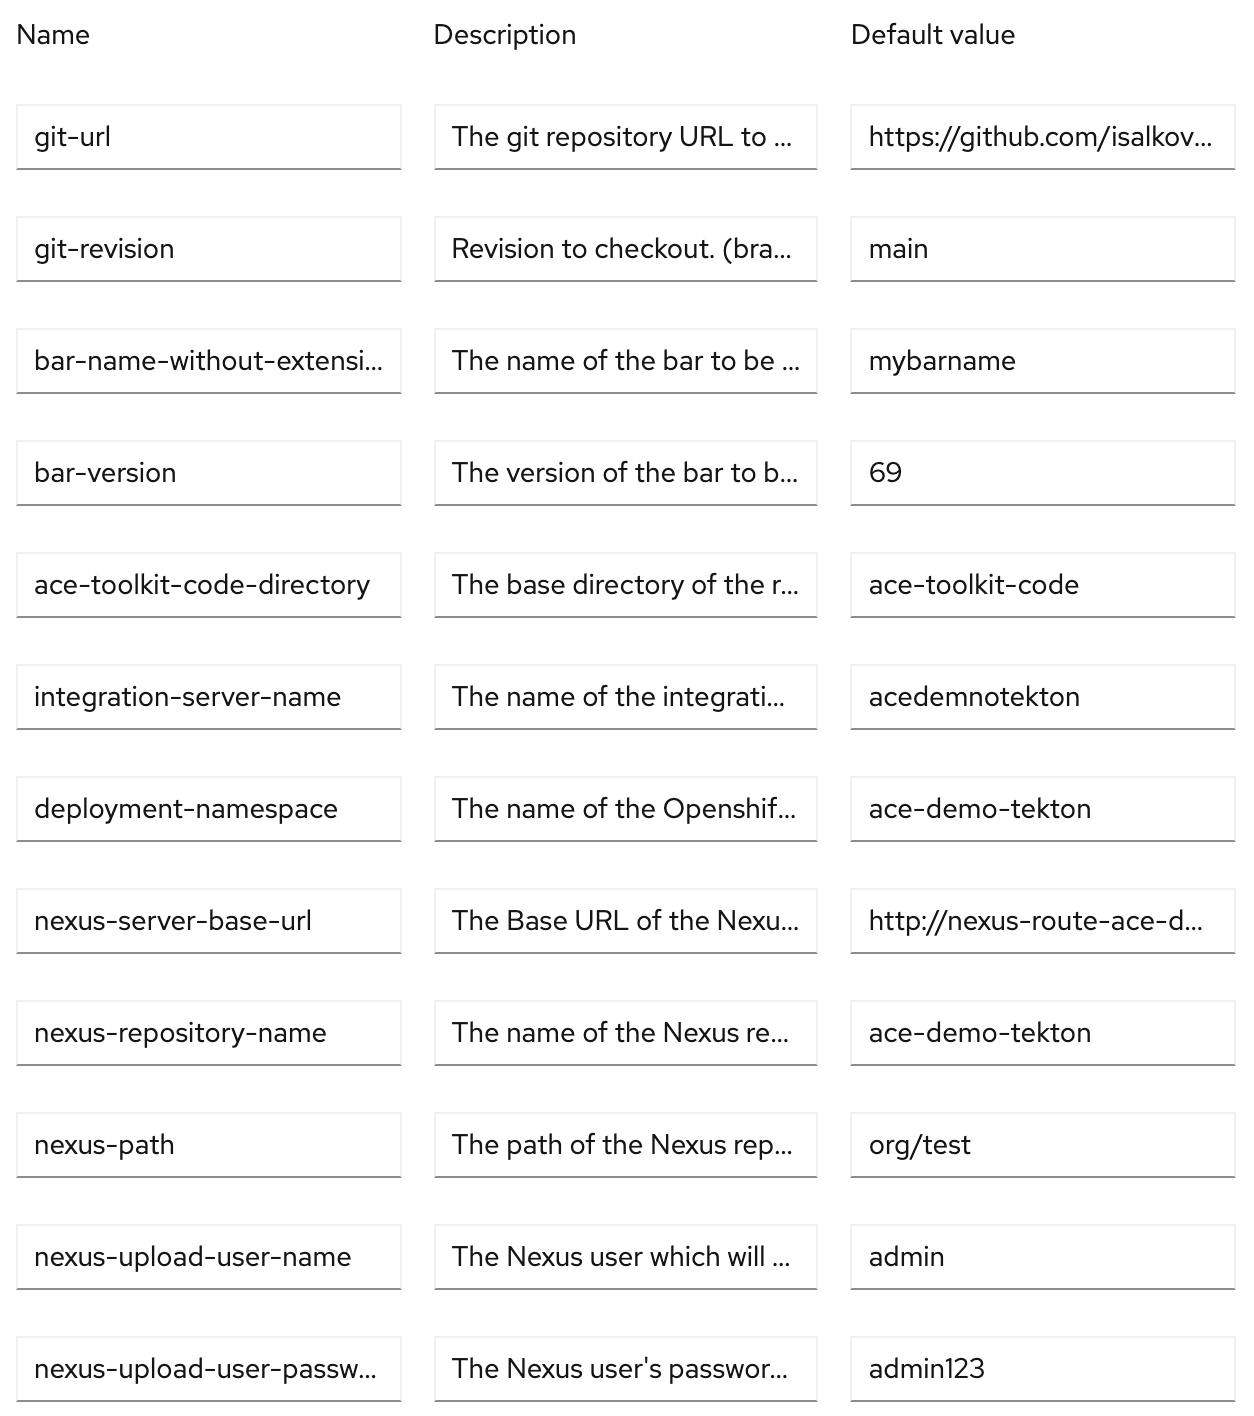
Following is the description of all the parameters:
| Parameter name | Description |
|---|---|
| git-url | The git repository URL to clone from |
| git-revision | Revision to checkout. (branch, tag, sha, ref, etc...) |
| bar-name-without-extension | The name of the bar to be built, without the .bar extension |
| bar-version | The version of the bar to be built, without the .bar extension - will be appended to bar name |
| ace-toolkit-code-directory | The base directory of the repository, containing ACE projects |
| integration-server-name | The name of the integration server which will be deployed - will be used in Openshift deployment artefacts |
| deployment-namespace | The name of the Openshift namespace/project , where the integration server and configuration will be deployed |
| nexus-server-base-url | The Base URL of the Nexus server where the bar file will be uploaded |
| nexus-repository-name | The name of the Nexus repository, where the bar file will be uploaded |
| nexus-path | The path of the Nexus repository, where the bar file will be uploaded, for example - "org/dept" |
| nexus-upload-user-name | The Nexus user which will upload the bar file (default for Nexus is "admin") |
| nexus-upload-user-password | The Nexus user's password (default for Nexus is "admin123") |
Each definition (pipeline, pipelinerun, task) of the pipeline is stored in a separate YAML file and can be found in the /pipeline folder of the project. The names of the files are pretty self-explanatory.
For the purpose of this scenario, we will be using two applications, which are available as ACE toolkit code and can be found in the ace-toolkit-code folder of the project. These are:
- ExampleServer - simple HTTP application which returns a JSON response, useful to quickly verify that our app is up and running
- ExampleDatabaseCompute - simple HTTP application which inserts a new entry into a database
More information on these applications can be found in the documentation or through the ACE Toolkit, in the Tutorials gallery. These applications were chosen because they are simple and yet we can use them to demonstrate integration with external database using ODBC, as well as the configuration elements which are required to accomplish this. Also, two applications were chosen in order to demonstrate how to handle the situation where more than one application is deployed (and configured) per Integration server / container. If you want the applications to function properly after deployment to your environment, no changes are required to the ExampleServer application, but the ExampleDatabaseCompute application will require some changes, probably for the DBSchema parameter in the ESQL, if your database can not be set with the same schema (db2admin) as in this scenario. More details on this set-up can be found in the step-by-step instructions later in this document.
It is easy to insert your own applications into this scenario, instead of the ones which come by default - simply delete the folders with existing application code and add the folders containing your applications. Just make sure you modify the configuration appropriately, if needed. 😉
Configuration parameters set-up was one of the key steps, when building this scenario. The configuration typically follows the application code and varies depending on the application, but it can also be unrelated to applications and specific to integration server runtime. Operator-based deployment and configuration of the ACE runtime requires that the configuration is provided in a specific format and in a specific way (unless you are baking your configuration in the container image).
ACE Operator supports the Configuration Custom resource and expects the configuration files/information to be base64 encoded and passed as spec.data in the Custom resource. There are many "Configuration types" which are supported and a list of them, along with more details, can be found in the ACE documentation.
At the time of preparing this document, the documentation was not detailed enough, at least for my taste.
Different configuration types have different rules on how to generate them, so some caution is required here. For example, server.conf.yaml type requires the server.conf.yaml file to be directly base64 encoded, while the Generic files and Policy project types require the files to be first compressed and then encoded to base64. However, one needs to be careful even here, because while Generic files type must be compressed without any directory structure, this is not the case with Policy project - where a folder with the policy project name is expected to be compressed along with the policy files.
Another requirement is for these compressed files to be in the .zip format, which is not the first compression option in the Linux world, so it could require some additional preparation. For the purpose of this scenario, this logic has been implemented in the generate_CRs.sh script in the project root. The script takes care of all the configuration packaging details, and uses template files (which can be found in the operator_resources_CRs folder of the project) to create the Custom resource YAMLs expected by the ACE Operator.
Now, all that is needed to configure our server is to create/copy appropriate configuration files in the initial-config folder of the project. Here, please mind the placement of configuration files in the appropriate subfolders.
At the moment, the following Configuration types are supported by the script, as part of this scenario:
- BarAuth
- Generic files
- odbc.ini
- Policy project
- server.conf.yaml
- setdbparms.txt
- Truststore certificate
After the Configuration Custom resource YAML has been generated, this Configuration object needs to be referenced by the Integration server Custom resource. The script does this automatically for each configuration it generates, by listing the configuration name in the spec.configuration part of the Integration server Custom resource.
Similar like with the applications, it is easy to insert your own configuration into this scenario, instead of the provided configuration - simply edit the existing configuration files or add new ones. In case you need to add a configuration type which is not supported by the scenario, you will also need to edit the generate_CRs.sh script and create an appropriate template in the operator_resources_CRs folder of the project. 😉
The following steps will include only short instructions (for readability reasons) on what to do - for advanced users. Very detailed instructions for each step can be found in the appendix of this document.
-
In Openshift, create a new project with the name of your choice. In further instructions, we will reference it as $PROJECT . When performing further steps, always make sure you are in your $PROJECT, either in the Openshift console or in the command line.
-
Install the Openshift Pipelines Operator.
-
Install the IBM App Connect Operator.
Note: this operator is part of IBM Operator Catalog, which must be installed before you can see and install the ACE Operator. If you do not have the IBM Operator Catalog installed, follow these simple instructions on how to do it. Once installed, it may take a minute or two before the ACE Operator becomes visible in the Openshift OperatorHub. -
Install the Nexus Repository Operator.
-
Using the Nexus operator, create a new instance of Nexus repository (default settings are enough, choose a name which you like).
-
Create a new Route for the Nexus instance you have just created, by exposing the service which was created automatically.
Sign-in to Nexus using default credentials ( admin / admin123 ) -> default wizard starts - click to allow anonymous access to the repo. -
Next, we must create a new Nexus repository, where we will be storing the BAR files. In Nexus UI, Go to settings->Repository->Repositories and click on the “Create repository” button.
Select "maven2(hosted)" as type and proceed to give your repo a name - we will reference it as $NEXUSREPOSITORY. Under Hosted->"Deployment policy" change default to “Allow redeploy”. This will make it easier to run the demo - you will be allowed to upload the same bar more than once (which can happen if you do not change the code between builds/deploys). Also, set the “Layout policy” to “Permissive” - this will make Nexus more flexible towards the path that you choose for the upload of your bar file - for demo it is fine like this. -
Create a new Persistent Volume Claim (PVC) on your Openshift cluster. PVC is required by the pipeline, since this pipeline needs to exchange data between different pipeline Tasks.
Select appropriate storage class, for size put 1GiB and give it a name of your choice - we will reference it as $PVCNAME - while leaving other parameters default.
Click the button “Create” and make sure that the status of your PVC is “Bound”.
Note:: I have noticed different behaviour of the pipeline, depending on the Storage class being used for the PVC. Depending on what you select, it is possible that your pipeline Tasks will run into problems with file permissions.
I can confirm that there were no issues with OCS provided Filesystem volume and thin vmware storage classes on my local cluster and with ibmc-file-bronze-gid storage class, when using ROKS on IBM Cloud.
-
As a next step, you will fork the Git repository to your account (so that you can make changes to it) and after that clone your forked Git repository to your local machine. The Git repository contains sample application code, configuration example and pipeline definitions. You need to fork it and clone it, so that you can change the code, configuration and pipeline parameters to fit your environment. Fork this repository - https://github.com/isalkovic/ACE_Tekton_Operators.git - and after that clone it to your local machine.
-
Before we continue, login to your Openshift cluster from the command line and switch to your $PROJECT:
oc login yourClusterDetails
oc project $PROJECT
- Another requirement of the pipeline (ace-build-bar Task) is to have an appropriate container image, which is suitable to run “ibm int” commands, which we need to execute in order to build the code generated in ACE Toolkit.
Inside the git repo you have cloned previously, there is a folder named 'ace-minimal-image'.
Using the Dockerfile.aceminimalubuntu dockerfile, build a new image and tag it for your Openshift registry ( Make sure that the registry is exposed and that you note it’s exposed URL as $IMAGEREPOSITORY ) , and push it to your registry:
docker build -t ace-with-zip -f Dockerfile.aceminimalubuntu .

docker tag acewithzip $IMAGEREPOSITORY/$PROJECT/ace-with-zip:latest
docker push $IMAGEREPOSITORY/$PROJECT/ace-with-zip:latest
- Next, navigate to the “pipeline” directory of this repository. You will need to do some modifications to pipeline elements definitions, in order for the pipeline to run successfully on your cluster. At minimal, do the following modifications:
| File name | Changes to be made |
|---|---|
| pipeline-ace-build-and-deploy.yaml | Modify the default value of parameter “git-url” to match the name of your forked github repository - $YOURGITREPOURL. Modify the default value of parameter “deployment-namespace” to match the name of your Openshift $PROJECT. Modify the default value of parameter “nexus-repository-name” to match the name of your $NEXUSREPOSITORY. Find parameter “nexus-server-base-url” and modify it to the Nexus base URL of your Nexus instance. Normally, this should be the $NEXUSURL URL which is the URL of your Nexus route, which you noted earlier. |
| pipelinerun-ace-build-and-deploy-run.yaml | Only in the case that you decided to change the name of the Persistent Volume Claim (PVC) , which you have created earlier, make a change to spec.workspaces.persistentVolumeClaim.claimName parameter, to match the name you have chosen. |
| task-ace-build-bar.yaml | Update the spec.steps.image parameter, to be pointing to your ace image which you have built previously - meaning correct repository address, project and image name and tag. |
| task-ace-deploy-crs.yaml | N/A |
| task-ace-generate-crs.yaml | Update the spec.steps.image parameter, to be pointing to your ace image which you have built previously - meaning correct repository address, project and image name and tag. The only reason why here we are using the same image as for ace build is because in this step we need the zip command, which I have packed in the same image. |
| task-ace-nexus-upload-bar.yaml | N/A |
| task-git-clone.yaml | N/A |
- After you have made the appropriate changes, apply these pipeline definitions (yaml files) to your Openshift cluster.
In the command prompt, enter:
oc apply -f pipelineElementName.yaml
where you change the name of the YAML file, for each of the files in the pipeline directory.
- As the last step, before testing your pipeline, we need to configure a db2 database, so that our ExampleDatabaseCompute ACE application can connect to it and insert data into it. This step is not mandatory and your app and server will still run, even if you do not configure a database (but returning error messages 😉 ).
If you already have a db2 database in your cluster, feel free to use it (wherever it is, just make sure there is network connectivity).
As you probably do not have such an instance lying around, I suggest you create an instance of IBM Db2 on Cloud, here. It takes only minutes to set-up.
To set the database, you will first need to create a new database and a new table (except for db2 on cloud - there you do not need to execute first two commands, as a default database bludb is already created for you):
db2 create database USERS2
CONNECT TO USERS2
CREATE TABLE DB2ADMIN.EMPLOYEES (PKEY INTEGER NOT NULL, FIRSTNAME VARCHAR(30), LASTNAME VARCHAR(30), COUNTRY VARCHAR(2), PRIMARY KEY(PKEY))
After creating the database, you will need to update the configuration and application files to match the parameters of your database instance.
List of files in your repository, which may require editing (depending on your database set-up):
- /ace-toolkit-code/ExampleDatabaseCompute/DatabaseCompute_Compute.esql - change the value of DB schema, if it is different for your database
- /extensions/db2cli.ini - change the Hostname, Port, Database (name) and Security parameters, to match those of your Database instance
- /setdbparms/setdbparms.txt - change the username and password of the database (last two entries in the line), to match those of your Database instance
After you make changes to these files, you will need to commit and push them to your git repository.
Finally you have set-up your environment and we can start running some ACE pipelines, and hopefully even containers. To start your first pipeline, in the Openshift console go to Pipelines->Pipelines->PipelineRuns and click on the three dots next to your ace-build-and-deploy-pipeline-run pipeline run.
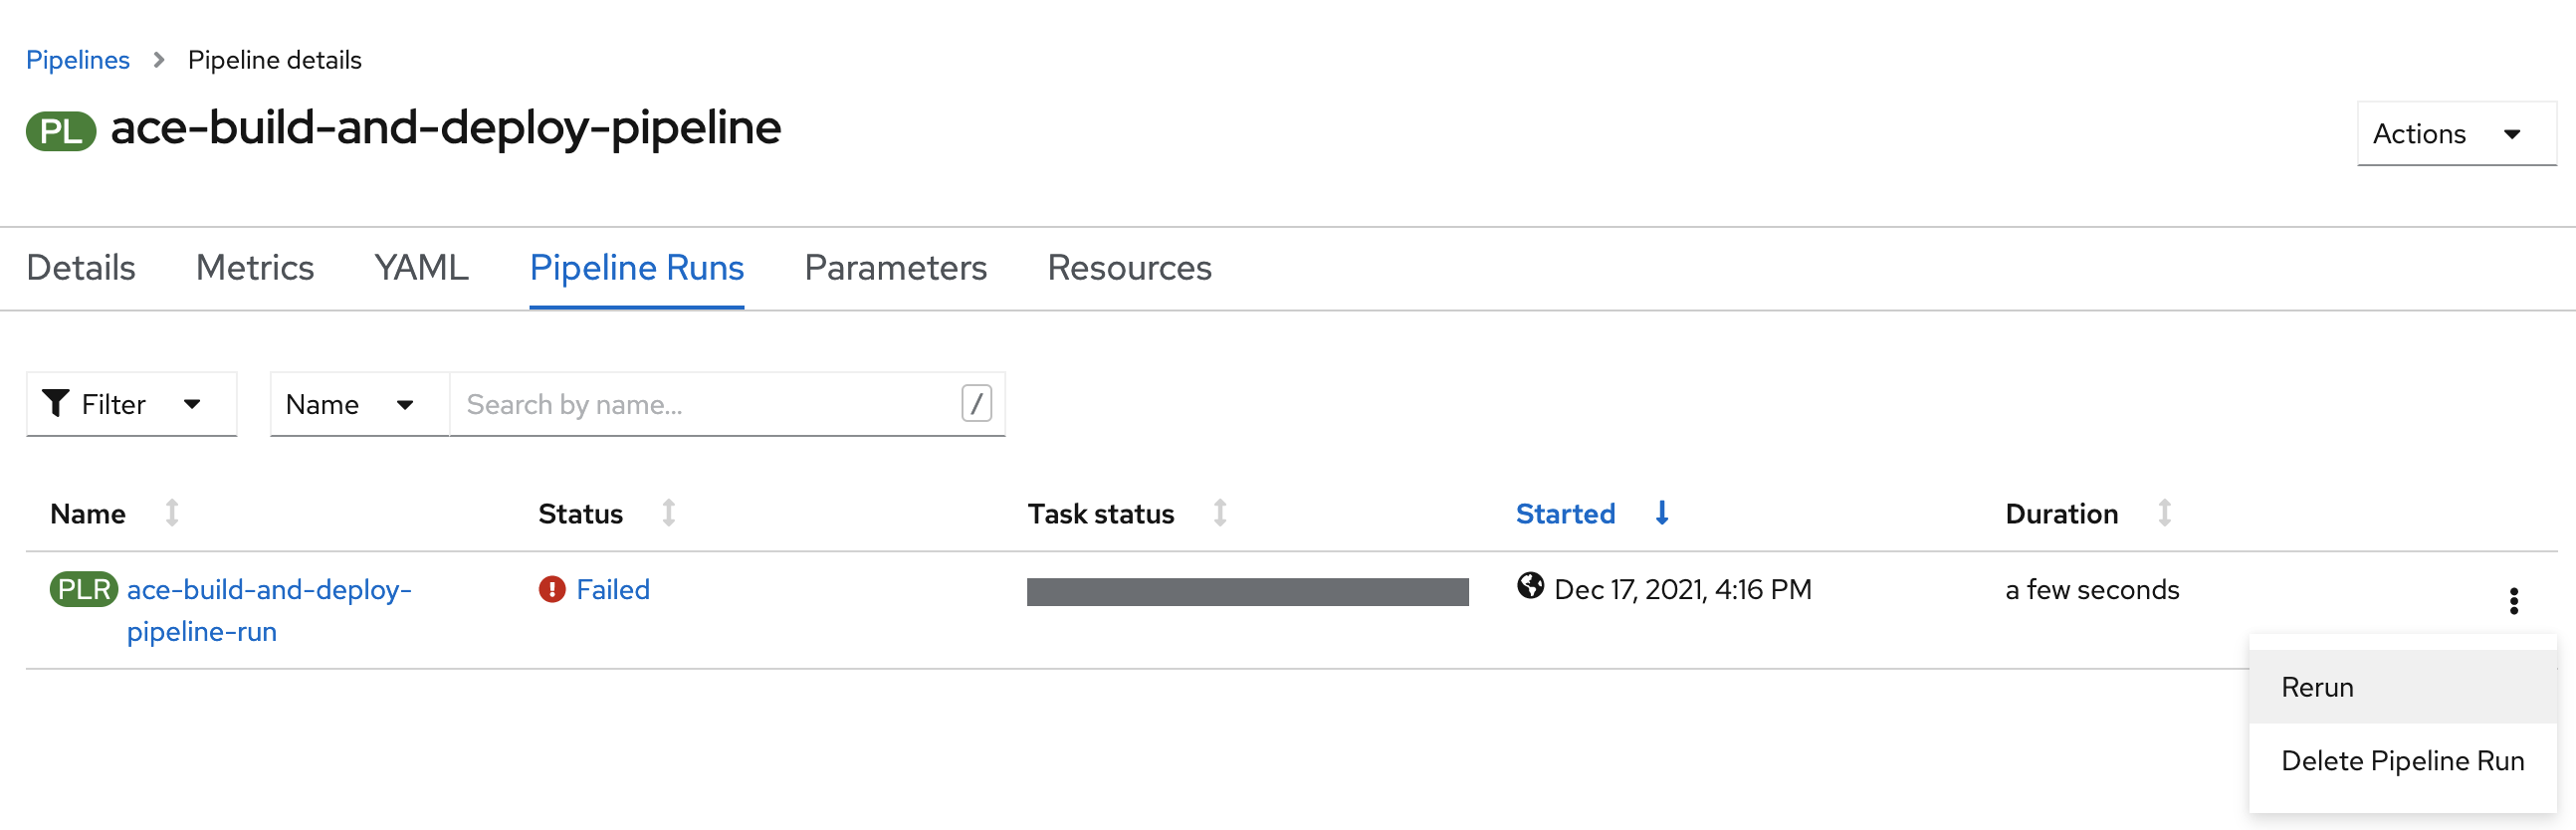
Click "Rerun", cross your fingers and hope that everything was set up correctly.
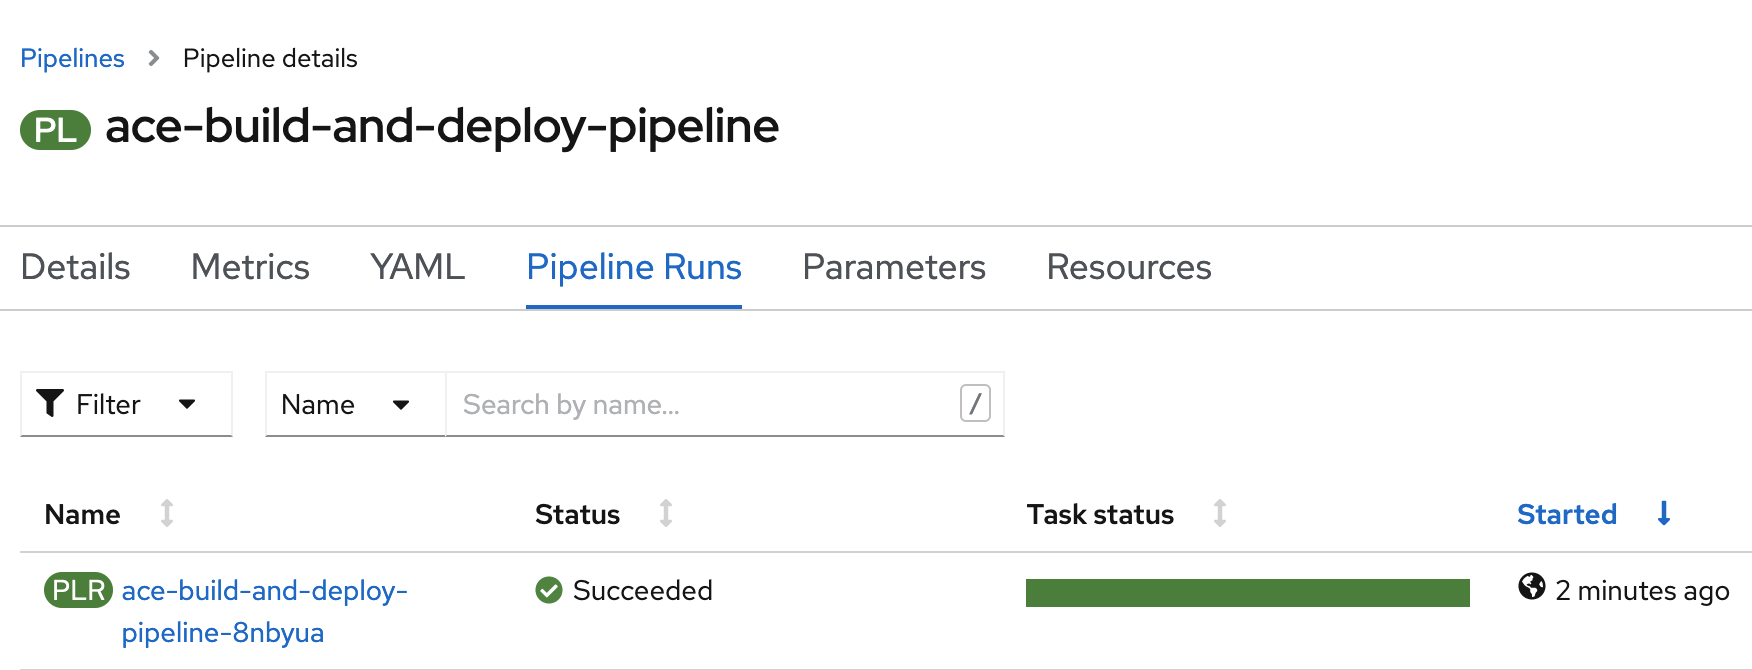
If you would like, you can track the execution of your pipeline (steps progression and step logs) by clicking on the name of your new pipeline run (it should be in “Running” status).

If the pipeline was successful, you should see a completely green “Task status” for this pipeline run.
Once successfully completed, you can check if the sample applications which were deployed are running and available. To do this, on the Openshift console (make sure you are in your project) , go to Networking->Routes and find the route “Location” of your ACE server ( hint: it will have the name of the server which you have configured when editing the pipeline-ace-build-and-deploy.yaml pipeline file ).
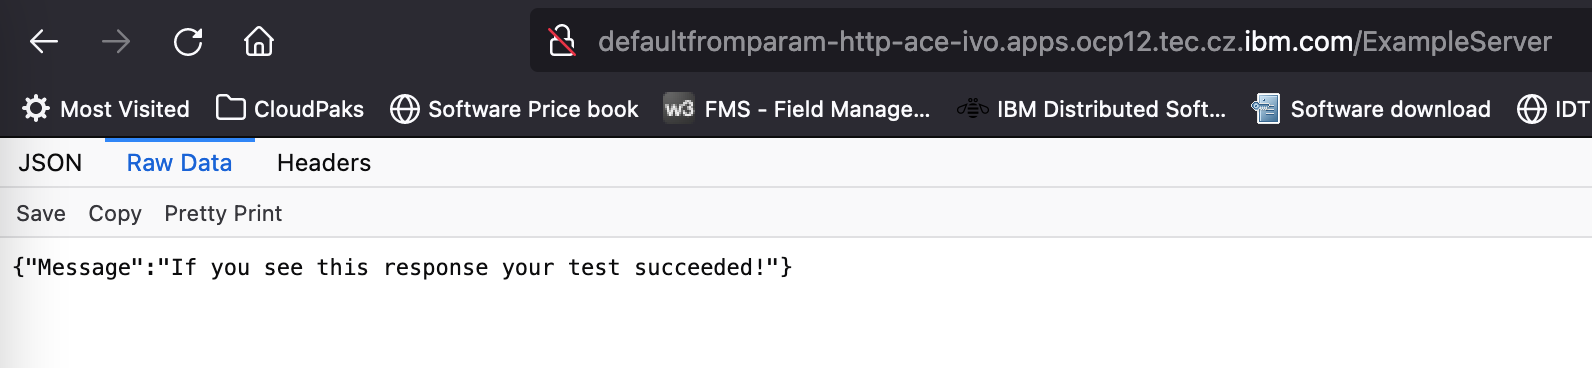
- For the HTTP Example app, open the URL in your browser and add the “/ExampleServer” path at the end. If the ACE application is started and listening to requests, you should see the following message (exact view depends on your browser):
- For the Database app, open the URL in your browser and add the “/DatabaseComput” path at the end. If the ACE application is started and listening to requests, you should see the following message (exact view depends on your browser):

Note: if you did not configure a database and it's connection, you will get some error message as a response
Congratulations!! You have successfully deployed your App Connect Enterprise application using these instructions!
Here you can find very detailed instructions for each step of this scenario.
- We will start by creating a new Openshift project. The idea is to use a fresh/clean one, so that there is no interference with other existing projects and in this way all required resource dependencies are documented. Creating a new project is optional, but in that case you need to be aware that some steps may not be needed on your cluster. In Openshift, create a new project with the name of your choice. In further instructions, we will reference it as $PROJECT . When performing further steps, always make sure you are in your $PROJECT, either in the Openshift console or in the command line.
- Next prerequisite is to have Openshift Pipelines installed on our cluster. In the Openshift console, go to Operators->Operator hub and search "Red Hat Openshift Pipelines" - when you find it, click on it, and install the Openshift Pipelines Operator.

This action will add a new section in your Openshift console - "Pipelines" will appear in the menu to the left.

- Install the IBM App Connect Operator.
Note: this operator is part of IBM Operator Catalog, which must be installed before you can see and install the ACE Operator. If you do not have the IBM Operator Catalog installed, follow these simple instructions on how to do it. Once installed, it may take a minute or two before the ACE Operator becomes visible in the Openshift OperatorHub.

- Since we will be using Nexus to store the BAR files that we build - we also need to install and configure Nexus. We will start by installing the "Nexus Repository Operator", which can be found again in the Operators->Operator hub - search for the "Nexus Repository Operator", click on it and install it in your $PROJECT .
- After installing the Nexus Operator, we need to also create a new Nexus instance, using this operator. In the Openshift console, go to Operators->Installed operators and click on the Nexus Repository Operator.

On the "NexusRepo" tab, click the button "Create NexusRepo". Change the name if you like and click “Create” to create a new instance of Nexus repository.
- Since we want to access our Nexus repository from outside the cluster, we need to expose it, using a route . In the Openshift console, go to Networking->Routes and click on the "Create route" button . Give this route a name of your choice, select the nexus service under “Service” and select the only available Target port (should be 8081) . Click the “Create” button to create a new route.

On the next screen you will see the details of the new route. Under location, make a note of the Nexus route URL - we will reference it as $NEXUSURL - you will need it later. Also, click on this URL to open it in your browser and to test that the Nexus repo is up and running and available. If the Nexus repository is started successfully (it may take a couple of minutes), the Nexus UI will appear. In the top-right corner, click the button to sign-in to Nexus using default credentials ( admin / admin123 ) -> default wizard starts - click to allow anonymous access to the repo.
- Next, we must create a new Nexus repository, where we will be storing the BAR files. In Nexus UI, Go to settings->Repository->Repositories and click on the “Create repository” button.

Select "maven2(hosted)" as type and proceed to give your repo a name - we will reference it as $NEXUSREPOSITORY. Under Hosted->"Deployment policy" change default to “Allow redeploy”. This will make it easier to run the demo - you will be allowed to upload the same bar more than once (which can happen if you do not change the code between builds/deploys). Also, set the “Layout policy” to “Permissive” - this will make Nexus more flexible towards the path that you choose for the upload of your bar file - for demo it is fine like this. On the bottom, click the “Create Repository” button.
- Before proceeding to create the pipeline and pipeline elements, first you will need to define a Persistent Volume Claim (PVC) on your Openshift cluster. PVC is required by the pipeline, since this pipeline needs to exchange data between different pipeline Tasks - i.e. after you clone the repository and it’s files, they are later used in another Task to build the .bar file). To do this, we need persistent storage, since each pipeline Task runs as a separate container instance and as such is ephemeral.
Make sure that you are in the project which you have created earlier - $PROJECT.
In the Openshift console, go to Storage->PersistentVolumeClaims and click on the button “Create PersistentVolumeClaim”.
Select appropriate storage class, for size put 1GiB and give it a name of your choice - we will reference it as $PVCNAME - while leaving other parameters default.
Click the button “Create” and make sure that the status of your PVC is “Bound” (it could take a minute sometimes).

Note:: I have noticed different behaviour of the pipeline, depending on the Storage class being used for the PVC. Depending on what you select, it is possible that your pipeline Tasks will run into problems with file permissions.
I can confirm that there were no issues with OCS provided Filesystem volume and thin vmware storage classes on my local cluster and with ibmc-file-bronze-gid storage class, when using ROKS on IBM Cloud.
- As a next step, you will fork the Git repository to your account (so that you can make changes to it) and after that clone your forked Git repository to your local machine.
The Git repository contains sample application code, configuration example and pipeline definitions. You need to fork it and clone it, so that you can change the code, configuration and pipeline parameters to fit your environment.
In order to do this, log in to your github account (if you do not have a github account you will have to open a new one before proceeding) and go to this repository page in your browser: https://github.com/isalkovic/ACE_Tekton_Operators.git
Once there, in the top-right corner of the screen click on the "Fork" button - this action will fork the repository and after a couple of seconds redirect you to the forked repository on your account.

Make a note of your new repository URL - we will continue to reference it as $YOURGITREPOURL
As the next step, clone this forked repo - in your command prompt, enter:
git clone $YOURGITREPOURL
Note: if asked for a username and password in this step - for the username, enter your github username, and for the password visit this github page, generate a new access token (select only "repo" permissions) and provide it as a password.
That's it - now you have your own copy of this repo (in the ACE_Tekton_Operators folder) and you can start making changes to it.
- Before we continue, let's login to our Openshift cluster from the command line ( for this step, you will need to have the 'oc' command installed ).
In the top-right corner of the Openshift console, click on your username and after that click of the “Copy login command” in the menu.

This will take you to a new browser tab, where you need to click display token and from there copy the “oc login …” command, which is specific for your user and your cluster. Paste this command to you CLI:
oc login yourClusterDetails
After successfully logging in, switch to the openshift project which you have created previously:
oc project $PROJECT
- Another requirement of the pipeline (ace-build-bar Task) is to have an appropriate container image, which is suitable to run “ibm int” commands, which we need to execute in order to build the code generated in ACE Toolkit.
We want this image to be as small and light as possible, but IBM does not provide such an image, so we need to build it. To build this light image, I have used some resources provided by Trevor Dolby, IBM ACE Architect.
OK, so how will we do this?
Using the Dockerfile.aceminimalubuntu dockerfile, build a new image (for this you will need to have either docker or alternative CLI installed on your machine):
docker build -t ace-with-zip -f Dockerfile.aceminimalubuntu .
After building the image, tag it with an appropriate tag, so that you can push the image to your Openshift image registry:
docker tag acewithzip $IMAGEREPOSITORY/$PROJECT/ace-with-zip:latest
Next, we need to tag and push our image to the internal Openshift registry.
First, we need to make sure that the registry is exposed and that we know it’s exposed address.
You can check if your registry is exposed if there is a registry route in the project openshift-image-registry. Make a note of that route and we will continue to reference it as $IMAGEREPOSITORY
If your Openshift registry is not exposed, you first have to expose it using the following oc command:
oc patch configs.imageregistry.operator.openshift.io/cluster --patch '{"spec":{"defaultRoute":true}}' --type=merge
Again, make a note of the new route which was created.
Next, you need to login to your Openshift registry:
docker login -u openshift -p $(oc whoami -t) $IMAGEREPOSITORY
And finally, push the image to the registry:
docker push $IMAGEREPOSITORY/$PROJECT/ace-with-zip:latest
In case of issues with docker login and self-signed certificate, a quick workaround could be to use podman (podman command installation required) instead of docker.
CHEAT SHEET FOR PODMAN ALTERNATIVE::
podman login -u openshift -p $(oc whoami -t) --tls-verify=false $IMAGEREPOSITORY
podman build -t ace-with-zip -f Dockerfile.aceminimalubuntu .
podman tag ace-with-zip $IMAGEREPOSITORY/$PROJECT/ace-with-zip:latest
podman push --tls-verify=false $IMAGEREPOSITORY/$PROJECT/ace-with-zip:latest
- Next, navigate to the “pipeline” directory of this repository. You will need to do some modifications to pipeline elements definitions, in order for the pipeline to run successfully on your cluster. At minimal, do the following modifications:
| File name | Changes to be made |
|---|---|
| pipeline-ace-build-and-deploy.yaml | Modify the default value of parameter “git-url” to match the name of your forked github repository - $YOURGITREPOURL. Modify the default value of parameter “deployment-namespace” to match the name of your Openshift $PROJECT. Modify the default value of parameter “nexus-repository-name” to match the name of your $NEXUSREPOSITORY. Find parameter “nexus-server-base-url” and modify it to the Nexus base URL of your Nexus instance. Normally, this should be the $NEXUSURL URL which is the URL of your Nexus route, which you noted earlier. |
| pipelinerun-ace-build-and-deploy-run.yaml | Only in the case that you decided to change the name of the Persistent Volume Claim (PVC) , which you have created earlier, make a change to spec.workspaces.persistentVolumeClaim.claimName parameter, to match the name you have chosen. |
| task-ace-build-bar.yaml | Update the spec.steps.image parameter, to be pointing to your ace image which you have built previously - meaning correct repository address, project and image name and tag. |
| task-ace-deploy-crs.yaml | N/A |
| task-ace-generate-crs.yaml | Update the spec.steps.image parameter, to be pointing to your ace image which you have built previously - meaning correct repository address, project and image name and tag. The only reason why here we are using the same image as for ace build is because in this step we need the zip command, which I have packed in the same image. |
| task-ace-nexus-upload-bar.yaml | N/A |
| task-git-clone.yaml | N/A |
- After you have made the appropriate changes, proceed with applying these pipeline definitions (yaml files) to your Openshift cluster.
In the command prompt, enter:
oc apply -f pipelineElementName.yaml
where you change the name of the YAML file, for each of the files in the pipeline directory.
As an alternative to running oc commands, you can do the same thing through the Openshift console. In the top-right corner of the console UI, click on the “+” (import YAML) button, and paste the contents of the yaml file.

Click “Create” button to apply the pipeline element. Do this for all the files in the pipeline directory.
- As the last step, before testing your pipeline, we need to configure a db2 database, so that our ExampleDatabaseCompute ACE application can connect to it and insert data into it.
This step is not mandatory and your app and server will still run, even if you do not configure a database (but returning error messages 😉 ).
If you already have a db2 database in your cluster, feel free to use it (wherever it is, just make sure there is network connectivity).
As you probably do not have such an instance lying around, I suggest you create an instance of IBM Db2 on Cloud, here. It takes only minutes to set-up.
To set the database, you will first need to create a new database and a new table (except for db2 on cloud - there you do not need to execute first two commands, as a default database bludb is already created for you):
db2 create database USERS2
CONNECT TO USERS2
CREATE TABLE DB2ADMIN.EMPLOYEES (PKEY INTEGER NOT NULL, FIRSTNAME VARCHAR(30), LASTNAME VARCHAR(30), COUNTRY VARCHAR(2), PRIMARY KEY(PKEY))
After creating the database, you will need to update the configuration and application files to match the parameters of your database instance.
List of files in your repository, which may require editing (depending on your database set-up):
- /ace-toolkit-code/ExampleDatabaseCompute/DatabaseCompute_Compute.esql - change the value of DB schema, if it is different for your database
- /extensions/db2cli.ini - change the Hostname, Port, Database (name) and Security parameters, to match those of your Database instance
- /setdbparms/setdbparms.txt - change the username and password of the database (last two entries in the line), to match those of your Database instance
After you make changes to these files, you will need to commit and push them to your git repository.
In your command line interface, execute the following commands, from your cloned repository folder:
git commit -a -m "changed database parameters"
git push
ACE CD documentation (operator usage)
Connecting integration servers to Db2 in IBM App Connect Enterprise certified containers
Obtaining the IBM App Connect Enterprise server image from the IBM Cloud Container Registry
-
when running ACE in container, some ENV variables are set on the process level - check their values using this command: cat /proc/{IntegrationServer PID}/environ | tr '\0' '\n' | sort
-
to set-up ACE in containers to connect to DB2 database, only the following is required:
- put a configured db2cli.ini in the extensions folder (will be transformed to genericFiles configuration CR and stored in container at /home/aceuser/generic )
- put a configured odbc.ini file to the odbcini folder (will be transformed to odbc configuration CR and stored in container at /home/aceuser/ace-server )
- set DB2CLIINIPATH variable somehow ( I did through server.conf env: which seems the simplest solution, but other options could be integrationserver CR or EnvironmentVariables part of server.conf - last one since ACE 12.0.3)
-
most of the time, ibm-entitlement-key needs to be set in OCP project, so that the ACE images can be pulled from IBM registry. Here you can find information on how to obtain your entitlement key. To apply the key to your cluster, run the following command (replace the $ENTITLEMENTKEY and $PROJECT variables with your values):
oc create secret docker-registry ibm-entitlement-key \
  --docker-username=cp \
  --docker-password=$ENTITLEMENTKEY \
  --docker-server=cp.icr.io \
  --namespace=$PROJECT
Note:: entitlement key is not required if a free developer ACE image is used. For example, you could edit the IntegrationServer CR yaml template and set the following values: spec.license.license=L-KSBM-C87FAW , spec.license.use=AppConnectEnterpriseNonProduction, version=12.0.2.0-r2 (example valid for ACE Operator 3.0)
- As of ACE 12.0.3, we can now use server.conf.yaml stanzas such as
StartupScripts:
  FirstScript:
    command: 't:\tmp\user-script-work-dir\startup-script.cmd'
    readVariablesFromOutput: 'auto'
    includeCommandOutputInLogs: true
  SecondScript:
    command: '/gsa/hurgsa/home/t/d/tdolby/tmp/user-script-work-dir/startup-script-blank.sh'
    readVariablesFromOutput: 'auto'
    includeCommandOutputInLogs: 'true'

EnvironmentVariables:
  ENV_VAR_ONE: 'env_var_one_value'
  ENV_VAR_TWO: 'env_var_two_value'
and there's also support for loading credentials from a script to pull secrets in from HashiCorp or Azure or similar.
- There are two user variables that can be set in server.conf.yaml (only two right now!) that will set environment variables in the parent:
UserVariables:
  env-var-name: 'DB2DSDRIVER_CFG_PATH'
  env-var-value: '/gsa/hurgsa/home/t/d/tdolby/tmp/db2-ssl-work-dir/db2dsdriver.cfg'
  env-var2-name: 'ODBCINI'
  env-var2-value: '/gsa/hurgsa/home/t/d/tdolby/tmp/db2-ssl-work-dir/odbc.ini'
- If you set the following in server.conf.yaml, then the server will run the script before it starts initializing resource managers (pretty early, in other words):
UserVariables:
  startup-phase10-script: '/tmp/test-script.sh'
- If the Openshift version is 4.6 or older, the openshift pipelines version will be 1.2 or older, which it seems is not supporting the Task:workspaces.optional parameter. This means that the git clone task will not run on OCP 4.6 or older, with the current configuration. When I encountered this situation, my quick and dirty solution was to comment out these "optional" workspace references (last 3 on the bottom of the file) in the ace-git-clone task definition.