An IEEE workshop to introduce students to full stack web application development using Meteor
This workshop assumes you have a general understanding of the basics concepts in HTML, CSS, JavaScript, Bootstrapn and Git. Below, I've listed some excellent resources which you can use to either brush up or thoughly learn these concepts.
- In this workshop we will be building a Twitter clone using Meteor, a full-stack web application framework.
- We will be following an excellent tutorial written by Kai from randomdotnext.com - Meteor Tutorial - Let's build a Twitter clone
##Part 1: Intro to Meteor
- Meteor is a full-stack JavaScript framework. What is a full-stack framework?
- Meteor is real time out the box. What the heck does that mean?
- Meteor is built on top of node.js. What is node.js? Do I need to learn it?
- The core of Meteor comes with MongoDB (Database), Blaze (front-end reactive framework)
- It's a 'hot' framwork http://hotframeworks.com/
NOTE: Windows users may need to add meteor to there system path: %USERPROFILE%\AppData\Local\.meteor;
Meteor comes with a command-line tool belt meteor used to create your project and run many of meteors commands.
Create a Meteor project:
$ meteor create myTwitterClone
$ cd myTwitterClone
$ meteor
Open browser to localhost:3000 to see your application running.
Open your project folder in a file explorer. You should see the following files/folders:
- myTwitterClone.css
- myTwitterClone.html
- myTwitterClone.js
- .meteor (hidden folder)
Notes:
- Entire js logic of the application is in 1 file with serverside and client side blocks
- The server side and client side will eventually be broken up into seperate modules
Server vs Client example:
- When you log into Facebook, your browser doesn't get every single Facebook photo every uploaded.
- The server will just send back what is revelant based on what the client logic requests
Within your myTwitterClone.js file:
  Template.hello.events({
    'click button': function () {
      // increment the counter when button is clicked
      Session.set('counter', Session.get('counter') + 1);
    }
});- Similar to jQuery style of listening to events
- Changes to variables stored inside the Session variable reactively notify all the listeners on that variable
Within your myTwitterClone.js file:
Template.hello.helpers({
  counter: function () {
    return Session.get('counter');
  }
});- This helper function listens to any changes happending to the Session variable
counter - If the value of the
counterchanges, the helper tell the front-end that the HTML should render a new value
- Where your actual UI lives
- Primary composed of HTML which can be paired up with a front end templating engine
- Meteor uses Blaze for this
<head>
  <title>twitterClone</title>
</head>

<body>
  <h1>Welcome to Meteor!</h1>

  {{> hello}}
</body>

<template name="hello">
  <button>Click Me</button>
  <p>You've pressed the button {{counter}} times.</p>
</template>
The head & body html syntax should be familiar to you all. Let's cover the blaze components now.
{{> hello}}is a blaze/handlebar syntax for adding in a template- The hello template is defined in the HTML block
<template name="hello"> - Using 'variables' like
{{counter}}in your HTML template is another Blaze feature {{counter}}renders the output of you counter method defined in the Javascipt helper blockcounter: function()
- In this part, we will be learning about client side template of Meteor
- The goal is to build a tweetbox
- Change the character count as you type
- The Button should be disabled if there is no text
- Save the data to mongodb when you click Tweet
meteor add twbs:bootstrapand were done!- Meteor offers LOTS of 3rd packages/libraries through AtmosphereJS
meteor add package-nameis the syntax for addding these packages- If your getting errors try
sudo meteor add twbs:bootstrap
.tweetbox-container {
  margin: 45px;
}

.tweetbox {
  background-color: rgb(240, 247, 254);
}

.btnGroup {
  margin-top: 10px;
  display: flex;
  align-items: center;
}

.charCount {
  margin-right: 10px;
  color: gray;
}

.errCharCount {
  margin-right: 10px;
  color: red;
}<head>
<title>twitterClone</title>
</head>
<body>
{{> tweetBox}}
</body>
<template name="tweetBox">
<div class="tweetbox-container">
<div class="panel panel-default tweetbox col-md-6">
<div class="panel-body">
<!-- Text box for tweet content -->
<textarea class="form-control" id="tweetText" placeholder="What's happening?" rows="3"></textarea>
<!-- Character count & button -->
<div class="pull-right btnGroup">
<strong class="{{charClass}}">{{charCount}}</strong>
<button class="btn btn-info pull-right" type="button" {{disableButton}}>Tweet</button>
</div>
</div>
</div>
</div>
</template> - The textbox:
<textarea class="form-control" id="tweetText" placeholder="What's happening?" rows="3"></textarea>
- This is simply a textbox for users to input the tweet content
- The character countdown:
<strong class="{{charClass}}">{{charCount}}</strong>
- We need to implment two function in the javascript helper blocks to handle
{{charClass}}and{{charCount}} {{charClass}}should return the correct css class to be used. If # of characters is greater than max (140), then the text should be red. Blaze allows you to inject this HTML paramter from the Javascript!{{charCount}}should return an integer representing the # of characters remaining. This logic will be in javascript as well
- The tweet button:
<button class="btn btn-info pull-right" type="button" {{disableButton}}>Tweet</button>
- If were over 140 characters, disable the button
- We'll implement disableButton function in the javascript helpers.
- It should return a string, either be 'disabled' or empty.
- Dynamically insert html elements, tags, classes, components, etc by using Meteor's blaze framework
- Easily modify what the UI render will look like without worrying about complicated front-end logic
- Keeping a counter of character count in the tweetbox
- Meteor templates offer three lifecycle callback functions:
onCreated,onDestroyed, andonRendered - We can set the initial character counter to zero when the tweetBox template is rendered
Template.tweetBox.onRendered(function () {
  Session.set('numChars', 0);
});- We want to update the character counter when the user types content into the textbox
- We can add an event listener for input into #tweetText element. This syntax is quite similar to that of jQuery. tweetText is the id of the DOM element.
Template.tweetBox.events({
  'input #tweetText': function(){
    Session.set('numChars', $('#tweetText').val().length);
  }
});- Lastly, we want helper methods to push session variable changes into the HTML
- Again, from the HTML, there are three variables we need to implement: {{charClass}}, {{charCount}}, and {{disableButton}}
Template.tweetBox.helpers({
  charCount: function() {
    return 140 - Session.get('numChars');
  },

  charClass: function() {
    if (Session.get('numChars') > 140) {
      return 'errCharCount';    //css class name
    } else {
      return 'charCount';       //css class name
    }
  },

  disableButton: function() {
    if (Session.get('numChars') <= 0 ||
        Session.get('numChars') > 140) {
      return 'disabled';
    }
  }
});- Notice that the changes to numChars actually reactively notify these helper methods to push new values into the DOM
- However, if the helper method only has static values, it will not run when you update Session variables
Your myTwitterClone.js should now look something like:
if (Meteor.isClient) {

  Template.tweetBox.helpers({
    charCount: function() {
      return 140 - Session.get('numChars');
    },

    charClass: function() {
      if (Session.get('numChars') > 140) {
        return 'errCharCount';    //css class name
      } else {
        return 'charCount';       //css class name
      }
    },

    disableButton: function() {
      if (Session.get('numChars') <= 0 ||
          Session.get('numChars') > 140) {
        return 'disabled';
      }
    }
  });

  Template.tweetBox.events({
    'input #tweetText': function(){
      Session.set('numChars', $('#tweetText').val().length);
    }
  });

  Template.tweetBox.onRendered(function () {
    Session.set('numChars', 0);
  });

}

if (Meteor.isServer) {
  Meteor.startup(function () {
    // code to run on server at startup
  });
}- We need to add one more event listener inside of Template.tweetBox.events to insert data into mongoDB
'click button': function() {
  var tweet = $('#tweetText').val();
  $('#tweetText').val("");
  Session.set('numChars', 0);
  Tweets.insert({message: tweet});
}
Before the isClient block, simply define the mongoDb collection:
Tweets = new Meteor.Collection("tweets"); -
This Mongodb collection is accessible by both the client and the server without any additional code!
-
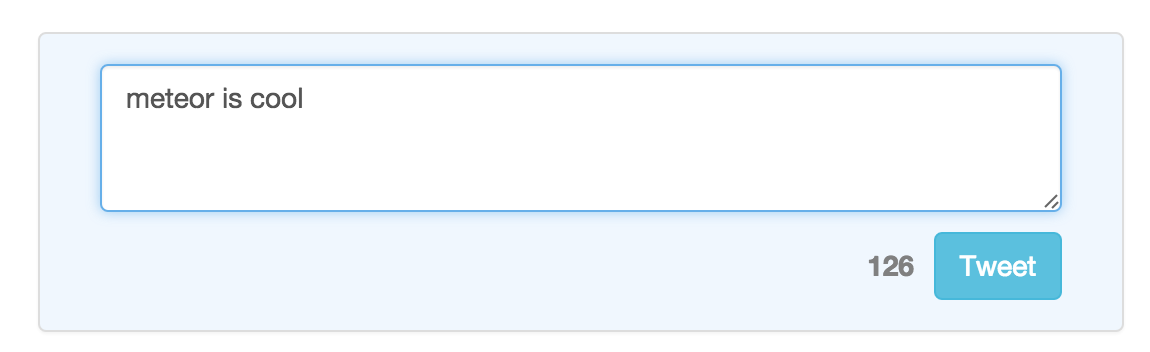
Now you can to try to tweet in the barebone tweetBox. This is the UI that you should see if you followed along:
-
We are not showing any tweets in the UI yet, so we need to use the mongodb console tool to see that the data is getting stored correctly.
-
Meteor makes this process easy. In your project directory, you can type in
meteor mongoNote: Depending on your setup, you may have to type in use meteor before using meteor mongo
- Mongo console should now show up in your terminal/cmd.
- type in
db.tweets.find()
meteor:PRIMARY> db.tweets.find()
{ "_id" : "BbQczRMQp5FGQ39qa", "message" : "meteor is cool" }- This is actually Amazing!
- We are inserting into the database directly in the client code.
- No need to be proxying db operations through a REST point
- This is the power of Meteor
- In this part we will be building a user authentication system

- Meteor makes the process of user management very easy. Let's go ahead and add the meteor packages:
meteor add accounts-ui accounts-password - The meteor packages comes with HTML template, you can go ahead and drop this in html:
{{> loginButtons}}You will see a super basic signup/login UI:

- Meteor gives you user account management, complete with bcrypt, user db operations, session management, auth logic right out of the box
- We basically did a million things in one line...
If you try to create a user now, you can see in the mongodb console:
meteor:PRIMARY> db.users.find()
{ "_id" : "iw75fJLwPNXwDrPWN", "createdAt" : ISODate("2015-07-11T20:49:30.702Z"), "services" : { "password" : { "bcrypt" : "$2a$10$2Od1oJZm693aRzIyYNIVVO4XyAuU0pXrcsrHgvuu0p0MWbp1aSzGW" }, "resume" : { "loginTokens" : [ ] } }, "emails" : [ { "address" : "test@test.com", "verified" : false } ] }- Let's customize the user experience so it conforms to a twitter-like experience
- Let's create a user management template:
<template name="userManagement">

  <h4>New User?</h4>
  <div class="form-group">
    <input class="form-control input-sm" id="signup-username" placeholder="Username">
    <input class="form-control input-sm" id="signup-fullname" placeholder="Full Name (Optional)">
    <input class="form-control input-sm" id="signup-password" placeholder="Password" type="password">
  </div>

  <button type="button" class="btn btn-info fullbutton" id="signup">Sign up</button>

</template> Template.userManagement.events({
'click #signup': function() {
var user = {
username: $('#signup-username').val(),
password: $('#signup-password').val(),
profile: {
fullname: $('#signup-fullname').val()
}
};
Accounts.createUser(user, function (error) {
if(error) alert(error);
});
}
});-
We are creating a new template
userManagement -
The javascript code is listening to clicks on
signupbutton -
A new user variable is created and processed through
Accounts.createUser -
Accounts.createUser()method is made available through the accounts-ui package -
It comes with a variety of customization and methods (documentation)
-
You can also add third-party authentication through services like twitter, facebook, google, etc. by adding their accounts packages.
Login module can be created similarly
<template name="userManagement">
  ...

  <h4>Already have an account?</h4>
  <div class="form-group">
    <input class="form-control input-sm" id="login-username" placeholder="Username">
    <input class="form-control input-sm" id="login-password" placeholder="Password" type="password">
  </div>

  <button type="button" class="btn btn-info fullbutton login" id="login">Log in</button>

</template> Template.userManagement.events({
'click #login': function() {
var username = $('#login-username').val();
var password = $('#login-password').val();
Meteor.loginWithPassword(username, password, function(error) {
if(error) alert(error);
});
}
});-
Meteor.loginWithPassword()will try to log the user in via the username and password provided. -
If the validation is correct, browser cookie will be set for you. If validation fails, the callback function will have error.
-
Bring out your browser console and type in
Meteor.user()to see the logged in user -
If your not logged in, this will return null
- User should know when they're logged in and they can logout
- Let's put all the pieces we have built together to complete the user management lifecycle
<body>
  <div class="row">
    <div class="col-md-4 col-sm-4">{{> userManagement}}</div>
    <div class="col-md-8 col-sm-8">{{> tweetBox}}</div>
  </div>
</body>

<template name="userManagement">
  <div class="user-container">
    <div class="panel panel-default userBox">
      <div class="panel-body">
        {{# if currentUser}}
        <!-- Message for logged in user -->
        <p>Hello <strong>@{{currentUser.username}}</strong>, welcome to twitterClone</p>

        {{else}}
        <!-- Log in module -->
        <h4>Already have an account?</h4>
        <div class="form-group">
          <input class="form-control input-sm" id="login-username" placeholder="Username">
          <input class="form-control input-sm" id="login-password" placeholder="Password" type="password">
        </div>

        <button type="button" class="btn btn-info fullbutton login" id="login">Log in</button>


        <!-- Sign up module -->
        <h4>New User?</h4>
        <div class="form-group">
          <input class="form-control input-sm" id="signup-username" placeholder="Username">
          <input class="form-control input-sm" id="signup-fullname" placeholder="Full Name (Optional)">
          <input class="form-control input-sm" id="signup-password" placeholder="Password" type="password">
        </div>

        <button type="button" class="btn btn-info fullbutton" id="signup">Sign up</button>
        {{/if}}

      </div>
    </div>
  </div>
</template> - We have put in some Blaze template code to show logged in user
{{# if currentUser}}{{else}}{{/if}}block will show a welcome message if user is logged in, or the login/signup form if the user is not logged incurrentUseris calling a helper method that is part of Meteor user-accounts package (doc)(http://docs.meteor.com/#/full/template_currentuser)
<p>Hello <strong>@{{currentUser.username}}</strong>, welcome to twitterClone</p> - access the user's username through {{currentUser.username}}
- currentUser returns the entire user object to the browser
Our user management module is now complete!
Logging a user out is as easy as logging a user in.
<button type="button" class="btn btn-info fullbutton" id="logout">Log out</button> 'click #logout': function() {
Meteor.logout();
}Now that we have user information. We can assign the currentUser username to each tweet
Template.tweetBox.events({
  'click button': function() {
    ...
    Tweets.insert({message: tweet, user: Meteor.user().username});
  }
});- Meteor.user() is an accessibility method for developers to get current logged in user's information
We should also make sure only logged in users can post stuff
if (Meteor.user()) {
  Tweets.insert({message: tweet, user: Meteor.user().username});
}
Additionally, let's prevent users from even clicking tweet if they aren't logged in:
Template.tweetBox.helpers({

  disableButton: function() {
    if (Session.get('numChars') <= 0 ||
        Session.get('numChars') > 140 ||
        !Meteor.user()) {
      return 'disabled';
    }
  }

});
We will change the button message to make sure users understand why the post button is disabled in the UI
{{#if currentUser}}
  <button class="btn btn-info pull-right" type="button" {{disableButton}}>Tweet</button>
{{else}}
  <button class="btn btn-info pull-right" type="button" disabled>Please Log In</button>
{{/if}}
Let's add a tweet and check out our database again!
meteor:PRIMARY> db.tweets.find()
{ "_id" : "myxrQmPWbKDrKDcr9", "message" : "hello world", "user" : "l33thax" }
##Part 4: Security & File Structure In this part we will be:
- Adding security to our application
- Organizing the application so the codebase can scale nicely
###Section 4.1: Remove the autopublish and insecure packages
insecureandautpublishare two packages that come with meteor out the box- They are packages designed for developer-friendliness
- We have been able to take for granted that we can access and modify databases on the client-side without any authentication.
For example, you can type in the following command in the browser console:
Meteor.users.find().fetch() - And you will get the entire list of users and their emails!!!
- This is because the autopublish package allows the server to publish all the database in complete form.
- We do not want this. So let's remove it.
meteor remove autopublish - Now you should see that the same db query on the client-side will get you an empty list.
- But we are not done! Right now, anyone can update and remove any tweets.
- Once again, back in the browser console:
Tweets.remove({_id: 'someTweetId'}) - Essentially, anyone can perform the db update, insert, and remove operations from any client.
- We can remove the insecure package to prevent this:
meteor remove insecure - Now, if you try to remove tweets, you get a notification:
remove failed: Access denied###Section 4.1: Meteor Application File Structure
- Our JavaScript code has been all in one file up to this point... This isn't scalable in real-life applications
- Meteor offers a high level of flexibility when it comes to file structure doc.
- Meteor has its own file loading order that you cannot override. I won't go into too much detail about this.
- You should understand that you do not get to specify each javascript dependency in your html as is the case with most other frameworks. - All files are loaded. So you should exercise caution when it comes to structuring your files.
There are special directory names that you can define in your file structure for Meteor framework:
- client (same as Meteor.isClient)
- server (same as Meteor.isServer)
- public (static assets)
- private (assets only available to server)
- tests (test code)
Additionally, files inside of /lib are loaded before their parent directories.
-
The application currently does not have not assets or tests.
-
We will simply divide the content into client/server files. The database is shared for both the server and the client.
-
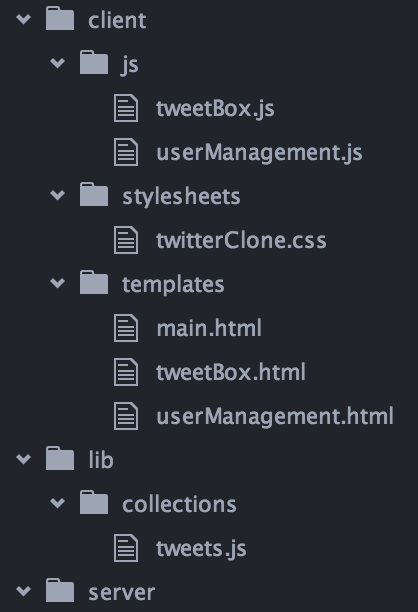
So we want to put our database in the /lib folder. See the new file structure:
-
On the client-side, we will further separated the code into the stylesheets (css)/templates (html)/js.
-
We can now start to write code in a structured fashion!
##Part 5: Server Methods In this section, we will be learning about writing server-side javascript methods in Meteor. The goal is to enable a user to follow other users. We will build this module:

We will see how Meteor allows you to interact with the server with minimal amount of code.
###Section 5.1 Search for User on the Server
As we talked about in the part 4, after we remove autopublish package, the client no longer has access to all the users. We want to be able to find users to follow. Let's start with a simple search module:
/client/stylesheets/twitterClone.css CSS on github
/client/templates/followUsers.html
<form class="form-inline">
  <input type="text" class="form-control" id="searchUser" placeholder="Search for user">
  <button type="submit" class="btn btn-info">Search</button>
</form>
/client/js/followUsers.js
Template.followUsers.events({
  'submit form': function(event) {
    var searchUser = event.target.searchUser.value;

    var foundUser = Meteor.call('findUser', searchUser, function(err, res) {
      if (res) Session.set('foundUser', res);
    });
    return false;
  }
});
p.s. notice the change in our file structure!
We switched to using a form instead of using textbox/button. Using a form gives us the advantage that the submit form function can accept an event variable that contains all the values of the form. We can access the value in textbox by event.target.searchUser.value.
Here we are using Meteor.call('findUser', searchUser, callback). We have not defined the method findUser yet. We will be doing that on the server-side. This is how Meteor exposes server code to the client. The first variable searchUser would be the first parameter passed into the server method. This method also contains a callback when the query is complete.
Lastly, the method is returning false because a form submit kicks off a page refresh and we want to prevent that from happening.
/server/js/followUsers.js
Meteor.methods({
  'findUser': function(username) {
    return Meteor.users.findOne({
      username: username
    }, {
      fields: { 'username': 1 }
    });
  }
});
findUser method is defined and executed on the server. Notice that the js file is stored in the /server directory. This method contains nothing more than a mongodb call to find the username. The first argument username came from the client call Meteor.call('findUser, searchUser).
I hope you are starting to appreciate the simplicity of Meteor. Methods defined in the server can be called by methods in the client directly without jumping through hoops! This is an awesome concept in full-stack js framework.
###Section 5.2: Display Found User
/client/templates/followUsers.html
{{#if foundUser}}
  <div class="found-user">
    <button type="button" class="btn btn-default" id="follow">Follow @{{foundUser.username}}</button>
  </div>
{{/if}}
/client/js/followUsers.js
Template.followUsers.helpers({
  'foundUser': function() {
    return Session.get('foundUser');
  }
});

Template.followUsers.events({
  'click #follow': function() {
    Meteor.call('followUser', Session.get('foundUser').username);
  }
});
/server/js/followUsers.js
Meteor.methods({
  'followUser': function(username) {
    Relationships.insert({
      follower: Meteor.user().username,
      following: username
    });
  }
});
We are once again calling a server-defined method directly in the client Meteor.call('followUser', Session.get('foundUser').username)
If the user successfully finds someone that she wishes to follow, we will display a button for her to do so. On the server-side, we are creating a new database to store following/follower relationships. We do want to ensure that a user does not mistakeningly follow the same user twice. We can do this through mongodb unique check.
/server/js/startup.js
Meteor.startup(function () {
  Relationships._ensureIndex({follower: 1, following: 1}, {unique: 1});
});
Meteor.startup() runs when the server first starts up. ensureIndex is a mongodb operation to create an index and ensure uniqueness. The server will prevent dups in the Relationships db.
###Section 5.3 Recommend People to Follow We want to display some random people that the user could follow inside the same UI module.
/client/templates/followUsers.html
<div class="recommend-users">
  <h5>Who to follow:</h5>
  {{#each recommendedUsers}}
    <button type="button" class="btn btn-default" id="followRec">Follow @{{this.username}}</button>
  {{/each}}
</div>
The each for-loop here is part of Blaze/Handlebar syntax. recommendedUsers will be a helper method returning an array of content.
/client/js/followUsers.js
Template.followUsers.helpers({
  'recommendedUsers': function() {
    return Session.get('recommendedUsers');
  }
});

Template.followUsers.events({
  'click #followRec': function(event) {
    Meteor.call('followUser', this.username);
  }
});

Template.followUsers.onRendered(function () {
  Meteor.call('recommendUsers', function(err, res) {
    Session.set('recommendedUsers', res);
  });
});
As the page renders, the client-side template will make a call to recommendUsers server method in order to get a list of potential candidates that the logged in user can follow.
If the user clicks on any of the recommendations, the events function 'click #followRec' will be called. You can see that we used this to refer to context in the current for loop iteration.
Let's define the recommendUsers method on the server:
/server/js/followUsers.js
Meteor.methods({
  'recommendUsers': function() {
    if (Meteor.user()) {
      var currentFollowings = UserUtils.findFollowings(Meteor.user().username);

      var recUsers = Meteor.users.find({
        username: {
          $nin: currentFollowings
        }
      }, {
        fields: { 'username': 1 },
        limit: 5
      }).fetch();

      return recUsers;
    }
  }
});
We do not want to recommend candidates that the user is already following. We are calling the method UserUtils.findFollowings(Meteor.user().username) to find the list already being followed. We will go ahead and define this method inside of the /lib directory so that it can be accessed by both the server and the client.
/lib/userUtils.js
UserUtils = function() {};    //no var in front

UserUtils.findFollowings = function(username) {
  var currentFollowings = Relationships.find({
    follower: username
  }).fetch().map(function(data) {
    return data.following;
  });
  currentFollowings.push(Meteor.user().username);

  return currentFollowings;
};
Note that UserUtils does not have var in front of its definition. All variables and functions are automatically file-scoped, meaning that you cannot access them outside of the file you defined them in (think IIFE). However, you can create globally scoped variables by defining them without var. We want UserUtils to be globally accessible.
Mongodb queries tend to be a bit verbose, but don't get tied up on those! Check out the mongoDb doc for more details. Focus on the server-client method calls and the ability to share methods between the two entities.
###Section 5.4 Move Tweet Insertion to Server
Remember how we removed the Meteor package insecure in part 4? We can no longer insert data into the Tweets db instance on the client-side. Let's move the data insertion to the server.
/client/js/tweetBox.js
'click button': function() {
  var tweet = $('#tweetText').val();
  $('#tweetText').val("");
  Session.set('numChars', 0);
  Meteor.call('insertTweet', tweet);
}
/server/js/tweetBox.js
Meteor.methods({
  insertTweet: function(tweet) {
    if (Meteor.user()) {
      Tweets.insert({
        message: tweet,
        user: Meteor.user().username
      });
    }
  }
});
##Part 6: Data Publish/Subscribe In this section we will be learning about data transfer between server and client.
Meteor core library comes with Distributed Data Protocol (DPP), which is a websocket protocol for doing live data updates. The protocol follows the publish/subscribe pattern.
In a nutshell, the data publisher (producer) will notify data subscribers (consumers) if there is a change in the database. Instead of the client consumers constantly pulling data from the server producer, the server will push data to the clients.

We will using this data protocol to build our twitter feed to support live updates.
###Section 6.1: Public/Subscribe Tweets
Let's take a look at how you would get access to the Tweets on the client-side now that we have removed autopublish package in part 4.
/server/js/publications.js
Meteor.publish('tweets', function() {
  return Tweets.find();
});
/client/js/tweetFeed.js
Template.tweetFeed.onCreated(function() {
  this.subscribe('tweets');
});
The server is publishing all the content of Tweets and the client is subscribing to it inside of a template.
The problem with the current design is that we are going to get all the tweets, not just from the folks you are following. You can modify the publish code so that it only selects a subset of the data to publish.
/server/js/publications.js
Meteor.publish('tweets', function() {
  if (this.userId) {
    var username = Meteor.users.findOne({_id: this.userId}).username;
    var currentFollowings = UserUtils.findFollowings(username);

    return Tweets.find({user: { $in: currentFollowings }});
  }
});
This code allows us to get tweets from only the followed users.
###Section 6.2 Display Tweets
Before we start displaying tweets, let's think about how we want to organize it. Twitter displays tweets in the reverse time order, such that the newest item would be on top. Let's attach a timestamp to our tweets so we can do the same thing.
/server/js/tweetBox.js
insertTweet: function(tweet) {
  if (Meteor.user()) {
    Tweets.insert({
      message: tweet,
      user: Meteor.user().username,
      timestamp: new Date()
    });
  }
}
And we can change the tweet order directly in the subscription query, and we want to limit the size of our feed to a reasonable count of 10:
/client/stylesheets/twitterClone.css CSS on github
/client/js/tweetFeed.js
Template.tweetFeed.helpers({
  'tweetMessage': function() {
    return Tweets.find({}, {
        sort: {timestamp: -1},
        limit: 10
    });
  }
});
/client/templates/tweetFeed.html
<template name="tweetFeed">
  <div class="tweetfeed-container">
    <div class="panel panel-default tweetfeed">
      <div class="panel-body">
        <!-- Text box for tweet content -->
        {{#each tweetMessage}}
          <div class="panel panel-info">
            <div class="panel-heading">
              <h3 class="panel-title">@{{this.user}}
                <span class="glyphicon glyphicon-triangle-right" aria-hidden="true"></span>
                 {{this.timestamp}}
               </h3>
            </div>
            <div class="panel-body">
              {{this.message}}
            </div>
          </div>
        {{/each}}
      </div>
    </div>
  </div>
</template>
You should now be able to see real time updates coming from tweet messages. The following is a demo as I logged in as two users following each other:

###Section 6.2: ADVANCED TOPIC: Reactive Join Publish
Note: Feel free to skip this section if you feel like it. This is intended for more advanced discussion of the pub/sub pattern in Meteor.
While this might not be immediately obvious to you, if you follow a new user, your feed will not immediately update with tweets from the new user. This is happening because the server publish method in Meteor only publishes the cursor. Any changes to the dependency of the cursor will not be reactively pushed to the client (details).
What we need to do here is to perform a reactive join when we publish the data. Fortunately there is a Meteor package that can help us with this.
meteor add reywood:publish-composite /server/js/publications.js
Meteor.publishComposite('tweets', function(username) {
  return {
    find: function() {
      // Find the current user's following users
      return Relationships.find({ follower: username });
    },
    children: [{
      find: function(relationship) {
        // Find tweets from followed users
        return Tweets.find({user: relationship.following});
      }
    }]
  }
});

Meteor.publish('ownTweets', function(username) {
  return Tweets.find({user: username});
});
Let's look at Meteor.publishComposite() method first. The find: function() function watches for changes in the Relationships database. This method returns a reactive cursor for a list of Relationships, which is passed to each of the child's find() function. The child will then query for Tweets associated with each user passed into it. For details of the publishComposite, please take a look at the package doc.
Lastly, we want to see user's own tweets. This can be done easily with Meteor.publish('ownTweets', function(username)). Remember that you need to subscribe to other publishers in the client:
/client/js/tweetFeed.js
Template.tweetFeed.onCreated(function() {
  if (Meteor.user()) {
    this.subscribe('tweets', Meteor.user().username);
    this.subscribe('ownTweets', Meteor.user().username);
  }
});
We now have a reactive join that updates your twitter feed as you follow new users:
(Word of caution, reactive joins are pretty expensive in terms of db queries. A production version might consider doing data normalization)
###Section 6.3: Use Pub/Sub for Follow Recommendations
Now that we know how to do publication and subscription. Let's improve our follow recommendations. The existing module does not respond to user interaction. When you click on someone to follow, :

I'll demonstrate how you can use a reactive client-side data join to solve this problem. We can do this on the client-side instead of server because none of the data involved need to be hidden from the client. All we need is a list of usernames, and the individuals that the current user is following.
/server/js/publications.js
// List of all usernames
Meteor.publish('users', function(username) {
  return Meteor.users.find({}, {
    fields: { 'username': 1 },
    limit: 100
  });
});

// List of usernames the current user is following
Meteor.publish('followings', function(username) {
  return Relationships.find({ follower: username });
});
Now that the client has the two databases it needs. We will need to find a disjoint set. We can directly copy the server code to the client:
/client/js/followUsers.js
Template.followUsers.helpers({
  'recommendedUsers': function() {
    if (Meteor.user()) {
      var currentFollowings = UserUtils.findFollowings(Meteor.user().username);

      var recUsers = Meteor.users.find({
        username: {
          $nin: currentFollowings
        }
      }, {
        fields: { 'username': 1 },
        limit: 5
      }).fetch();

      return recUsers;
    }
  }
});

Template.followUsers.onCreated(function() {
  if (Meteor.user()) {
    this.subscribe('users', Meteor.user().username)
    this.subscribe('followings', Meteor.user().username);
  }
});
This is the beauty of Meteor's full-stack framework. We did not need to change a single line of code for this server-side logic to work on the client.
###Section 6.4: Use Pub/Sub for User Profile
Let's finish up the last modification we want to do with pub/sub. Our user profile does not show any cool information other than the username. Let's change this. Twitter shows the number of tweets, followers, and followings. We can implement this very easily.
We need to publish one more set of information. To get the follower counter:
/server/js/publications.js
Meteor.publish('followers', function(username) {
  return Relationships.find({ following: username });
});
On the client template, we will go ahead and count the number of followers, followings, and tweets by using mongoDb's count() method:
/client/js/userManagement.js
Template.userManagement.helpers({
  'tweets': function() {
    if (Meteor.user()) {
      return Tweets.find({ user: Meteor.user().username }).count();
    }
  },

  'following': function() {
    if (Meteor.user()) {
      return Relationships.find({ follower: Meteor.user().username }).count();
    }
  },

  'followers': function() {
    if (Meteor.user()) {
      return Relationships.find({ following: Meteor.user().username }).count();
    }
  }
});

Template.followUsers.onCreated( function() {
  if (Meteor.user()) {
    this.subscribe('followings', Meteor.user().username);
    this.subscribe('followers', Meteor.user().username);
    this.subscribe('tweets', Meteor.user().username);
  }
});
/client/templates/userManagement.html
{{# if currentUser}}
<!-- Message for logged in user -->
<p>Hello <strong>@{{currentUser.username}}</strong>, welcome to twitterClone</p>
<button type="button" class="btn btn-info fullbutton" id="logout">Log out</button>

<table class="table">
  <tr>
    <td class="tableHeader">Tweets</td>
    <td class="tableHeader">Following</td>
    <td class="tableHeader">Followers</td>
  </tr>
  <tr>
    <td class="tableContent">{{tweets}}</td>
    <td class="tableContent">{{following}}</td>
    <td class="tableContent">{{followers}}</td>
  </tr>
</table>

{{else}}
Notice the Tweets count and Following count increases as I interact with the application, in real time!

###Conclusion
We have only touched the tip of the iceberg. Meteor offers a whole lot of features to make your life as a developer easier. Meteor also recently raised substantial funding to further develop the framework. I'm sure the framework will continue to evolve as the community continue to develop on it. So, keep learning, keep hacking.