Measurements
Welcome to the measurement guide. Here you'll find instructions and comments about what gear is needed and how to do the measurements yourself. This guide goes first through the measurement principles using a stereo recording for simplicity. Surround recordings with one, two or multiple speakers is detailed after the stereo recording. Measurements for room correction are shown at the end.
The recordings cannot be used as is but need to be transformed with Impulcifer to binaural room impulse responses. See Processing for details.
Binaural microphones, audio interface, headphones and speakers are required to measure BRIR. Optionally you can have a calibrated measurement microphone for doing room correction.
Recommendation here is, if you can afford it, to buy The Sound Professionals MS-TFB-2 binaural microphones with XLR connectors and Behringer UMC202HD audio interface. More budget friendly option is to buy the SP-TFB-2 mics, two RØDE VXLR+ adapters and J&D female stereo to 2x male mono Y-splitter. Even cheaper option is to use two Primo EM258 capsules instead of The Sound Professionals mics (and Y-splitter).
Microphones used for BRIR measurements need to be small enough to fit inside your ears and have some kind of plug or hook for keeping the microphone capsule in place during the measurements. The Sound Professionals binaural microphones have been proven to work well for the task. Pictured below is the basic model with the hooks cut off and regular foam earplugs glued to help hold the microphones in place.
Microphones are placed at the ear canal opening or inside the ear canal. Having the mics too far out away from the ear canal could affect how the outer ear affects the sound.
 |
 |
|---|
Some commercially available binaural microphones are:
| Model | Noise | Sensitivity | Price |
|---|---|---|---|
| The Sound Professionals SP-TFB-2 | 36 dB | -30 dB | $89 |
| The Sound Professionals SP-TFB-2 with XLR | 36 dB | -30 dB | $199.95 |
| The Sound Professionals MS-TFB-2 | 19 dB | -32 dB | $149.95 |
| The Sound Professionals MS-TFB-2 with XLR | 19 dB | -32 dB | $259.95 |
| Primo EM258 | 20 dB | -32 dB | $21 |
| Roland CS-10EM | <34 dB | -40 dB | ~$80 |
| Microphone Madness MM-BS-8 | 32 dB | -35 db | $99 |
| Soundman binaural microphone line-up | ? | ? | €65-145 |
| Core Sound binaural microphones | 30 dB | -66 dB | $230 |
| Core Sound high-end binaural microphones with 4060 capsule | 28 dB | -34 dB | $990 |
| Core Sound high-end binaural microphones with 4061 capsule | 23 dB | -44 dB | $990 |
Low noise is very desirable for the binaural microphones because lower noise means better signal to noise ratio for the BRIR. The noise figures in the table above are not to be trusted blindly. The cheapest sound professionals mics were tested to provide significantly better noise floor than Primo EM 258 mics even though Primo advertizes a lot lower noise floor for their mics!

Audio interface is the microphone input for the PC. Excellent noise performance can be had very cheaply with Behringer UMC202HD or UMC204HD if more features are needed for other purposes but other popular options such as Focusrite 2i2 2.Gen should work just as well. Just make sure the audio interface has two microphone inputs!
When using audio interface that can provide phantom power make sure you never, ever have it turned on if you are about to plug in anything else than microphones which require phantom power! 48 volts is enough to fry any electronics device!
Alternative to a normal USB audio interface is a digital recorders which can function as a USB audio interface. Most digital recorders cannot so the options here are limited. One suitable option is Zoom H1n although optimal results cannot be guaranteed since H1n has a whopping 20 dB higher input noise than Behringer UMC202HD.
Finally it is possible to measure BRIR with digital stereo recorders which cannot act as USB audio interface but in this case you have to play the sine sweep on PC, use the recorder without being connected to PC and then manually transfer the recorded files from the recorder's SD card to PC.
All of the mics above are electret microphones and as such require bias voltage (plug-in power) between 2 to 12 volts. These are typically designed to be used with digital recorders. USB audio interfaces don't normally have plug-in power, only phantom power, and therefore cannot be used with electret mics directly. XLR versions of The Sound Professionals mics have adapters which convert 48 volts of phantom power to 9 or 12 volts of plug-in power for the capsules and Core sound mics come with a battery box so they can be used with audio interfaces without turning on phantom power.
RØDE VXLR+ is phantom power XLR to plug-in power 3.5 mm adapter which should work with practically all electret mics and audio interfaces. Using two RØDE adapters (one for each channel) requires 2x mono 3.5mm jack connectors. Primo EM258 mono capsules from FEL Communications work directly but many others require a 3.5 mm female stereo to 2x 3.5 mm male mono Y-splitter such as the one from J&D. The J&D cable's Amazon listing has (had) incorrect title but the picture with two male mono jacks is correct. The cable is available in other region Amazon stores too.

In theory any decent speakers and around ear headphones work but the end result will depend on the performance of the speakers and headphones.
The sound quality of the speakers and the room largely determine how the end result will sound since the BRIR recorded with Impulcifer will simulate the speakers and the room. Many of the problems in speakers cannot be corrected easily, at least not without extensive anechoic measurement data, and therefore good speakers will in general sound good with the recorded BRIR and bad speakers will sound bad. There are couple of relaxations however. The bass extension is not as critical since the listening will happen with headphones and many headphones can produce lowest frequencies just fine, at least with a bit of EQ. Low sub-bass output will however affect the signal-to-noise ratio in low frequencies which means good bass extension is still preferred. Harmonic distortion of the speakers is also not very important since the measurement method inherently removes all harmonic distortion from the recording.
Headphones will have major impact on the speaker virtualization quality. Frequency response, which is normally by far the most important aspect of headphones' sound quality, isn't very critical in this application because it will be equalized as a part of the BRIR measurement process. Headphones' other qualities will have direct impact on the end result and therefore fast and well resolving headphones are recommended although any decent pair of around ear headphones can create illusion of listening to speakers in a real room. Some headphones are better suited for for speaker virtualization but it's not well known at this time which elements affect the localization, externalization and plausibility of binaural reproduction. Light weight and comfortable headphones remind of themselves less which makes it easier for the brains to accept speaker sound when wearing headphones. Electrostatic headphones and Sennheiser HD 800 at least have proven themselves as reliable tools for binaural use.
Input and output devices in Windows (or whatever OS you are on) need to be configured for the measurement process. One measurement is done with speakers and one with headphones so if you have different output devices (soundcard) for them then you need to configure both. For the sake of simplicity we will here go through the setup for using the audio interface for speaker output, headphone output and microphone input.
Go to Windows sound settings: Control panel -> Hardware and Sound -> Sound. Select your output device (audio interface), click Set Default and then click properties. Go to Advanced tab and select a format with highest possible bit number and 48000 Hz. Other sampling frequencies are possible but 48000 Hz is default on HeSuVi and covers all use cases. Click OK to close the output device properties. 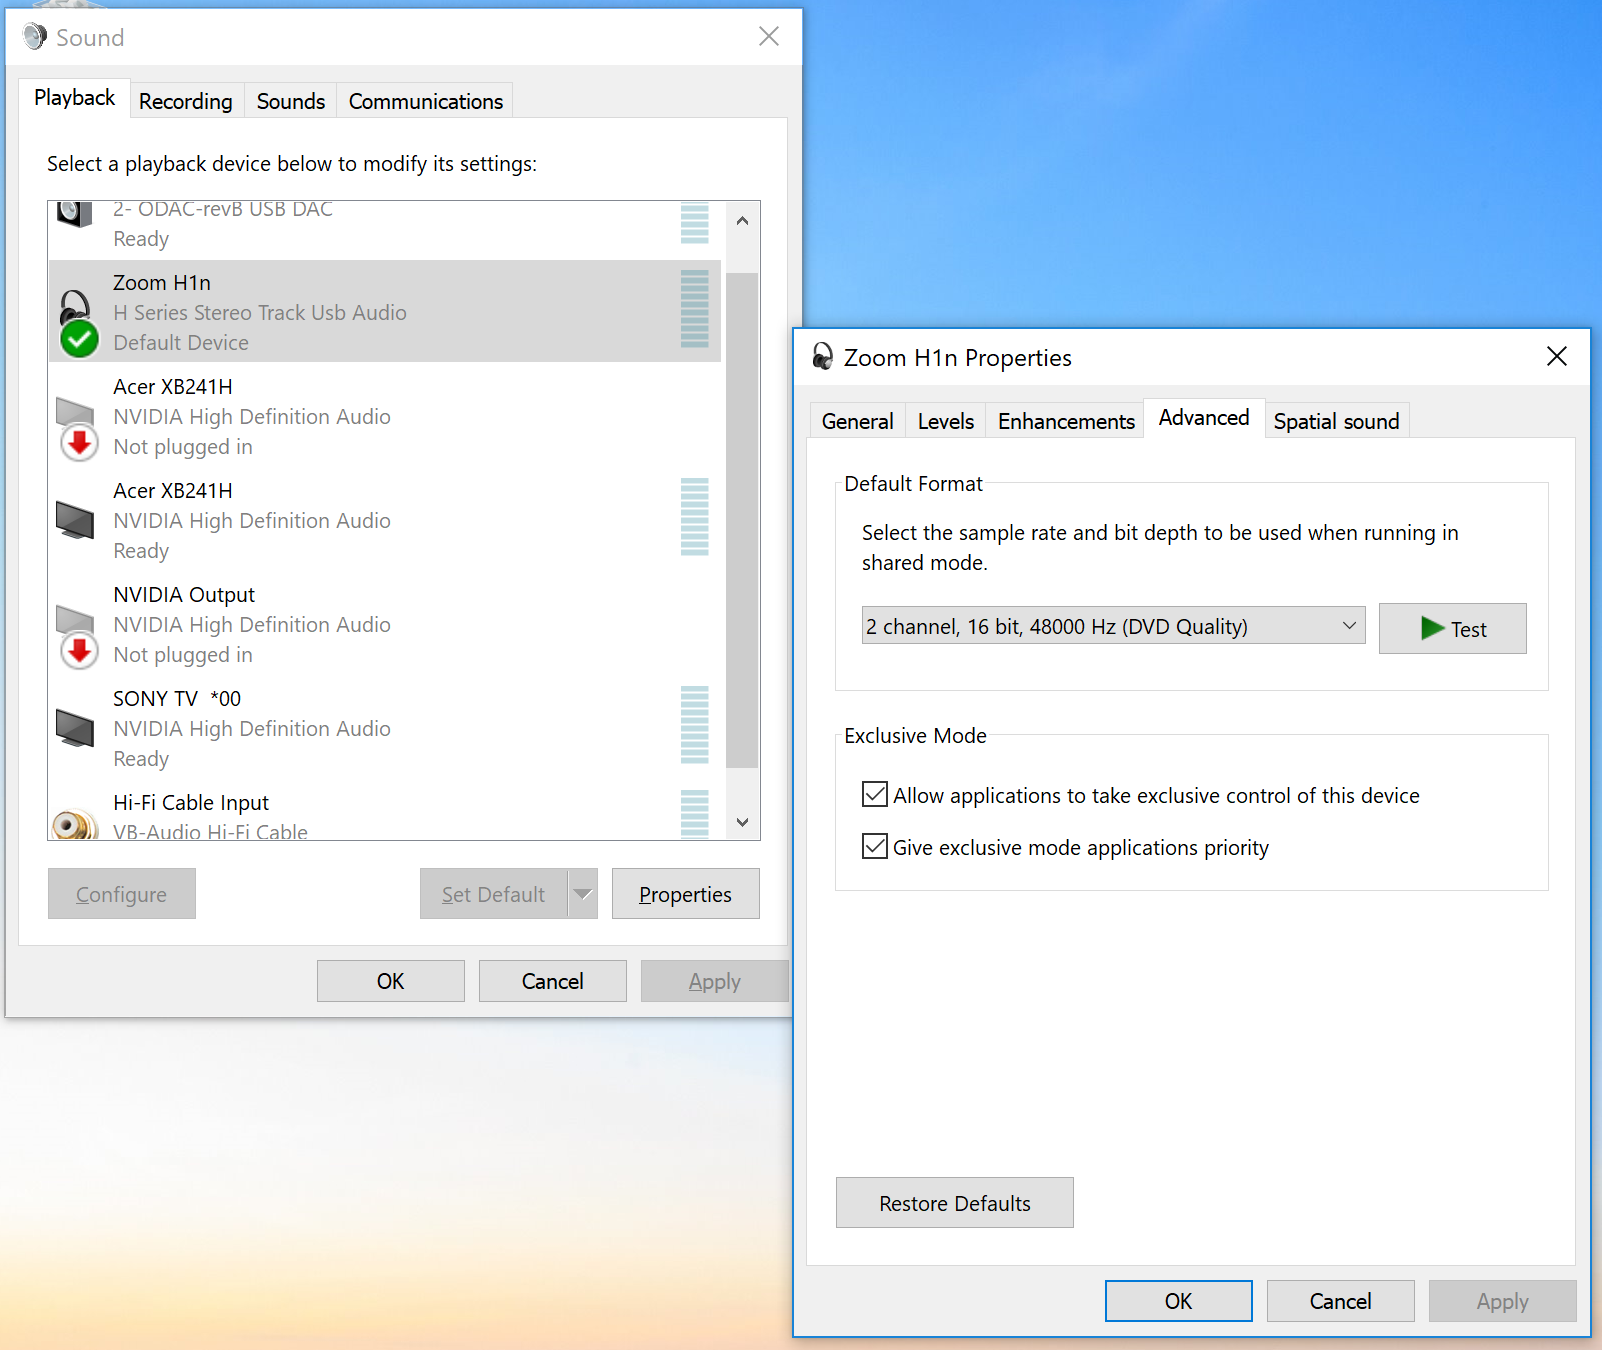
Next go to Recording tab on Windows sound settings, select your input device (audio interface), set it as default and select same format from the Properties as you selected for the output device. 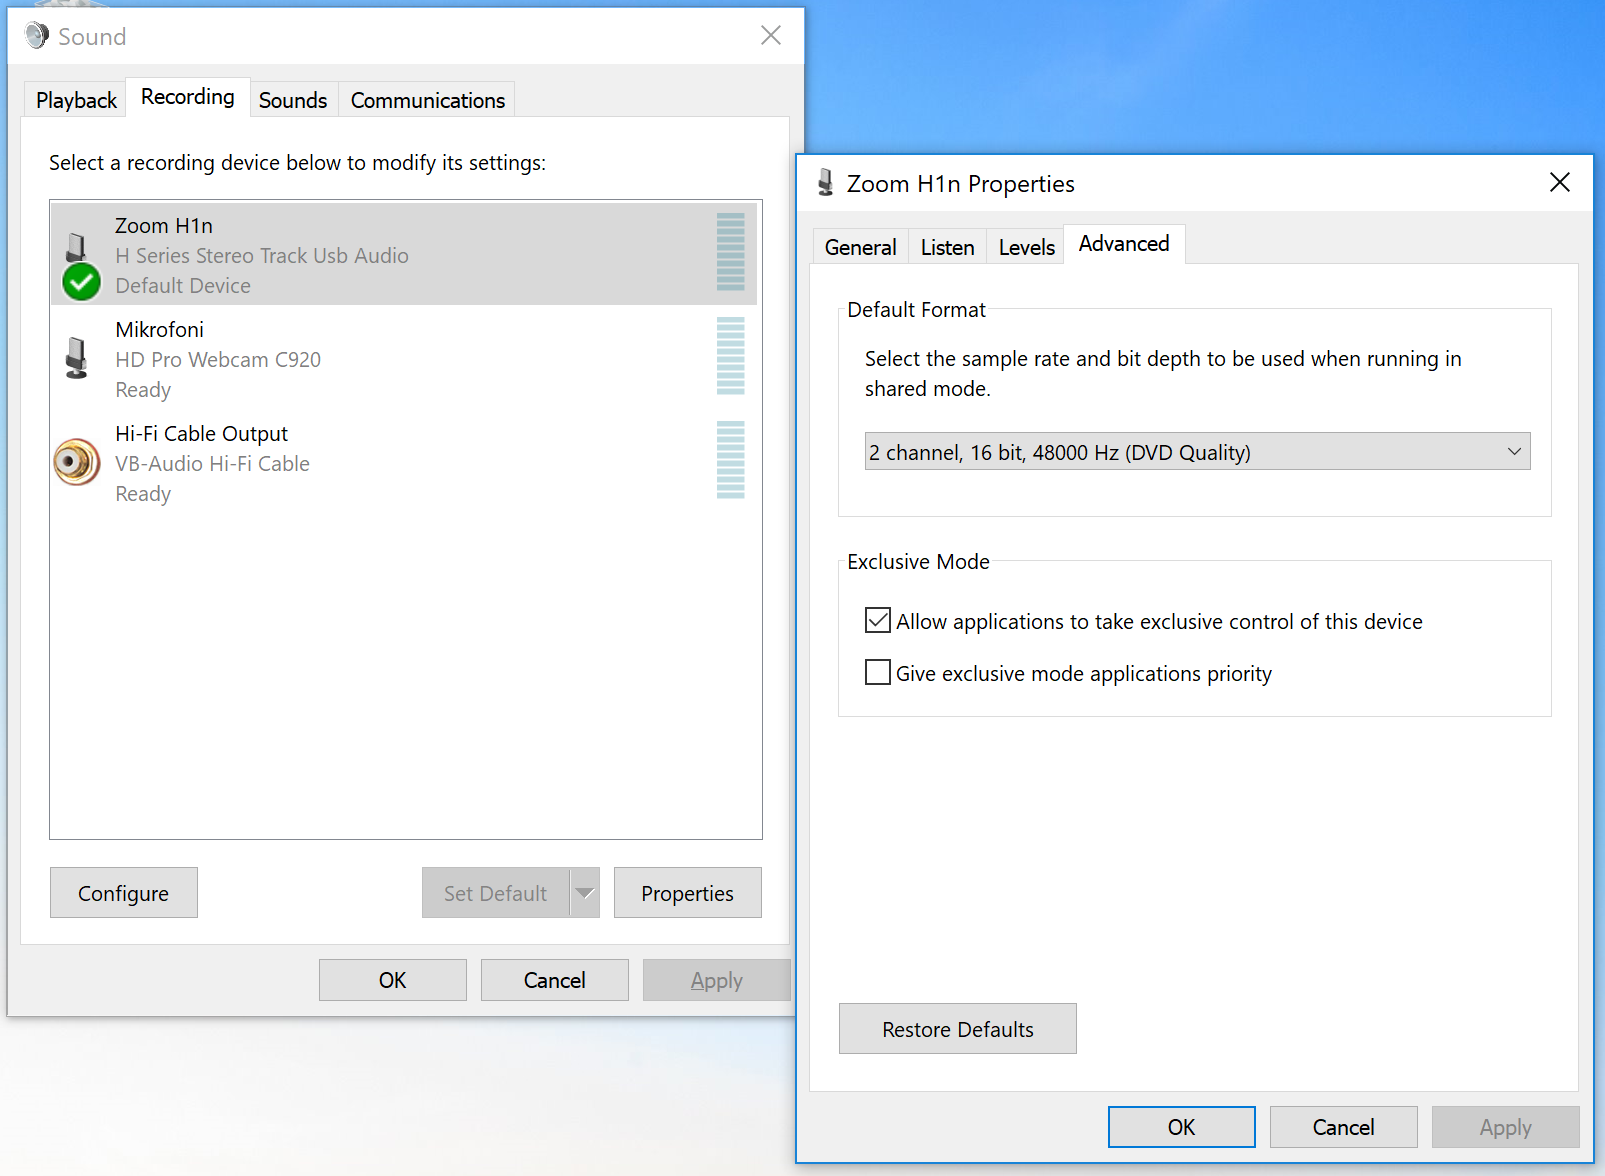
recorder.py is Impulcifers own playback and recording utility. It's used from command line and has been developed specifically for recording BRIRs. A single command with 7.1 speaker system can do the whole recording process.
By default recorder.py uses system default input and output sound devices but these can also be specified if needed
python recorder.py --input_device="Zoom H1n" --output_device="Speakers (ODAC-revB USB DAC)"On Windows the audio host API can be selected
python recorder.py --host_api=WASAPIhost API can be included in the device parameters as well in which case it will override the --host_api parameter
python recorder.py --input_device="Zoom H1n DirectSound"In most cases you should not need to specify devices or host API and things should work just fine by using the system default devices. These options are given in case you run into problems and are getting device not found errors or if the playback or recording is not working.
All available devices can be listed
python -m sounddeviceIf recorder fails to work even after playing around with sound devices and host APIs you might need to fall back to the old way of Recording with Audacity.
It's wise to start by recording and processing a simple stereo BRIR which doesn't include any surround channels. This is a simpler introduction into the recording process and once you have the stereo BRIR nailed down you can continue to multi-channel BRIR.
When you have your sound devices set up like described above, you can start recording. Headphones should be measred first because putting the headphones on and taking them off might move the microphones if they are not secured well and while this isn't necessarily catastrophic we'll want the microphones to be in the same position for both the headphone measurement and the speaker measurement. For this reason the headphone measurement has to be made again every time they are taken off, so you cannot reuse headphone measurement from one measurement session with the future measurements.
Put on your headphones and set the output volume to a comfortable high level. High volume is better because it ensures higher signal to noise ratio but the volume shouldn't be so high that listening to the sine sweep is uncomfortable. Also too high volume might cause significant distortion on certain headphones and speakers. recorder.py doesn't have volume adjustment but instead it always blasts full strength signal. Volume control has to be done with operating system volume control or with the physical volume knob of the amplifier. If you have any existing audio processing going on, you should disable them now.
Run recorder:
python recorder.py --play="data/sweep-seg-FL,FR-stereo-6.15s-48000Hz-32bit-2.93Hz-24000Hz.wav" --record="data/my_hrir/headphones.wav"This will play ascending sine sweep first on the left side and then on the right. Recorder will also record microphones at the same time and save the recorded audio into headphones.wav file in my_hrir folder.
Recorder will report the recording headroom at the end. Headroom should ideally be close to 0.0 dB without actually being that. If the reported headroom is 0.0 dB, this in most cases means the audio clipped and the recording is ruined. In this case adjust microphone level down and re-run the recording. You can also try increase headphone volume or microphone level if the headroom is a lot larger than 6 dB.
Speaker recording for a stereo setup goes exactly like the headphone recording. Unplug and take off your headphones and set the volume on speakers to a comfortable high level. You may enable room correction EQ at this point if you have such an option. Keep in mind that any room correction used during these measurements must also be enabled during room correction measurements if those are to be done later.
Run recorder again with different output file:
python recorder.py --play="data/sweep-seg-FL,FR-stereo-6.15s-48000Hz-32bit-2.93Hz-24000Hz.wav" --record="data/my_hrir/FL,FR.wav"You should hear frequency sweep first from the left speaker and then from the right speaker. Check the headroom and adjust speaker volume or microphone level if needed.
Congratulations, you have your first BRIR measurement finished. Now you need to process the sine sweep recordings into head related impulse responses with Impulcifer. See Processing for more details.
python impulcifer.py --test_signal=data\sweep-6.15s-48000Hz-32bit-2.93Hz-24000Hz.pkl --dir_path=data\my_hrir There are multiple ways of creating surround BRIR files, even without having an access to a surround speaker setup. You can experiment with different ways and see which provide the best results for you.
Headphone recording is the same for all of the recording setups and won't be repeated later in the guide. This is the first step of any BRIR recording process.
python recorder.py --play="data/sweep-seg-FL,FR-stereo-6.15s-48000Hz-32bit-2.93Hz-24000Hz.wav" --record="data/my_hrir/headphones.wav"The simplest way is to use 7.1 surround speaker setup to play sine sweeps on all 7 speakers. This is an easy and fast way to do the recording because the whole thing will be done in less than a minute. The obvious caveat here is that you'll need an access to 7.1 speaker system. If the side and rear speakers are not placed well then recording surround BRIR with stereo pair or mono might turn out to be better.
Most of the measurement process is the same as for stereo recording. Surround sine sweep sequence WAV file is required which can be generated if it doesn't exist in data folder
python impulse_response_estimator.py --dir_path=data --fs=48000 --speakers=FL,FC,FR,SR,BR,BL,SL --tracks=7.1 --duration=5This will generate file where the sine sweeps in the order given by --speakers, so starting from front left and continuing clock-wise. Output test signal and the sequence will be written to data folder.
Speaker recording requires different sweep sequence file and needs to write a file whose name matches recorded speakers
python recorder.py --play="data/sweep-seg-FL,FC,FR,SR,BR,BL,SL-7.1-6.15s-48000Hz-32bit-2.93Hz-24000Hz.wav" --record="data/my_hrir/FL,FC,FR,SR,BR,BL,SL.wav"7 channel BRIR can be recorded with a stereo speaker pair either by looking at 4 different directions or moving speakers around in the room. In both cases a stereo sequence sine sweep is used and 4 different recordings are made.
Standard 7.1 surround speaker setup defines the speaker angles to be
- FL 30 degrees left
- FC 0 degrees, directly in front
- FR 30 degrees right
- SR 90 degrees right
- BR 150 degrees right
- BL 150 degrees left
- SL 90 degrees left
All but front center speaker are 60 degrees apart from it's neighbors and this is assumed and required to get the speaker angles right in the 7 channel BRIR. If the angle between the physical left speaker and the physical right speaker is less than 60 degrees, there will be more than 60 degrees between virtual side left and virtual front left, between virtual side right and virtual front right and between virtual back left and virtual back right. Having an angle greater than 60 degrees between speakers will often cause a gap in imaging in the middle of the two speakers. This might not be catastrophic because pinpoint imaging outside of front speakers is not crucial.
Similarly if the angle between the physical speakers is greater than 60 degrees then there might be a gap in the center of the sound image. This is going to be a lot worse than the previous alternative because vocals and other important things are often placed in the middle of the front speakers' image. Fortunately the speaker angle can be adjusted very easily without moving the speakers. Simply move closer towards the front center for larger speaker angle or further away for smaller speaker angle.
Let's take a look at the 4 stages of the recording process. This example is using sine sweep sequence with two tracks, first is the left channel and the second is the right channel. In every step the physical left speaker plays the sine sweep first, followed by a short silence and the right speaker sine sweep. Just like in stereo recording process
 |
Step 1 Looking in the middle of the speakers. This is what is done during stereo recording process. The physical left speaker stays front left speaker and the physical right speaker stays front right speaker. Run python recorder.py --play="data/sweep-seg-FL,FR-stereo-6.15s-48000Hz-32bit-2.93Hz-24000Hz.wav" --record="data/my_hrir/FL,FR.wav"
|
 |
Step 2 Looking 120 degrees left. The physical left speaker is at the direction of side right speaker (90 degrees right) and the physical right speaker is at the direction of back right speaker (150 degrees right). Run python recorder.py --play="data/sweep-seg-FL,FR-stereo-6.15s-48000Hz-32bit-2.93Hz-24000Hz.wav" --record="data/my_hrir/SR,BR.wav"
|
 |
Step 3 Looking 120 degrees right. The physical left speaker is at the direction of back left speaker (150 degrees left) and the physical right speaker is at the direction of side left speaker (90 degrees left). Run python recorder.py --play="data/sweep-seg-FL,FR-stereo-6.15s-48000Hz-32bit-2.93Hz-24000Hz.wav" --record="data/my_hrir/BL,SL.wav"
|
 |
Step 4 Looking directly at the physical right speaker which becomes front center speaker. The physical left speaker doesn't match any of the surround setup speaker directions so we will ignore it when processing. Run python recorder.py --play="data/sweep-seg-FR-stereo-6.15s-48000Hz-32bit-2.93Hz-24000Hz.wav" --record="data/my_hrir/FC.wav"
|
An alternative way to the panorama method above is to move the speakers around in the room. The same principle holds that in each step the physical speakers' directions must match some of the virtual speakers in the BRIR. Here is one option how to do it.
|
Step 1 Normal front speaker recording. Run python recorder.py --play="data/sweep-seg-FL,FR-stereo-6.15s-48000Hz-32bit-2.93Hz-24000Hz.wav" --record="data/my_hrir/FL,FR.wav". |
 |
Step 2 The physical left speaker moved to left side and the physical right speaker moved to the right side. Run python recorder.py --play="data/sweep-seg-FL,FR-stereo-6.15s-48000Hz-32bit-2.93Hz-24000Hz.wav" --record="data/my_hrir/SL,SR.wav". |
 |
Step 3 The physical left speaker moved to the location of back left speaker and the physical right speaker moved to the location of the back right speaker. Run python recorder.py --play="data/sweep-seg-FL,FR-stereo-6.15s-48000Hz-32bit-2.93Hz-24000Hz.wav" --record="data/my_hrir/BL,BR.wav". |
 |
Step 4 The physical left speaker moved to the center and the physical right speaker is at it's own position. The sine sweep won't be played at the right speaker. Run python recorder.py --play="data/sweep-seg-FL-stereo-6.15s-48000Hz-32bit-2.93Hz-24000Hz.wav" --record="data/my_hrir/FC.wav". |
Recording process with a single speaker is similar to two speakers but this time sine sweep is played only on one speaker, either left or right. This guide assumes the single speaker is connected to left speaker terminals in the amplifier thus we'll play sine sweeps on the left channel by using sine sweep file data/sweep-seg-FL-stereo-6.15s-48000Hz-32bit-2.93Hz-24000Hz.wav. Right speaker can be used by playing file data/sweep-seg-FR-stereo-6.15s-48000Hz-32bit-2.93Hz-24000Hz.wav.
Speakers can be recorded in any order, here we'll start from front left and continue clockwise.
 |
Step 1 Looking 30 degrees right of the speaker. In other words the speaker is 30 degrees to your left. This is the direction of front left speaker. Run python recorder.py --play="data/sweep-seg-FL-stereo-6.15s-48000Hz-32bit-2.93Hz-24000Hz.wav" --record="data/my_hrir/FL.wav". |
 |
Step 2 Looking directly at the speaker. Run python recorder.py --play="data/sweep-seg-FL-stereo-6.15s-48000Hz-32bit-2.93Hz-24000Hz.wav" --record="data/my_hrir/FC.wav". |
 |
Step 3 Looking 30 degrees left of the speaker. Run python recorder.py --play="data/sweep-seg-FL-stereo-6.15s-48000Hz-32bit-2.93Hz-24000Hz.wav" --record="data/my_hrir/FR.wav". |
 |
Step 4 Looking 90 degrees left of the speaker. Run python recorder.py --play="data/sweep-seg-FL-stereo-6.15s-48000Hz-32bit-2.93Hz-24000Hz.wav" --record="data/my_hrir/SR.wav". |
 |
Step 5 Looking 150 degrees left of the speaker. Run python recorder.py --play="data/sweep-seg-FL-stereo-6.15s-48000Hz-32bit-2.93Hz-24000Hz.wav" --record="data/my_hrir/BR.wav". |
 |
Step 6 Looking 150 degrees right of the speaker. Run python recorder.py --play="data/sweep-seg-FL-stereo-6.15s-48000Hz-32bit-2.93Hz-24000Hz.wav" --record="data/my_hrir/BL.wav". |
 |
Step 7 Looking 90 degrees right of the speaker. Run python recorder.py --play="data/sweep-seg-FL-stereo-6.15s-48000Hz-32bit-2.93Hz-24000Hz.wav" --record="data/my_hrir/SL.wav". |
Impulcifer can correct room acoustics with equalization based on frequency response measurement. The measurements need to be done with a calibrated measurement microphone instead of the binaural microphones which were used for all the other measurements. MiniDSP UMIK-1 is a popular measurment microphone which comes with the calibration data.

The idea is perform the room measurement with the measurement microphone in the same position where the binaural room measurements were done. Room acoustics change quite a lot depending on the location and therefore it's important to ensure the positioning is as precise as possible. Impulcifer has the added benefit that the "listening position" doesn't change since the BRIR is a snapshot in time and space. This makes it possible to control the room measurement microphone placement with utmost precision.
webcam.html contains a small webapp which can help in this task. Open the file in browser and you'll be able to take photos of your listening position while measuring binaural room responses. The webapp will then overlay the live camera feed with the photo which makes it easy to place the room measurement microphone in the same location as where the binaural microphone capsules were at each stage. Picture below is a screenshot of the webapp taken during measurement session with two speakers. There are 7 slots for 7 photos and the currently active slot is overlaid with the live feed from the camera. The grey stick is the room measurement microphone which is placed at the location of the ear canal entrance of left ear.

Impulcifer can handle room measurments for each individual speaker-ear pair. The room measurement filenames tell Impulcifer which speaker-ear pairs should be corrected based on which room measurements. The file name convention is room-<speaker1>,<speaker2>,<...>,<speakerN>-<left|right>.wav where the speakers are the virtual speakers and the last part is either left or right, indicating the ear. The file name for the situation in the picture above would have to be room-FL,FR-left.wav since this position will capture the front left and right virtual speakers using two physical speakers and the microphone is placed at the left ear. Getting room measurements for all 7 virtual speakers and 2 ears using only one physical speaker would require 14 separate recordings with a single room measurement microphone.
This level of precision is optional however. The process can be made easier by recording only one room measurement. In this case the file name lacks the last part indicating the ear and would be for example room-FL,FR.wav. The generic measurement can be repeated for a multi-position measurement by adding an argument --append which will tell recorder.py that the new tracks are to be appended to the end of the existing file.
It is also possible to combine these two methods. A more precise measurement could be done for front speakers only and the rest can be handled with the generic measurement.
Room correction is no replacement for good speakers and physical room treatment. Speakers often have issues which cannot be corrected with equalization and the room frequency response measurement doens't represent the room acoustics the same way as human ears and brains perceive it. Optimal results will be had in a professionally treated room with high quality speaker. Live room correction can be used during the binaural and room measurements but if the live room correction has been correctly set up, Impulcifer's room correction might not change the results a lot. Room correction must be used during room measurements if it was used during binaural measurements!
recorder.py can be used for room measurements too. Some audio interfaces and USB connected measurement microphones will always output stereo signal even if the microphone itself is only mono. Impulcifer however cannot handle stereo room measurements and therefore it's required to force the recordings to mono. recorder.py can do this with an option --channels=1. Room measurement microphone can be made the default input device in the operating system's audio settings or by specifying the input device for recorder with --input_device="Umik-1".
All of the following commands assume the room measurement microphone is MiniDSP UMIK-1.
| Setup | Command |
|---|---|
| Step 1 Place the microphone at the location of the left ear during binaural measurements | python recorder.py --play="data/sweep-seg-FL,FC,FR,SR,BR,BL,SL-7.1-6.15s-48000Hz-32bit-2.93Hz-24000Hz.wav" --record="data/my_hrir/room-FL,FC,FR,SR,BR,BL,SL-left.wav" --input_device="Umik-1" --channels=1 |
| Step 2 Place the microphone at the location of the right ear during binaural measurements | python recorder.py --play="data/sweep-seg-FL,FC,FR,SR,BR,BL,SL-7.1-6.15s-48000Hz-32bit-2.93Hz-24000Hz.wav" --record="data/my_hrir/room-FL,FC,FR,SR,BR,BL,SL-right.wav" --input_device="Umik-1" --channels=1 |
Alternatively it's possible to do only one measurement by placing the microphone in the location of the center of the head during binaural measurements.
python recorder.py --play="data/sweep-seg-FL,FC,FR,SR,BR,BL,SL-7.1-6.15s-48000Hz-32bit-2.93Hz-24000Hz.wav" --record="data/my_hrir/room-FL,FC,FR,SR,BR,BL,SL.wav" --input_device="Umik-1" --channels=1| Setup | Command |
|---|---|
| Step 1 Place the microphone at the location of the left ear during FL, FR binaural measurements | python recorder.py --play="data/sweep-seg-FL,FR-stereo-6.15s-48000Hz-32bit-2.93Hz-24000Hz.wav" --record="data/my_hrir/room-FL,FR-left.wav" --input_device="Umik-1" --channels=1 |
| Step 2 Place the microphone at the location of the right ear during FL and FR binaural measurements | python recorder.py --play="data/sweep-seg-FL,FR-stereo-6.15s-48000Hz-32bit-2.93Hz-24000Hz.wav" --record="data/my_hrir/room-FL,FR-right.wav" --input_device="Umik-1" --channels=1 |
| Step 3 Place the microphone at the location of the left ear during SR, BR binaural measurements | python recorder.py --play="data/sweep-seg-FL,FR-stereo-6.15s-48000Hz-32bit-2.93Hz-24000Hz.wav" --record="data/my_hrir/room-SR,BR-left.wav" --input_device="Umik-1" --channels=1 |
| Step 4 Place the microphone at the location of the right ear during SR, BR binaural measurements | python recorder.py --play="data/sweep-seg-FL,FR-stereo-6.15s-48000Hz-32bit-2.93Hz-24000Hz.wav" --record="data/my_hrir/room-SR,BR-right.wav" --input_device="Umik-1" --channels=1 |
| Step 5 Place the microphone at the location of the left ear during BL, SL binaural measurements | python recorder.py --play="data/sweep-seg-FL,FR-stereo-6.15s-48000Hz-32bit-2.93Hz-24000Hz.wav" --record="data/my_hrir/room-BL,SL-left.wav" --input_device="Umik-1" --channels=1 |
| Step 6 Place the microphone at the location of the right ear during BL, SL binaural measurements | python recorder.py --play="data/sweep-seg-FL,FR-stereo-6.15s-48000Hz-32bit-2.93Hz-24000Hz.wav" --record="data/my_hrir/room-BL,SL-right.wav" --input_device="Umik-1" --channels=1 |
| Step 6 A Place the microphone at the location of the left ear during FC measurement if the FC was measured with FL | python recorder.py --play="data/sweep-seg-FL-stereo-6.15s-48000Hz-32bit-2.93Hz-24000Hz.wav" --record="data/my_hrir/room-FC-left.wav" --input_device="Umik-1" --channels=1 |
| Step 6 B Place the microphone at the location of the left ear during FC measurement if the FC was measured with FR | python recorder.py --play="data/sweep-seg-FR-stereo-6.15s-48000Hz-32bit-2.93Hz-24000Hz.wav" --record="data/my_hrir/room-FC-left.wav" --input_device="Umik-1" --channels=1 |
| Step 7 A Place the microphone at the location of the right ear during FC measurement if the FC was measured with FL | python recorder.py --play="data/sweep-seg-FL-stereo-6.15s-48000Hz-32bit-2.93Hz-24000Hz.wav" --record="data/my_hrir/room-FC-right.wav" --input_device="Umik-1" --channels=1 |
| Step 7 B Place the microphone at the location of the right ear during FC measurement if the FC was measured with FR | python recorder.py --play="data/sweep-seg-FR-stereo-6.15s-48000Hz-32bit-2.93Hz-24000Hz.wav" --record="data/my_hrir/room-FC-right.wav" --input_device="Umik-1" --channels=1 |
Alternatively it's possible to do only one measurement by placing the microphone in the location of the center of the head during binaural measurements.
python recorder.py --play="data/sweep-seg-FL,FR-stereo-6.15s-48000Hz-32bit-2.93Hz-24000Hz.wav" --record="data/my_hrir/room-FL,FR.wav" --input_device="Umik-1" --channels=1The same measurement applies for all virtual speakers pairs since all of the binaural measurements were made with two physical speakers.
Copy the file to cover the other speakers too.
# Windows
copy data\my_hrir\room-FL,FR.wav data\my_hrir\room-SR,BR.wav
copy data\my_hrir\room-FL,FR.wav data\my_hrir\room-BL,SL.wav
# if FC was recorded with FL
copy data\my_hrir\room-FL,FR.wav data\my_hrir\room-FC,X.wav
# if FC was recorded with FR
copy data\my_hrir\room-FL,FR.wav data\my_hrir\room-X,FC.wav

# Linux and Max
cp data/my_hrir/room-FL,FR.wav data/my_hrir/room-SR,BR.wav
cp data/my_hrir/room-FL,FR.wav data/my_hrir/room-BL,SL.wav
# if FC was recorded with FL
cp data/my_hrir/room-FL,FR.wav data/my_hrir/room-FC,X.wav
# if FC was recorded with FR
cp data/my_hrir/room-FL,FR.wav data/my_hrir/room-X,FC.wav
The X in the last file name tells Impulcifer to omit the track.
| Setup | Command |
|---|---|
| Step 1 Place the microphone at the location of the left ear during FL binaural measurement | python recorder.py --play="data/sweep-seg-FL-stereo-6.15s-48000Hz-32bit-2.93Hz-24000Hz.wav" --record="data/my_hrir/room-FL-left.wav" --input_device="Umik-1" --channels=1 |
| Step 2 Place the microphone at the location of the right ear during FL binaural measurement | python recorder.py --play="data/sweep-seg-FL-stereo-6.15s-48000Hz-32bit-2.93Hz-24000Hz.wav" --record="data/my_hrir/room-FL-right.wav" --input_device="Umik-1" --channels=1 |
| Step 3 Place the microphone at the location of the left ear during FC binaural measurement | python recorder.py --play="data/sweep-seg-FL-stereo-6.15s-48000Hz-32bit-2.93Hz-24000Hz.wav" --record="data/my_hrir/room-FC-left.wav" --input_device="Umik-1" --channels=1 |
| Step 4 Place the microphone at the location of the right ear during FC binaural measurement | python recorder.py --play="data/sweep-seg-FL-stereo-6.15s-48000Hz-32bit-2.93Hz-24000Hz.wav" --record="data/my_hrir/room-FC-right.wav" --input_device="Umik-1" --channels=1 |
| Step 5 Place the microphone at the location of the left ear during FR binaural measurement | python recorder.py --play="data/sweep-seg-FL-stereo-6.15s-48000Hz-32bit-2.93Hz-24000Hz.wav" --record="data/my_hrir/room-FR-left.wav" --input_device="Umik-1" --channels=1 |
| Step 6 Place the microphone at the location of the right ear during FR binaural measurement | python recorder.py --play="data/sweep-seg-FL-stereo-6.15s-48000Hz-32bit-2.93Hz-24000Hz.wav" --record="data/my_hrir/room-FR-right.wav" --input_device="Umik-1" --channels=1 |
| Step 7 Place the microphone at the location of the left ear during SR binaural measurement | python recorder.py --play="data/sweep-seg-FL-stereo-6.15s-48000Hz-32bit-2.93Hz-24000Hz.wav" --record="data/my_hrir/room-SR-left.wav" --input_device="Umik-1" --channels=1 |
| Step 8 Place the microphone at the location of the right ear during SR binaural measurement | python recorder.py --play="data/sweep-seg-FL-stereo-6.15s-48000Hz-32bit-2.93Hz-24000Hz.wav" --record="data/my_hrir/room-SR-right.wav" --input_device="Umik-1" --channels=1 |
| Step 9 Place the microphone at the location of the left ear during BR binaural measurement | python recorder.py --play="data/sweep-seg-FL-stereo-6.15s-48000Hz-32bit-2.93Hz-24000Hz.wav" --record="data/my_hrir/room-BR-left.wav" --input_device="Umik-1" --channels=1 |
| Step 10 Place the microphone at the location of the right ear during BR binaural measurement | python recorder.py --play="data/sweep-seg-FL-stereo-6.15s-48000Hz-32bit-2.93Hz-24000Hz.wav" --record="data/my_hrir/room-BR-right.wav" --input_device="Umik-1" --channels=1 |
| Step 11 Place the microphone at the location of the left ear during BL binaural measurement | python recorder.py --play="data/sweep-seg-FL-stereo-6.15s-48000Hz-32bit-2.93Hz-24000Hz.wav" --record="data/my_hrir/room-BL-left.wav" --input_device="Umik-1" --channels=1 |
| Step 12 Place the microphone at the location of the right ear during BL binaural measurement | python recorder.py --play="data/sweep-seg-FL-stereo-6.15s-48000Hz-32bit-2.93Hz-24000Hz.wav" --record="data/my_hrir/room-BL-right.wav" --input_device="Umik-1" --channels=1 |
| Step 13 Place the microphone at the location of the left ear during SL binaural measurement | python recorder.py --play="data/sweep-seg-FL-stereo-6.15s-48000Hz-32bit-2.93Hz-24000Hz.wav" --record="data/my_hrir/room-SL-left.wav" --input_device="Umik-1" --channels=1 |
| Step 14 Place the microphone at the location of the right ear during SL binaural measurement | python recorder.py --play="data/sweep-seg-FL-stereo-6.15s-48000Hz-32bit-2.93Hz-24000Hz.wav" --record="data/my_hrir/room-SL-right.wav" --input_device="Umik-1" --channels=1 |
Alternatively it's possible to do only one measurement by placing the microphone in the location of the center of the head during binaural measurements.
python recorder.py --play="data/sweep-seg-FL-stereo-6.15s-48000Hz-32bit-2.93Hz-24000Hz.wav" --record="data/my_hrir/room.wav" --input_device="Umik-1" --channels=1The same measurement applies for all virtual speakers since all of the binaural measurements were made with a single physical speaker.