Recording with Audacity
Audacity is a free audio workstation and while being simpler than it's commercial counterparts it has all the features needed for recording sine sweep measurements. Download and install Audacity from Audacity's website.
Audacity can do overdub recordings meaning that Audacity will play back the existing tracks at the same time as it is recording new tracks. Overdub recordings need to be enabled in the options for this. Go to Edit -> Preferences -> Recording and select "Play other tracks while recording (overdub)" and "Record on a new track". Overdub recordings aren't strictly necessary but make the process easier when playing the sine sweeps on one or two speakers.
When saving the recording as WAV file Audacity needs to create multi-track file. This too needs to be enabled from the options. Go to Edit -> Preferences -> Import / Export and select "Use custom mix". 
Once you have the settings configured you can start recording. Open up exponential sine sweep sequence file from data\sweep-seg-FL,FR-stereo-6.15s-48000Hz-32bit-2.93Hz-24000Hz.wav in audacity. We'll record on two speakers in this guide but it is possible to record even full 7 channel surround sound setup with just one speaker. 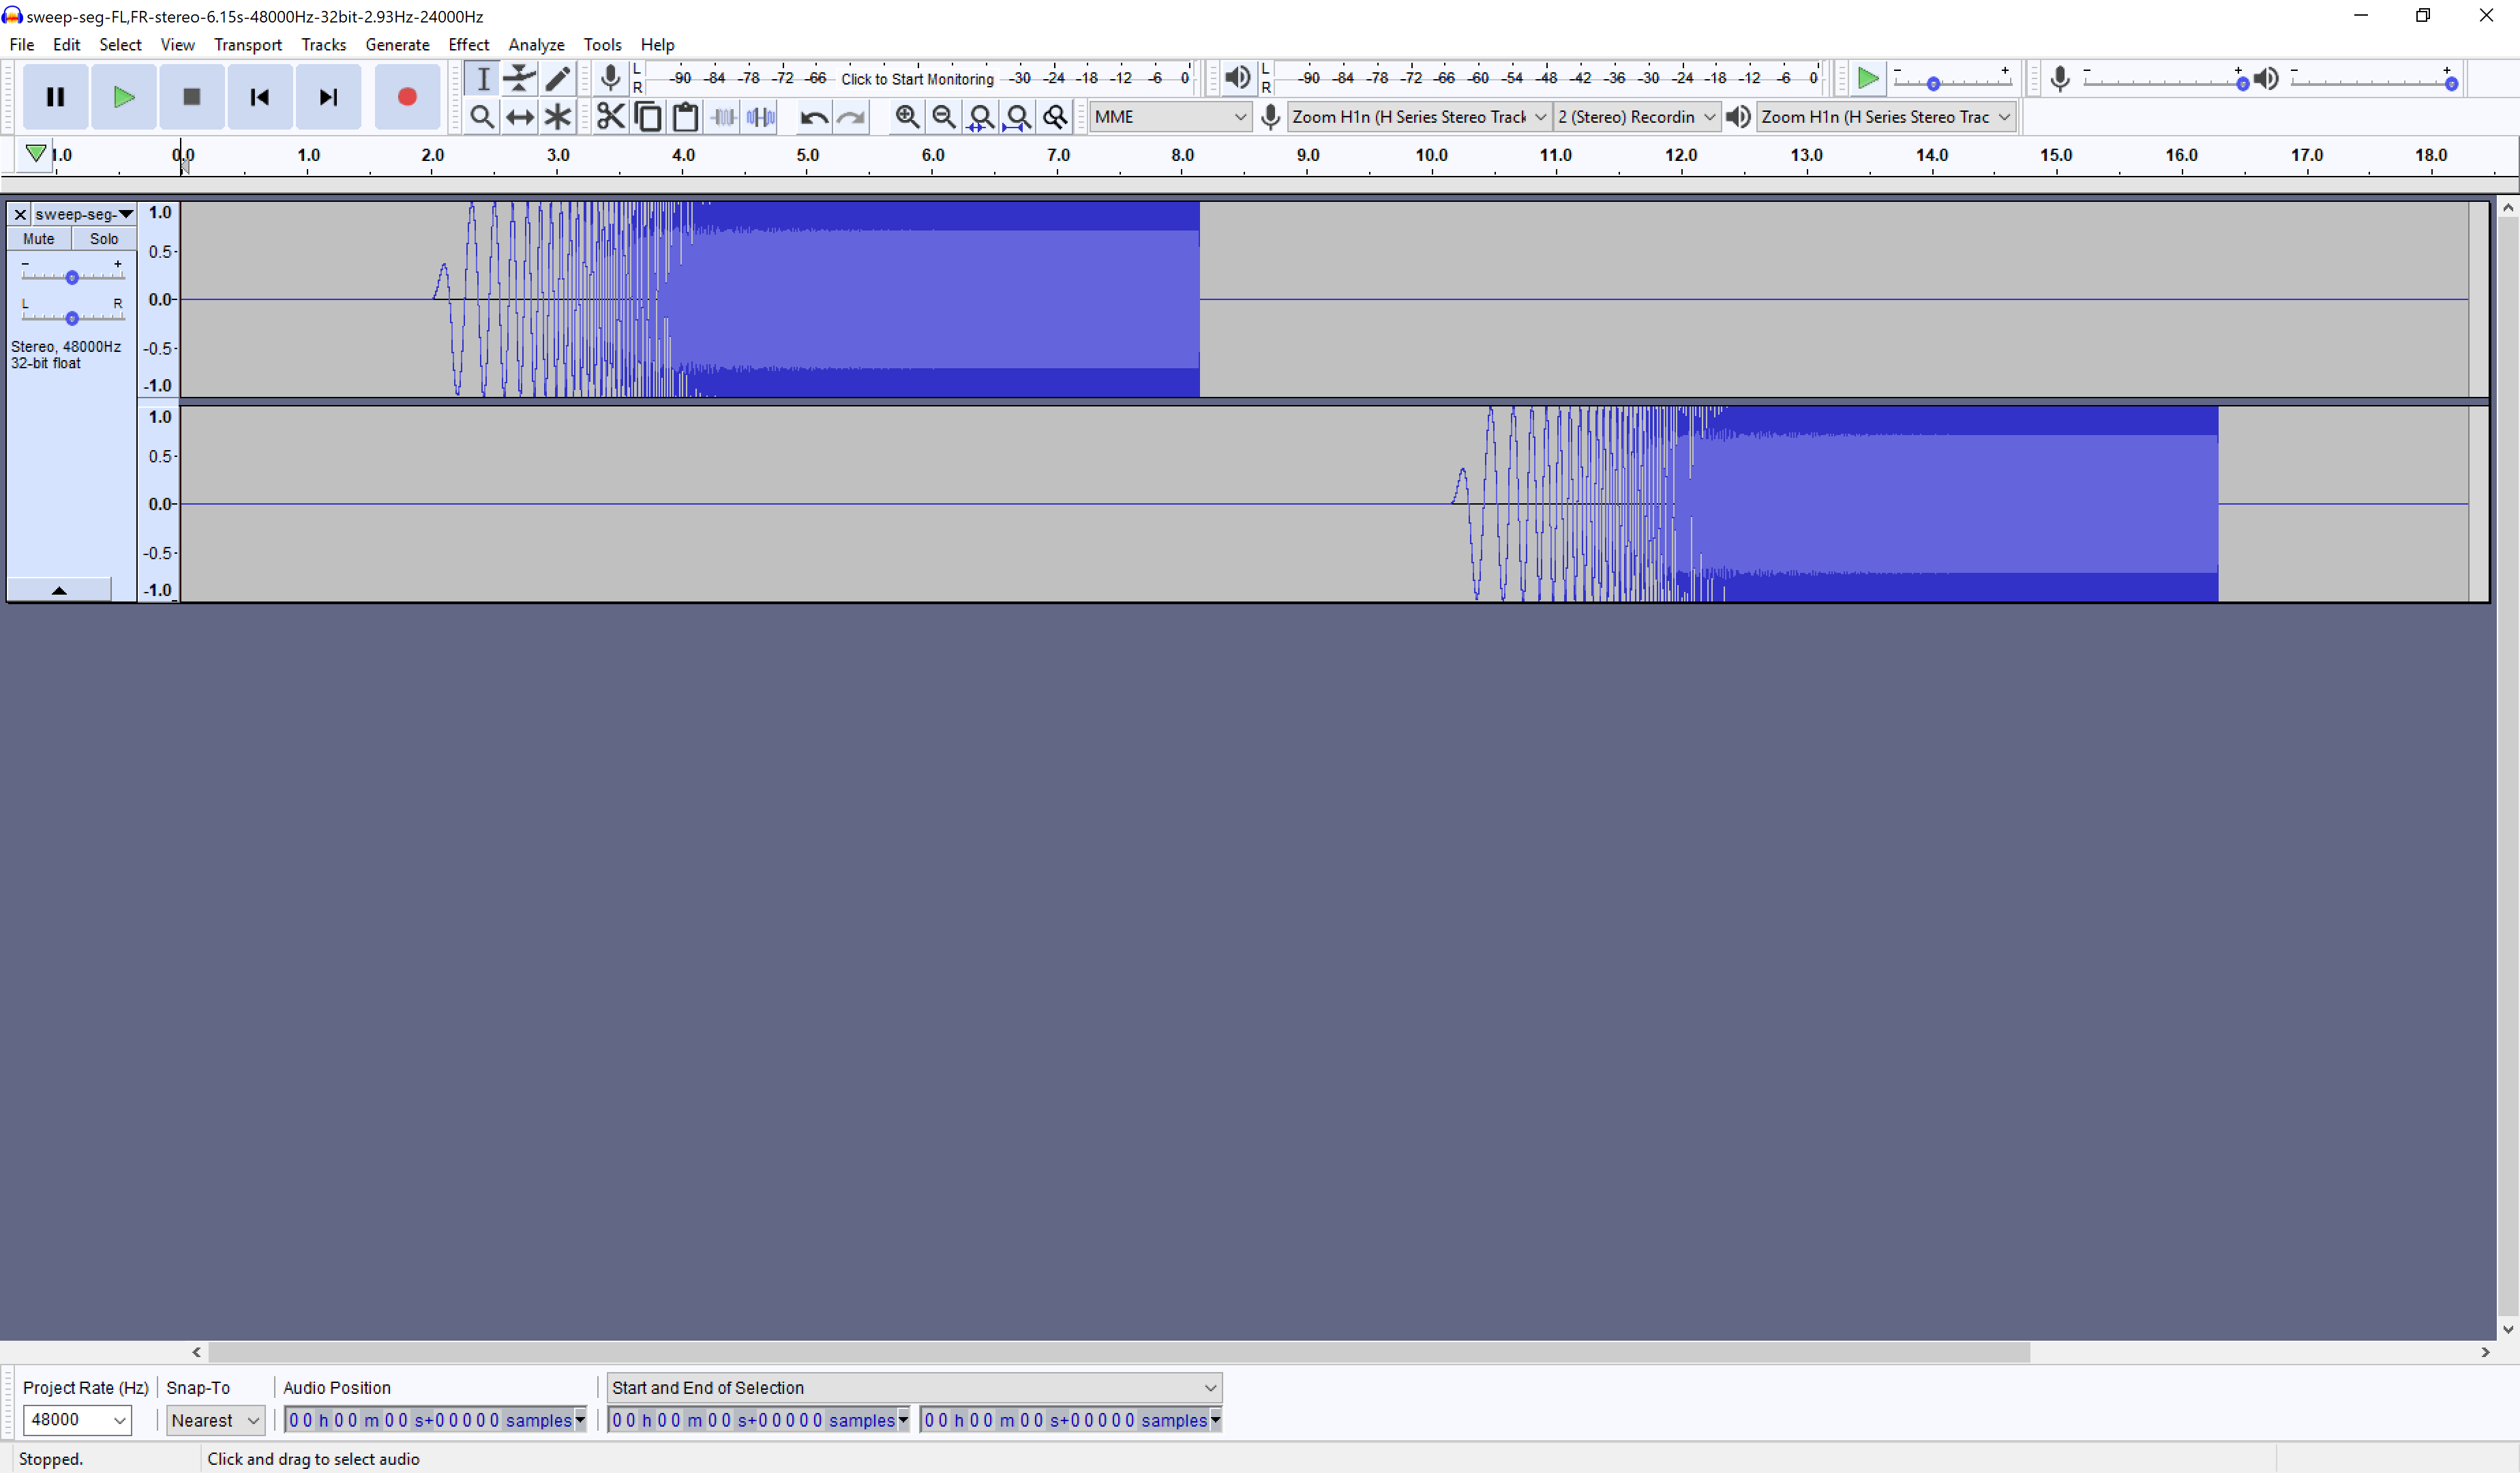
Input and output devices should be correctly selected if you set them as default devices in Windows Sound Settings but check once more in the tool bar that input and output device is correct (Zoom H1n in this case) and "2 (Stereo) Recording" is selected as the recording format for the input device.
Now you're ready to start recording. Headphones should be measured first because putting the headphones on and taking them off might move the microphones if they are not secured well and while this isn't necessarily catastrophic we'll want the microphones to be in the same position for both the headphone measurement and the speaker measurement. For this reason the headphone measurement has to be made again every time they are taken off, so you cannot reuse headphone measurement from one measurement session with the future measurements.
Put on your headphones and set the output volume to a comfortable high level. High volume is better because it ensures higher signal to noise ratio but the volume shouldn't be so high that listening to the sine sweep is uncomfortable. Also too high volume might cause significant distortion on certain headphones and speakers. If you have any existing audio processing going on, you should disable them now.
Click the big red record button to start recording. Single ascending frequency should start playing after two seconds of silence. End the recording with stop button after the entire sweep sequence has played. Recording has to be longer than the sweep sequence. 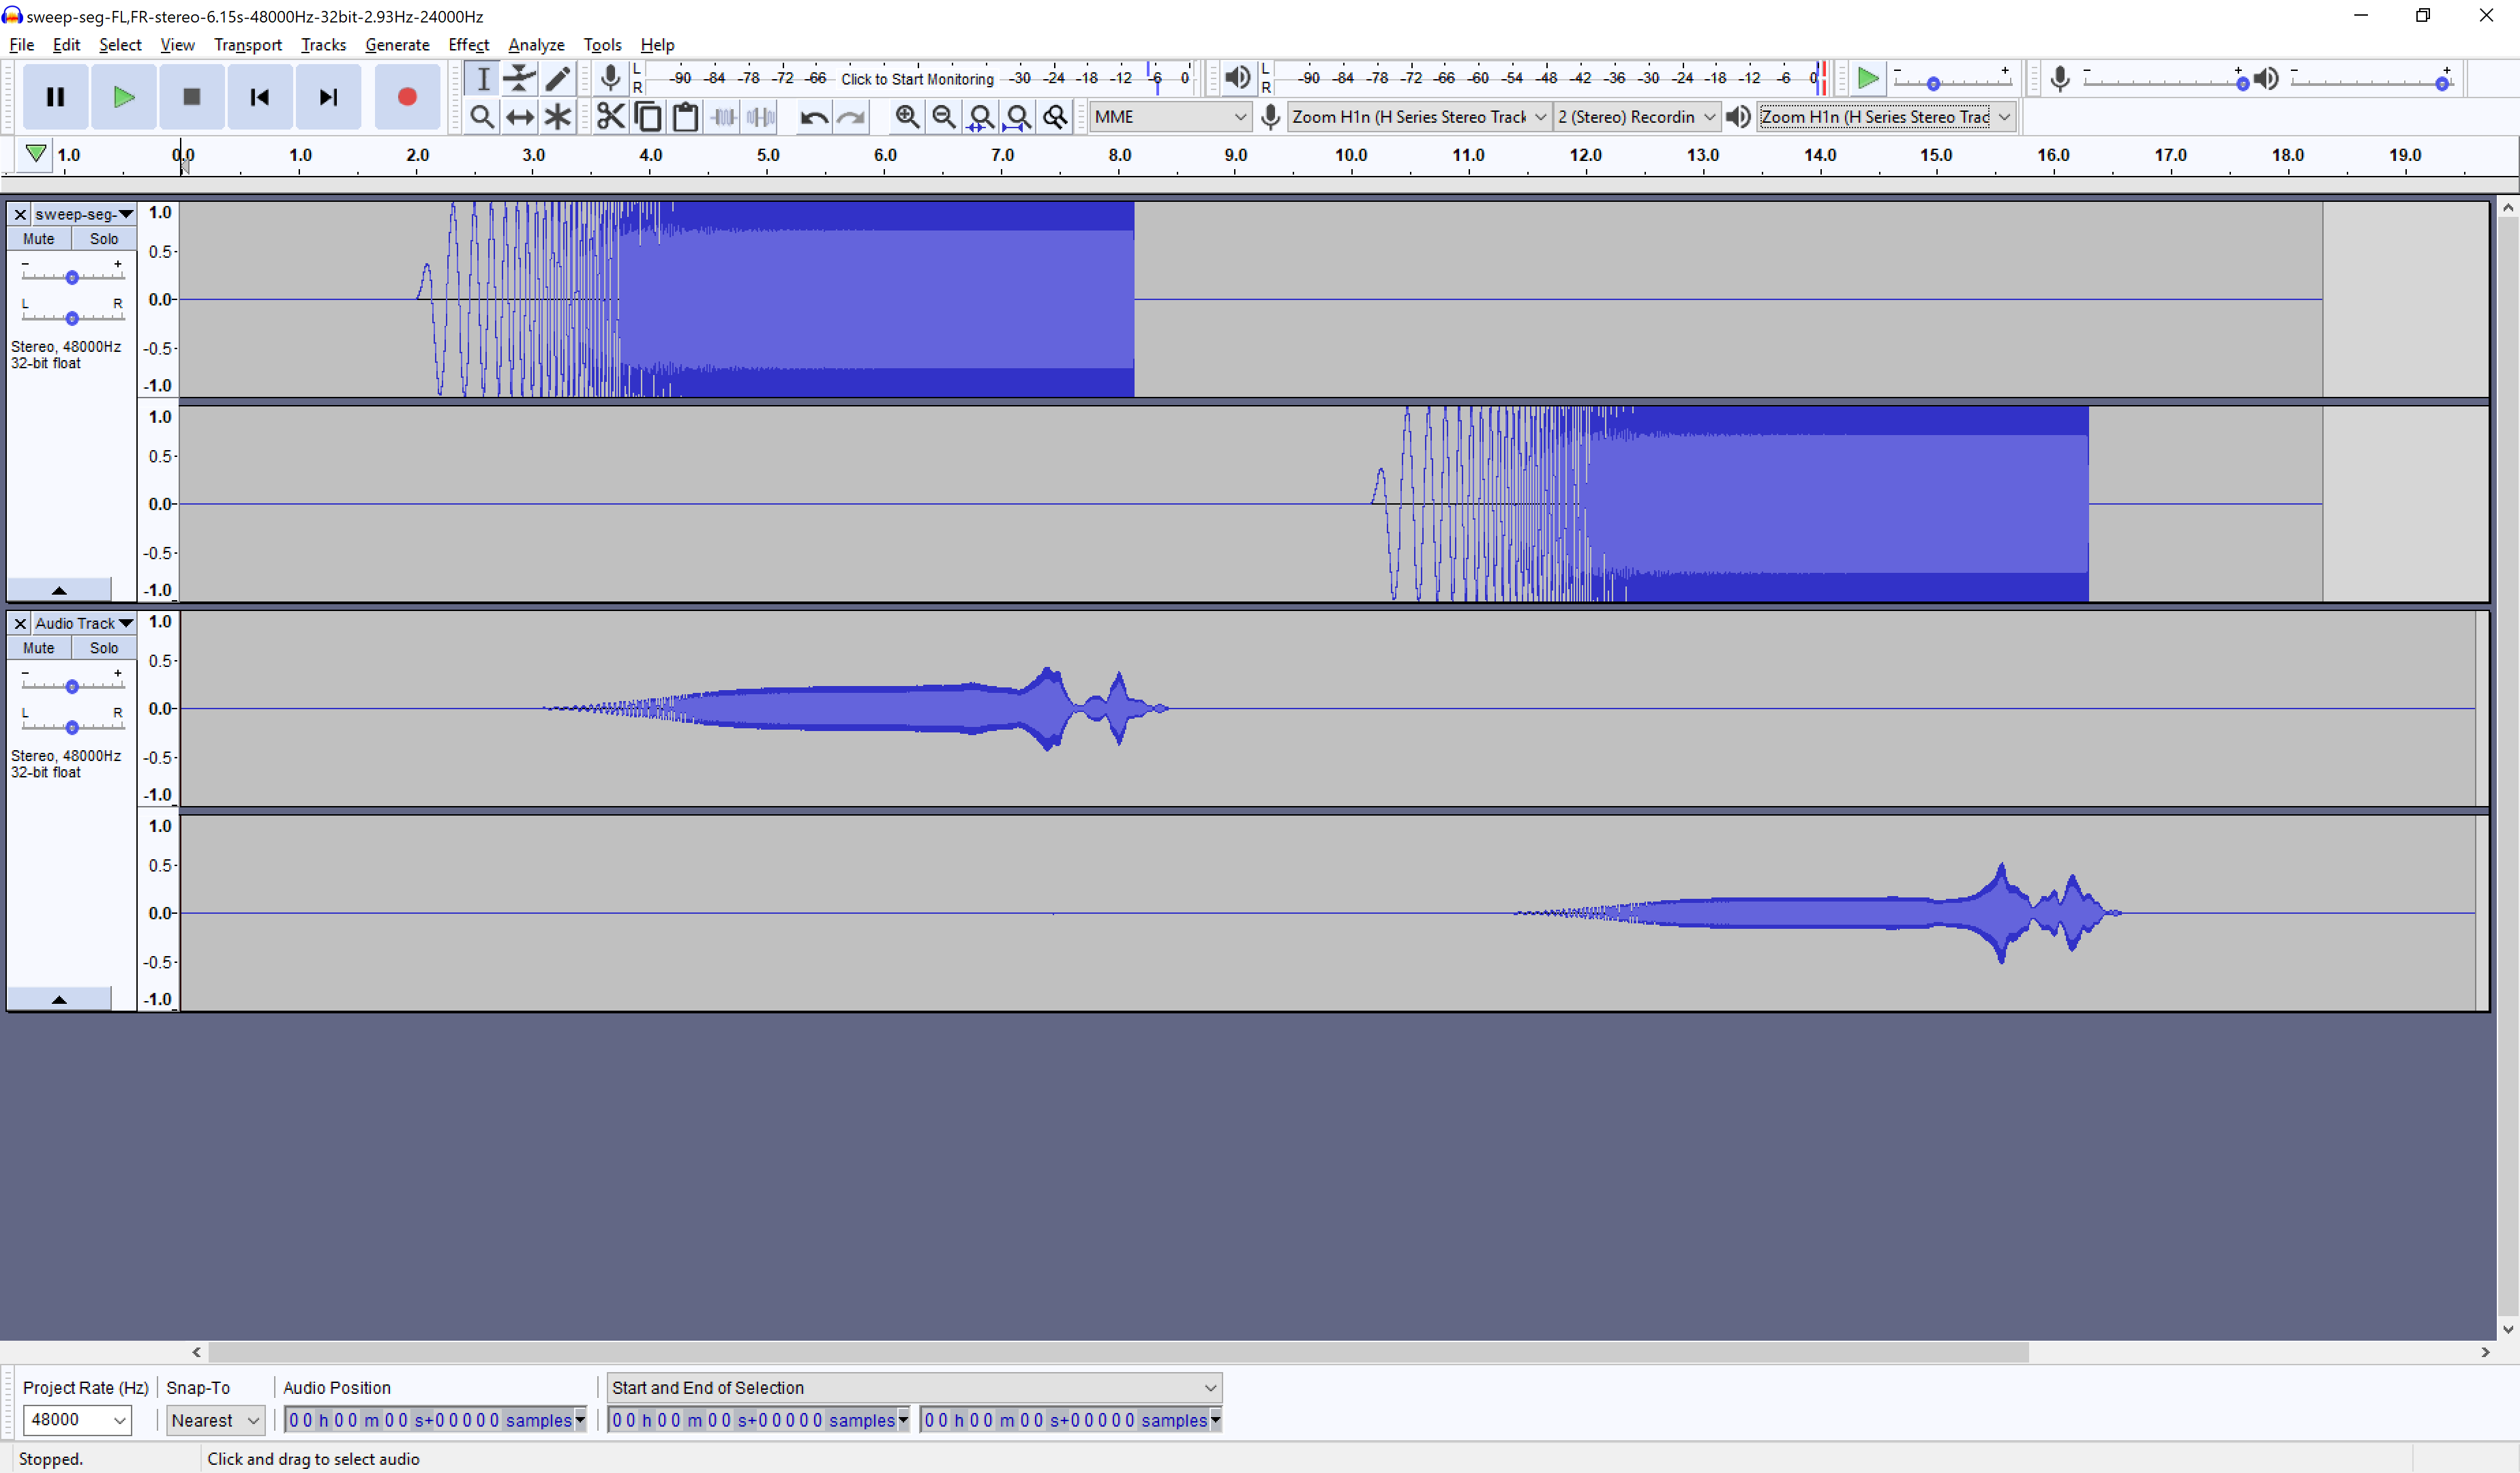
The waveform should reach close to maximum but should never touch it. If there are samples that are at the maximum then most likely they went over it and clipped. Clipping causes massive distortion and will ruin the measurement. If the highest point of the waveform is close to maximum (or lowest is close to minimum) you can check if they are in fact within the limits by selecting the recorded track, opening Amplify tool from Effect -> Amplify, setting "New Peak Amplitude" to 0.0 dB and looking at the "Amplification (dB)" value. If the value is above zero dB you are safe. 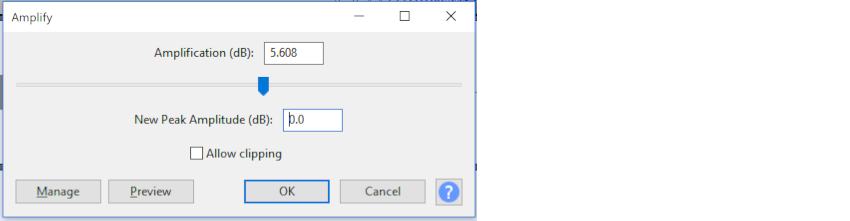
Often the level is not going to be within optimal limits the first try and if this is the case you need to adjust mic input gain. Typically the audio interface has a physical knob for the microphone gain. If the recorded track is very low on volume, increase the mic gain and reduce the gain if the waveform clipped. Run the recording again after adjusting the mic gain and remove the old track from the small x button on the top left corner of the track.
When you have successfully recorded the frequency sweep with headphones you need to save the stereo track to a WAV file. Select the track if not selected already and go to File -> Export -> Export Selected Audio. Create a new folder inside Impulcifer-master\data called my_hrir and open the folder. Name the file as headphones.wav select file type as "WAV (Microsoft) 32-bit float PCM" and click Save. Audacity will ask you about the mix, if you selected custom mix from the settings earlier, and you should select the two channel output where first track is mapped to the first output channel and the second track to second output channel. 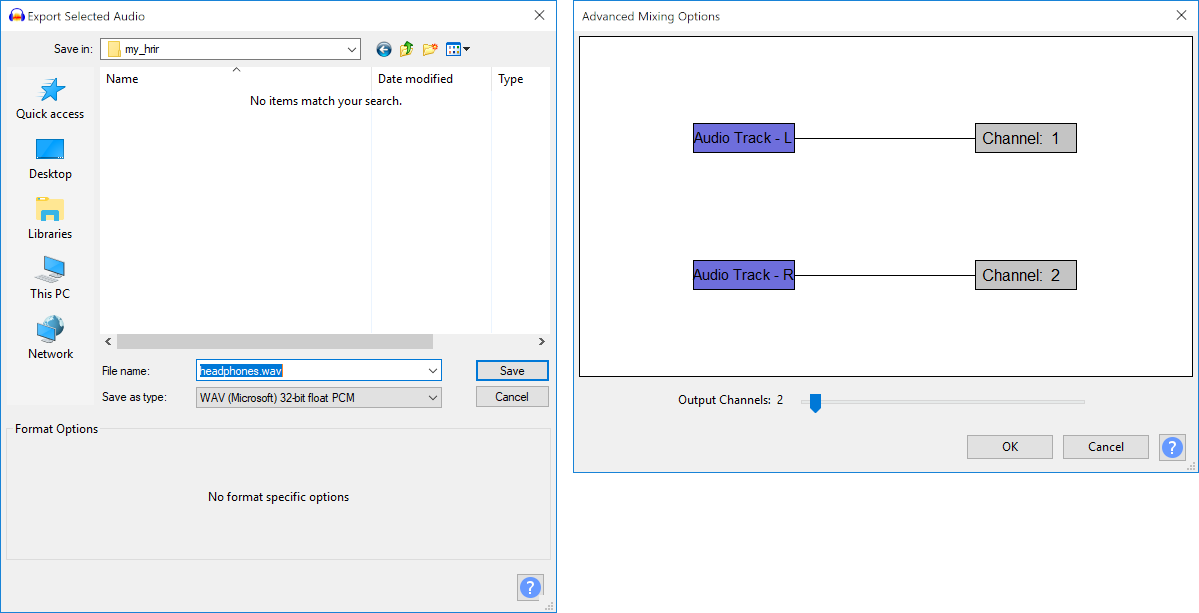
Speaker recording for a stereo setup goes exactly like the headphone recording. Unplug your headphones and set the volume on speakers to a comfortable high level. Only the original sweep sequence must be playing and to prevent Audacity from playing the headphone recording as well you need to mute it. Click the "Solo" button on the first track control panel below the delete button. All other tracks turns grey.
Start recording with the same red record button, wait silently and without moving until the sweep sequence has played entirely and stop the recording with the stop button. 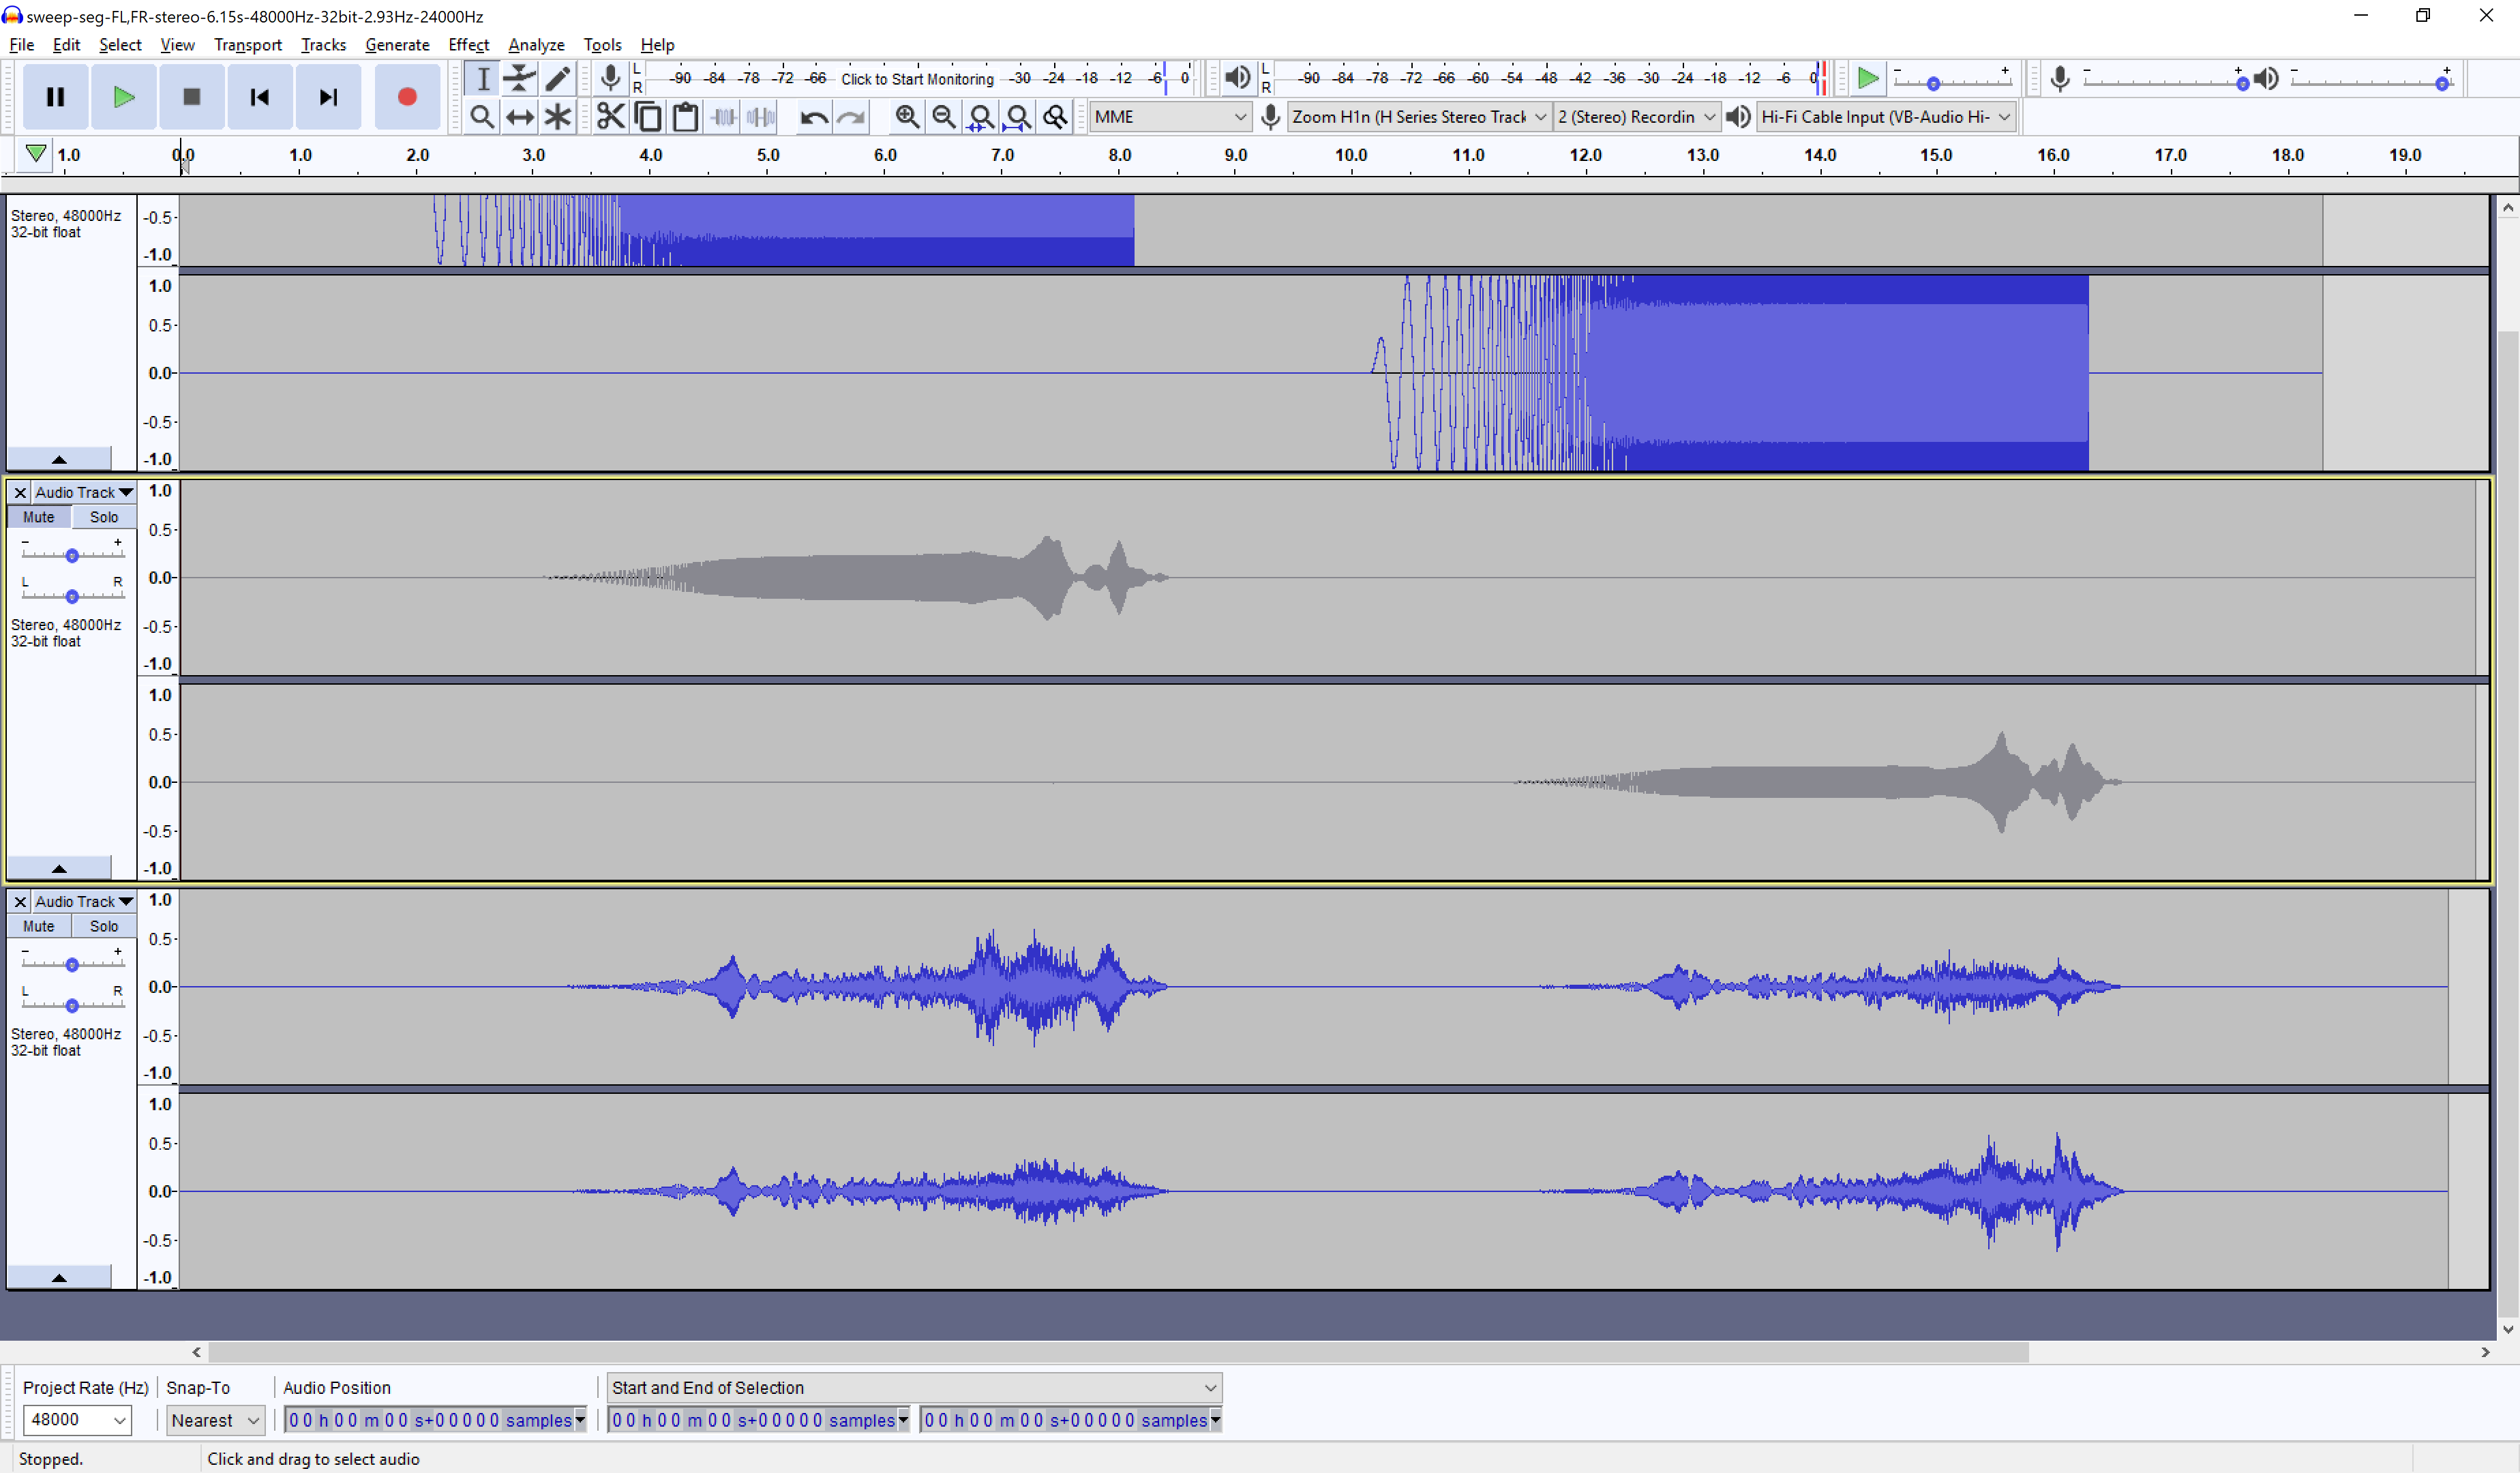
Check the speaker recording levels and export to a file called FL,FR.wav inside the same folder.
Congratulations, you have your first HRIR measurement finished. Now you need to process the sine sweep recordings into head related impulse responses with Impulcifer.
python impulcifer.py --dir_path=data\my_hrir --test_signal=data\sweep-6.15s-48000Hz-32bit-2.93Hz-24000Hz.wavThere are multiple ways of creating surround HRIR files, even without having an access to a surround speaker setup. You can experiment with different ways and see which provide the best results for you.
The simplest way is to use 7.1 surround speaker setup to play sine sweeps on all 7 speakers. This is an easy and fast way to do the recording because the whole thing will be done in less than a minute. The obvious caveat here is that you'll need an access to 7.1 speaker system. If the side and rear speakers are not placed well then recording surround HRIR with stereo pair or mono might turn out to be better.
Most of the measurement process is the same as for stereo recording. Surround sine sweep sequence WAV file is required and since Audacity cannot play more than two channels at a time, VLC is required for the playback. Recording is still done with Audacity.
Multi-channel sine sweep sequence can be generated with impulse_response_estimator.py
python impulse_response_estimator.py --dir_path=data --fs=48000 --speakers=FL,FC,FR,SR,BR,BL,SL --tracks=7.1 --length=5This will generate file where the sine sweeps in the order given by --speakers, so starting from front left and continuing clock-wise. Output test signal and the sequence will be written to data folder.
Open the generated sine sweep sequence file data\sweep-seg-FL,FC,FR,SR,BR,BL,SL-7.1-6.15s-48000Hz-32bit-2.93Hz-24000Hz.wav in VLC media player and stop the playback if it started automatically. Next open Audacity without any files opened (empty project). To play and record at the same time you have to first start recording in audacity and immediately after start playback in VLC from the beginning of the file. Impulcifer has a small tolerance for delays but it's better to be quite fast. You can have both windows open side by side, keep Audacity as the "active" window and move mouse cursor on top of play button on VLC. Then hit Shift+R to start recording in Audacity and click mouse button immediately after to start playback in VLC. You should have sine sweep sequence playing and Audacity recording a new track. You can of course continue on the same Audacity project if you made headphone compensation again and you have it already open, just remember to mute all tracks avoid playing them.

When the recording has finished, select the track and export it as WAV called FL,FC,FR,SR,BR,BL,SL.wav(File > Export > Export selected tracks).

Now you should have speaker recording and the headphone recording files and you can create 7 channel HRIR with Impulcifer
python impulcifer.py --dir_path=data\my_hrir --test_signal=data\sweep-6.15s-48000Hz-32bit-2.93Hz-24000Hz.wav7 channel HRIR can be recorded with a stereo speaker pair either by looking at 4 different directions or moving speakers around in the room. In both cases a stereo sequence sine sweep is used and 4 different recordings are made which are then exported from Audacity as one WAV that has 16 tracks.
Standard 7.1 surround speaker setup defines the speaker angles to be
- FL 30 degrees left
- FC 0 degrees, directly in front
- FR 30 degrees right
- SR 90 degrees right
- BR 150 degrees right
- BL 150 degrees left
- SL 90 degrees left
All but front center speaker are 60 degrees apart from it's neighbors and this is assumed and required to get the speaker angles right in the 7 channel HRIR. If the angle between the physical left speaker and the physical right speaker is less than 60 degrees, there will be more than 60 degrees between virtual side left and virtual front left, between virtual side right and virtual front right and between virtual back left and virtual back right. Having an angle greater than 60 degrees between speakers will often cause a gap in imaging in the middle of the two speakers. This might not be catastrophic because pinpoint imaging outside of front speakers is not crucial.
Similarly if the angle between the physical speakers is greater than 60 degrees then there might be a gap in the center of the sound image. This is going to be a lot worse than the previous alternative because vocals and other important things are often placed in the middle of the front speakers' image. Fortunately the speaker angle can be adjusted very easily without moving the speakers. Simply move closer towards the front center for larger speaker angle or further away for smaller speaker angle.
Let's take a look at the 4 stages of the recording process. This example is using sine sweep sequence with two tracks, first is the left channel and the second is the right channel. In every step the physical left speaker plays the sine sweep first, followed by a short silence and the right speaker sine sweep. Just like in stereo recording process
 |
Step 1 Looking in the middle of the speakers. This is what is done during stereo recording process. The physical left speaker stays front left speaker and the physical right speaker stays front right speaker. |
 |
Step 2 Looking 120 degrees left. The physical left speaker is at the direction of side right speaker (90 degrees right) and the physical right speaker is at the direction of back right speaker (150 degrees right). |
 |
Step 3 Looking 120 degrees right. The physical left speaker is at the direction of back left speaker (150 degrees left) and the physical right speaker is at the direction of side left speaker (90 degrees left). |
 |
Step 4 Looking directly at the physical right speaker which becomes front center speaker. The physical left speaker doesn't match any of the surround setup speaker directions so we will ignore it when processing. |
Select all four stereo tracks in Audacity and export the selected tracks as WAV file called FL,FR,SR,BR,BL,SL,X,FC.wav.
X is there in the --speakers to tell Impulcifer to ignore the sine sweep played on the left speaker during step 4. Step 4 could have been done by looking directly at the left speaker in which case the speaker order would have been --speakers=FL,FR,SR,BR,BL,SL,FC,X.

Impulcifer is ran similarly to the previous cases
python impulcifer.py --dir_path=data\my_hrir --test_signal=data\sweep-6.15s-48000Hz-32bit-2.93Hz-24000Hz.wavAlternative way to the panorama method above is to move the speakers around in the room. The same principle holds that in each step the physical speakers' directions must match some of the virtual speakers in the HRIR. Here is one option how to do it.
|
Step 1 Normal front speaker recording. |
 |
Step 2 The physical left speaker moved to left side and the physical right speaker moved to the right side. |
 |
Step 3 The physical left speaker moved to the location of back left speaker and the physical right speaker moved to the location of the back right speaker. |
 |
Step 4 The physical left speaker moved to the center and the physical right speaker is at it's own position. The sine sweep played at the right speaker will be ignored because we already have the front right speaker recording. |
Once again the speaker order has changed and the file needs to have name FL,FR,SL,SR,BL,BR,FC,X.wav.
python impulcifer.py --dir_path=data\my_hrir --test_signal=data\sweep-6.15s-48000Hz-32bit-2.93Hz-24000Hz.wavRecording process with a single speaker is similar to two speakers but this time a mono sine sweep sequence is needed
python impulse_response_estimator.py --dir_path=data --fs=48000 --speakers=FL --tracks=mono --length=5Speakers can be recorded in any order, here we'll start from front left and continue clockwise.
 |
Step 1 Looking 30 degrees right of the speaker. In other words the speaker is 30 degrees to your left. This is the direction of front left speaker. |
 |
Step 2 Looking directly at the speaker |
 |
Step 3 Looking 30 degrees left of the speaker |
 |
Step 4 Looking 90 degrees left of the speaker |
 |
Step 5 Looking 150 degrees left of the speaker |
 |
Step 6 Looking 150 degrees right of the speaker |
 |
Step 7 Looking 90 degrees right of the speaker |
This time there will be 7 stereo tracks in Audacity which you need to select for exporting. The speaker order in this example was the same as in surround speaker setup recording process so export the tracks into a file called FL,FC,FR,SR,BR,BL,SL.wav
python impulcifer.py --dir_path=data\my_hrir --test_signal=data\sweep-6.15s-48000Hz-32bit-2.93Hz-24000Hz.wav