This code runs 2 types of tests against 1 or more ookla servers (defined in the settings.py file).
The first test is a multi-threaded test and then a single-threaded test.
The results are stored for each server for each type fo test, and then the highest speed is selected and displayed to the user on the Nextion 3.2" display.
The full results are written to a mysql database on a remote server, which also has a GUI for viewing the results. The database server and front end are defined in the ChecpointControlCenter repo.
The final version of this device is based on the Raspberry Pi 4 (1GB) with a 32 GB SD card and the Nextion enhanced 3.2" display.
The Raspberry Pi 4 has the following specs:
| CPU | RAM | ETH | CHARGING PORT |
|---|---|---|---|
| 1.5-GHz, Quad-Core Broadcom BCM2711B0 (Cortex A-72) | 1GB | 1Gbps | USB-C |
Download raspbian "Buster" and load it on the microSD card.
Perform an update and upgrade:
sudo apt-get update
sudo apt-get install upgrade
sudo apt-get update
Once Buster is loaded, add the following:
Speedtest-cli
curl -Lo speedtest-cli https://raw.githubusercontent.com/sivel/speedtest-cli/master/speedtest.py
chmod +x speedtest-cli
speedtest-cli
mysqldb
sudo apt-get install python-mysqldb -y
pip (or pip3)
sudo apt-get install python-pip -y
or
sudo apt-get install python3-pip -y
pyserial
sudo pip install pyserial
git
sudo apt-get install git -y
pandas
sudo apt-get install python-pandas -y
Once these modules are loaded, git clone this repo into the /home/pi directory.
Don't forget to add it into /etc/rc.local
add "startme.sh" to the file
/root/checkpointv2_production/startme.sh
git fetch downloads the latest from remote without trying to merge or rebase anything.
Then the git reset resets the master branch to what you just fetched. The --hard option changes all the files in your working tree to match the files in origin/master.
#!/bin/bash

cd /home/pi/checkpointPlus_final
git fetch
git reset --hard origin/master
python  /home/pi/checkpointPlus_final/checkpointRoutine.py
There are four leads from the Nextion display: Power (Red) Ground (Black) Tx (Blue?) Rx (Yellow?)
They map to the RPi 4 board as follows:
RPi 4 to Nextion HMI pinout
| RPi4 | Nextion |
|---|---|
| 5V | VCC |
| 15 | TX |
| 14 | RX |
| GND | GND |
The GPIO pinout is basically the same as the one used on the Odroid-C2, so we can just follow that.
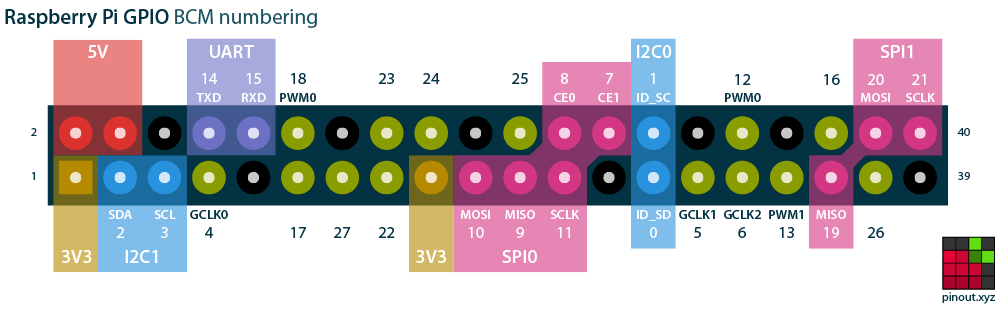
The serial on GPIO 14 & 15 is disabled because it is used by the bluetooth. To enable the serial interface, you must add the lines below to /boot/config.txt you must do this thru the terminal using sudo nano /boot/config.txt
click the terminal icon (black screen icon) on the top of the screen type sudo nano /boot/config.txt using you arrows, scroll to the bottom of the screen and add the lines below to the bottom of the files
#disable bluetooth so nextion can work on serial 0

dtoverlay=pi3-disable-bt

enable_uart=1
*Note: I used "pi3" and it worked. I don't think using "pi4" works.
Once these lines are added, next we save and exit press control x to exit press Y to save press [enter] to save file shutdown & remove pwr from the pi
restart.
We'll do this part via raspi-config:
-
Open the terminal and type sudo raspi-config
-
go to Interfacing options, then serial and enable the serial port and disable the shell
-
Tab to finish
-
Reboot one more time