在 VS Code 中实时调试预览 React/Vue 组件
1、VS Code 下载并启用 AutoPreview 插件,启用后项目便可以引入node_modules/autopreview模块;
2、在项目中引入autopreview模块,并初始化;
React 项目:
// main.ts
if (process.env.NODE_ENV === "development") {
  import("autopreview/react").then(({ default: AutoPreview }) => {
    new AutoPreview("#root")
  })
}
Vue 3 项目:
// main.ts
if (process.env.NODE_ENV === "development") {
  import("autopreview/vue3").then(({ default: AutoPreview }) => {
    new AutoPreview("#app", (app) => {
    app.use(router).use(store).use(vuetify);
    });
  });
}
Vue 2 项目:
// main.ts
if (process.env.NODE_ENV === 'development') {
  import('autopreview/vue2').then(({ default: AutoPreview }) => {
    new AutoPreview('#app', {
      vuetify: new Vuetify({}),
      // store/router…
    })
  })
}
其他项目参考
autopreview/react和autopreview/vue2的实现,即通过autopreview/index导出的getActiveFilePath()方法拿到当前窗口文件路径,传给import(PATH)拿到当前窗口导出的组件,将目标组件挂载到页面,即可实现预览。
3、导出autopreview开头的函数组件(大小写不敏感),如 autopreviewButton/AutopreviewText/Autopreview_Header:
React 组件示例:
import React from "react";
import { Button } from "antd";

export function AutoPreview_Button1() {
  return (<Button onClick={() => console.log("click")}> CLICK </Button>);
}
Vue3 组件示例:
<template>
  <v-layout>
    <v-app-bar>
      <v-app-bar-title>{{ title }}</v-app-bar-title>
    </v-app-bar>
  </v-layout>
</template>
<script lang="tsx">
// Vite2默认使用React JSX, 要使用Vue JSX,需要在esbuild中配置jsx,并在组件中显性引入h :`import { h } from "vue" `
import { defineComponent, h } from "vue";
const Header = defineComponent({
  props: {  title: String }
});
export default Header;

export function autopreviewHeader() {
  return <Header title="Title" />;
}
</script>
Vue2 组件示例
<template>
  <v-app-bar>
    <v-app-bar-title>{{ title }}</v-app-bar-title>
    <v-spacer></v-spacer>
  </v-app-bar>
</template>
<script>
const Header = {
  props: { title: String },
};
export default Header;

// 注意要声明h参数,否则会报错
export function AutoPreview_Test(h) {
  return <Header title="Title" />;
}
</script>
4、参考配置要求配置好 Webpack/Vite,然后启动项目,在 VS Code 预览窗口输入 localhost 地址即可。
1、Vite 服务器默认会忽略对 .git/ 和 node_modules/ 目录的监听,必须对node_mdules/autopreview模块也进行监听;
2、被监听的包必须被排除在优化之外, 以便它能出现在依赖关系图中并触发热更新;
3、Vite2 默认使用 React JSX, 要使用 Vue JSX,需要在 esbuild 中配置 jsx,并在组件中显性引入 h : import { h } from "vue" ;
示例
// vite.config.js
export default defineConfig({
  server: {
    watch: {
      // 对autopreview模块进行监听
      ignored: ["!**/node_modules/autopreview/**"],
    },
  },
  optimizeDeps: {
    // 被监听的包必须被排除在优化之外
    exclude: ["autopreview"],
  },
  esbuild: {   // Vue项目要使用Vue JSX,需要在esbuild中配置jsx
    jsxFactory: "h",
    jsxFragment: "Fragment",
  },
});
1、Webpack 5 需要禁用对autopreview模块缓存快照;
2、如果你的 webpack 配置忽略了对node_modules/目录的监听,请排除autopreview模块;
3、如果你的 webpack 配置对node_modules/目录做了缓存处理,请排除autopreview模块;
示例:
// config/webpack.config.js
module.exports = function (webpackEnv) {
  return {
    snapshot: {
      managedPaths: [/^(.+?[\\/]node_modules[\\/])(?!autopreview)/],
    }
  }
}
暂无
参考 demo 目录下的 webpack5+react 项目
参考 demo 目录下的 webpack5+vue3 项目
参考 demo 目录下的 vite+vue3 项目
参考 demo 目录下的 webpack4+vue2 项目
参考 demo 目录下的 Vite+vue3 项目
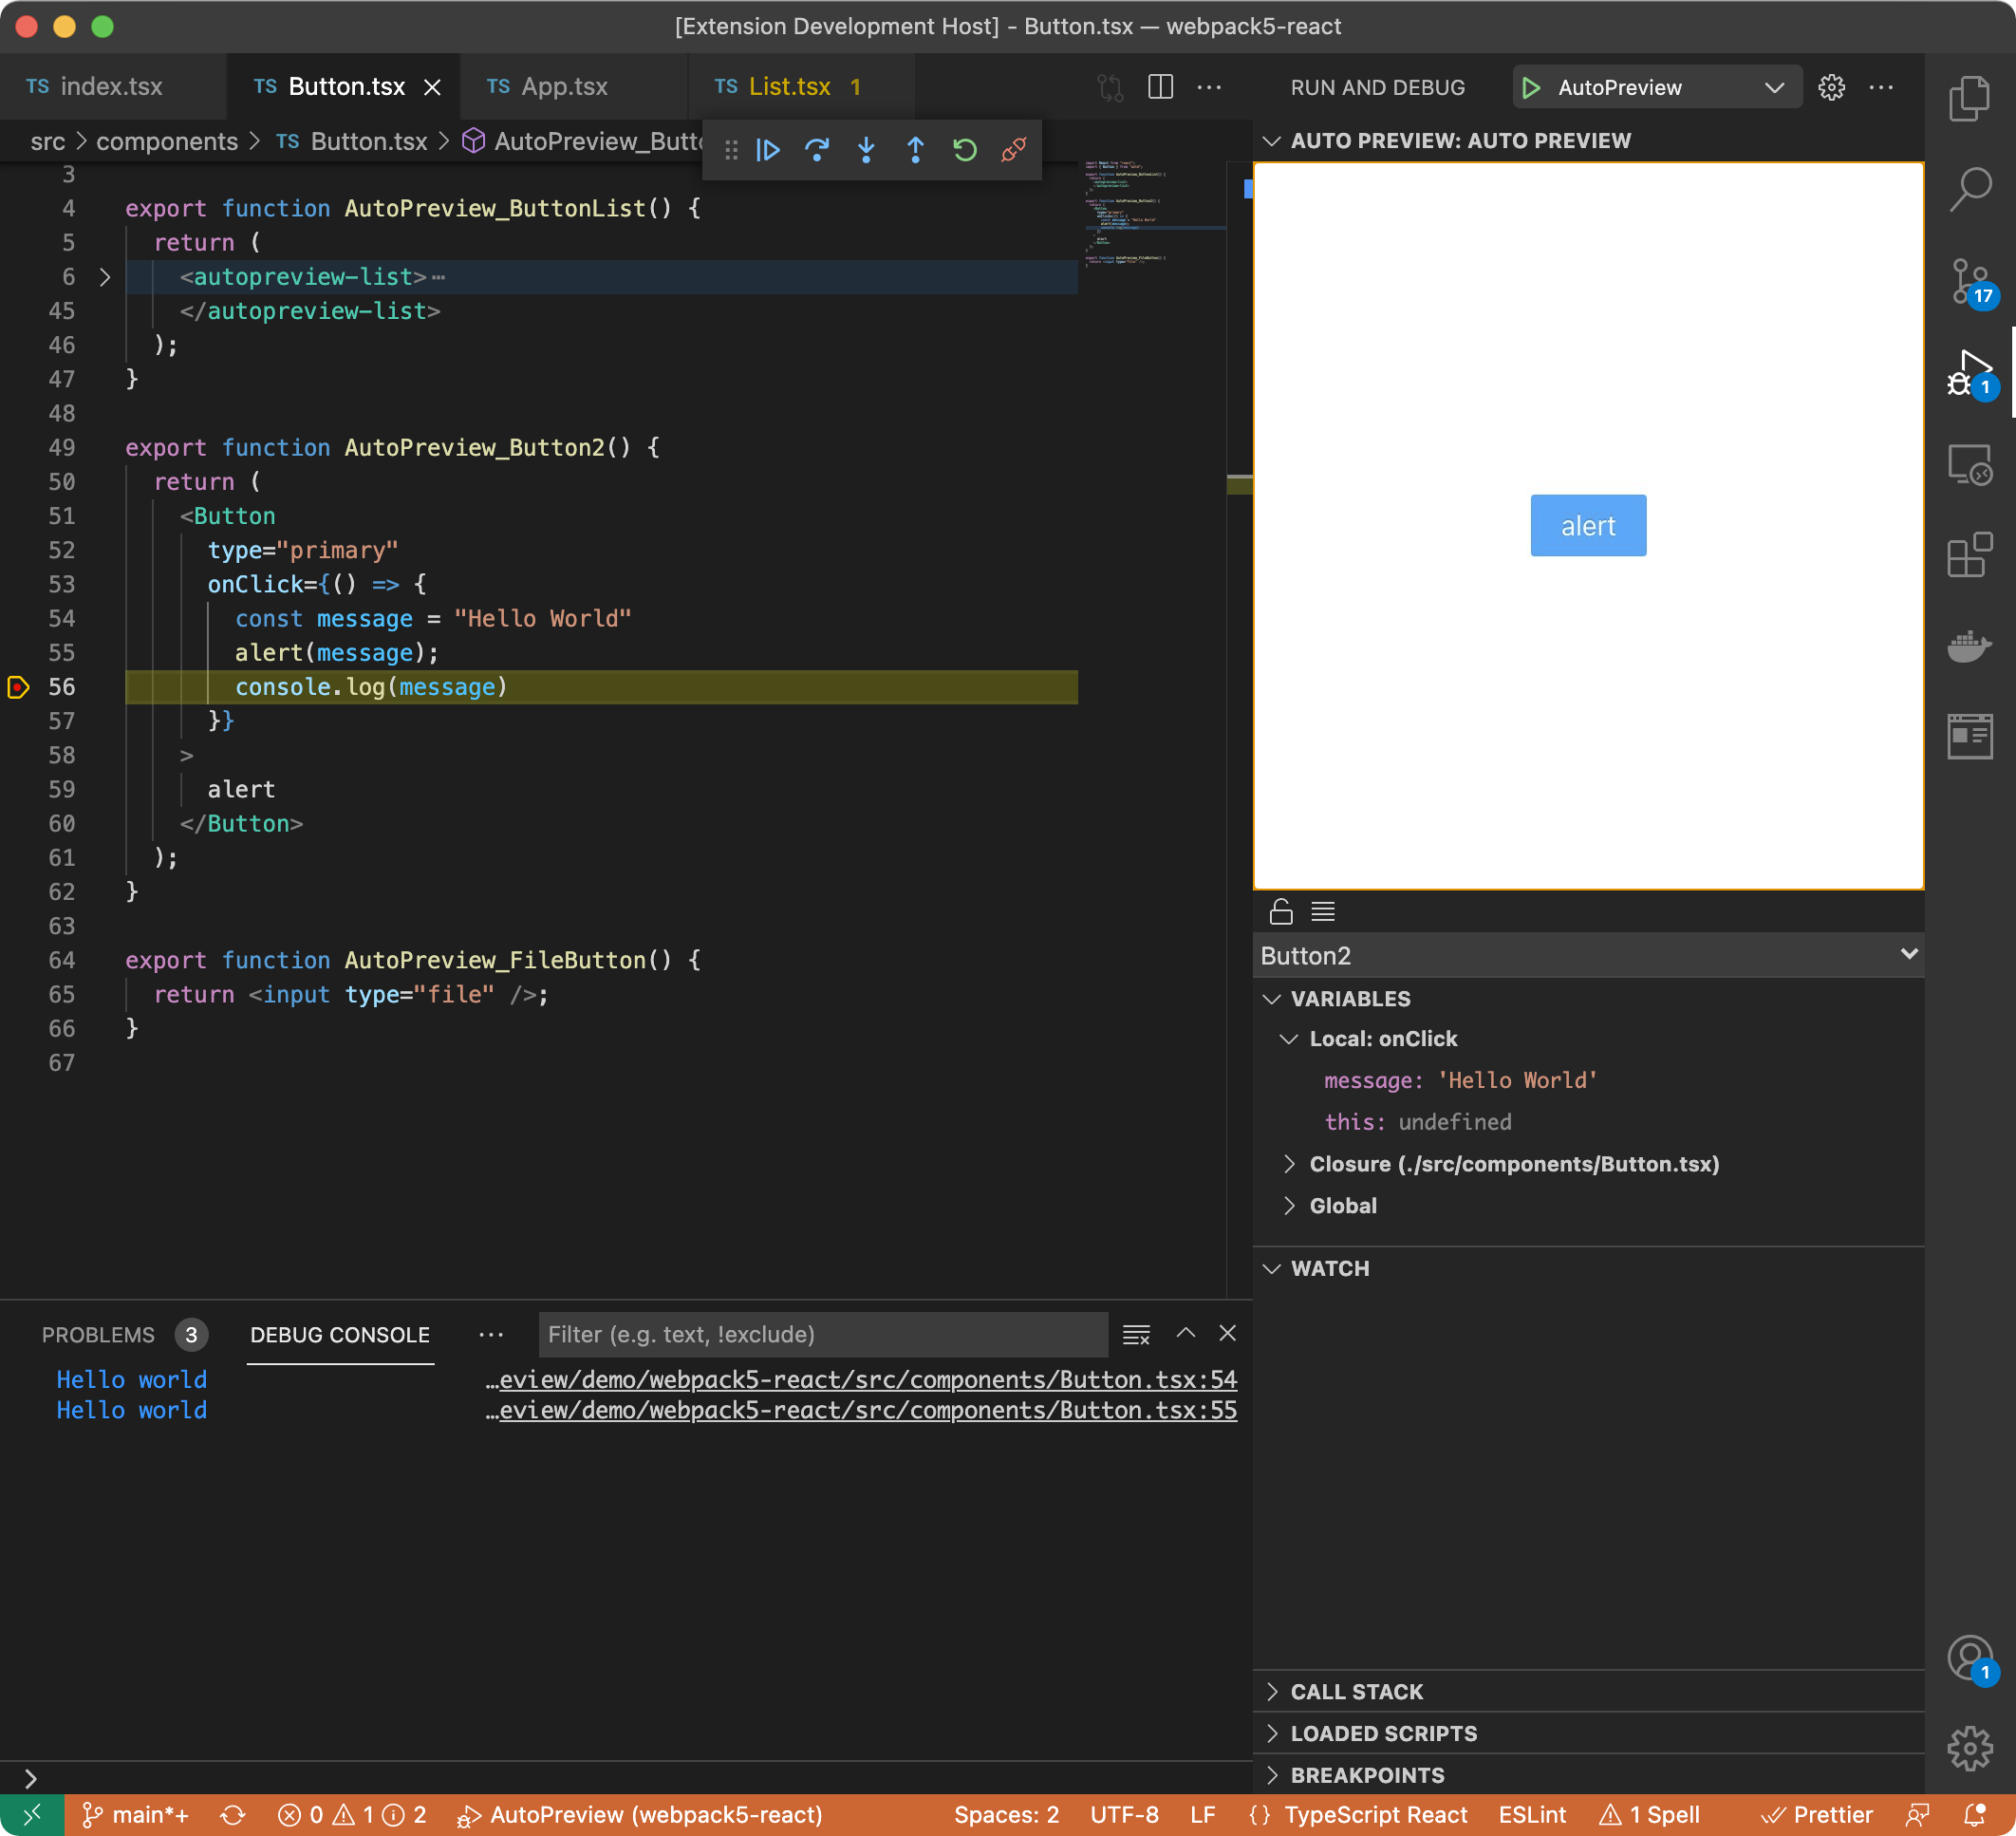
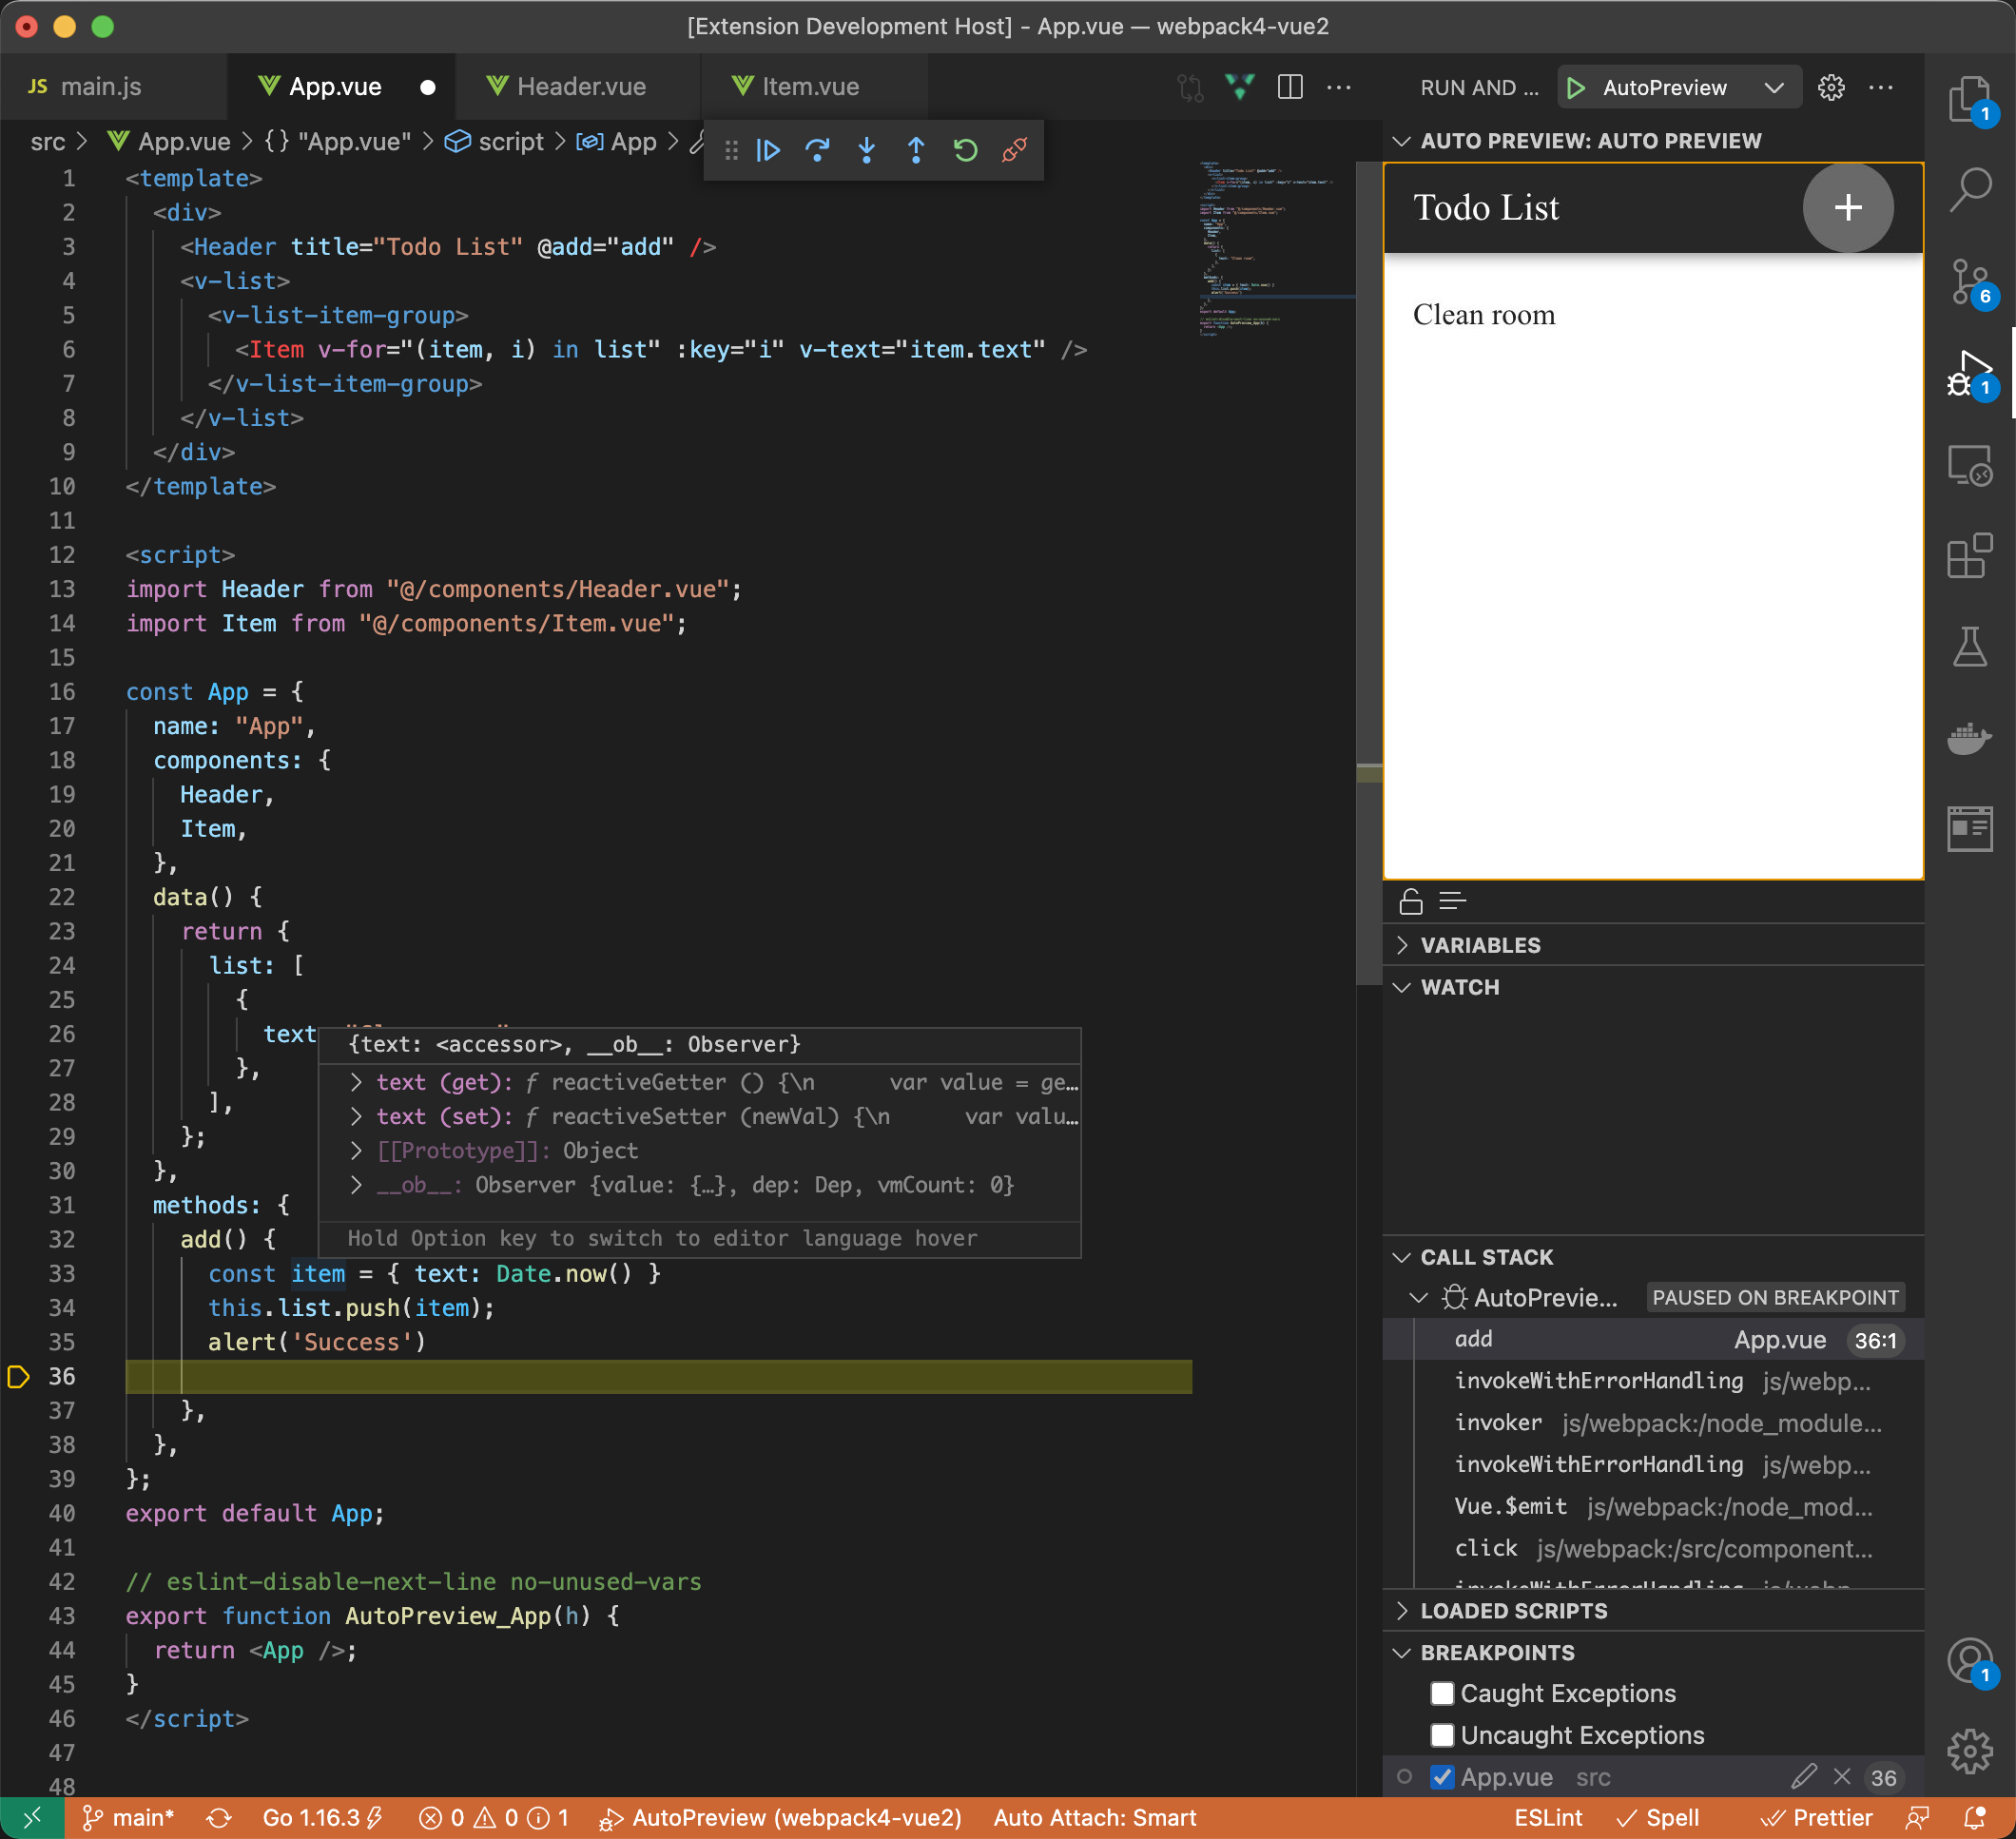
本插件提供了名为 AutoPreview 的调试适配器,在 launch.json 中配置后即可在预览的同时进行调试,配置参考如下:
React 项目配置例子
// launch.json
{
  "version": "0.2.0",
  "configurations": [
    {
      "name": "AutoPreview",
      "request": "attach",
      "type": "AutoPreview"
    }
  ]
}
Vue 项目配置例子(参考https://v2.vuejs.org/v2/cookbook/debugging-in-vscode.html?redirect=true)
// launch.json
{
  "version": "0.2.0",
  "configurations": [
    {
      "type": "AutoPreview",
      "request": "attach",
      "name": "AutoPreview",
      "webRoot": "${workspaceFolder}/src",
      "breakOnLoad": true,
      "sourceMapPathOverrides": {
        "webpack:///src/*": "${webRoot}/*"
      }
    }
  ]
}
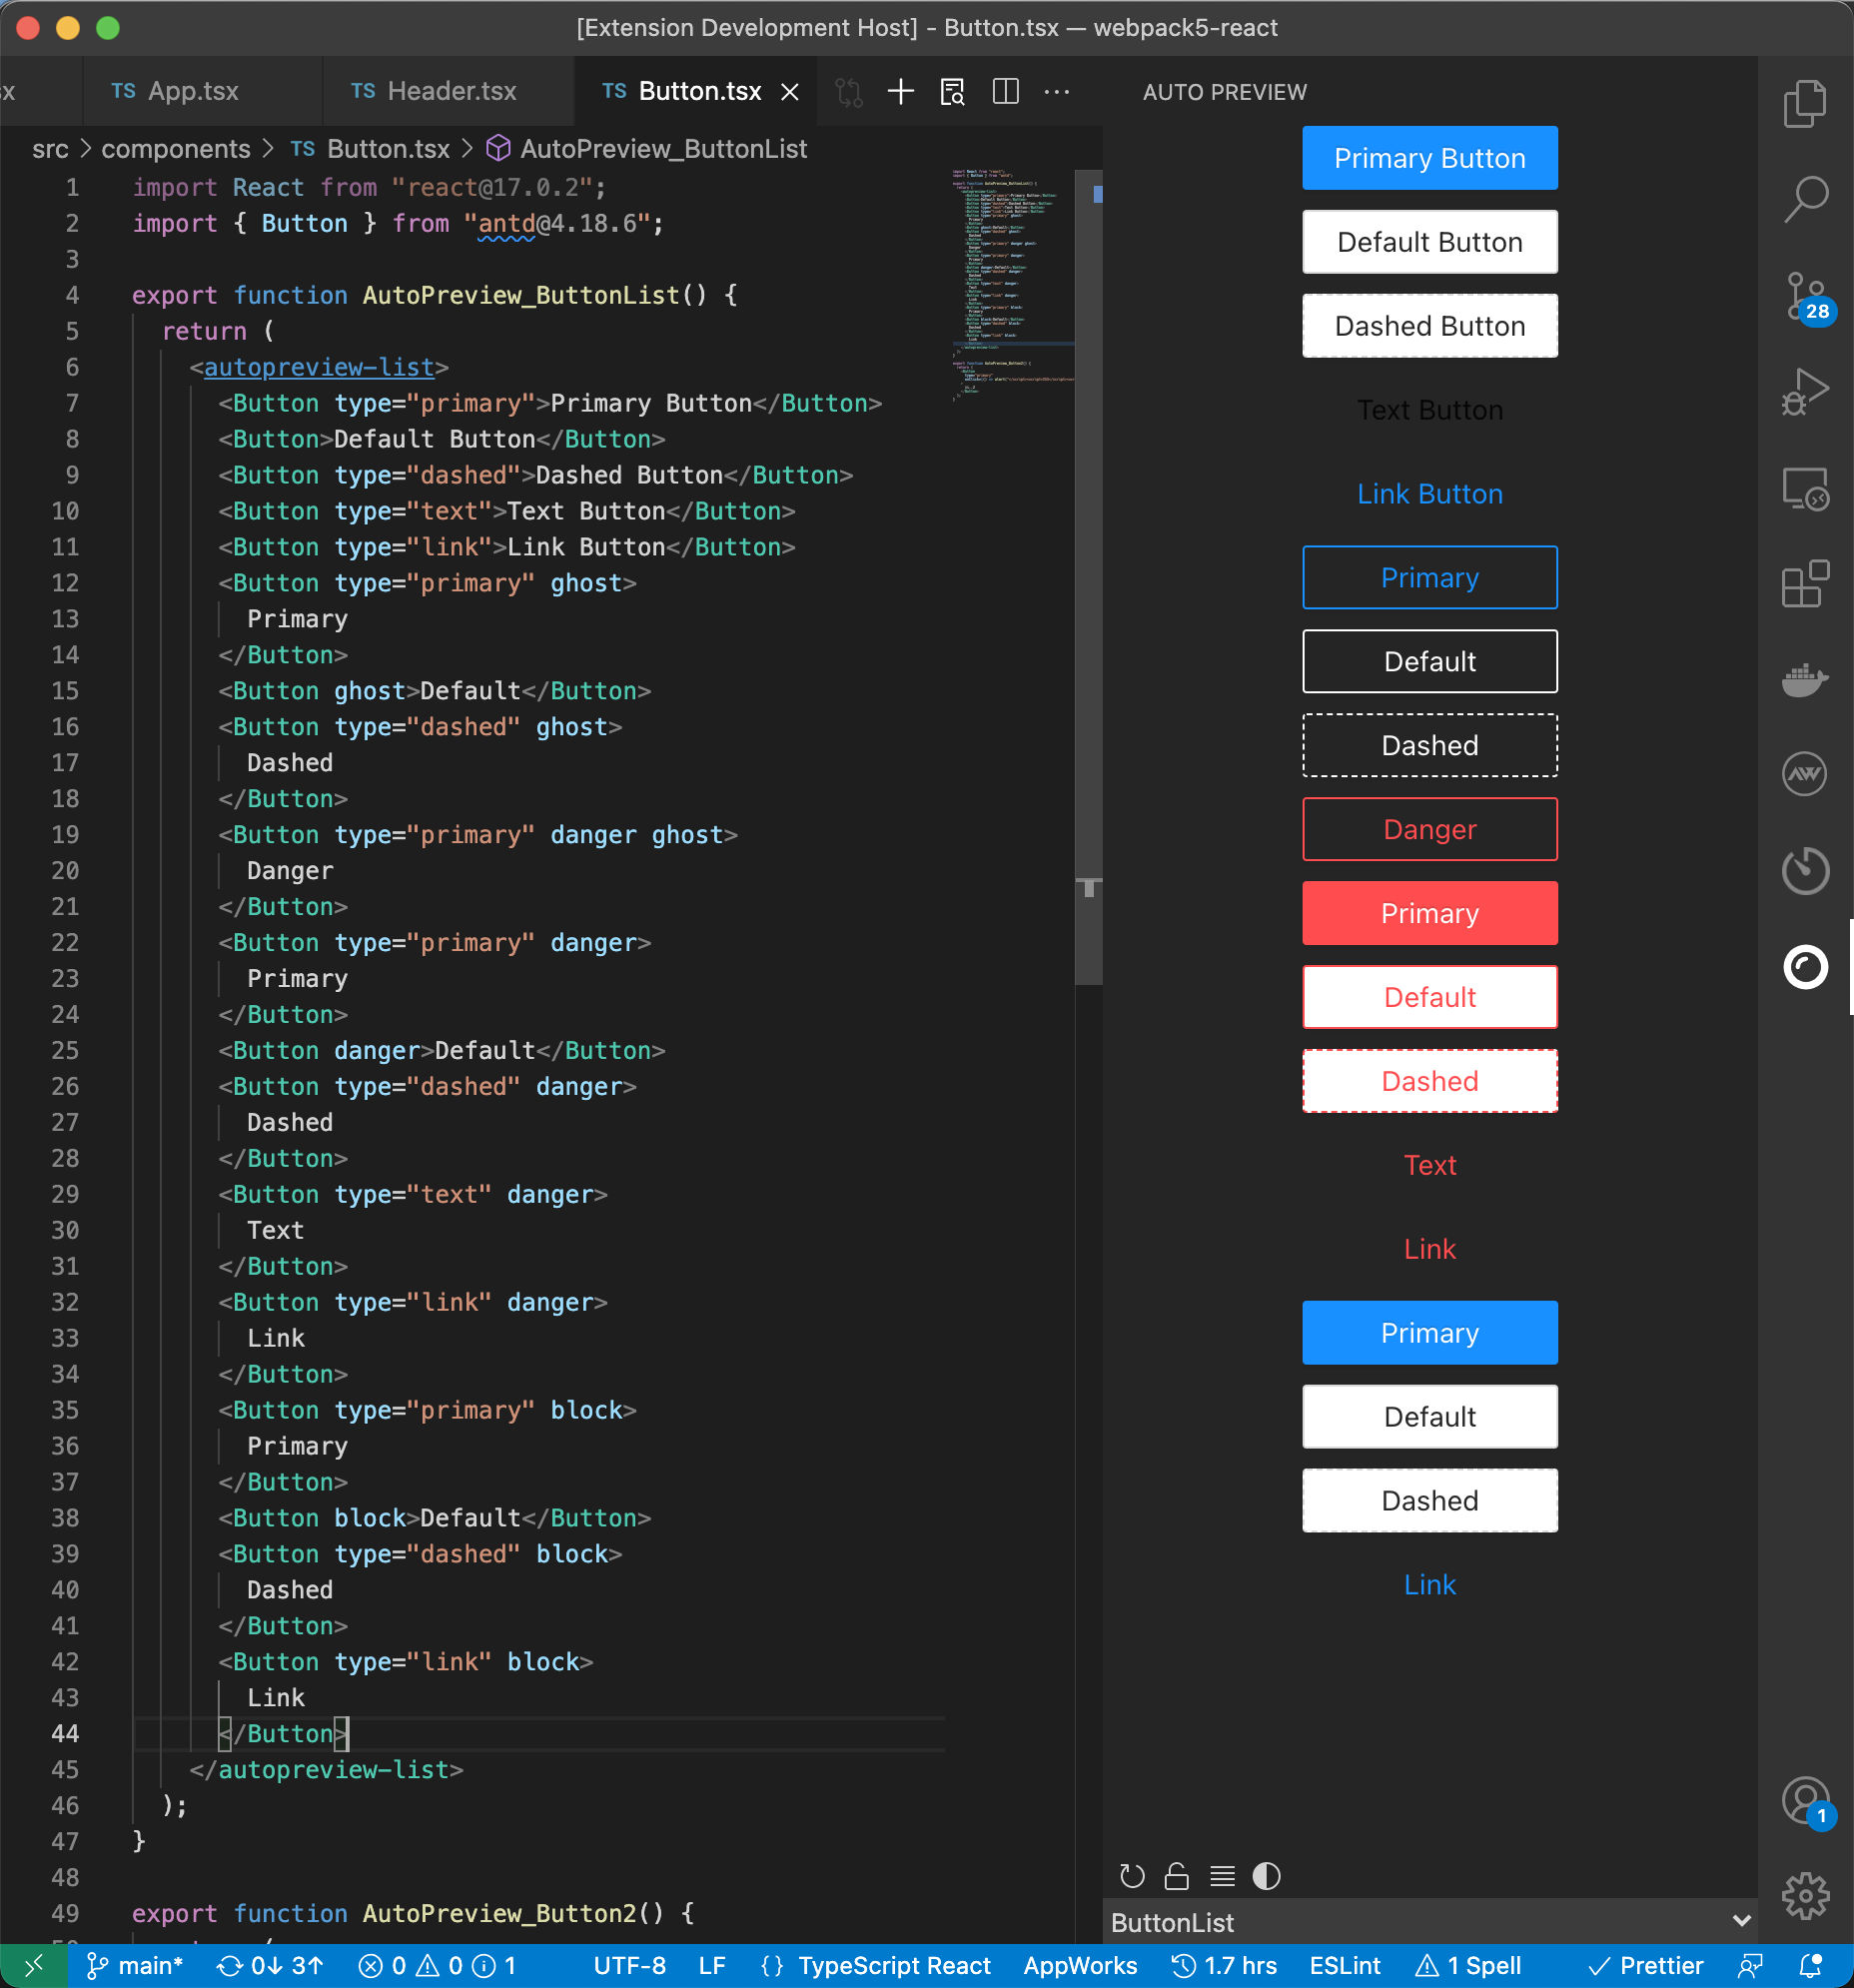
autopreview包注册了下面这些 Web 组件,可以直接使用,主要用于包裹被预览的内容来控制布局:
autopreview-list:列表展示,即应用了flex-direction: column;
例子:
<autopreview-list>
  <Button type="primary">Primary Button</Button>
  <Button>Default Button</Button>
  <Button type="dashed">Dashed Button</Button>
  <Button type="text">Text Button</Button>
  <Button type="link">Link Button</Button>
<autopreview-list>
· 英文版
· Debug 功能
· 预览面板中,复制组件用例代码
· 完善常用脚手架的配置例子
· 测试 Windows 系统使用
如果当前版本的更新影响了旧版本的使用,请在仓库的 release 中下载旧版本安装文件,使用命令安装 code --install-extension my-extension-0.0.1.vsix。
1、关于插件侵入性
开发环境,目前必须项目引入autopreview包初始化才能配合插件使用,这点的确具有侵入性,但是没有危险,如果你有办法改善这一点欢迎贡献代码或者与我联系。
生成环境,Webpack 和 Vite 的 tree shaking 会在打包时移除预览组件。
2、某些引起报错的场景
已知一些会引起报错的场景,需要进行特殊处理,比如:
React-router v6 中的 hook 函数,比如useNavigate,只能用在Router组件的后代中,直接用在预览函数中会报错,所以需要对预览函数返回的组件进行相应的包裹处理。
Vue 3.0 中 Provide、Reject 同理也可能出现这种问题。
3、提示 autopreview 包未安装
尝试重启 VS Code,然后重启服务。
4、项目启动后预览窗口显示”Access failed“
检查.vscode/setting.json 中配置的AutoPreview.serverURL是否与服务地址一致。
如遇到其他问题,可通过 VS Code-Help-Toggle Developer Tools 打开调试,查看报错。也可已加我微信沟通。