A detailed walkthrough on creating a real world decentralized application.
This tutorial will walk you through building a decentralized app on the NEO blockchain. The tutorial will use C# as example, but once you've grasp the core concept, this project can be written in any other language you prefer. The example project we are using is a book store that lets authors add books on the store which can be sold directly to customers.
The reason why I used this as an example is because it includes the basic building blocks of any data oriented software: retrieving, creating, updating and deleting data. Albeit, this guide will be a long read, but you will definitely learn a lot more by building a real world app as compared to a hello world example. So grab a drink, put on some music if you'd like, and let's get started.
- Functional Requirements
- Tools & Technologies
- Getting Started
- Architecture Overview
- Application Development
- Testing The Project
- Production Readiness
- Conclusion
Develop a decentralized book store that lets authors add books on the store which can be sold directly to customers. The book store will consist of the following features:
- Authors can add new books for sale.
- Authors can update books info.
- Authors can remove their own books.
- Customers can place order on books.
- Visual Studio 2017 (with .NET Core cross-platform development enabled)
- .NET Framework 4.7
- ASP.NET Web API 2
First, you will need to get your developer tools ready to build your Dapp. You will need to install the following on your machine. Note: If you have already done this, skip to the next section.
- Visual Studio 2017 (with .NET Core cross-platform development enabled)
- NeoContractPlugin for Visual Studio
- Neo Compiler
The NEO official guide is a great reference point for installing the above tools. Follow the instructions on the official guide, it should take between 10 minutes to an hour for a complete installation. Return to this tutorial after you have installed the necessary developer tools.
Official Installation Guide: http://docs.neo.org/en-us/sc/quickstart/getting-started-csharp.html
Before you get started, you should have a ready test environment in order for you to deploy and test your Dapp on the blockchain. You have two options here:
- Set up your own NEO private network on your machine.
- Use the readily available NEO testnet environment.
Option 1 (Running NEO private net) gives you virtually unlimited GAS tokens, which is required to deploy your smart contract to the blockchain and for network fees on the blockchain. It is important to note that at the time of writing, a fee of 490 GAS is required to deploy your Dapp on NEO. This is the recommended option for NEO development, but it will take some time to set up. If you’d like to explore option 1, the following guides are a good starting point:
Official NEO guide to set up private chain
Docket Private Network Container
Option 2 (Using NEO testnet environment), which this tutorial will focus on, is a quick and easy way to get started. The downside is that you will need to request for GAS for test usage. You can request for GAS on the test net here: https://neo.org/Testnet/Create
INSTRUCTIONS: Setting up to use NEO test-net environment:
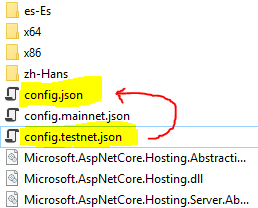
- Download NEO-GUI and extract the files to a location of your choice, then navigate to the extracted folder.
- Open the config.json and config.testnet.json files for edit. Copy all content from config.testnet.json and replace it in config.json, then save the config.json file. This will configure the client to connect to the testnet environment.
- Double-click neo-gui.exe to run the client.
- The client will automatically start downloading blocks to keep your copy of the blockchain in sync. Note: You can speed up the download process by downloading bootstrap files (pre-synced data): Blockchain Bootstrap Files. Just extract the downloaded bootstrap data files inside your neo-gui Chain folder
- Done
The following diagram illustrates the high level components for our Dapp.

Let’s understand the above diagram:
-
Mobile/Desktop/Web Apps These components make up the UI layer which will interact with the API via HTTP requests. The front-end apps shown here are illustration on what components a Dapp can consist of. They are not covered in the tutorial for the reason that front-end apps are not decentralized in nature and rely on the API to interact with the blockchain. Also, certain Dapps may not even have a UI.
-
App Web API The API will expose the core functionality of our Dapp and is where most of the implementation will reside. Developing our Dapp as an API gives us the advantage of having support across front-end platforms and allow for easier maintenance. You can have your front-end on mobile, desktop or web and interact with the dapp API using conventional HTTP requests. In this tutorial, we’ll use ASP.NET Web API 2 to develop the API. You can use any language or framework you are familiar with once you learn the basic concepts of designing a Dapp.
-
Off-Chain Database The off-chain database acts as a secondary low-cost storage to the blockchain. Off-chain data can be used for fast and cost-free retrieval, and also enables instant transaction commits while in waiting for blockchain commit. Note that the off-chain database is in no way replacing the blockchain - that would defeat the purpose of a dapp, which is to achieve decentralization. For this tutorial, we'll use the same key-value storage used in Neo as our database; Google's open-source LevelDB.
-
Transaction Queue Transactions queues are used to temporary store transactions which are yet to be committed to the blockchain. They are useful in designing a responsive Dapp, where requests can be responded immediately while transactions are waiting to be committed on the blockchain. The queue will not be covered in this tutorial. It is here as an illustration of what a production ready app would ideally have. As there are many ways to implement a proper queue system, this component of the Dapp alone would warrant its own tutorial guide.
-
App Smart Contract The smart contract is the part of your Dapp that makes it truly decentralized. Essentially, the smart contract is a set of code that runs on the blockchain. Smart contracts on NEO supports programmable logic and immutable data storage. In order to store data on the blockchain, we will need to deploy a smart contract developed specifically for our book store app.
The next section will guide you through the steps to create our Book Store Dapp, which consists of the API, Off-Chain Database, and Smart Contract.
Let's start by first creating the smart contract for our book store dapp.
-
Open Visual Studio. Go to File > New > Project. On the left panel, select C# > NeoContract. Check "Create directory for solution" and fill in the Name and Solution Name as below, then click OK.

-
Once the project is created, a contract class file Contract1.cs is available with the default hello world demo.
-
Build the solution now so that all required Nuget packages are downloaded. Go to Build > Build Solution. This will get rid of the intelllisense warning messages you see on the class file. Troubleshooting Tip: If you are still getting a compilation error from Visual Studio with "unable to find Neo.SmartContract.Framework": Right-Click > Remove Neo.SmartContract.Framework from References, then open Nuget Package Manager by going to Tools > NuGet Package Manager > Package Manager Console. Enter the following command to re-install the package PM> Install-Package Neo.SmartContract.Framework. In some cases, this will solve the compilation error.
-
Open the Contract1.cs file in visual studio. Notice that the contract class contains a Main() method. This is there entry point for all calls to our smart contract.
-
Now, go ahead and rename the Contract1.cs file to BookStoreContract.cs, then replace all contents in this file with the following code:
using Neo.SmartContract.Framework;
using Neo.SmartContract.Framework.Services.Neo;
using System.Numerics;
namespace BookStore.SmartContracts
{
    public class BookStoreContract : SmartContract
    {
        //ICO and Token Settings
        private const ulong factor = 100000000;
        private const ulong pre_ico_cap = 30000000 * factor;
        /// <summary>
        /// Main method of a contract.
        /// </summary>
        /// <param name="operation">Method to invoke.</param>
        /// <param name="args">Method parameters.</param>
        /// <returns>Method's return value or false if operation is invalid.</returns>
        public static object Main(string operation, params object[] args)
        {
            if (args.Length > 0)
            {
                if (operation == "deploy")
                    return Deploy((byte[])args[0]);
                if (operation == "balanceOf")
                    return BalanceOf((byte[])args[0]);
                if (operation == "transfer")
                    return Transfer((byte[])args[0], (byte[])args[1], (BigInteger)args[2]);

                //TODO: Add dapp method calls here

            }
            return false;
        }
        #region Default Methods

        public static bool Deploy(byte[] account)
        {
            byte[] supplyCheck = Storage.Get(Storage.CurrentContext, "totalsupply");
            if (supplyCheck == null)
            {
                Storage.Put(Storage.CurrentContext, "owner", account);
                byte[] owner = Storage.Get(Storage.CurrentContext, "owner");
                Storage.Put(Storage.CurrentContext, Key("A", owner), pre_ico_cap);
                Storage.Put(Storage.CurrentContext, "totalsupply", pre_ico_cap);
                return true;
            }
            return false;
        }

        private static BigInteger BalanceOf(byte[] account)
        {
            byte[] balance = Storage.Get(Storage.CurrentContext, Key("A", account));
            if (balance == null)
                return 0;
            return balance.AsBigInteger();
        }
        private static bool Transfer(byte[] from, byte[] to, BigInteger amount)
        {
            if (amount >= 0)
            {
                if (from == to)
                    return true;
                BigInteger senderBalance = Storage.Get(Storage.CurrentContext, Key("A", from)).AsBigInteger();
                BigInteger recipientBalance = Storage.Get(Storage.CurrentContext, Key("A", to)).AsBigInteger();
                if (senderBalance >= amount)
                {
                    BigInteger newSenderBalance = senderBalance - amount;
                    BigInteger newRecipientBalance = recipientBalance + amount;
                    Storage.Put(Storage.CurrentContext, Key("A", from), newSenderBalance);
                    Storage.Put(Storage.CurrentContext, Key("A", to), newRecipientBalance);
                    return true;
                }
                else
                {
                    Runtime.Log("Transfer: Sender has insufficient balance.");
                    return false;
                }
            }
            return false;
        }
        #endregion
        #region Helpers
        private static string Key(string prefix, byte[] id)
        {
            return string.Concat(prefix, id.AsString());
        }
        private static string Key(string prefix, string id)
        {
            return string.Concat(prefix, id);
        }
        #endregion
        #region Dapp Methods
        //TODO: Add dapp methods here
        #endregion
    }
}-
This code is a modification of the official smart contract ICO template. I have removed some code that we won’t be using in this tutorial. See the full template if you’d like to learn more on ICO implementation. SmartContract ICO Template
-
Let's implement our contract methods. Add the following method calls in our main method by replacing the comment line
//TODO: Add dapp methods calls here. This will redirect calls to our contract to the appropriate sub routine.
if (operation == "addBook")
    return AddBook((byte[])args[0], (string)args[1], (string)args[2], (string)args[3], (BigInteger)args[4]);
if (operation == "updateBook")
    return UpdateBook((byte[])args[0], (string)args[1], (string)args[2], (string)args[3], (BigInteger)args[4]);
if (operation == "deleteBook")
    return DeleteBook((byte[])args[0], (string)args[1]);
if (operation == "purchaseBook")
return PurchaseBook((byte[])args[0], (string)args[1], (string)args[2]);- Now we will implement each of our Dapp method. For each method, replace the line
//TODO: Add dapp methods herewith the following codes:
private static bool AddBook(byte[] ownerAddress, string bookId, string title, string author, BigInteger price)
{
    //Validate input
    if (ownerAddress == null || title == null || author == null || price == null)
    {
        Runtime.Log("AddBook: One or more required parameter is not specified.");
        return false;
    }

    //Put data in storage
    Storage.Put(Storage.CurrentContext, Key("Book_OwnerAddress", bookId), ownerAddress);
    Storage.Put(Storage.CurrentContext, Key("Book_Title", bookId), title);
    Storage.Put(Storage.CurrentContext, Key("Book_Author", bookId), author);
    Storage.Put(Storage.CurrentContext, Key("Book_Price", bookId), price);

    Runtime.Log("AddBook: Successfully added book.");

    return true;
}

private static bool UpdateBook(byte[] ownerAddress, string bookId, string title, string author, BigInteger price)
{
    //Validate input
    if (ownerAddress == null || title == null || author == null || price == null)
    {
        Runtime.Log("UpdateBook: One or more required parameter is not specified.");
        return false;
    }

    //Validate book existence and owner address
    byte[] bookOwnerAddress = Storage.Get(Storage.CurrentContext, Key("Book_OwnerAddress", bookId));
    if (bookOwnerAddress != null)
    {
        Runtime.Log("UpdateBook: Book not found.");
        return false;
    }
    if (bookOwnerAddress.AsString() != ownerAddress.AsString())
    {
        Runtime.Log("UpdateBook: Book is owned by a different owner.");
        return false;
    }

    //Update data in storage
    Storage.Put(Storage.CurrentContext, Key("Book_OwnerAddress", bookId), ownerAddress);
    Storage.Put(Storage.CurrentContext, Key("Book_Title", bookId), title);
    Storage.Put(Storage.CurrentContext, Key("Book_Author", bookId), author);
    Storage.Put(Storage.CurrentContext, Key("Book_Price", bookId), price);

    Runtime.Log("UpdateBook: Successfully updated book.");

    return true;
}

private static bool DeleteBook(byte[] ownerAddress, string bookId)
{
    //Validate input
    if (ownerAddress == null || bookId == null)
    {
        Runtime.Log("DeleteBook: One or more required parameter is not specified.");
        return false;
    }

    //Validate book existence and owner address
    byte[] bookOwnerAddress = Storage.Get(Storage.CurrentContext, Key("Book_OwnerAddress", bookId));
    if (bookOwnerAddress != null)
    {
        Runtime.Log("UpdateBook: Book not found.");
        return false;
    }
    if (bookOwnerAddress.AsString() != ownerAddress.AsString())
    {
        Runtime.Log("UpdateBook: Book is owned by a different owner.");
        return false;
    }

    //Delete data in storage
    Storage.Delete(Storage.CurrentContext, Key("Book_OwnerAddress", bookId));
    Storage.Delete(Storage.CurrentContext, Key("Book_Title", bookId));
    Storage.Delete(Storage.CurrentContext, Key("Book_Author", bookId));
    Storage.Delete(Storage.CurrentContext, Key("Book_Price", bookId));

    Runtime.Log("DeleteBook: Successfully deleted book.");

    return true;
}

private static bool PurchaseBook(byte[] buyerAddress, string orderId, string bookId)
{
    //Validate input
    if (buyerAddress == null || orderId == null || bookId == null)
    {
        Runtime.Log("PurchaseBook: One or more required parameter is not specified.");
        return false;
    }

    //Get book owner
    byte[] bookOwnerAddress = Storage.Get(Storage.CurrentContext, Key("Book_OwnerAddress", bookId));
    if (bookOwnerAddress == null)
    {
        Runtime.Log("PurchaseBook: Book not found.");
        return false;
    }

    //Check customer balance
    BigInteger bookPrice = Storage.Get(Storage.CurrentContext, Key("Book_Price", bookId)).AsBigInteger();
    if (BalanceOf(buyerAddress) < bookPrice)
    {
        Runtime.Log("PurchaseBook: Buyer has insufficient funds.");
        return false;
    }

    //Transfer funds from customer account to event account
    Transfer(buyerAddress, bookOwnerAddress, bookPrice);

    //Update data in storage
    Storage.Put(Storage.CurrentContext, Key("Purchase_BuyerAddress", orderId), buyerAddress);
    Storage.Put(Storage.CurrentContext, Key("Purchase_BookId", orderId), bookId);

    Runtime.Log("PurchaseBook: Successfully purchased book.");

    return true;
}
Lets briefly understand the above code:
- Storage.Put is a key-value storage and is used to store data on the blockchain. It can be used for adding new data (by a new key) or updating an existing set of data (by using Storage.Put with an existing key).
- Storage.Delete is used for deleting an existing data by the given key.
- Keys must uniquely identify a particular information. In our implementation, we have prefixed our keys with Class and Property. As an example, the key "Book_Title_123" refers to the title of a book for the book ID of 123.
- The final class file will look like this: BookStoreContract.cs
Now that our smart contract is ready, let's deploy it to the blockchain's testnet environment.
There are other guides focused on contract deployment that you can learn from. As this tutorial is focused on developing the Dapp, we'll run through briefly on the deployment. I'll provide a good resource link at the end in case you would like to go in the details.
First, you'll need a neo wallet. This wallet serves as your identity when you deploy your contract. Let's create a new one for development.
- Launch neo-gui (installed in earlier section).
- From the neo-gui menu bar, click Wallet > New Wallet Database
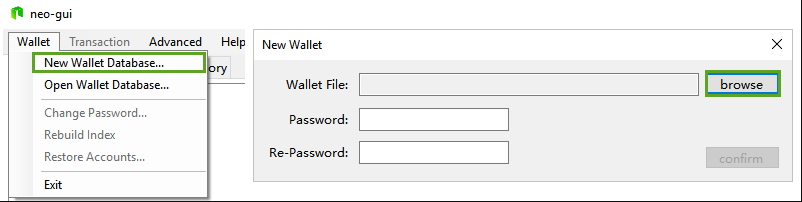
- In the New Wallet dialog, click browse.
- Select a folder where you would like to keep your new wallet, enter the name "my-dev-wallet", then click Save.
- Enter a new password for your wallet, then click Confirm.
- Your wallet is now created. Take note of the Address.
Next, we'll use the newly created wallet to deploy our smart contract.
- From the neo-gui menu bar, select Advanced > Deploy Contract. The blockchain must be downloaded completely before you can access this menu.
- In the Deploy Contract dialog, enter the following fields:
Name: Book Store
Version: 1.0
Author: [Your Name]
Email: [Your Email]
Description: Book Store Tutorial 1.0
Parameter List: 0710/01
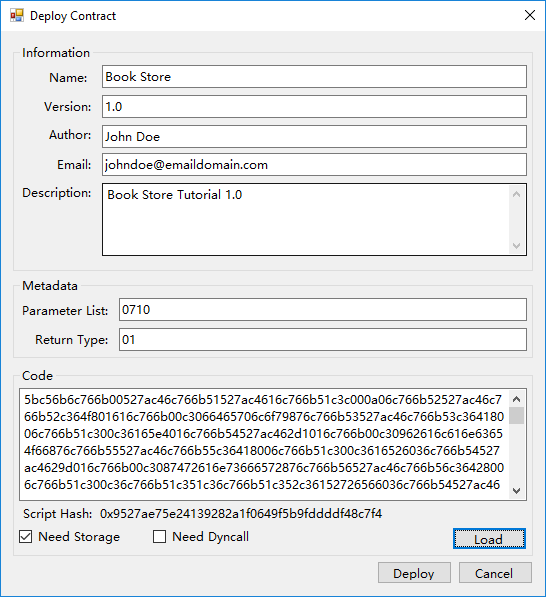
- Click "Load" and browse the .avm file we have created in the "Creating the Smart Contract" section. (It should be in \BookStore.SmartContract\bin\Debug\BookStore.SmartContracts.avm)
- Check the "Need Storage" checkbox.
- When all information above is filled in, click the "Deploy" button.
- A dialog box with the contract script hash will be displayed. Important: Take note of this script hash.
Note: The Return Type/Parameter List refers to the types of parameters our contract receive in its Main() method, and the return type. For the list of all available parameter codes, refer to the official reference guide http://docs.neo.org/en-us/sc/Parameter.html
-
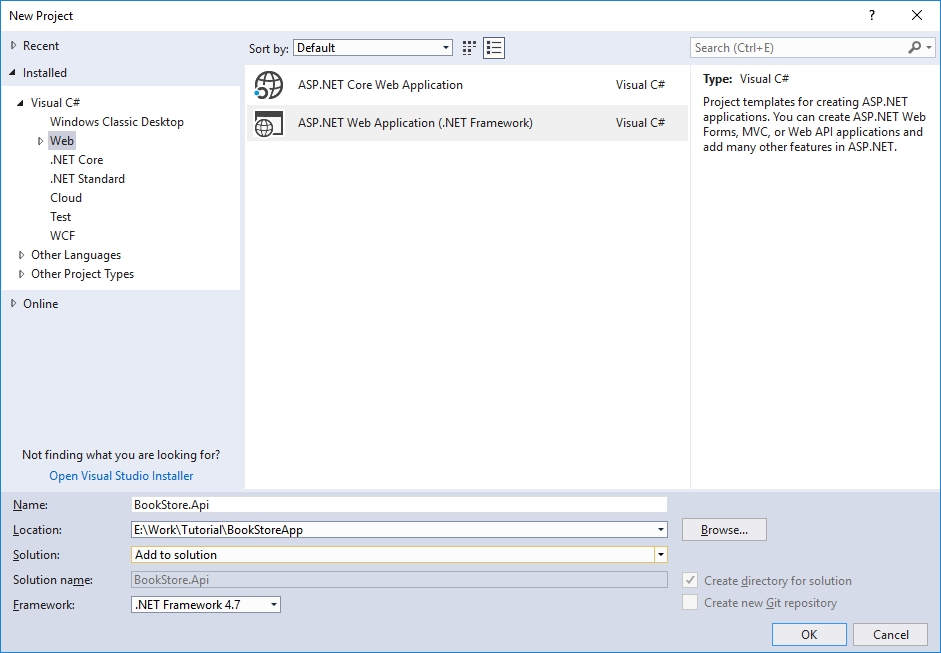
With the BookStoreApp solution opened in Visual Studio, from menu, click on
File > New > Project. -
Select the ASP.NET Web Application (.NET Framework) template. Name the project "BookStoreApp" and select .NET Framework 4.7, then click OK.
-
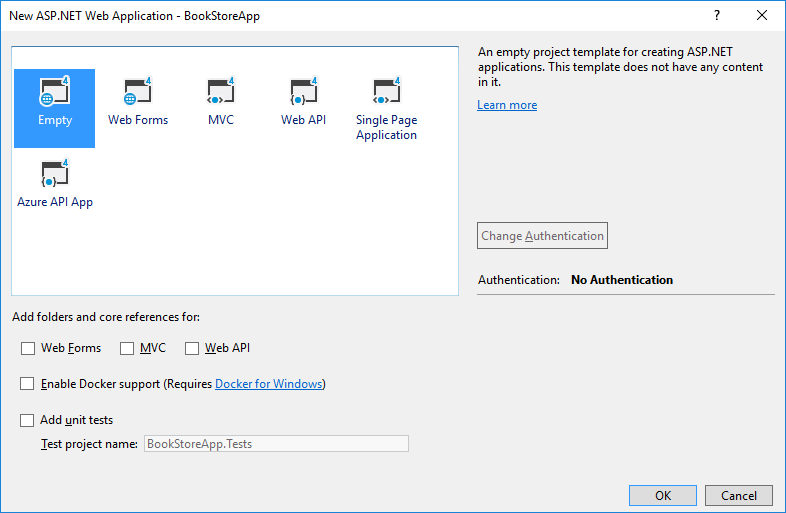
In the "New ASP.NET Web Application - BookStore.Api" dialog, select the Empty template and click OK. Note: Using the Empty template instead of API template keeps things simple and easier to follow. The API template include many files which are not required for our dapp.
-
Once the project is created, add a new folder in your solution called "Controllers" by going to
Project > New Folder. Right click on the Controller folder, then go toAdd > Controller. In the Add Scaffold dialog, select Web API 2 Controller - Empty, then click Add. Name the controller StoreController and click Add. Your Solution Explorer should now look like this: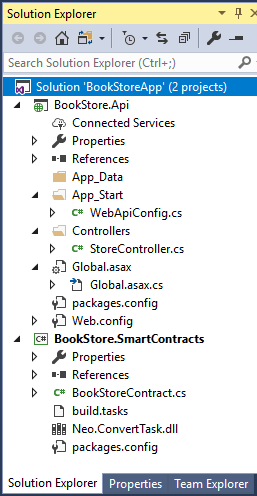
-
Open the WebApiConfig.cs file and add the following line just below the
config.MapHttpAttributeRoutes();line. This will return our API responses in Json format.
config.Formatters.JsonFormatter.SupportedMediaTypes.Add(new MediaTypeHeaderValue("text/html"));- Copy the following code and replace all content in the StoreController.cs file. We now have the outline of our Api controller.
using System;
using System.Net;
using System.Net.Http;
using System.Web.Http;
namespace BookStoreAPI.Controllers
{
    public class StoreController : ApiController
    {
        //TODO: Add DB Configuration here
        #region Struct
        public struct BookRequest
        {
            public string Address { get; set; }
            public Book Book { get; set; }
        }
        public struct Book
        {
            public string BookId { get; set; }
            public string Title { get; set; }
            public string Author { get; set; }
            public decimal Price { get; set; }
        }
        #endregion

        [HttpGet]
        [Route("books/{bookId}")]
        public HttpResponseMessage GetBookInfo(string bookId)
        {
            //TODO: Retrieve the book info from off-chain database and return the results to the front-end of our Dapp
            return Request.CreateResponse(HttpStatusCode.OK);
        }
        [HttpPost]
        [Route("books/add")]
        public HttpResponseMessage AddBook(BookRequest value)
        {
            //TODO: Add the given book into the off-chain database.
            //TODO: Commit to blockchain
            return Request.CreateResponse(HttpStatusCode.OK);
        }
        [HttpPost]
        [Route("books/update")]
        public HttpResponseMessage UpdateBook(BookRequest value)
        {
            //TODO: Update the given book on the off-chain database and on the blockchain.
            //TODO: Commit to blockchain
            return Request.CreateResponse(HttpStatusCode.OK);
        }
        [HttpPost]
        [Route("books/delete")]
        public HttpResponseMessage DeleteBook(BookRequest value)
        {
            //TODO: Delete the given book from the off-chain database.
            //TODO: Commit to blockchain
            return Request.CreateResponse(HttpStatusCode.OK);
        }

        [HttpPost]
        [Route("books/purchase")]
        public HttpResponseMessage PurchaseBook(BookRequest value)
        {
            //TODO: Add a purchase order for the given book into the off-chain database.
            //TODO: Commit to blockchain
            return Request.CreateResponse(HttpStatusCode.OK);
        }

        //TODO: Add Key() method here
    }
}Let's start implementing the Api methods in our controller. First, we'll need to integrate our project with LevelDB.
- In the BookStore.Api project, add the nuget package reference to LevelDB.NET:
PM > Install-Package LevelDB.Net - Add the following code at the top of the StoreController.cs class, replacing the
//TODO: Add DB Configuration herecomment.
#region DB Configuration
private string dbFolder = "Data";
private Options dbOptions = new Options() { CreateIfMissing = true, FilterPolicy = new BloomFilterPolicy(10) };
//The CreateIfMissing option will create the data folder if not already exists.
//The BloomFilterPolicy is meant to optimize disk reads.
#endregion- Add the following method at the bottom of the StoreController.cs class, replacing the
//TODO: Add Key() method herecomment. This is our helper method to create a unique key to store in database. Remember that LevelDB is a key-value store, so each key must uniquely identify our data.
private string Key(string keyName, string property, string id)
{
    return keyName + "_" + property + "_" + id;
}- You will only need to know three functions in LevelDB for this tutorial.
- Put(key, value) - Saves a value in the db with a given key.
- Get(key) - Retrieves a value from db for the given key.
- Delete(key) - Deletes a record for the given key. Note that in LevelDB, to update a record you just need to use Put with the same Key and the existing value for that key will be overwritten.
- Now that we have our database ready to use. Let's add in the code for retrieving and saving data in our off-chain. This is our implemented Api methods, you may copy and replace them in your code.
[HttpGet]
[Route("books/{bookId}")]
public HttpResponseMessage GetBookInfo(string bookId)
{
    //Retrieve the book info from off-chain database and return the results to the front-end of our Dapp
    using (var database = DB.Open(dbFolder, dbOptions))
    {
        var book = new Book()
        {
          BookId = bookId,
          Title = database.Get(ReadOptions.Default, Key("Book", "Title", bookId)).ToString(),
          Author = database.Get(ReadOptions.Default, Key("Book", "Author", bookId)).ToString(),
          Price = database.Get(ReadOptions.Default, Key("Book", "Price", bookId)).ToInt64()
      };
  }
  //TODO: Commit to blockchain
  return Request.CreateResponse(HttpStatusCode.OK);
}

[HttpPost]
[Route("books/add")]
public HttpResponseMessage AddBook(BookRequest value)
{
    //Add the given book into the off-chain database.
    using (var database = DB.Open(dbFolder, dbOptions))
    {
        database.Put(WriteOptions.Default, Key("Book", "OwnerAddress", value.Book.BookId), value.OwnerAddress);
        database.Put(WriteOptions.Default, Key("Book", "Title", value.Book.BookId), value.Book.Title);
        database.Put(WriteOptions.Default, Key("Book", "Author", value.Book.BookId), value.Book.Author);
        database.Put(WriteOptions.Default, Key("Book", "Price", value.Book.BookId), value.Book.Price);
    }
    //TODO: Commit to blockchain
    return Request.CreateResponse(HttpStatusCode.OK);
}

[HttpPost]
[Route("books/update")]
public HttpResponseMessage UpdateBook(BookRequest value)
{
    //Update the given book on the off-chain database and on the blockchain.
    using (var database = DB.Open(dbFolder, dbOptions))
    {
        database.Put(WriteOptions.Default, Key("Book", "OwnerAddress", value.OwnerAddress), value.OwnerAddress);
        database.Put(WriteOptions.Default, Key("Book", "Title", value.Book.BookId), value.Book.Title);
        database.Put(WriteOptions.Default, Key("Book", "Author", value.Book.BookId), value.Book.Author);
        database.Put(WriteOptions.Default, Key("Book", "Price", value.Book.BookId), value.Book.Price);
    }
    //TODO: Commit to blockchain
    return Request.CreateResponse(HttpStatusCode.OK);
}

[HttpPost]
[Route("books/delete")]
public HttpResponseMessage DeleteBook(BookRequest value)
{
    //Delete the given book from the off-chain database.
    using (var database = DB.Open(dbFolder, dbOptions))
    {
        database.Delete(WriteOptions.Default, Key("Book", "OwnerAddress", value.Book.BookId));
        database.Delete(WriteOptions.Default, Key("Book", "Title", value.Book.BookId));
        database.Delete(WriteOptions.Default, Key("Book", "Author", value.Book.BookId));
        database.Delete(WriteOptions.Default, Key("Book", "Price", value.Book.BookId));
    }
    //TODO: Commit to blockchain
    return Request.CreateResponse(HttpStatusCode.OK);
}

[HttpPost]
[Route("books/purchase")]
public HttpResponseMessage PurchaseBook(OrderRequest value)
{
    //Add a purchase order for the given book into the off-chain database.
    using (var database = DB.Open(dbFolder, dbOptions))
    {
        database.Put(WriteOptions.Default, Key("Purchase", "BuyerAddress", value.OrderId), value.BuyerAddress);
        database.Put(WriteOptions.Default, Key("Purchase", "BookId", value.OrderId), value.Book.BookId);
    }
    //TODO: Commit to blockchain
    return Request.CreateResponse(HttpStatusCode.OK);
}- We now have a book store app that can interact with its own data store. Next, we'll decentralize our app by integrating with the smart contract we have created earlier.
We are almost there, our API can now function using its own storage. Now all that's left is to integrate the API with the smart contract on the blockchain.
There are several ways to invoke a smart contract on Neo. For this tutorial we’ll explore and use NeoLux, an open-source C# library for invoking Neo smart contracts.
Implementing Neolux:
-
In the BookStore.Api project, open package manager console and add the NeoLux reference:
PM > Install-Package NeoLux -Version 0.8.0 -
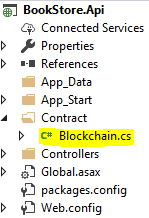
Create a new folder in the project named Contract and add a new class named Blockchain.cs inside this folder. This will act as our wrapper class to make interacting with our smart contract easier.
-
Edit the Blockchain.cs file and replace the entire content with the following code: Blockchain.cs
-
Fill in the wallet private key and the contract script hash in the class variables at the top of the class file. For the purpose of this tutorial, we are going to hardcode these values. However, when creating your actual Dapp, these should be in a configurable settings and best kept securely. Note: The private key and script hash must be in hexadecimal format.
//The private key of the wallet used to deploy the smart contract (In hex format)
private static string privateKey = "";
//Get this when deploying your contract to the blockchain (In hex format)
private static string contractScriptHash = "";- With the wrapper class complete, you can now invoke your smart contract from code like this:
Blockchain.InvokeScript("updateBook",
    new object[] {
        value.OwnerAddress,
        value.Book.Title,
        value.Book.Author,
value.Book.Price });- In the BookStore.Api project, open the Controllers/StoreController.cs file.
- Add the following line at the top of the class
using BookStore.Api.Contract; - For each HttpPost method in the controller, replace the line
//TODO: Commit to blockchainwith the following codes:
/*Replace in method: AddBook(BookRequest value)*/
//Commit to blockchain
Blockchain.InvokeScript("addBook",
    new object[] {
        value.OwnerAddress,
        value.Book.Title,
        value.Book.Author,
        value.Book.Price
    });
/*Replace in method: UpdateBook(BookRequest value)*/
//Commit to blockchain
Blockchain.InvokeScript("updateBook",
new object[] {
value.OwnerAddress,
value.Book.Title,
value.Book.Author,
value.Book.Price
});/*Replace in method: DeleteBook(BookRequest value)*/
//Commit to blockchain
Blockchain.InvokeScript("deleteBook",
new object[] {
value.OwnerAddress,
value.Book.BookId
});/*Replace in method: PurchaseBook(OrderRequest value)*/
//Commit to blockchain
Blockchain.InvokeScript("purchaseBook",
new object[] {
value.BuyerAddress,
value.OrderId,
value.Book.BookId
});- The final class file will look like this: StoreController.cs
- Finish.
Our API is now complete! Build the project and prepare for testing in the next section.
Finally, we are now ready to test the project.
Note: If you are following the agile development principles of test-driven development (TDD) when developing your dapp, this would be the first project created in the solution.
-
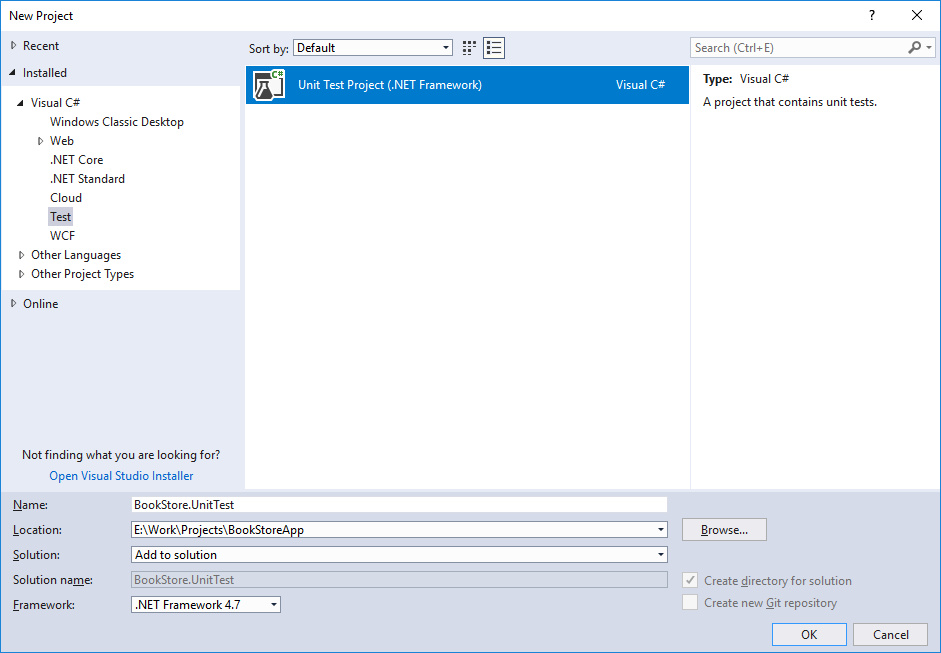
Add a new project to our BookStore solution from the menu
File > New > Project. -
Select Unit Test Project (.NET Framework), then enter the name BookStore.UnitTest. Make sure to select "Add to solution" under the Solution drop down. Click OK when ready.
-
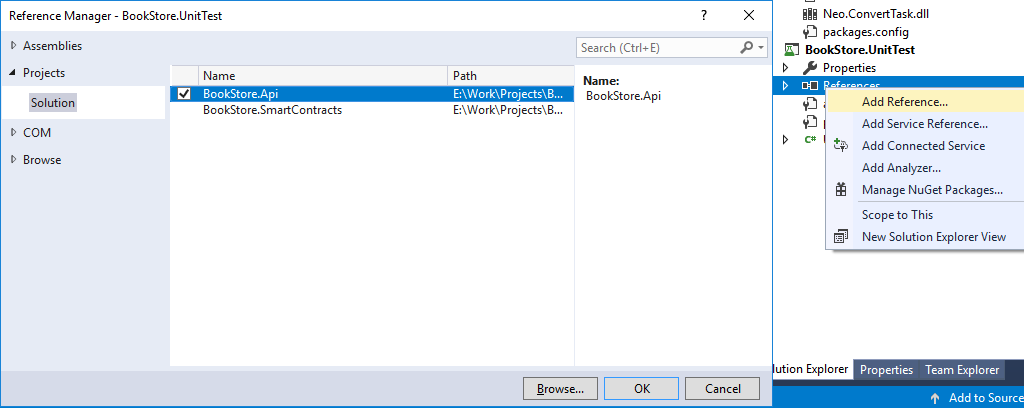
Once the project has been created successfully, add a reference to our BookStore.Api project. Right-click "References" in Solution Explorer to open the Reference Manager window. Select Projects : Solution from the left panel, then check "BookStore.Api". Click OK when done.
-
Next, add a reference to Web API 2.
PM > Install-Package Microsoft.AspNet.WebApiNote: The Microsoft.AspNet.WebApi version added in the unit test project must match the version in API project. -
Open the UnitTest1.cs file in the project from the Solution Explorer.
-
Replace all code in the class with the following:
using System;
using BookStore.Api.Controllers;
using Microsoft.VisualStudio.TestTools.UnitTesting;
using static BookStore.Api.Controllers.StoreController;
namespace BookStore.UnitTest
{
    [TestClass]
    public class UnitTest1
    {
        private string sellerAddress = "a8e2b5436cab6ff74be2d5c91b8a67053494ab5b454ac2851f872fb0fd30ba5e";
        private string customerAddress = "b8e2b5436cab6ff74be2d5c91b8a67053494ab5b454ac2851f872fb0fd30ba5c";
        //Note: When running tests in sequence, set this variable as a static string
        private string bookId = Guid.NewGuid().ToString();
        [TestMethod]
        public void TestMethod_AddBook()
        {
            Book book = new Book
            {
                BookId = bookId,
                Author = "Khaled Hosseini",
                Title = "The Kite Runner",
                Price = 225000
            };
            BookRequest bookRequest = new BookRequest
            {
                OwnerAddress = sellerAddress,
                Book = book
            };

            StoreController controller = new StoreController();
            var response = controller.AddBook(bookRequest);
            bool successful = response.IsSuccessStatusCode;
            Assert.AreEqual(true, successful);
        }
        [TestMethod]
        public void TestMethod_UpdateBook()
        {
            Book book = new Book
            {
                BookId = bookId,
                Author = "Khaled Hosseini",
                Title = "The Kite Runner",
                Price = 187000
            };
            BookRequest bookRequest = new BookRequest
            {
                OwnerAddress = sellerAddress,
                Book = book
            };
            StoreController controller = new StoreController();
            var response = controller.UpdateBook(bookRequest);
            bool successful = response.IsSuccessStatusCode;
            Assert.AreEqual(true, successful);
        }
        [TestMethod]
        public void TestMethod_PurchaseBook()
        {
            OrderRequest order = new OrderRequest
            {
                BuyerAddress = customerAddress,
                OrderId = Guid.NewGuid().ToString(),
                BookId = bookId
            };
            StoreController controller = new StoreController();
            var response = controller.PurchaseBook(order);
            bool successful = response.IsSuccessStatusCode;
            Assert.AreEqual(true, successful);
        }

        [TestMethod]
        public void TestMethod_DeleteBook()
        {
            Book book = new Book
            {
                BookId = bookId
            };
            BookRequest bookRequest = new BookRequest
            {
                OwnerAddress = sellerAddress,
                Book = book
            };
            StoreController controller = new StoreController();
            var response = controller.DeleteBook(bookRequest);
            bool successful = response.IsSuccessStatusCode;
            Assert.AreEqual(true, successful);
        }

    }
}-
Set your project to debug under x64 processor architecture. Without this, you may get the error "Unable to load assembly 'LevelDB.Net'" when debugging. To avoid encountering this, let's configure our projects for x64: From the menu go to
Debug -> Options -> Projects and Solutions -> Web Projects. And select Use the 64 bit version of IIS Express for web sites and projects.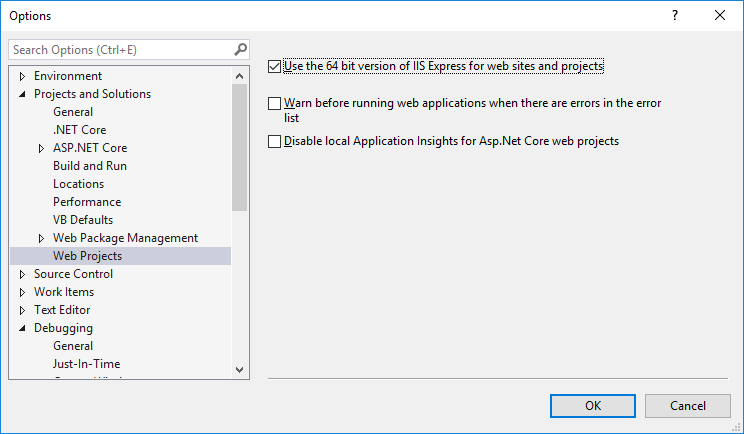 From the menu go to
 Test > Test Settings > Default Processor Architecture > x64.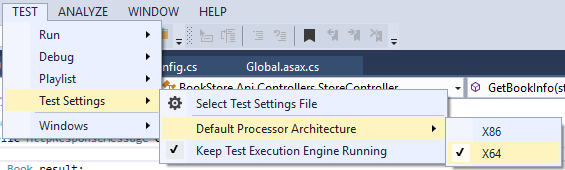
-
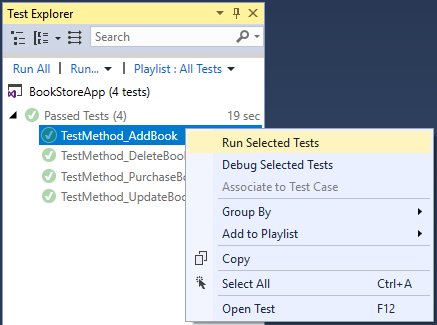
Done. We are now ready to run the tests. In Visual Studio menu, go to
Test > Windows > Test Explorer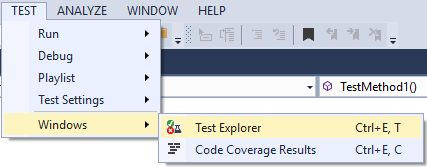
-
Right-click > Run Selected Tests for each test in the following sequence: TestMethod_AddBook, TestMethod_UpdateBook, TestMethod_PurchaseBook, TestMethod_DeleteBook
-
Finish.
We have come a long way in creating our Book Store dapp. However, there are several improvements that should be taken care of before launching the dapp to production or beta test. Here are some suggestions:
-
Transaction Queues: As mentioned at the beginning of the tutorial, a scalable and responsive dapp must respond to client requests in a timely manner. This is where a queuing system can help by allowing immediate response to clients while transactions are queued to be eventually committed.
-
Consistency Handling: Consistency between the off-chain and blockchain should be properly maintained. The off-chain database can include a rollback mechanism if a transaction is unable to commit on the blockchain. There shouldn't be a case where a transaction is permanently on the off-chain database but not on the blockchain, unless it is by design.
-
Request Validation: As always, it is best to validate any requests to avoid unexpected errors or worse; corrupted data. In this case, we can improve the reliability of our dapp by validating the parameters sent to the API and the smart contract, before committing any transaction. An example of this would be checking for null values. Note that this kind of validation is different from business rules verification like checking wallet balance before making purchase.
-
Testing: As with any software, thorough testing is a must before release. In this tutorial, we have used the unit test feature in Visual Studio. While this is an efficient way to perform test runs during development, it is not a complete end-to-end test. This is because the unit test triggers our controller method directly without going through http requests. Once development is done, host the API on IIS and perform an end-to-end tests using actual http requests. A useful and free tool to perform API tests would be Postman.
-
Logging: You may have noticed that the tutorial did not include any exception logging. This is an important necessity in any production application. You may use any logging mechanism that helps you detect and troubleshoot errors. Personally, I use NLog for most of my C# projects.
We have covered designing the architecture of a dApp, creating and deploying smart contracts, integrating it with the dApp API, and implementing a supporting off-chain database, as well as unit testing our app. There is much to learn when it comes to decentralize application development, and what this tutorial has covered is really just the surface. Hopefully this tutorial was a good demonstration on one way to build a dApp on NEO blockchain.