How To create Decals
This is a general introduction to the matter; as such it won't address program specific behavior. In fact everything that follows should be applicable to any vector drawing program and to some extent even raster image drawing.
Before you begin please note, that templates and color swatches can be found in the resources folder.
When using vector programs to draw you actually define mathematic expressions. Each path consists of several nodes and each node has two control points. Two consecutive nodes are connected through a beziér curve.
Let's break that down a bit, shall we? Look at the following image:
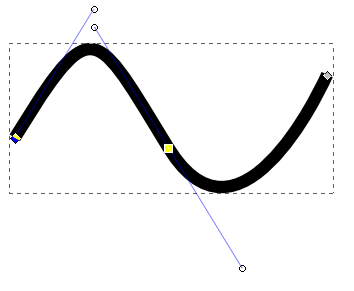
Those square markers along the black path are called nodes. Those blue lines going away from them with the balls at the end, that look like satellites are called control points. Look at the left most node and the one in the middle. A path consists of several of these two-node-segments, called beziér curves. A beziér curve is guaranteed to run through the nodes and tries to interpolate the box given by the nodes and their control points. The further away a control point is from its node, the more weight it has, i.e. the curve tries harder to stretch that way.
This seems like an unnecessary detail, but it helps in understanding what's going on. You see not every path is smooth. The interpolation starts anew between every two-node-segment. To get a smooth curve the control points of the connecting node have to form a straight line. If they’re at an angle so will the path at that node. Your chosen program probably has a way of setting the node type to continuous or smooth and various other to influence a nodes behavior, make yourself accustomed with them.
Most programs allow you to edit a path by simply dragging the curve. The control points then can be mostly ignored. Use them for fine tuning.
When creating decals you should take a few minutes to think through what you're about to do and if necessary look for references. If you are recreating an official decal from The Lego Group (TLG) take time to find a good source image.
What if you're trying to create a new one? Well that depends on the effect you want to achieve, of course. Here are some questions to ask yourself:
- What is the simplest representation of my goal? Official decals are often simplified. Tiny details won't get printed anyway and too many details will take away resting points for the eye.
- Is there anything I can reuse? Does your decal contain elements that TLG has already created? Have a look at the figures and the library here. Is there anything you can use? There are two benefits to reap here:
- By reusing official pieces it will make it easier for your decal to fit in with official figures. Also if TLG reuses elements of their decals, why shouldn't you?
- By reusing elements from our figures and library you can considerably speed up the creation of a decal.
- Are their "standards" to look out for? The way TLG designs their minifigs varies over time. If you want your decal to fit in with a certain theme, than look at a few torsos from that theme. Are their repetitive elements? The super heroes for example all use the same muscle torso. What about lines? Are they rounded or angular, thin or thick?
Your own collection should be a great resource for figures. Photograph them using a macro lens or a macro setting for best results.
Bricklink is of course the most comprehensive catalog around. The quality of the images varies a lot though.
Firestartoys sells minifigs. Most of their photographs are great source material, especially their part section.
The official Lego Collectible Minifigures Page has great 3D renders of the minifigures. The 3D renders best convey the intention of the original artist.
Eurobricks is another great source for photographs. The set reviews usually contain straight on shoots of the minifig. This of course means you have to know the set number or name. Also look out for the purist threads in the Minifig Customization Workshop. Users there are often very creative and dig out old, rare and odd minifig parts. Also have a look at the news section.
Images found at the Lego Wikia usually are not good enough source material, but it can be very helpful in finding the official set or name of a minifig.
Of course there is still google, flickr (where most of the reviews keep their images anyway) and ebay, but it can be time consuming finding what you need.
Use pt (point) as your measuring unit. Try to stay above a width of 0.3pt. This has to do with printing resolutions. Depending on the printer used to print decals, lines below this width are unprintable. Of course even TLG goes below this width, but sparingly and so should you.
The lines in newer torsos are hardly ever perfectly angular. Most of the time they are a bit rounded. This can be easily achieved by giving your lines a rounded outline.
Set your reference image as background and start tracing it if you want. The images created this way will be sufficient. More often than not they will also seem a bit off.
Invest a minute or so in planning. This will again help you create a better image faster.
Often torsos are mirrored along the vertical axel (with minor alterations). Use a flipped clone to create the other half of the torso. Doing this early on will also have the added benefit of seeing your lines mirrored, which is a good way to see if your lines seem correct.
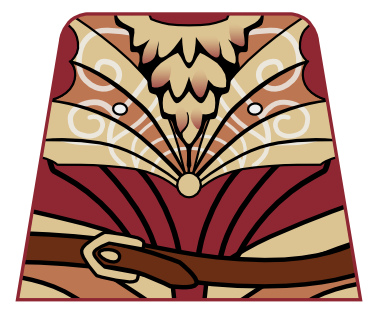
Take a look at the following torso. Except for the belt and some color variations at the neck both the left and right sides are perfectly mirrored.
Break your decal into layers. Don't try to do everything at once. Create a layer for each element you're creating (body, jacket, belt, logo, ...) and hide the others. This way you'll
- concentrate on one element at the time.
- won't be bothered by accidently clicking on other elements.
- improve the cpu load of your computer (hidden elements don't need to be rendered).
- be reassured to create complex elements without fear of losing oversight.
When learning to draw we are taught to break things up into more basic elements. Do the same when tracing torsos. Don't just trace the lines; instead try to guess the shapes the original designer used to create the effect. The tools join and intersect are very helpful with this approach. Most belts and straps are simple lines. Instead of drawing the outline by hand you could create a beziér curve as thick as the strap or belt. Position it and turn it into an outline and give it a stroke.
Look at the following image as example. Not only is it mirrored along the vertical axel, but the falcons head and its wings form perfect circles. The inside of the wings form an oval. Also the tips of the wings not only form a circle they are the rounded tips of a star with a bit over twenty points.

Use clones and repetition if possible. Most programs have tools to align elements into rows and columns. Make it easier for yourself and use them instead of tracing the lines individually or arranging them by hand.
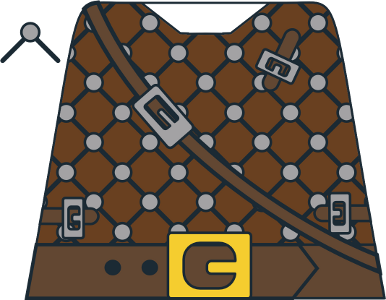
In the following image the form on the left consists of a circle and two lines at a right angle. By using tools to align and distribute doubles into rows and columns the creation of this gambeson was done very fast and in this case created the best possible outcome.
Take time to know your tools and find shapes. Often a certain effect can be achieved by using a certain filter or tool. The wings of the old falcon logo (see image above) are made of a star with rounding activated. No need to draw all that by hand. Instead of turning a beziér curve into an outline to create a belt you could create a linked offset path that you put behind your line and give a very thick border; this way you can easily change the line later on.
Knowing your tools also means to not forget what other tools you have, or to ignore knowledge you gathered. A crack at XML or at least not afraid to look at it? Well SVG is XML some things may be easier to do in XML than in your svg-editor. You know your way around photo manipulation? Improve the contrast of your reference images to help with your tracing. Or mask out an especially difficult form to have your svg-editor auto-trace it.