Hello World
Now let's do some hello world stuff. This addresses several targets at once:
- We need a minimal setup, to do some end-to-end testing.
- We figure out how to run a minimal case.
- We address some additional requirements of real world applications.
The script activate_alexa_actionable_notification is installed and the system is well configured.
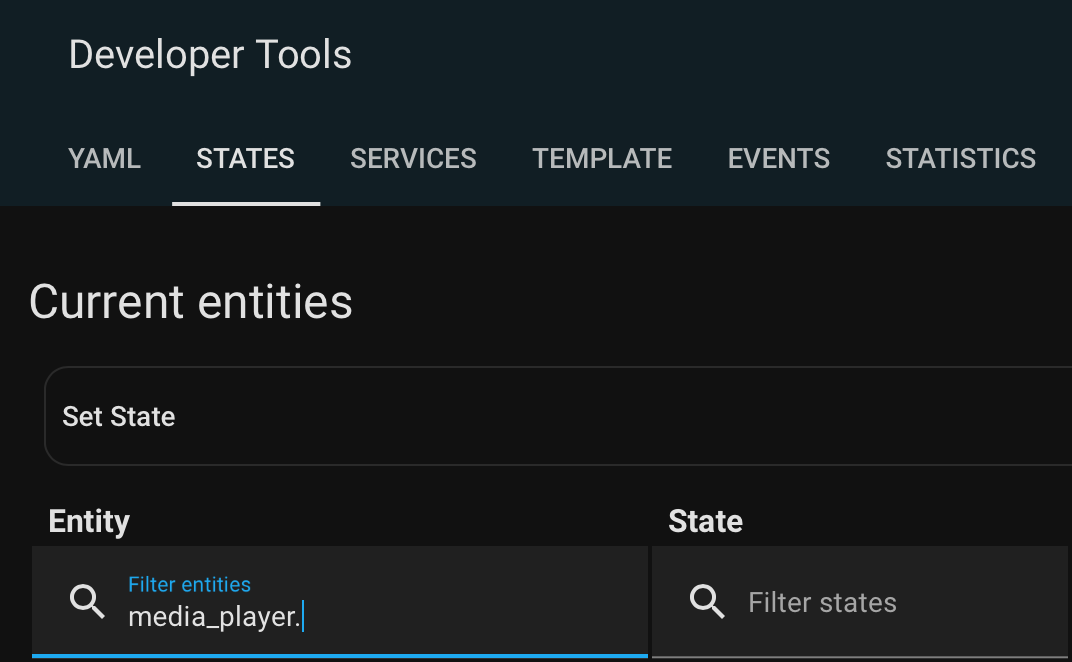
You have the ID of your media player at hand (i.e. an Echo device) to set into media_player.<Your Media Player> within the following templates. In doubt go to Developer Tools > STATES and search for it.
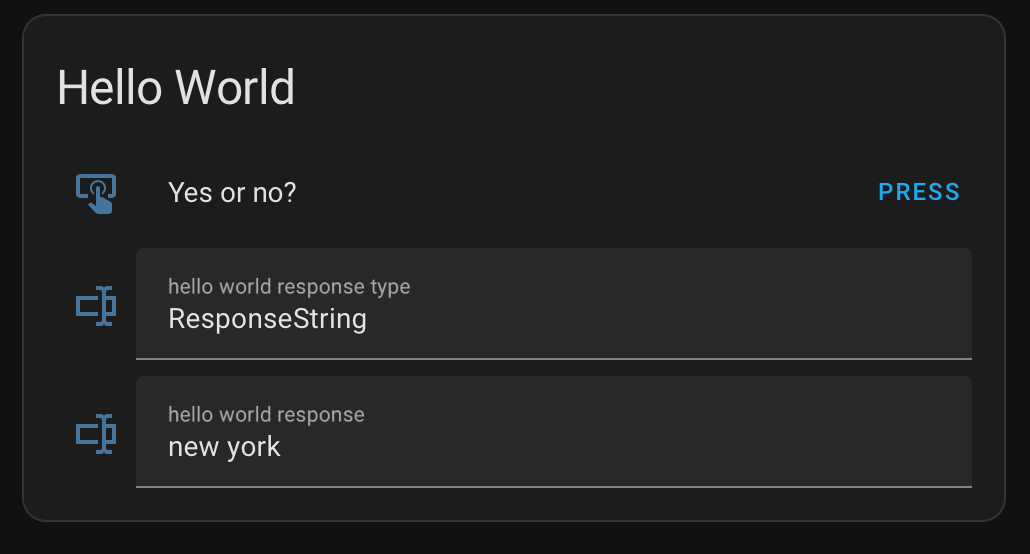
To /config/configuration.yaml we add a button for to trigger the question and two text fields to display the response.
input_button:
  hello_world_trigger:
    name: Yes or no?

input_text:
  hello_world_response_type:
    name: hello world response type
  hello_world_response:
name: hello world response- Translate
Yes or no?to your language. - Save the file.
- Use the Developer Tools to reload INPUT BUTTONS and INPUT TEXTS.
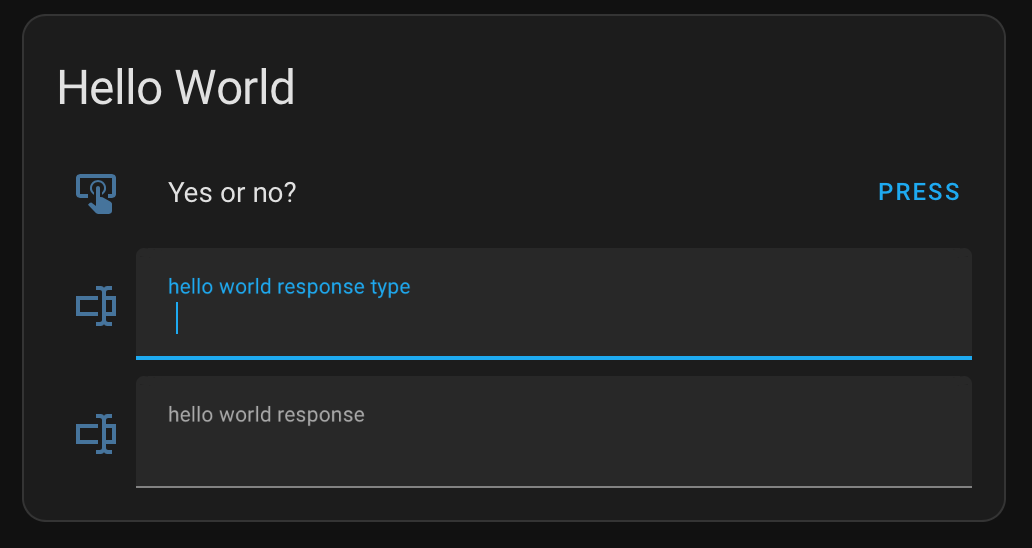
    cards:
      - type: entities
        title: Hello World
        entities:
          - input_button.hello_world_trigger
          - input_text.hello_world_response_type
- input_text.hello_world_responseWe wire it all up by adding automations to /config/automations.yaml. We need at least one for the question and one for the response.
- id: '1672409289559'
  alias: Hello World Question
  trigger:
  - platform: state
    entity_id: input_button.hello_world_trigger
  action:
  - service: script.activate_alexa_actionable_notification
    data:
      text: Yes or no?
      event_id: hello_world
alexa_device: media_player.<Your Media Player>- Set
alexa_deviceto the ID of<Your Media Player>. - Translate
Yes or no?to match the yes and no intents of the interaction model of your Alexa skill.
- id: '1672413097885'
  alias: Hello World Response
  trigger:
  - platform: event
    event_type: alexa_actionable_notification
    event_data:
      event_id: hello_world
  variables:
    response_type: "{{ trigger.event.data.event_response_type }}"
    response: "{{ trigger.event.data.event_response }}"
  action:
  - service: input_text.set_value
    data:
      value: "{{ response_type }}"
    target:
      entity_id: input_text.hello_world_response_type
  - service: input_text.set_value
    data:
      value: "{{ response }}"
    target:
entity_id: input_text.hello_world_response- Save the file.
- Use the Developer Tools to reload AUTOMATIONS.
The main takeaways are the two paths to access the data of your response. Also observe how question and response are related by the event_id, that you can freely choose.
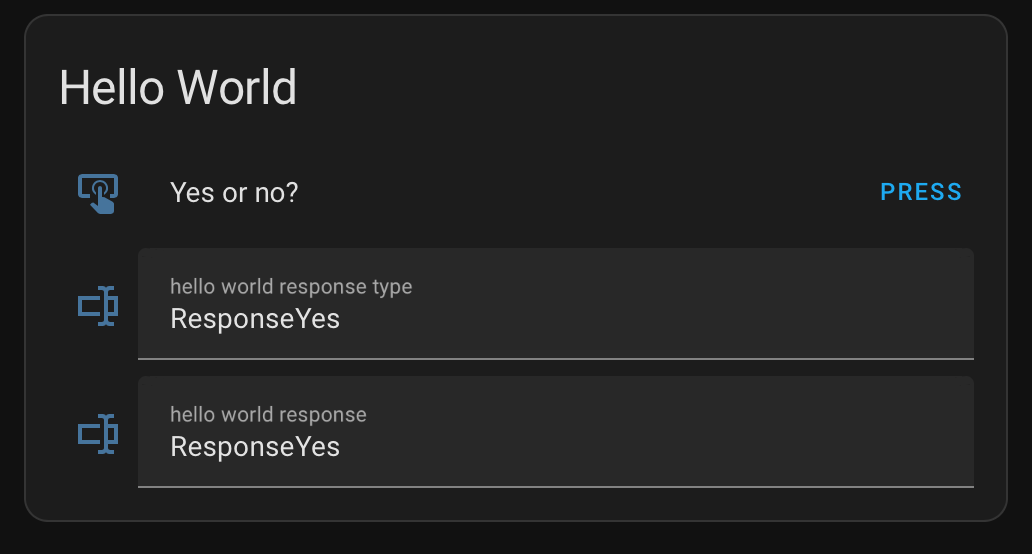
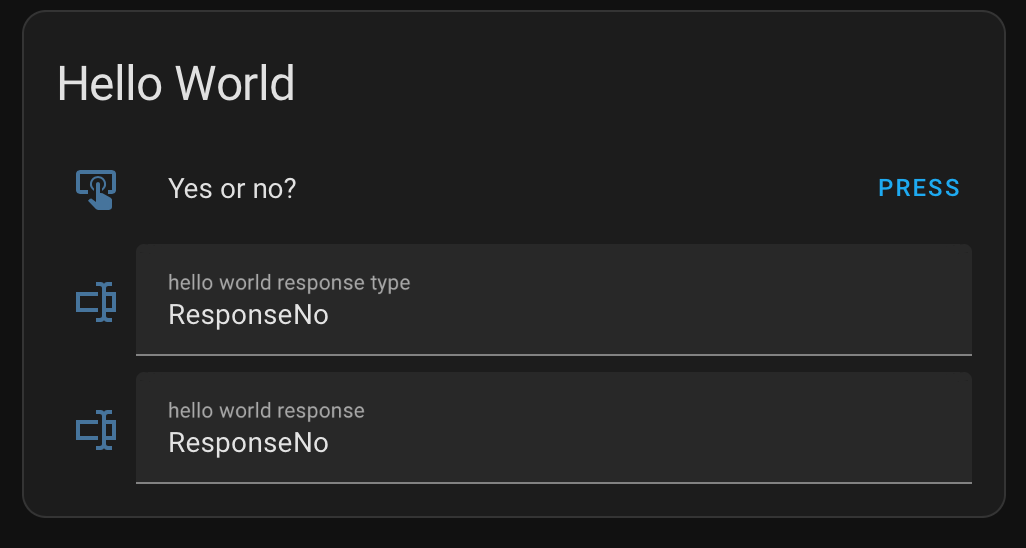
Hit PRESS to trigger the tests.
The user may not act as we expect him to do. Instead of the response types ResponseYes or ResponseNo we may also receive a response of the type ResponseString or something else. Still our little hello world example is not prepared for the real world.
There are multiple approaches to solve this. You may even rework the interaction model of the Alexa skill. The most simple solution is to filter the expected response types.
Let's extend the script Hello World Response accordingly. We specify two different events. Each one catches one response type. All other types are just ignored.
We apply a choose switch to route to different actions depending upon the type. This kind of duplicates the filtering (and we may go with one of the two options only). For reason of this duplication the default action should never be reached.
We do this by sending notifications via the Alexa Media Player.
- id: '1672413097885'
  alias: Hello World Response
  trigger:
  - platform: event
    event_type: alexa_actionable_notification
    event_data:
      event_id: hello_world
      event_response_type: ResponseYes
  - platform: event
    event_type: alexa_actionable_notification
    event_data:
      event_id: hello_world
      event_response_type: ResponseNo
  variables:
    response_type: '{{ trigger.event.data.event_response_type }}'
    response: '{{ trigger.event.data.event_response }}'
    device: media_player.<Your Media Player>
  action:
  - service: input_text.set_value
    data:
      value: '{{ response_type }}'
    target:
      entity_id: input_text.hello_world_response_type
  - service: input_text.set_value
    data:
      value: '{{ response }}'
    target:
      entity_id: input_text.hello_world_response
  - choose:
    - conditions: '{{ response_type == "ResponseNo" }}'
      sequence:
      - service: notify.alexa_media
        data:
          message: You said no
          target:  '{{ device }}'
    - conditions: '{{ response_type == "ResponseYes" }}'
      sequence:
      - service: notify.alexa_media
        data:
          message: You said yes
          target:  '{{ device }}'
    default:
    - service: notify.alexa_media
      data:
        message: Oops, this should never happen. Check your scripts!
target: '{{ device }}'- Update the
devicevariable with the ID of<Your Media Player>. - Do translations.
- Save the file.
- Use the Developer Tools to reload AUTOMATIONS.
The best user experience may be to get a spoken warning, when things go wrong. This does strongly depend upon your use case. To do so you could go without event filtering while using the default action to deal with unexpected responses.
Automations for responses tend to become complex quite quickly. You may want to use multiple automations instead, one per action.
Obviously hello_world is not a very distinctive namespace. It is used for educational purposes only. You should choose a smarter system of namespaces for your real word applications.
This is how the initial hello world (without event filtering and action routing) would look like in the canvas.
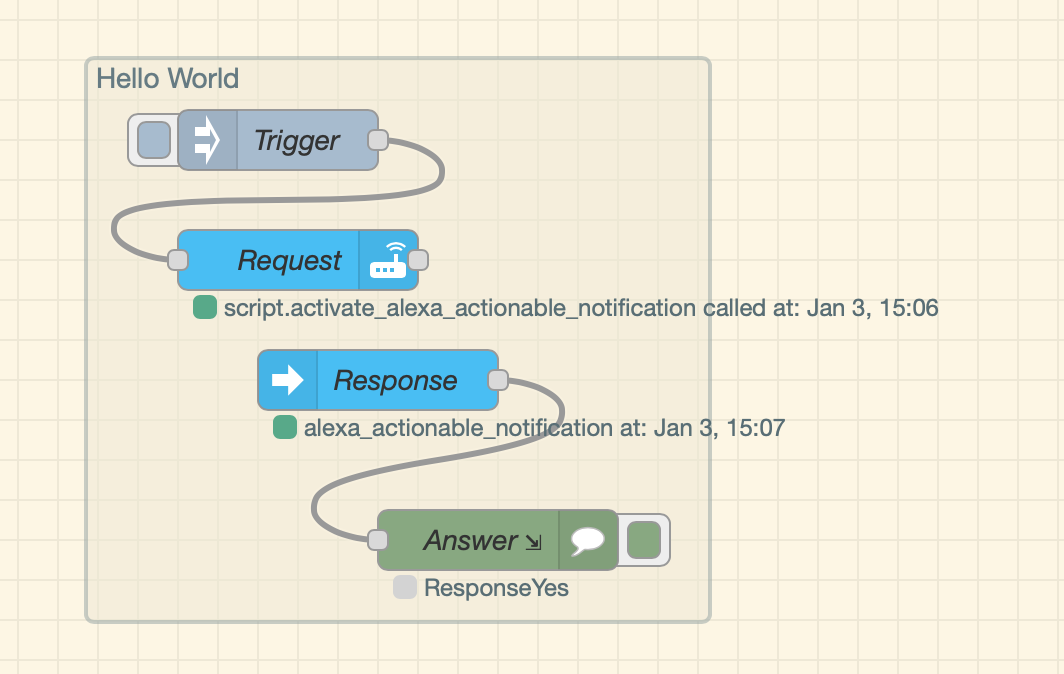
The request node is a service call to the script you have installed.
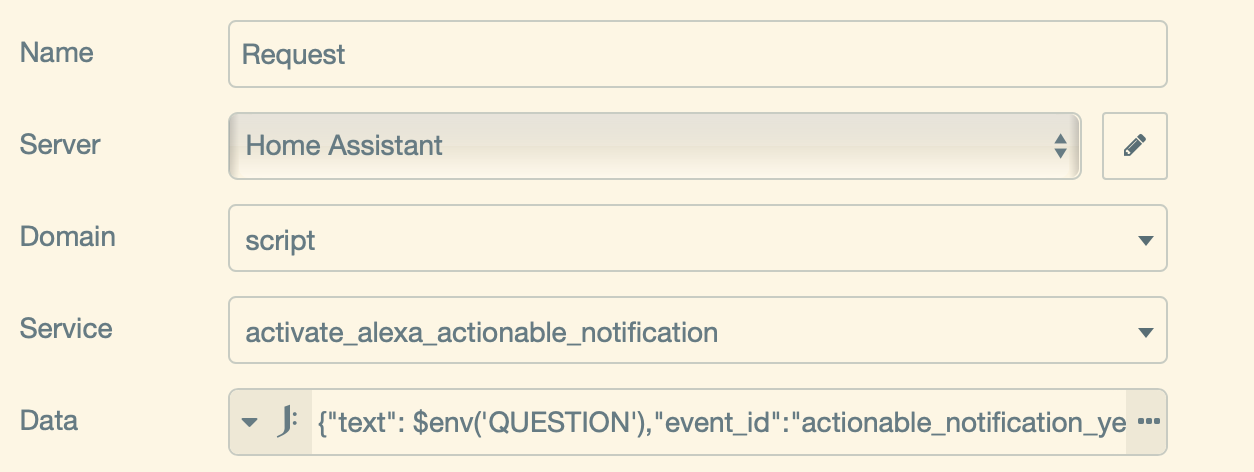
Node red guides you, which configuration is required to set it up.

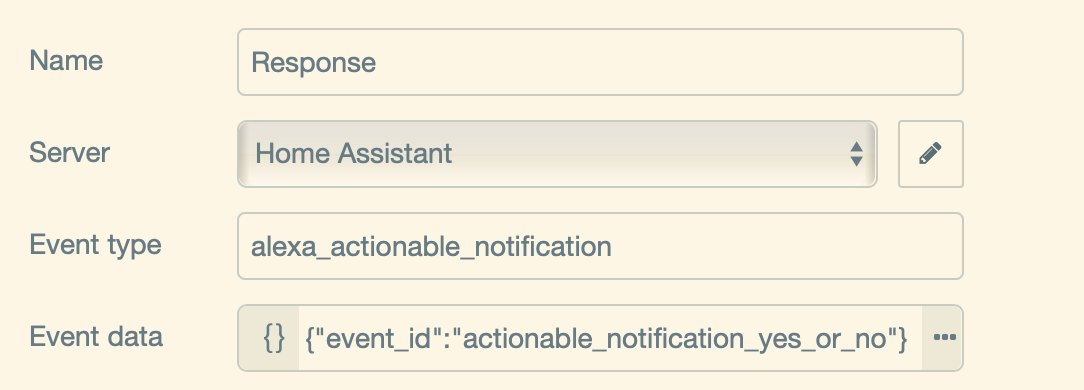
The response node is an event listener, that listens to the event type of alexa_actionable_notification and to the event_id you did choose.
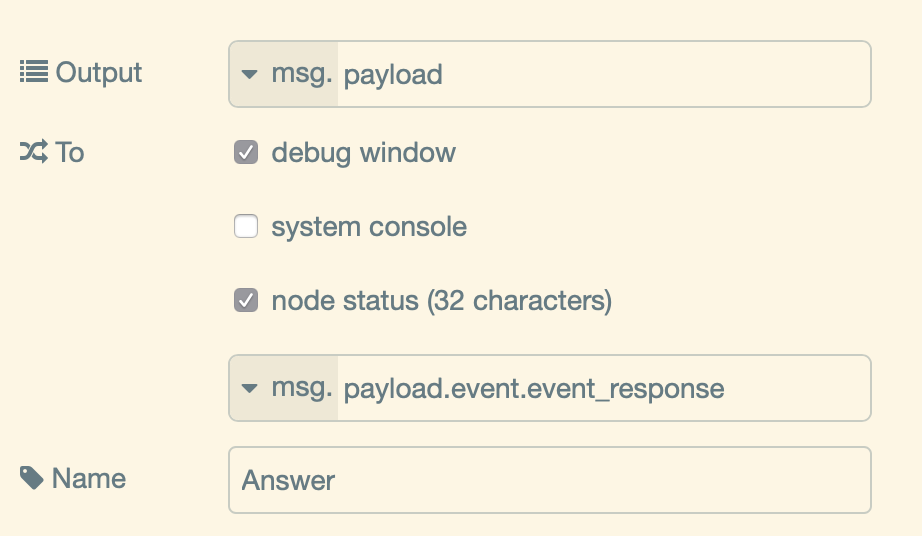
The debug node of the response is configured to display msg.payload.event_response.
Congratulations, you brought Alexa Actionable Notifications to life. You are prepared to make your home a real smart home.
The step-by-step tutorial is ending here. We hope you had a good experience. If you discovered something faulty or missing, don't hesitate to improve the wiki or to create an issue ticket.
Further reading:
- See some examples of real word applications: Examples
- Discover advanced features: Advanced Features
- Consult the FAZ: FAQ