1b tables and loops
« 1a Quads and Images | index | 1c More Tables »
On this tutorial we’ll start using tables and loops for streamlining our code and automate repetitive tasks.
The complete source code of this step can be found here:
On this step we’ll make use of tables, subtables and nested loops. You can read about those in the following sections:
On step 1a we ended up with a code that looked like this:
function love.draw()
  love.graphics.draw(Tileset, GrassQuad, 368, 268)
  love.graphics.draw(Tileset, GrassQuad, 400, 268)
  love.graphics.draw(Tileset, GrassQuad, 432, 268)
  love.graphics.draw(Tileset, GrassQuad, 368, 300)
  love.graphics.draw(Tileset, BoxQuad  , 400, 300)
  love.graphics.draw(Tileset, GrassQuad, 432, 300)
  love.graphics.draw(Tileset, GrassQuad, 368, 332)
  love.graphics.draw(Tileset, GrassQuad, 400, 332)
  love.graphics.draw(Tileset, GrassQuad, 432, 332)
end
This code is usually called “Copy-paste code”. It is a bad way of doing things because there’s a lot of unnecessary repetition – and that complicates making changes. For example, if you wanted to rename the Tileset variable to TileSet (the second one has an uppercase ‘S’), you would have to change it in no less than 9 lines.
When you see code that repeats itself a lot, there’s probably a way of writing it using tables and/or loops. That’s what we’re going to do on this step.
There’s a programming rule called Don't Repeat Yourself, or DRY, that specifically targets this kind of code. When you transform Copy-paste code into non-repetitive code, you can say that your code has been DRYed, or that your code is dry.
On this example we’ll be using the 4 tiles we had on the previous one:

On this step, we’ll use numbers to represent each type of tile. Grass will be represented by a number 1, Box by 2, Flowers by 3 and Boxtop by 4:

We’ll now create a global table called Quads. That table will contain 4 quads, in positions 1,2,3 and 4.
-- Inside love.load, right after calculating tilesetW and tilesetH:

Quads = {
  love.graphics.newQuad(0,   0, TileW, TileH, tilesetW, tilesetH), -- 1 = grass
  love.graphics.newQuad(32,  0, TileW, TileH, tilesetW, tilesetH), -- 2 = box
  love.graphics.newQuad(0,  32, TileW, TileH, tilesetW, tilesetH), -- 3 = flowers
  love.graphics.newQuad(32, 32, TileW, TileH, tilesetW, tilesetH)  -- 4 = boxtop
}
We are using the shortcut notation there. That code is equivalent to this one:
Quads = {}
Quads[1] = love.graphics.newQuad(0,   0, TileW, TileH, tilesetW, tilesetH) -- 1 = grass
Quads[2] = love.graphics.newQuad(32,  0, TileW, TileH, tilesetW, tilesetH) -- 2 = box
Quads[3] = love.graphics.newQuad(0,  32, TileW, TileH, tilesetW, tilesetH) -- 3 = flowers
Quads[4] = love.graphics.newQuad(32, 32, TileW, TileH, tilesetW, tilesetH) -- 4 = boxtop
Now we can reference the grass quad as Quad[1], and the flowers quad as Quad[3].
We’ll now proceed to create a table that stores, in rows and columns, what quad do we want to store on each tile in our map.
Let’s say that we wanted to represent what we had on the previous step:

Now we can do that using a table with subtables, like so:
TileTable = {
  { 1,1,1 },
  { 1,2,1 },
  { 1,1,1 }  -- notice that the last comma isn't needed here
}
We now need a way to draw it on the screen. And for that, we need loops.
First off, we need to make some local variables available in love.draw for calculation. So we take:
-- Inside love.load:
local tileW, tileH = 32, 32
and make it global like so:
TileW, TileH = 32, 32Note how we capitalized the variable names to indicate they can be accessed globally now.
Now we know all we need. TileTable is a table of tables, so in order to draw it properly we’ll need a nested loop.
Here it is:
function love.draw()
  for rowIndex=1, #TileTable do
    local row = TileTable[rowIndex]
    for columnIndex=1, #row do
      local number = row[columnIndex]
      love.graphics.draw(Tileset, Quads[number], (columnIndex-1)*TileW, (rowIndex-1)*TileH)
    end
  end
end
In order to understand those two loops, we’re going to imagine that TileTable is defined like this:
-- 3 boxes arranged on a diagonal line:
TileTable = {
  { 1,1,2 },
  { 1,2,1 },
  { 2,1,1 }
}
Keep in mind however that TileTable could have any width and height.
But on this example TileTable is a table made out of 3 elements – each one of them is also a table. The tables inside TileTable represent each “row” of 3 tiles.
What we need is something that, using that table, tells us “grass goes here” and “a box goes over there”.
The easiest way is by making two loops, one inside the other.
for rowIndex=1, #TileTable do
  local row = TileTable[rowIndex]
The first loop (or “external” loop) has a looping variable called rowIndex. It starts on 1, and it’s gradually incremented until it reaches the length of TileTable (on this example, that’s 3).
So rowIndex is 1 on the first loop iteration, 2 on the second one, and 3 on the third.
rowIndex is used to set up another variable, called simply row. row will contain the different rows of TileTable (one on each iteration).
On the first iteration, rowIndex is 1, so row is TileTable1; in other words, row is the first subtable: {1,1,2}. Similarly, on the second iteration, rowIndex is 2, and row is {1,2,1}. Finally, on the last iteration, row will be {2,1,1}.
But we still don’t have something that tells us “grass goes here”. row contains a “list” representing several horizontal tiles, but what we need is individual tiles instead.
The trick is doing something with row before it changes its value.
The steps we need to perform could be written as follows:
row = {1,1,2}
-- do something with row here
row = {1,2,1}
-- do something with row here
row = {2,1,1}
-- do something with row here
That “something” can even be another loop. We’ll call that second loop the internal loop.
  for columnIndex=1, #row do
    local number = row[columnIndex]
The internal loop defines another looping variable, this one called columnIndex. It goes iteratively from 1 to the length of row (3, in our example).
The first like inside the body of the internal loop sets up another variable called number. number gets iteratively initialized with row[1], row[2] and row[3]. In other words, when row is {1,1,2}, number iterates over it, getting the values 1,1 and 2. It’s called number because it gets the “number” that represents each tile.
    local x = (columnIndex-1)*TileW
    local y = (rowIndex-1)*TileH
With number we have something that tells us “grass”, “grass”, “box”, etc.
The only thing missing is the “here” of “grass goes here”. We encode that “here” in two variables, called x and y. Their calculation is very simple. For x, we use rowIndex and the tile width; for y, columnIndex and the tile height.
love.graphics.draw(Tileset, Quads[number], x, y)Finally, that last line obtains the quad referenced by number, and draws it on the coordinates calculated on x and y.
The good thing is that we can now replace TileTable with something much bigger, and it will work just the same!
TileTable = {
{ 4,2,2,2,2,2,2,2,2,2,2,2,2,2,2,2,2,2,2,2,2,2,2,2,4 },
{ 4,1,1,1,1,1,1,1,1,1,1,1,1,1,1,1,1,1,1,1,1,1,3,1,4 },
{ 4,1,3,1,1,1,1,1,1,1,1,1,1,1,1,3,1,1,1,1,1,1,1,1,4 },
{ 4,1,1,1,1,1,1,1,2,1,1,2,1,1,1,1,1,1,1,1,1,1,1,1,4 },
{ 4,1,1,1,1,1,1,1,1,1,1,1,1,1,1,1,1,1,1,1,1,1,1,1,4 },
{ 4,1,1,4,1,1,1,1,1,2,2,1,1,4,1,1,1,4,1,4,2,2,1,1,4 },
{ 4,1,1,4,1,1,1,1,4,3,3,4,1,2,1,1,1,2,1,4,1,1,1,1,4 },
{ 4,1,1,4,1,1,1,1,4,3,3,4,1,1,4,1,4,1,1,4,2,2,1,1,4 },
{ 4,1,1,4,1,1,1,1,4,3,3,4,1,1,2,1,2,1,1,4,1,1,1,1,4 },
{ 4,1,1,4,1,1,1,1,2,3,3,2,1,1,1,4,1,1,1,4,1,1,1,1,4 },
{ 4,1,1,2,2,2,2,1,1,2,2,1,1,1,1,2,1,3,1,2,2,2,1,1,4 },
{ 4,1,1,1,1,1,1,1,1,1,1,1,1,1,1,1,1,1,1,1,1,1,1,1,4 },
{ 4,1,1,1,1,1,1,1,1,2,1,1,1,1,2,2,4,1,1,1,1,1,1,1,4 },
{ 4,1,1,1,1,1,1,1,4,3,4,1,1,1,1,1,2,1,1,1,1,1,1,1,4 },
{ 4,1,1,3,1,1,1,1,2,3,2,1,1,1,1,2,1,1,1,1,1,1,1,1,4 },
{ 4,1,1,1,1,1,1,1,1,2,1,1,2,1,2,1,1,1,1,1,1,1,3,1,4 },
{ 4,1,1,1,1,1,1,1,1,1,1,1,1,1,1,1,1,1,1,1,1,1,1,1,4 },
{ 2,2,2,2,2,2,2,2,2,2,2,2,2,2,2,2,2,2,2,2,2,2,2,2,2 }
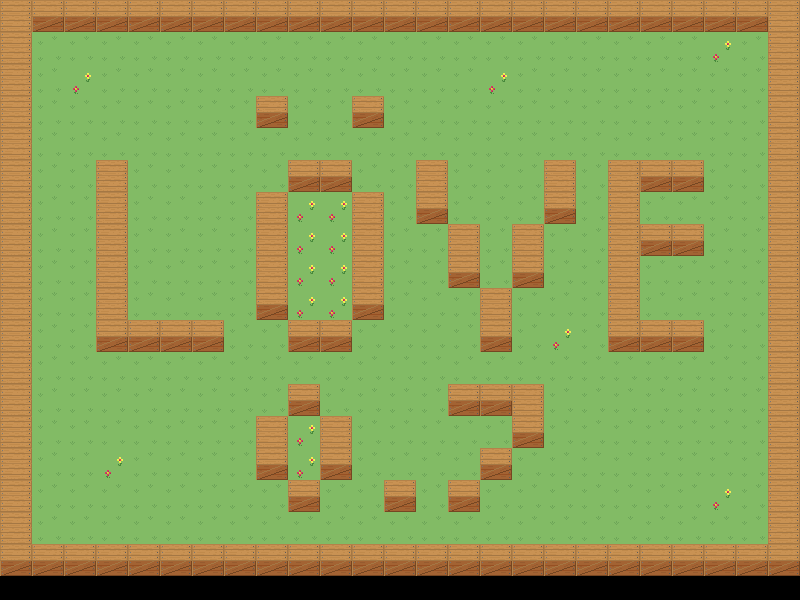
}This will give you:
Now imagine doing that with the code we had on the first step. Huge improvement!
Current approach has some problems:
-
TileTableis indexed first by row, then by column. If you want to know the number of the tile in 12,16, you have to doTileTable[16][12]. It would be more appropiate to index it like thisTileTable[12][16]. -
TileTableis a bit too cryptic. Numbers aren’t as easy to interpret as, say, characters. Also, if you have more than 10 types of tiles, your tile array is going to become unaligned pretty easily.
We will see how to solve all these problems on the next step.
- Experiment changing the numbers of
TileTable, and getting new figures.