The purpose of this tutorial is to walk through the key features of React JS and to outline some of the basics through the development of a single page application. Furthermore, this tutorial is geared towards beginners and people who are new to web development and the architecture/file structure needed to develop applications. The intention is to learn by doing, specifically by creating a functional application with multiple page views and then host it on the Repl.it servers for the world to see. Repl.it was chosen as the environment to write code in because of the ease of accessibility and setup, moreover because it allows you to ‘host’ your completed work at a URL address from the start.
The approach for designing the application itself is organized into two parts and these sections are as follows:
Part 1: Creating A Barebones Single Page App With Create-React-App
Part 2: Styling the Single Page App Page Views
Tutorial PDF format: https://github.com/kitfud/SinglePageAppTutorial/blob/master/TutorialDocuments/Starving%20Artist_%20Time%20to%20React%20With%20Single%20Page%20Apps!%20.pdf
Repl.it Repo/Hosting:https://repl.it/@KitFuderich1/SinglePageApp
Live Deployment of App: https://artserver-9afd8.web.app/home
Resource Walkthrough: https://www.youtube.com/watch?v=PYmPZERDtRo&feature=youtu.be
Times are tough! The other day I contacted a bunch of coffee shops to see if anyone could exhibit my artwork. With the response across the board being, “no”- it’s finally time to “React” and to figure out a way to deploy my artwork online so I can showcase what I have!
For displaying artwork online you could go ahead and choose an established web service like Instagram but that would not allow the flexibility, long term, for if your website/application grows and you want to add customized features.
In the end, you have a variety of options to choose from for building your app/product but in my opinion the easiest way to code something up for display, such as showcasing images of paintings, is to use the React JS as a framework for developing our website in conjunction with the ‘create-react-app’ tool to accelerate development.
React JS allows us to create a hybrid of HTML/CSS known as JSX and this flexibility will allow us to code up our own ‘custom’ components. Towards this end, React JS allows us to extend the basic functionality of HTML/CSS and blend JavaScript within our syntax; all of which will be helpful for making our webpages interactive.
- Students will scaffold an application using ‘create-react-app’ and host an application on the Repl.it environment/servers
- Students will apply component based architecture (and thinking) for managing their app file structure
- Create a single page application using the package add on, ‘react-router-dom’
- Implement some basic CSS rules for styling the header and footer with the inclusion of a navigation interface (‘navbar’)
- Use React JSX to render individual components to the browser
- It is necessary that students have a good grasp of Javascript before jumping into development with React JS.
- For React JS you’ll want to be familiar with ES6 syntax. During this tutorial, arrow functions and the higher order map() function is used.
- Experience with HTML/CSS and how the structure of code dictates the template for what is ‘viewed’ as the end result of a data flow.
- Important: I recommend that you complete the following React JS tutorial from the official documentation page: https://reactjs.org/tutorial/tutorial.html
We will be coding the entirety of this application within the Repl.It environment. This will allow us to centralize our learning in one place and also allow for the importing of packages which would otherwise have to take place through the use of the Command Line arguments and the use of a package delivery service such as, NPM.
The decision to work in Repl.It is also to ensure maximum accessibility to an environment for writing React JS as all you’ll need is access to the internet and then the ability to navigate to the website URL: https://repl.it/.
Repl.It will also allow us to save or work, view previews of our code also host our finished project at a URL address. These are all excellent affordances for someone just wanting to tinker around and play with some React JS!
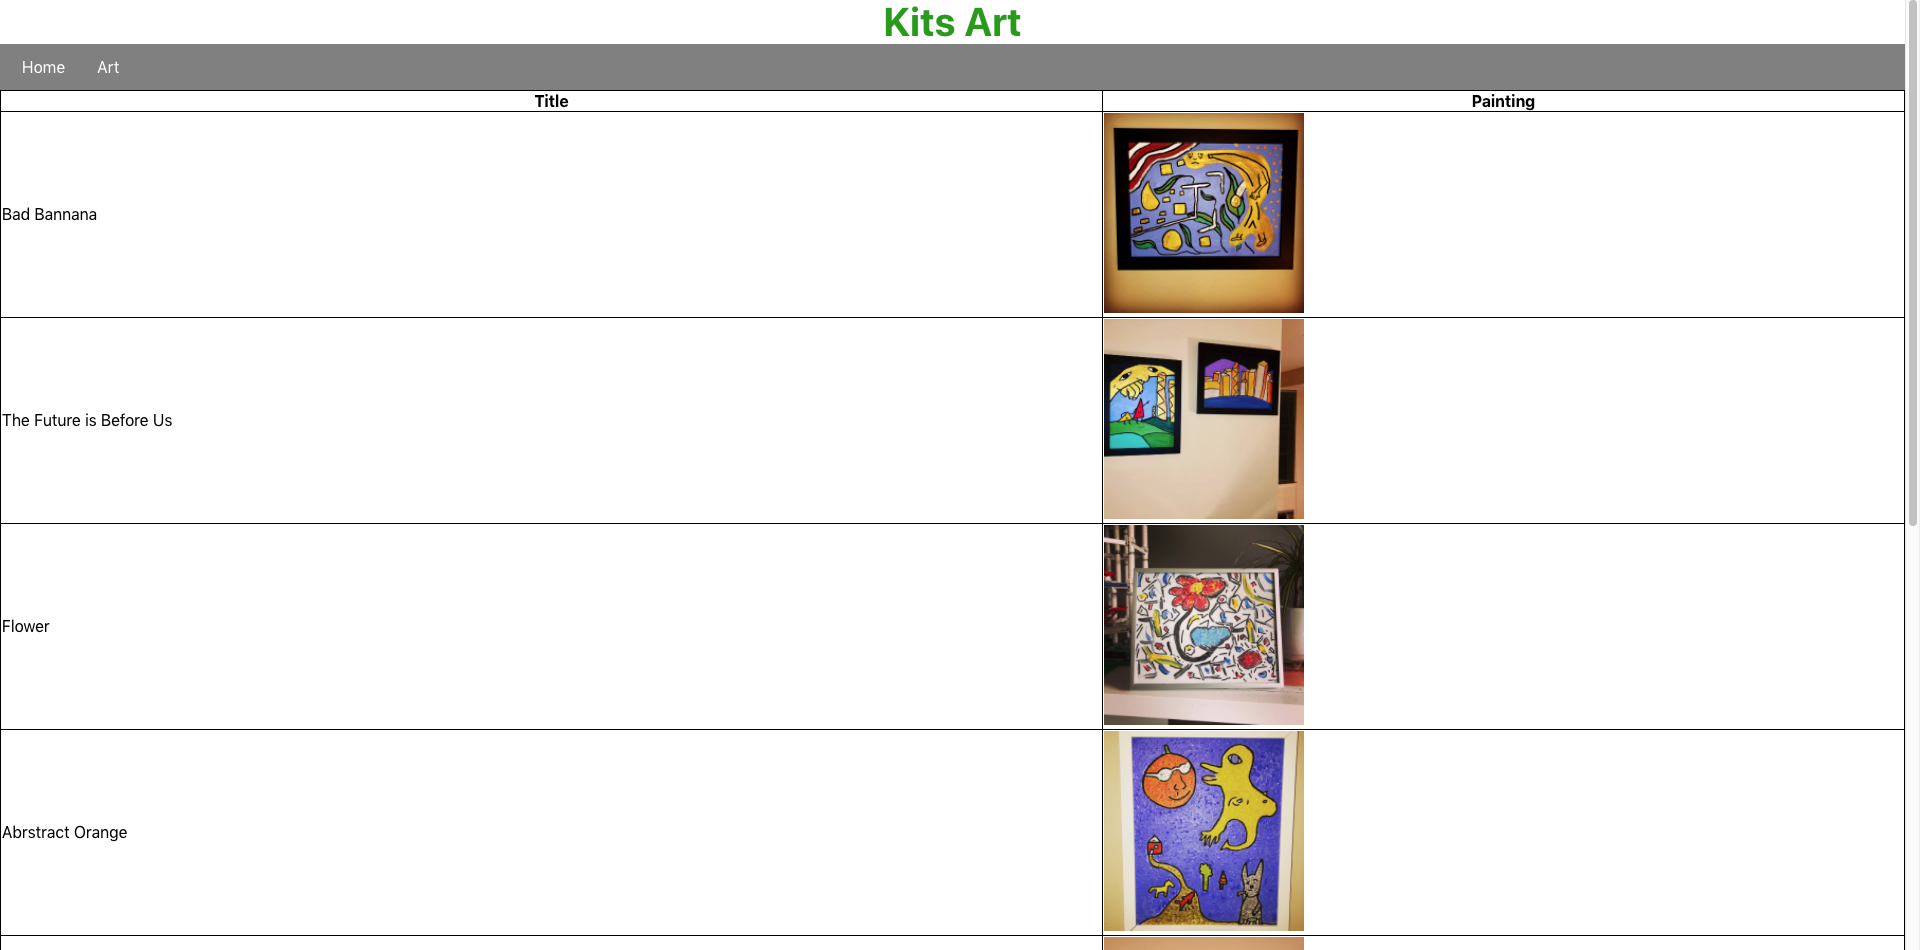
Below is a screenshot of what we will be working towards coding up. Each screen shot in the table below represents a separate ‘view’ the user can access by clicking the ‘Home’ or ‘Art’ tabs within the gray navigation bar we will call the ‘Navbar.’ If a user scrolls down they would also find another gray bar sectioned out; an area which we will call the ‘Footer’.
| View 1 (Home Page) | View 2 (Art Page) |
|---|---|
 |
 |
Check it out! Completed App URL:https://artserver-9afd8.web.app/home
There are multiple ways to create such a two view application (as shown above) and the antiquated style of doing something like this may have been to code up two separate HTML pages, each of which to represent a separate ‘view.’ However, this has performance drawbacks, specifically the re-rendering of an entire HTML page rather than just the specific components which need to change per the differences between them.
So, what we will do is define one HTML page with a ‘root element’ and then capitalize on the affordance of React JS to detect only those specific parts of an HTML page which need to be shifted out and changed per page render.
After each step in this tutorial, I have included the commit note for you to follow and this will allow you to have access to the code base during each successive step. The key for these messages is the following:
GitCommit {No.}: {“commit message”}
Note: You can click on the commit message (blue text) for each of the ensuing checkpoints and the link will take you directly to a repository for viewing the code.
Overall commit history for this project: CLICK HERE
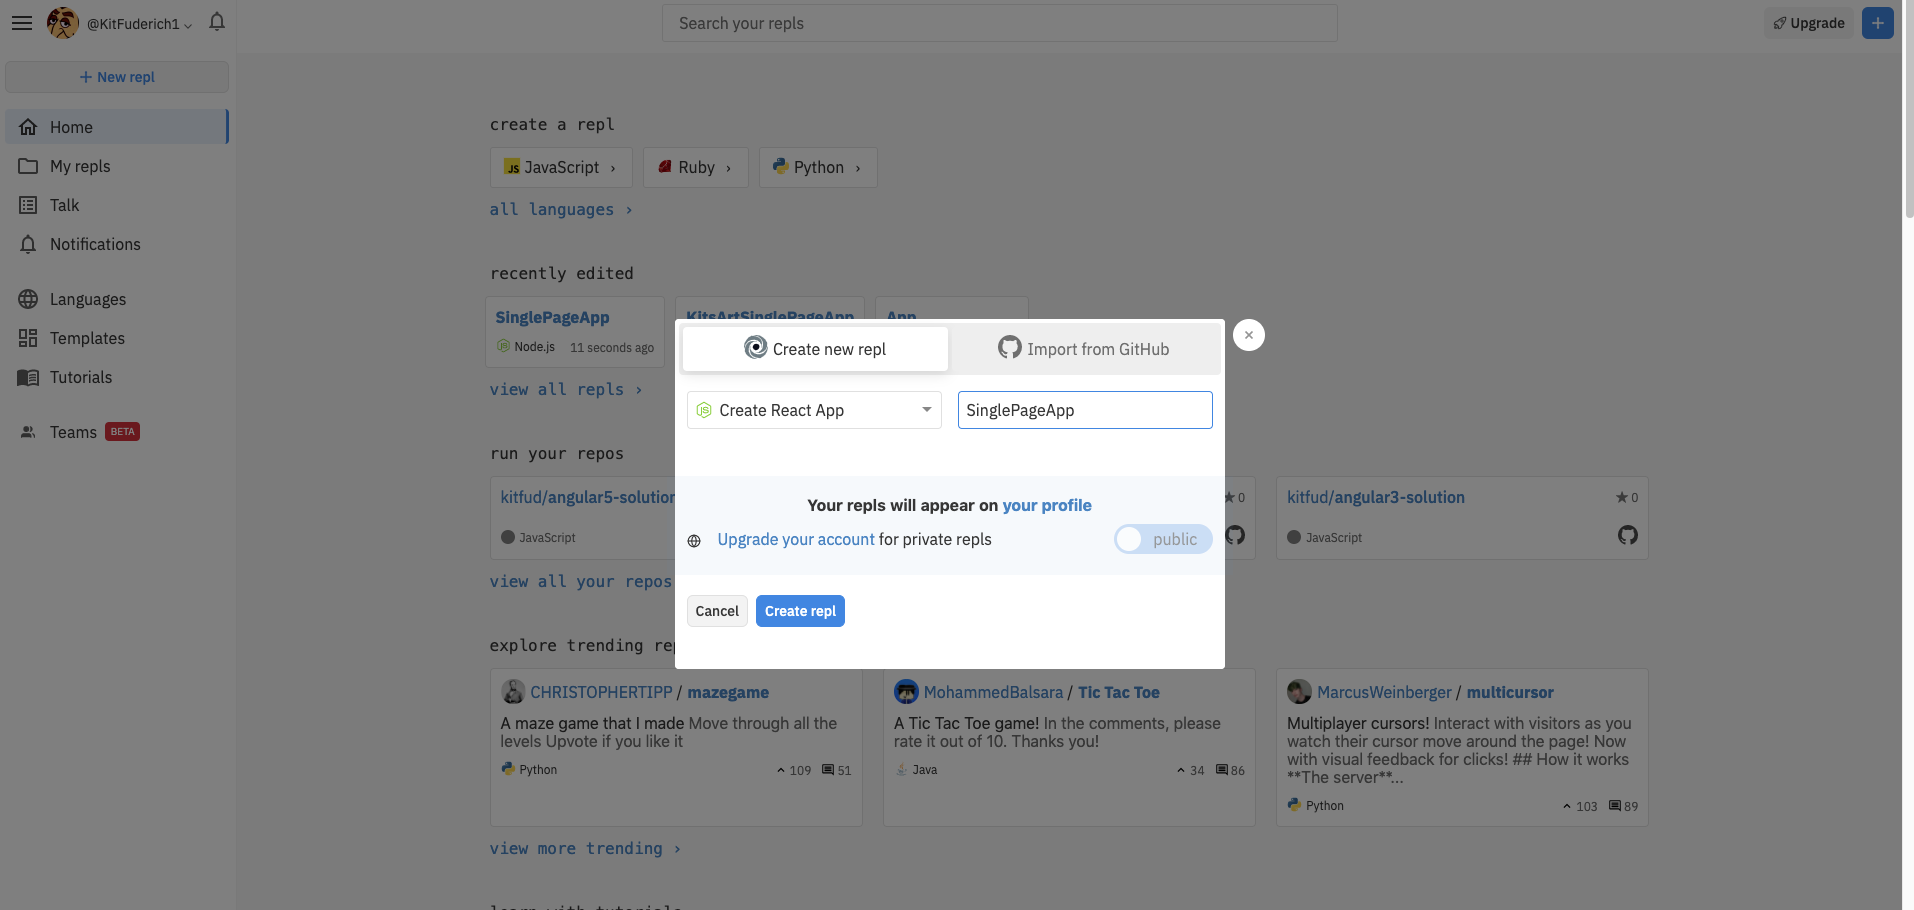
Scaffolding A Create-React-App: Create a new “New Repl” by clicking the button in the top left part of the screen after you access the Repl.It webpage. Within the drop down menu for creating a new Repl.it, select “Create React App” and give your app a name. I’ve called mine “SinglePageApp”:
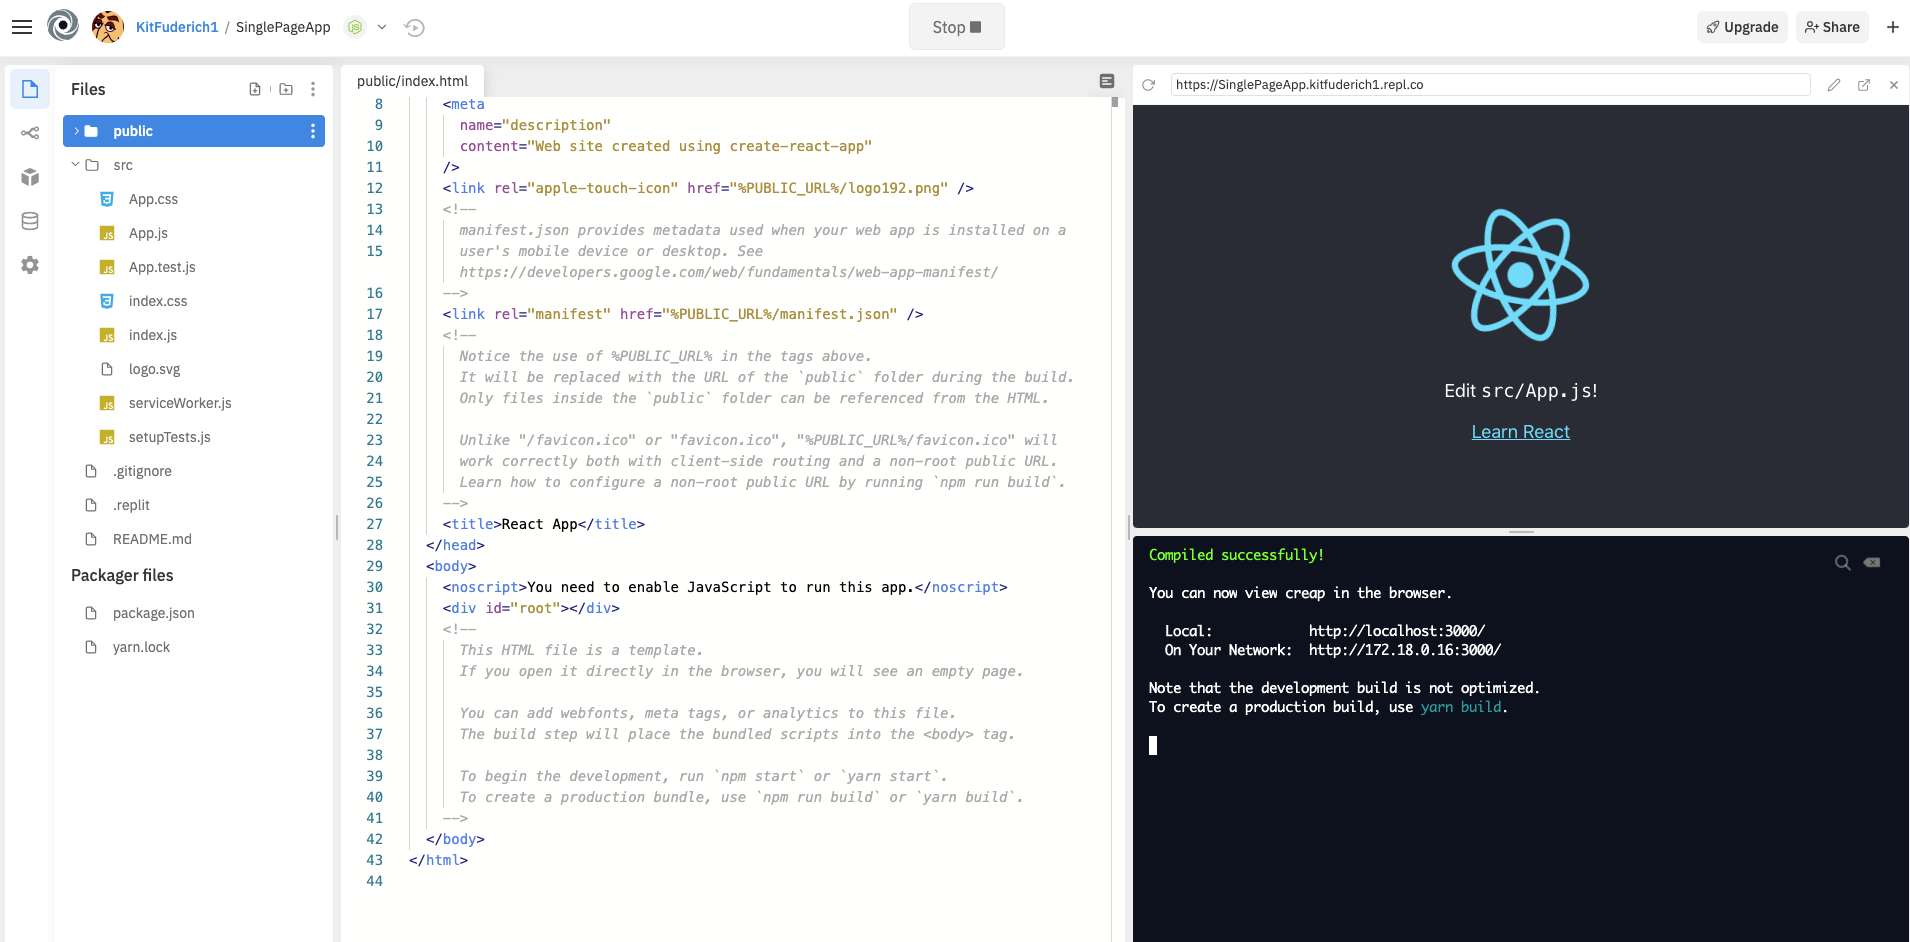
“Create-react-app” will scaffold the file structure for the application and will give us a starting point to begin designing our work. Once your Repl.it loads (this is after naming your application) click the “Run” button and you should see the preview of what the resultant code produces:
GitHub Commit 1: Initial Commit
File Cleanup and Simplification: Begin by simplifying the file structure and remove some of the scaffolding that we don’t need for our project. Open the “src” folder and take a look at the files in the drop down menu. You should see the following (“before” and “after” deleting files):
| Before: | After: |
|---|---|
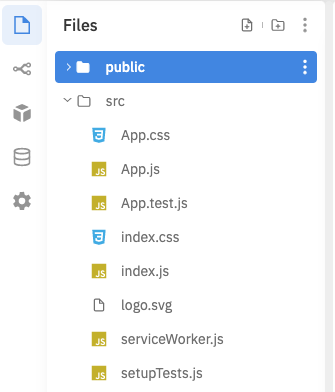 |
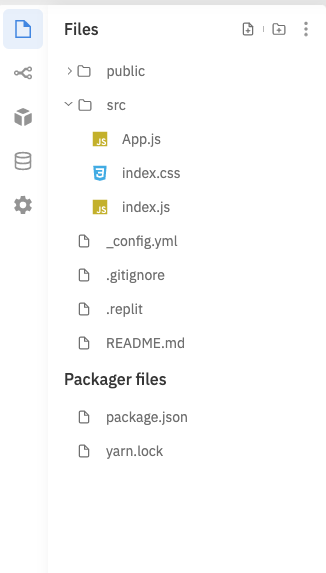 |
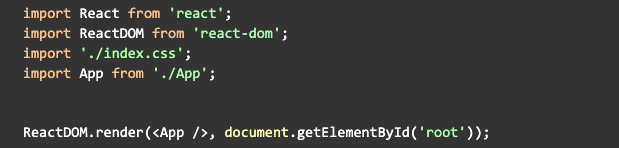
Open index.js and get ready to remove some content from the file. Notice how Index.js holds our ‘root’ element. After the deletions, your index.js code should look like the following below:
In the end, only three files need to exist in the “src” folder before we begin the project; these should be “App.js”, “index.css” and “index.js” as seen below in the left most column of the Repl.It interface:
GitHub Commit 2: “Simplified file structure to the minimum needed. Deleted unused file in "src" folder and refined content in App.js and index.js”
Creating the Main Component: For our application we are going to apply component based architecture (and thinking) which means we want to separate the code for elements into individual files. This will help with debugging, organizing and scaling our app up in the future, if necessary.
To begin, create a folder named “components” within the “src” folder and then go ahead and create a new JavaScript file called “MainComponent.js”, the code can be written out as follows:
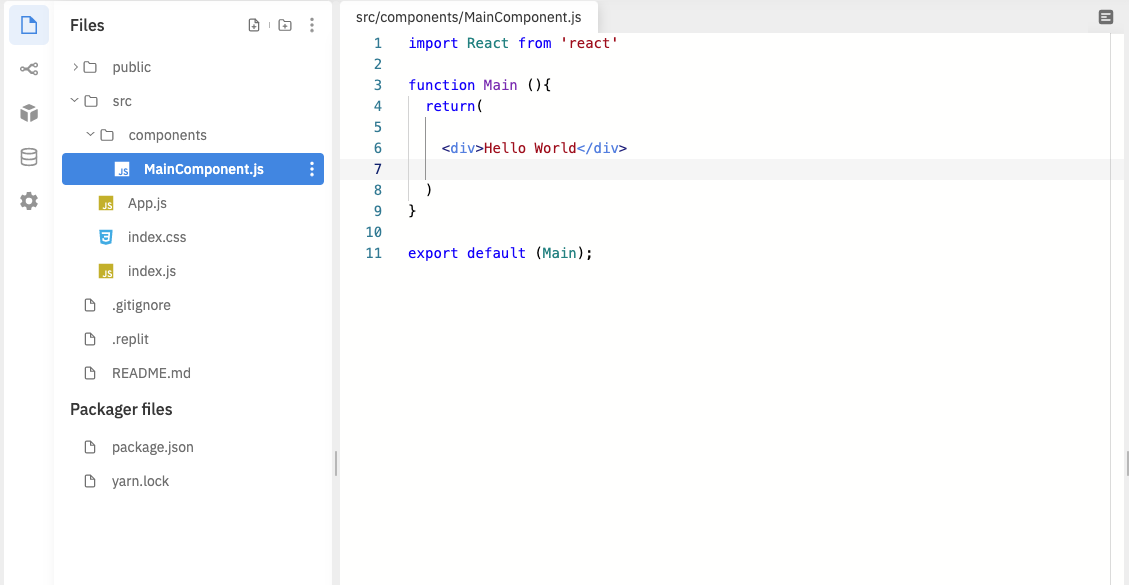
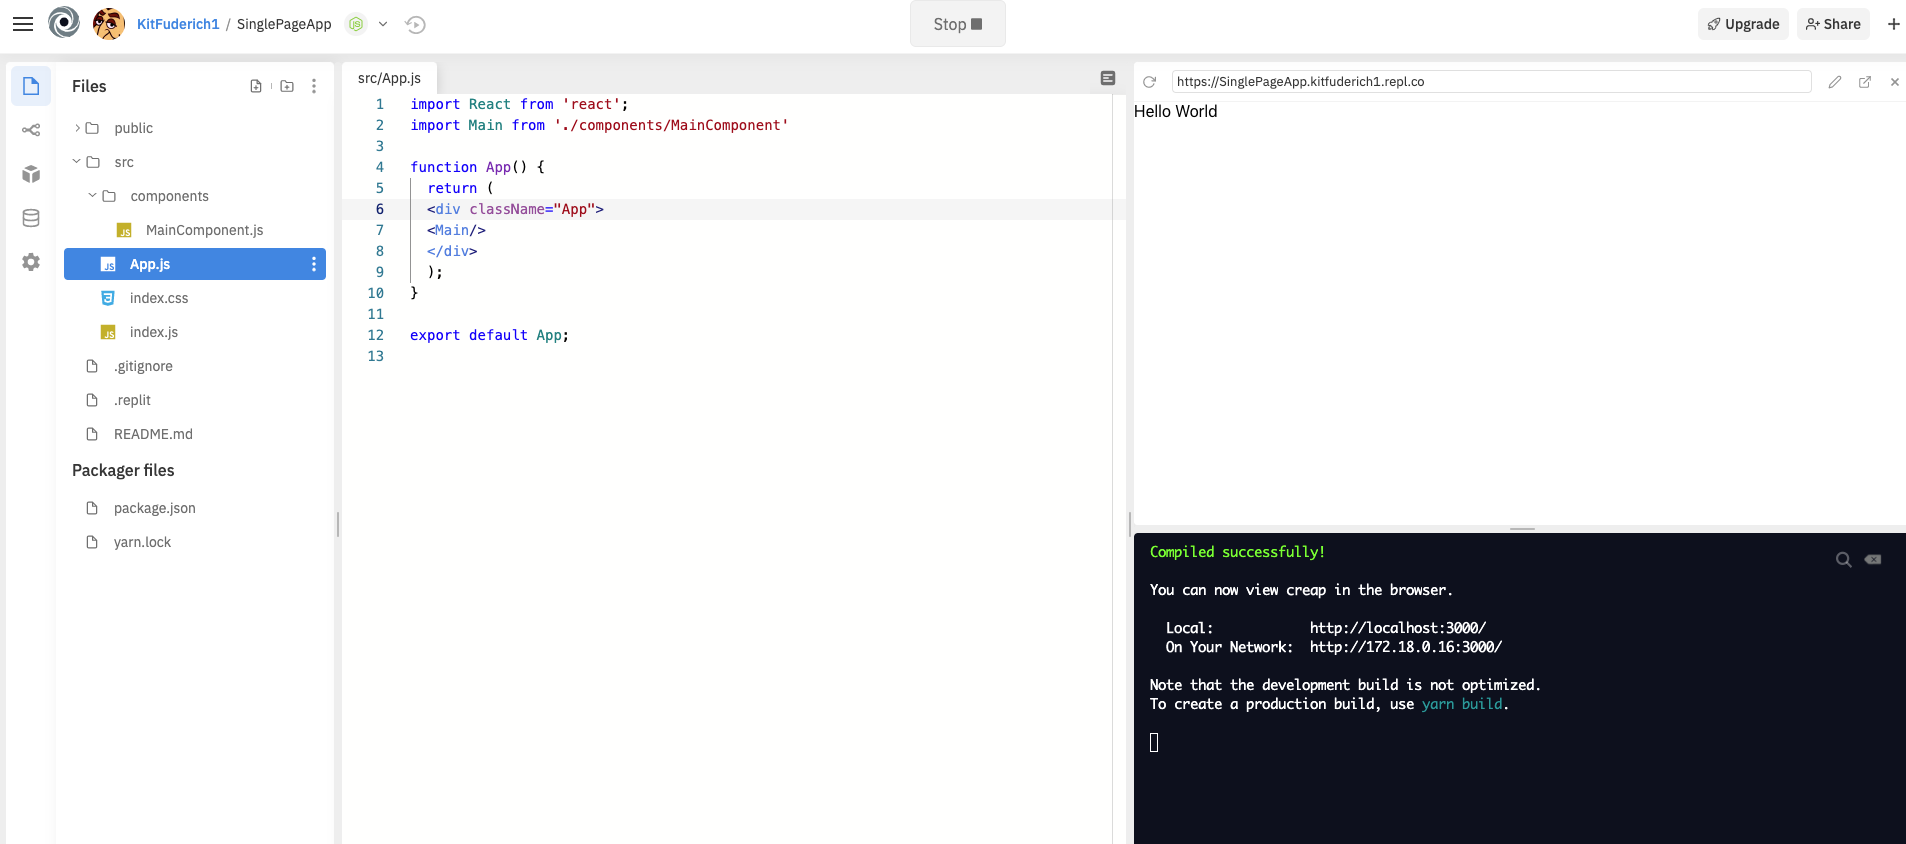
Then go into your “App.js” file and import this newly coded “Main” component into your application. Notice how the text, “Hello World” gets rendered to the Repl.It browser preview as a result:
GitHub Commit 3: “Main Component Created”
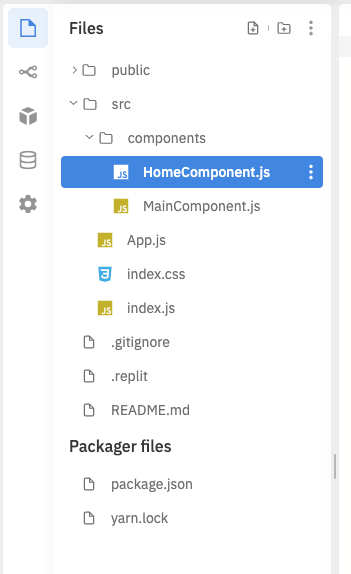
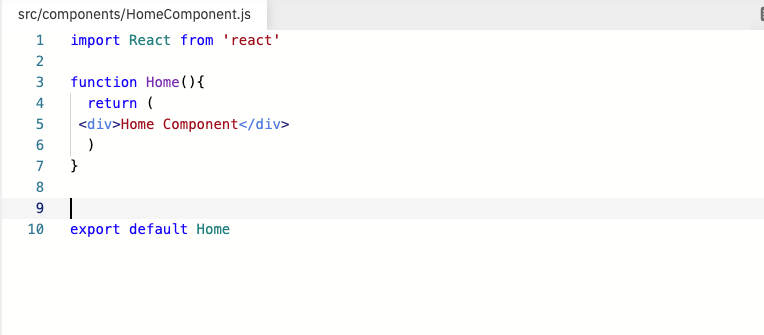
Creating the Home, Header and Footer Component: Now we are going to begin setting up some components used for separate ‘page views.’ For us to have a home page we need to code up a “Home Component.” To begin, create the “HomeComponent.js” file in ‘src-->components’ path and include the following code in the HomeComponent.js file:
| File: | Code: |
|---|---|
 |
 |
Afterwards, go ahead and create the components which will hold our navigational buttons, called the ‘header,’ as well as some contact information for our business, called the ‘footer,’ which will be visible at the top and bottom no matter what the current web view is. You can create and code up HeaderComponent.js and FooterComponent.js as following:
| File: | Code: |
|---|---|
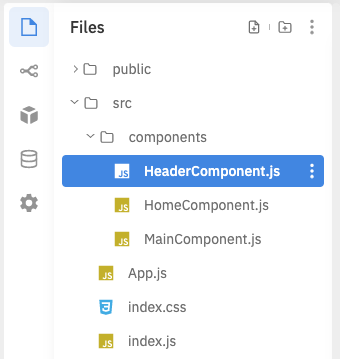 |
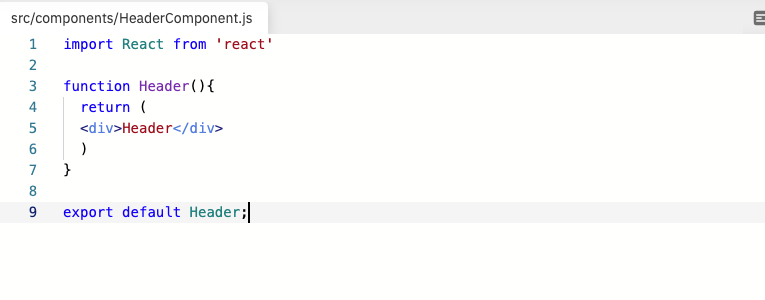 |
| File: | Code: |
|---|---|
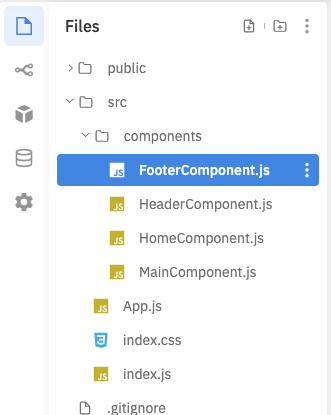 |
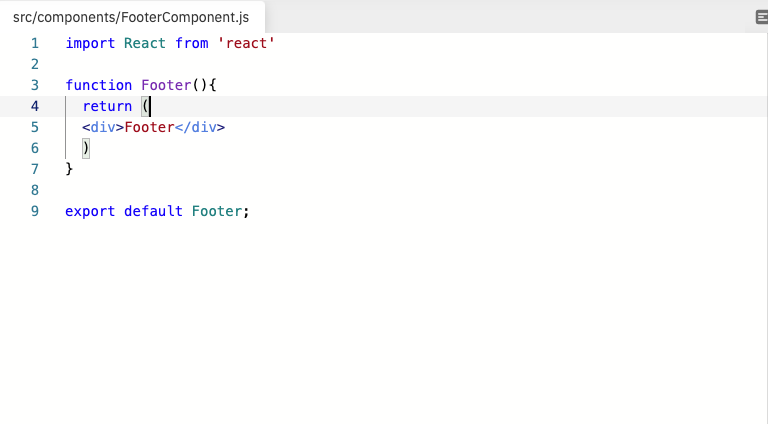 |
After these three components (Header.js, Footer.js, Home.js ) have been created, go ahead and import them into the MainComponent.js file:
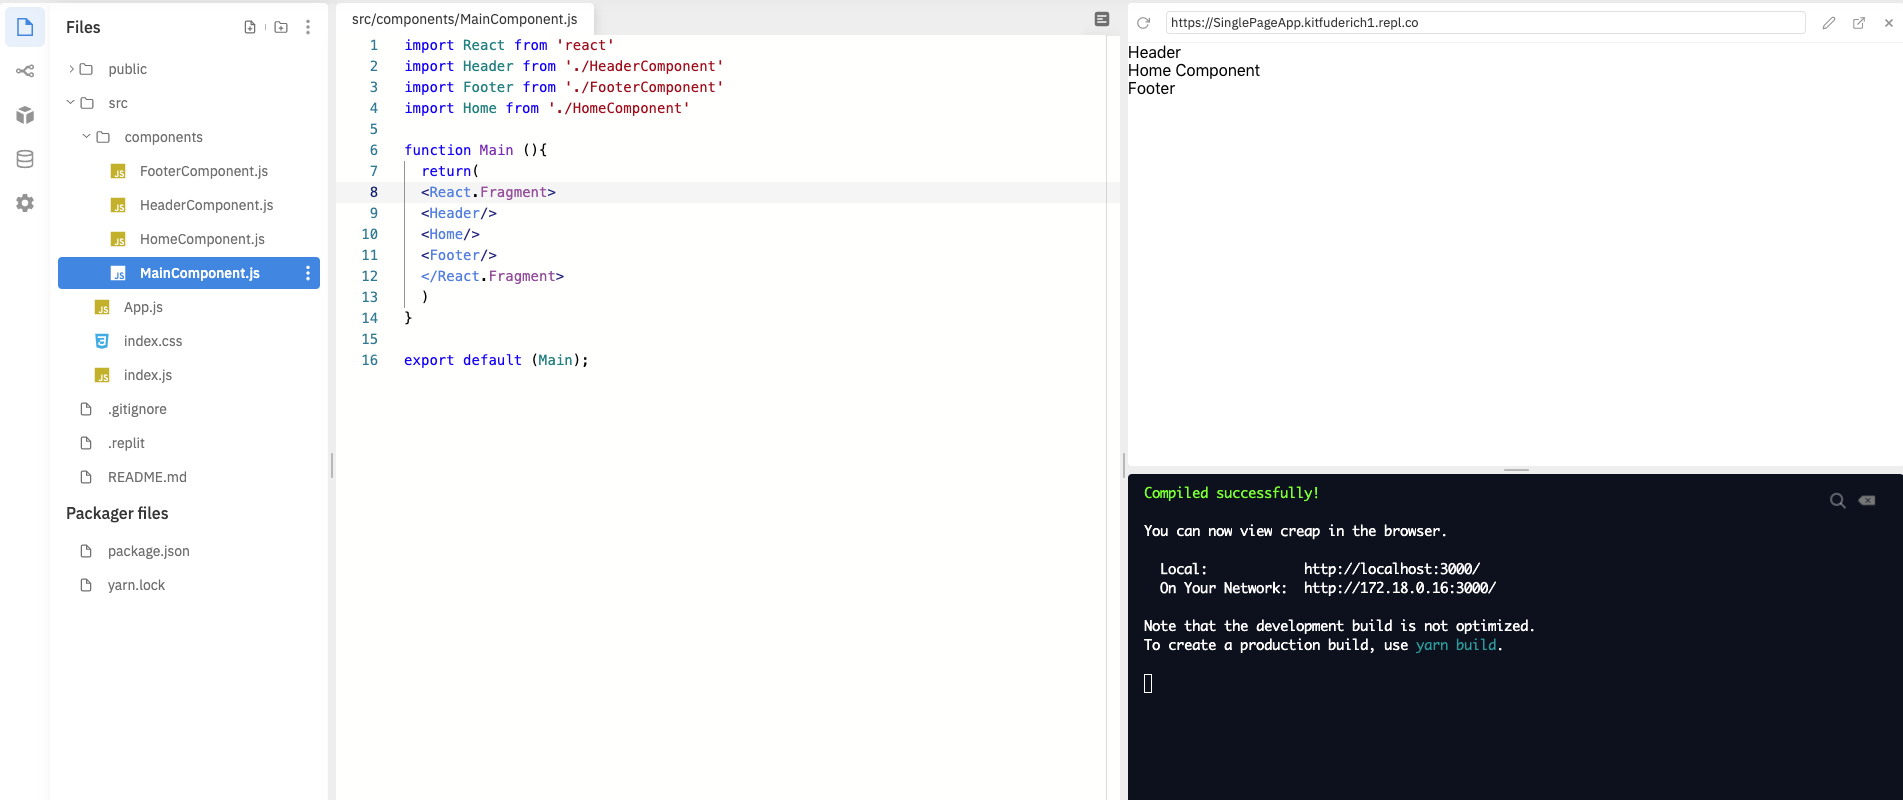
Notice how I have deleted our initial "div" tag with the “Hello World” in it and have replaced it with a "React.Fragment" tag which wraps all the components in the current MainComponent.js file. This is necessary when we want to pass multiple components within an export of JSX for rendering (line 16); simply put- we have to bundle multiple components for an export as a syntactic rule to be implemented within React JS.
GitCommit 4: “Header, Footer and Home Component Created”
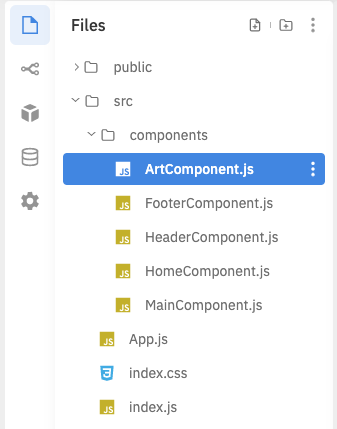
Setting up the Art Component and page routing: The impetus for building out this application is to display my artwork and for this I want to create another page view as a sort of gallery which I am going to call the “Art Component.” This page will hold images of my work and a user will be able to navigate to this page as a separate view.
Create the Art Component like so and be sure to do so in the ‘src--> components’ folder (ArtComponent.js):
| File: | Code: |
|---|---|
 |
 |
Before we import this newly created ArtComponent.js into our MainComponent.js we are going to do some quick setup to prepare our app for routing via the URL.
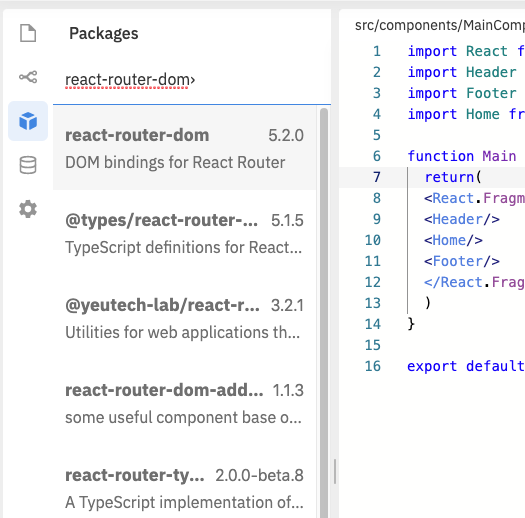
To begin, select the “Packages” tab to the left of your Repl.It window and then search for “react-router-dom”. Select this package and click the plus sign to add it to our project:
| Step 1: packages tab→ type ‘react-router-dom’ | Step 2: Add the package --> ‘react-router-dom’ |
|---|---|
 |
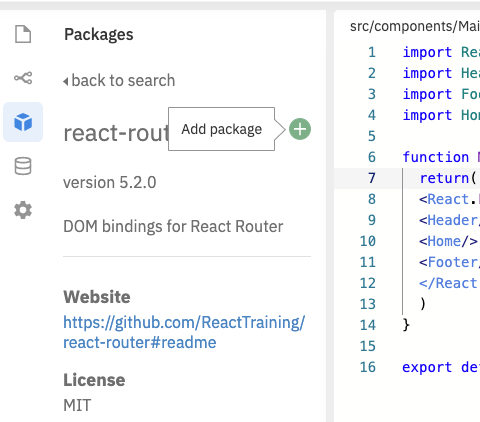 |
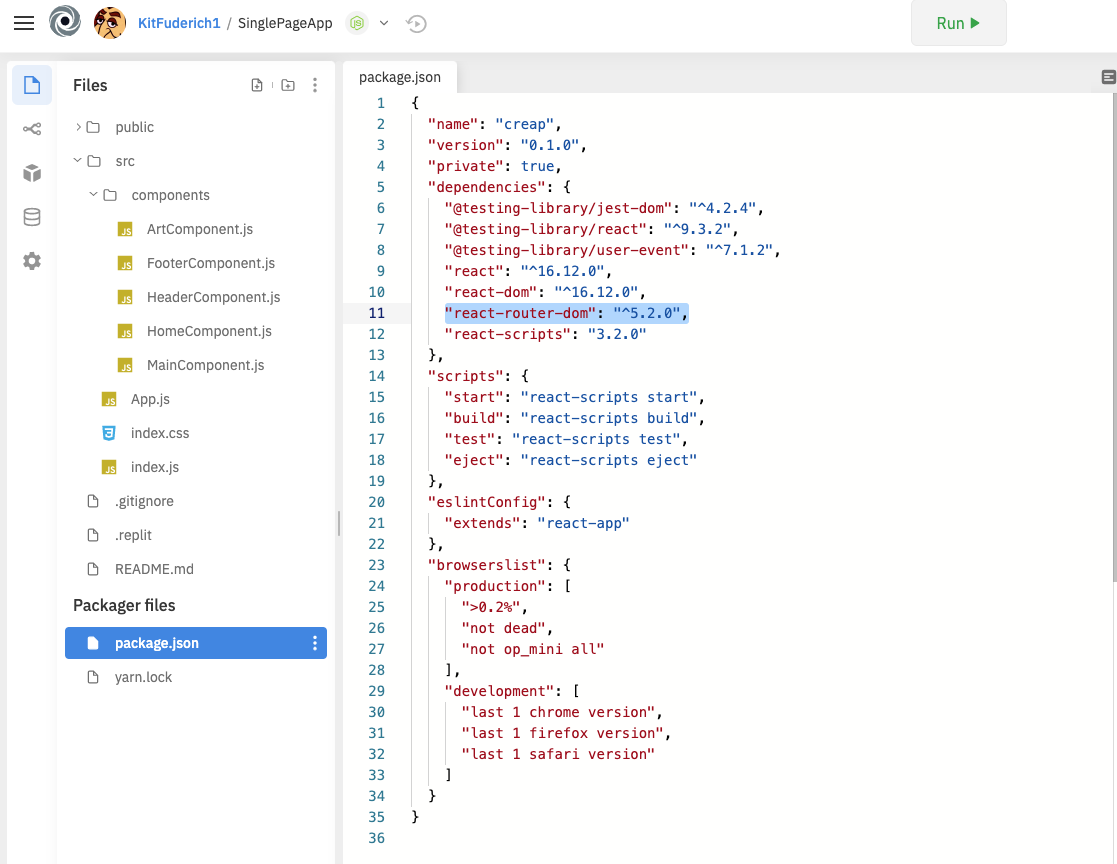
Note: You can check that the package has been successfully added by looking in your “package.json” file and looking for “react-router-dom” within the JSON object:
Once the ‘react-router-dom’ package has been added go back to MainComponent.js and import the Art Component as well as the Switch, Route and Redirect modules from ‘react-router-dom’. Afterwards your code should look like the following:

Notice how we do have an error at this point: “You should not use 'Switch' outside a 'Router'” and this is because we have not completed the setup of ‘react-router-dom’ yet.
To complete the setup of react-router-dom: go to your App.js file and import in the {BrowserRouter} module from ‘react-router-dom’ and wrap the Main component (line 10, picture below) with the 'BrowserRouter' tag:

Afterwards, test the router by opening the Repl.It browser render in a new tab (see picture click the icon near the text “Open in a new tab”):

From this newly opened tab you will be able to change the ending of the URL (as indicated below) and then notice how the component sandwiched between the header and the footer changes as a result. This is the beginning of our single page application!
| /home | /art |
|---|---|
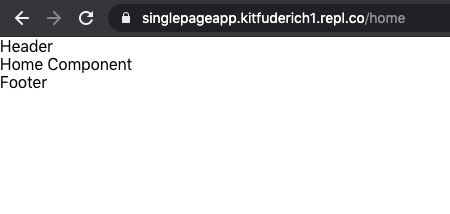 |
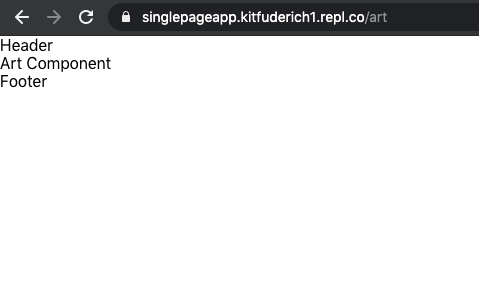 |
GitCommit 5: “Art component and page routing added.”
To keep this tutorial within the scope of React JS, and not necessary CSS styling (which could be a separate tutorial in itself), go ahead and change index.css to reflect the following styling rules in your index.css file:
body {
 margin: 0;
 font-family: -apple-system, BlinkMacSystemFont, 'Segoe UI', 'Roboto', 'Oxygen',
   'Ubuntu', 'Cantarell', 'Fira Sans', 'Droid Sans', 'Helvetica Neue',
   sans-serif;
 -webkit-font-smoothing: antialiased;
-moz-osx-font-smoothing: grayscale;
}

code {
font-family: source-code-pro, Menlo, Monaco, Consolas, 'CourierNew',
monospace;
}

nav {
border:1px;
background-color:gray;
color:white;
padding:6px;
}


.headerText {
font-size:40px;
color:#090;
font-weight:bold;
text-align:center;
}

.button{
border:none;
display:inline-block;
padding:8px 16px;
vertical-align:middle;
overflow:hidden;
text-decoration:none;
color:inherit;
background-color:inherit;
text-align:center;
font-size:25px;
cursor:pointer;
white-space:nowrap}

.button:hover{
background:red
}

.bar{
display:inline-block;
width:100%;
}

.item{
padding:8px 16px;
float:left;
width:100%;
border:none;
display:block;
outline:0}

p{
padding-left: 10%;
color: white;
font-size: 0.7em;
line-height: 70px;
text-transform: capitalize;
letter-spacing: 1px;
}

.center{
display: block;
margin-left: auto;
margin-right: auto;
width: 80%;
text-align:center;
}

text{
margin-top:10px;
font-size:20px;
}

table, th, td {
border: 1px solid black;
border-collapse: collapse;
text-align: center;
margin: 0 auto;
margin-top:20px;
width:80%;
}

.container{
margin-left: auto;
margin-right: auto;
}

footer {
width: 100%;
display: inline-block;
margin: 2em 0;
height: 100%;
background-color: #999;
}

.footerstyleleft {
width: 50%;
float: left;
}

.footerstyleleft>p{
font-size:20px
}
.footerstyleright{
width: 50%;
float: right;

}

.footerstyleright>p>a{
 font-size:20px;
 float:right;
 margin-right:60px;
}
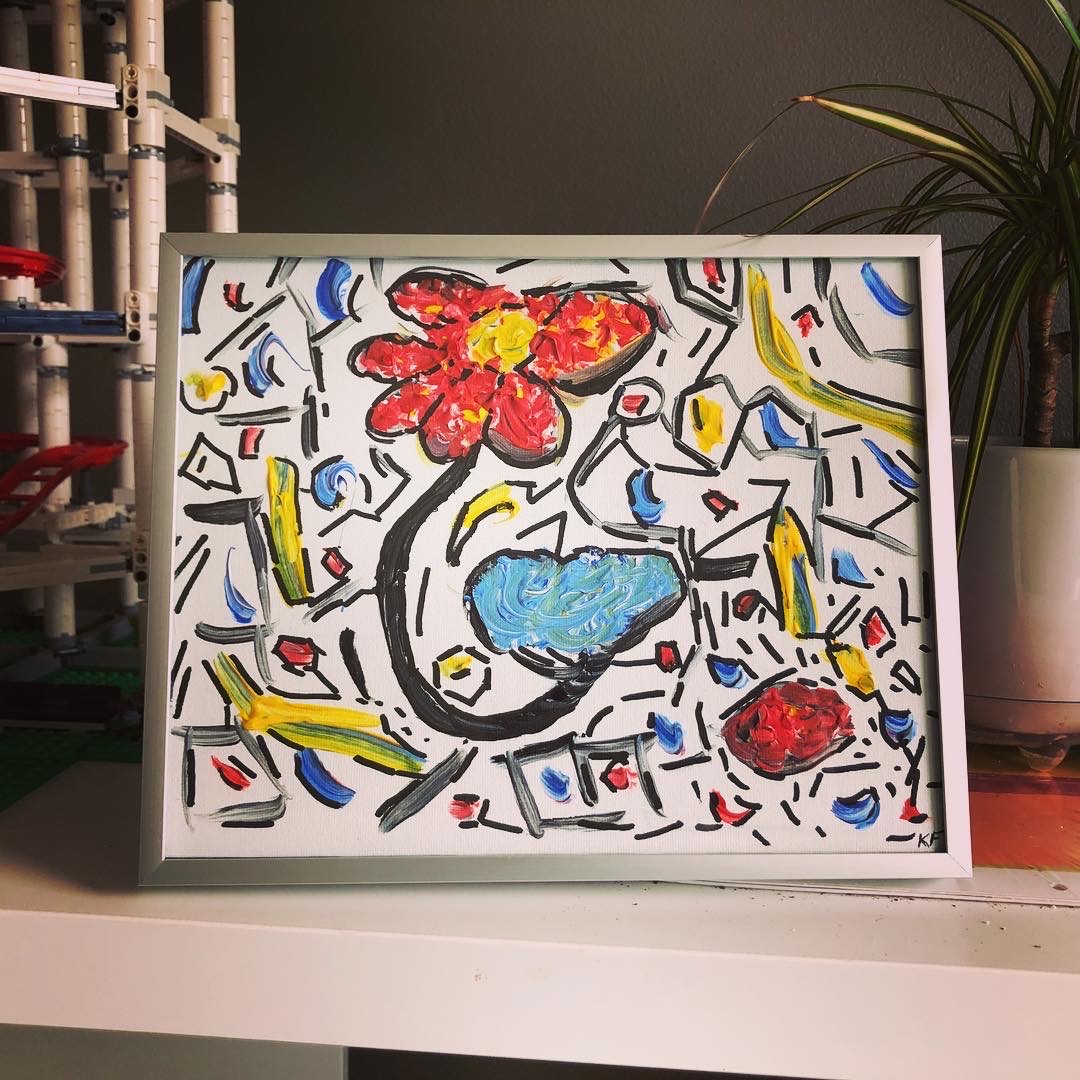
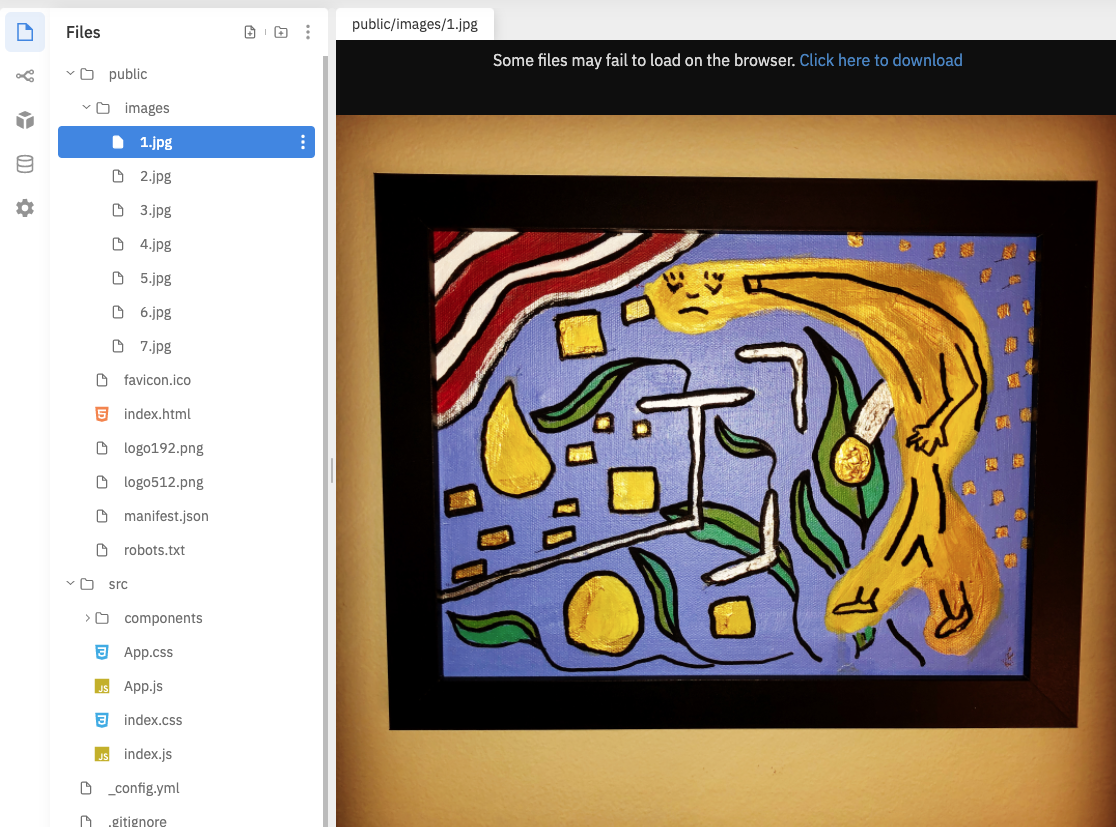
Time to start styling components and add images of my paintings to the application framework. For this tutorial we are not working with a database where I could download all of the images needed for my application. Instead, everything will exist within the deployed file structure; specifically, within an ‘images’ file I will create within the ‘public’ folder.
To begin, create a new folder named “images” within my “public” folder and I have added in all the .jpg files (photos) of my artwork. The screenshot shows the images file setup:
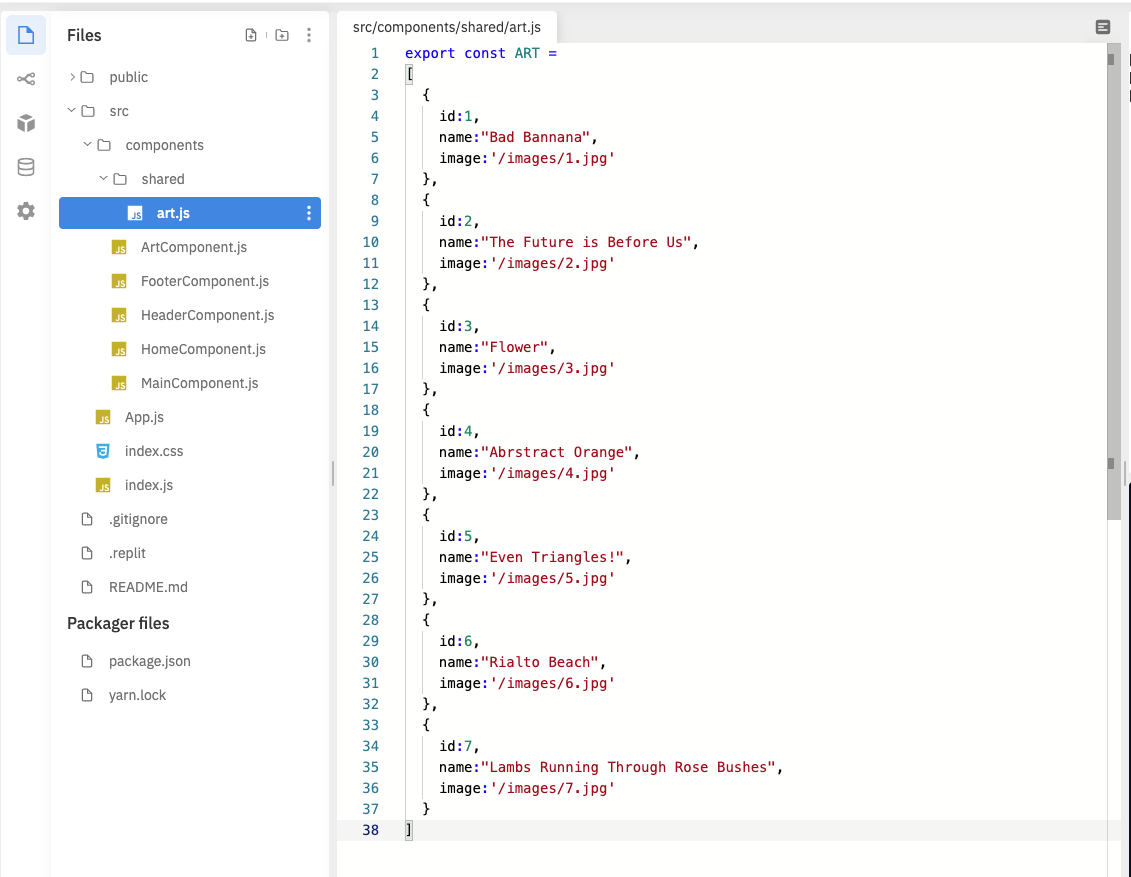
Once you have your images folder setup, you’ll also want to create a data structure to hold some information about each of the paintings. I’ll be using an array of objects for this purpose.
Notice how I have created a separate folder named “shared” within the “src”->”components” path to hold an array of objects (see the photo below).
Within this newly created folder named ‘shared’, create a file called art.js and you can reimplement the code as I have done here but please note you will have had to setup the images folder in exactly the same way as I have, especially with the naming of the individual .jpg files being consistent with that found in the ‘public->images’ folder :
We are now ready to begin styling our Home component. Navigate to HomeComponent.js and change the code to the following:
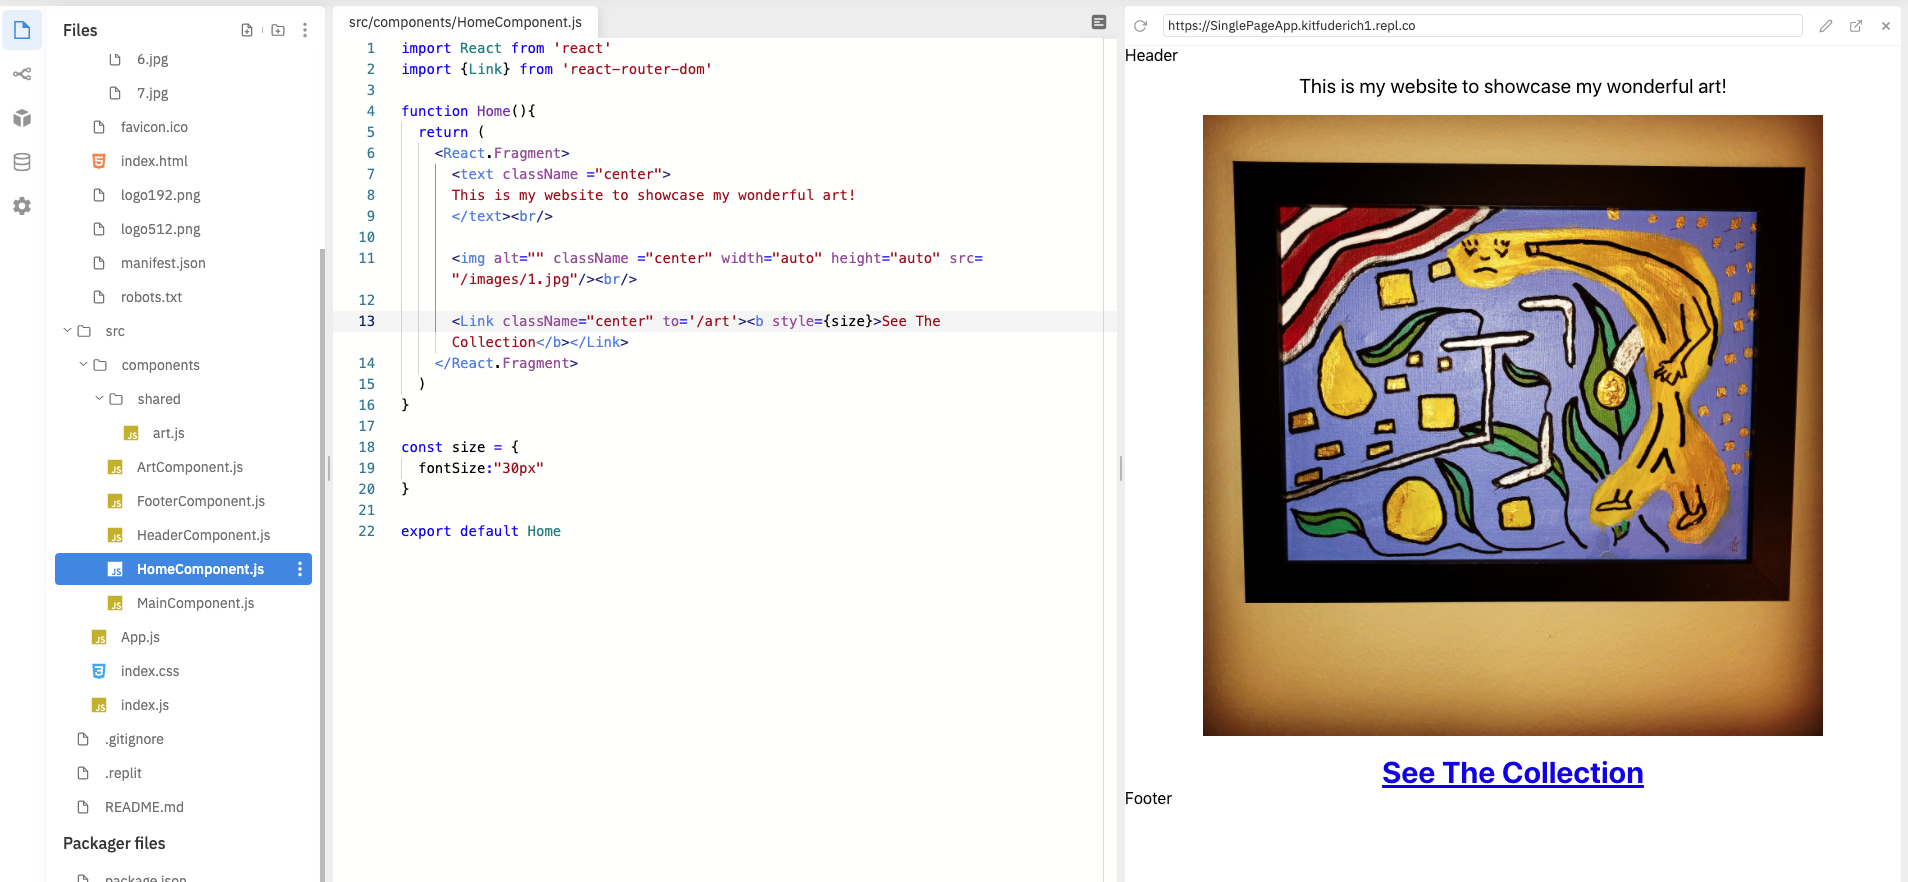
Key additions to the code at this point is the {Link} module from ‘react-router-dom’ which we are using to create hyperlinks between page views. Check out how I imported an image from my “images” file onto the home view. Within this document I have also demonstrated how to do some in-line styling (use of, “const size”- line 18) to change the image’s size on the home landing page.
Notice how our Header and Footer component text is still sandwiching the image at this stage!!
Styling the Header + Footer Component: For the header component we are going to go about adding some navigational tools. Specifically a Navbar (by including a 'nav' tag) which will hold buttons to link between the Home and Art page views. Notice how a main addition to the code at this point is also the importing of the {Link} module from ‘react-router-dom’ (line 2-HeaderComponent.js):
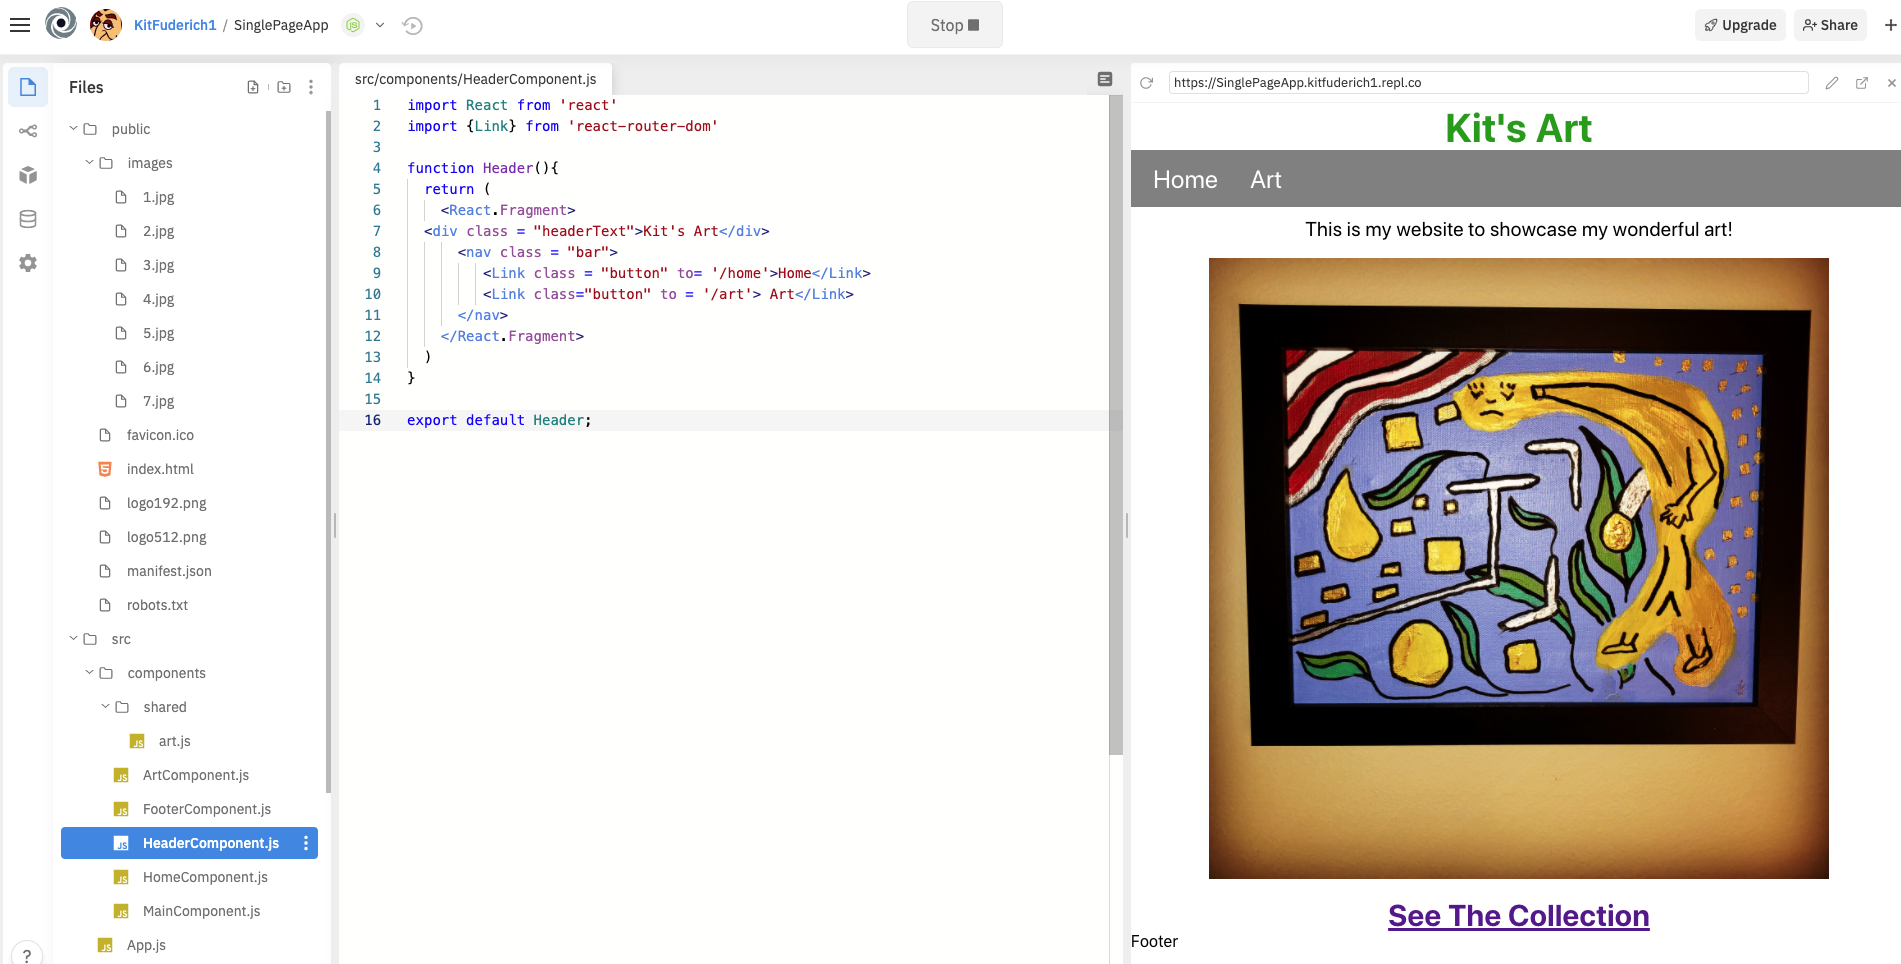
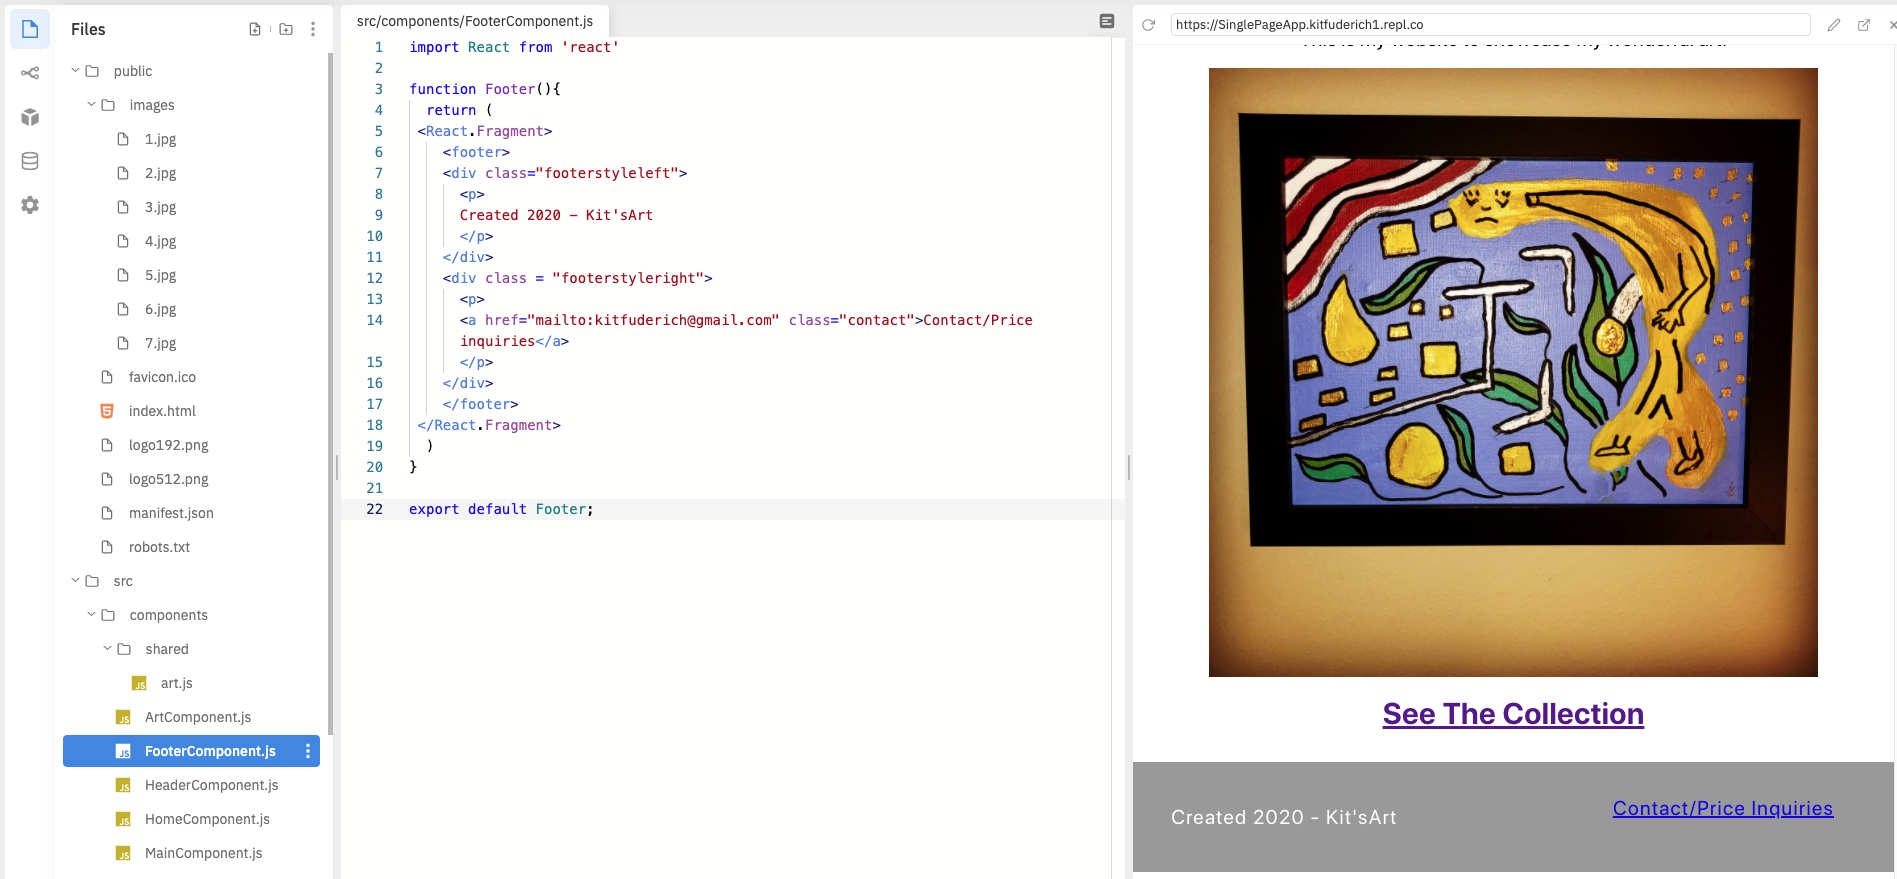
Let’s add to the Footer component: navigate to FooterComponent.js and change the code to following seen in the image below. The idea here is that this element holds a link for contacting us as well as some information about the date our app was developed:
Styling the Art Component and Rendering With JSX: Last thing we need to complete is the styling of our Art component which will hold a grid of images along with information about each painting.
For this we will have to format the array of objects we coded earlier in, art.js. First off we will import the {ART} module out of the art.js file using the file path ‘./shared/art’. The ArtComponent.js file should look like the following:
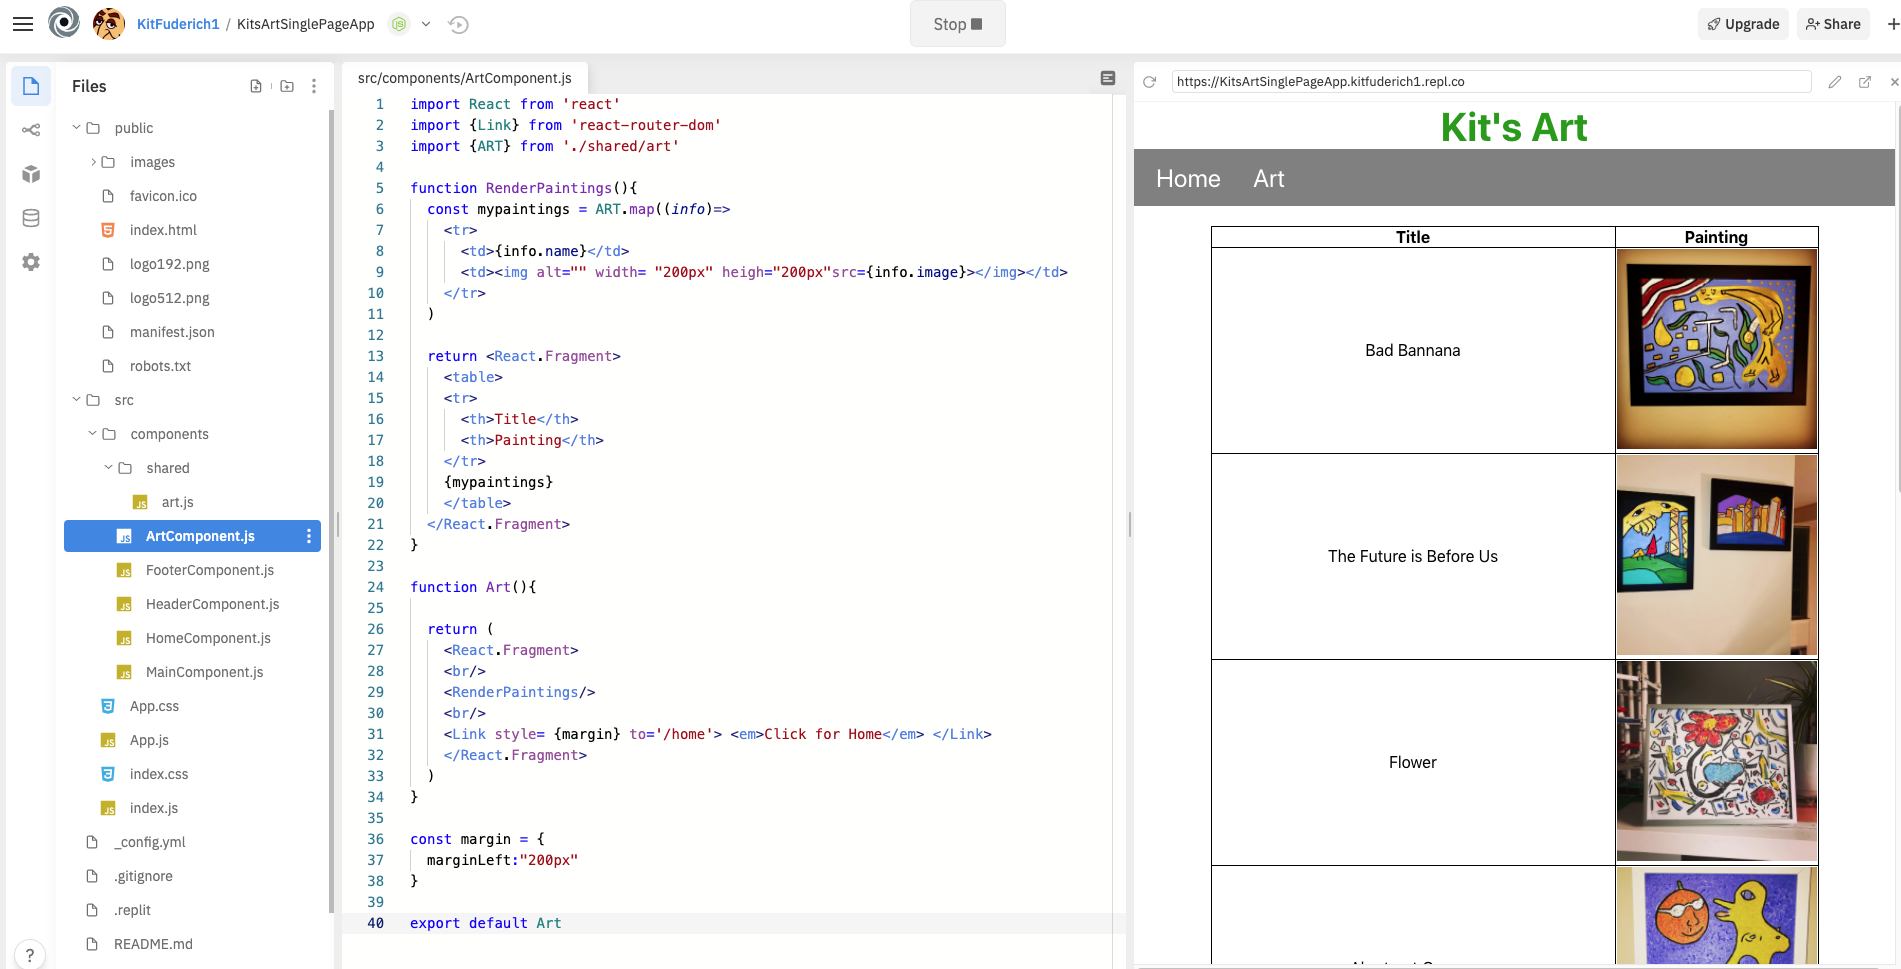
The key features of the code, in ArtComponent.js, includes the RenderPaintings() function (line 5, picture above). With the use of this function we have an implementation of JSX; blending of HTML with JavaScript, as you can see squiggly parentheses ‘{ }’ invoking a JavaScript variable (line 19) where HTML is being described.
We then go ahead and ‘call’ this RenderPaintings functional component (line 29) in our Art Component and this maps the objects within our array (art.js) and pulls each image into a column of the table along with the title in an adjacent column.
Note: I’ve included some inline styling (the use of “cost margin”) to align some of the cells. I’ve also included a “Link” tag to return the user back to Home view upon a click on this text.
GitCommit 8: “Art Component Styled with help of React JSX”
Conclusion: Through this tutorial I have demonstrated how to setup and implement a simple single page application using create-react-app and react-router-dom. With this, I have styled my views to showcase some of my paintings and my work is hosted live at this url:https://artserver-9afd8.web.app/home . Many of the concepts outlined can be extended and there is still a lot which can be included and improved within my code base. With this in mind, I encourage those learning to experiment with my code and begin by changing some of the variables to see what results as well as adapting the content to reflect your own interests; especially if painting is not your thing.
Concepts learners should pursue after this tutorial are class based components, the use of React Hooks, passing of ‘props’ between components, as well as state management through Redux. A quick internet search of any of these is likely to pull up a variety of helpful resources for self study.
Wishing you the best of luck with your coding and next time you are enjoying a coffee or tea at home, perhaps staring at a blank wall, please remember that you can navigate to Kit’s Art and contact me about acquiring one of my paintings to make things more colorful.
Be well, be healthy, and happy creating :)