Howto: Compile Firmware with PlatformIO
- 1. Foreword
- 2. Installation of PlatformIO
- 3. Download firmware source code
- 4. Opening source code in Visual Studio Code/PlatformIO
- 5. Compile the first time
- 6. Install firmware on printer
- 7. Example 1: Change BLTouch pin from 2 to 21
- 8. Example 2: Buildflags/BMG Extruder
In order to compile this hybrid firmware yourself, i.e. to translate the source code into machine code for the printer, it is unfortunately no longer possible to use the simple Arduino IDE without further ado. With the present source code, not only is a single firmware built for exactly one printer, but a separate environment is created using profiles, in which the source code adapts to the respective printer.
This has the advantage that you only have to maintain one codebase and all changes (that are not printer-specific) directly affect all other printers. For example, if you want to change the maximum temperature of the hotend, you can do this globally without having to edit it individually for each printer and each firmware. You just change the temperature in the source code and then just compile all the printer configurations you want.
For this reason I use my own profiles and compiler directives and an IDE (development environment) that supports this. I chose the free Visual Studio Code from Microsoft with the associated extension PlatformIO.
PlatformIO is not a standalone development environment, but an add-on to easily and conveniently develop for a variety of microcontrollers using Visual Studio Code.
First we need Visual Studio Code. We can download this directly from https://code.visualstudio.com/download. Since I'm using a Mac, all of the following screenshots show the Mac variant. However, the content hardly differs and only the menus may be in a different place.
For PlatformIO we don't need (as most people assume) to download or install anything new manually. Instead, this extension can be installed directly within the IDE.
To do this, we click on the symbol on the left, which looks like a square consisting of 4 squares, and enter "platformio" in the search bar at the top. The first hit should show the plugin, which we then download and install directly by clicking on "Install".
If you want, you can also install the language pack of your choice here (e.g. German).

After installation, the blue button should change to "uninstall" and a new icon that looks like an alien should appear in the left-hand bar.
This completes the installation. Messages about component updates may also appear at the bottom right. You can confirm this and then restart the entire IDE.
I always recommend downloading a specific version of source code as it may be that the master, i.e. the truly up-to-date version of the firmware is in an unstable state. Of course you can also use the master, but then you have to be aware that there are changes here that are not yet intended for the public and are therefore different from the .hex release versions.
To download a specific version, we click on "switch branches/tags" in the top left and then on the "Tags" tab. Here we look for the desired version and click on it. The entire source code page then changes to the status at this point in time and you can click on the green button labeled Code at the top right and download the code as a .zip file here, for example.

Alternatively, every release also comes with the associated source code as a zip and tar.gz. This serves as security in case tags are deleted at some point or the Repository changes. It's unlikely, but you never know ;)

If we have downloaded our desired source code, it must of course be extracted/unzipped. Preferably in a location that is easy to find on the hard drive, since the path length can also become a problem, especially with older Windows versions.
The unzipped folder no longer looks very tidy and contains both visible and hidden files. (More on that later).

Now we open Visual Studio Code and click on the icon with the two sheets of paper in the top left and then on Open Folder. Here we just select the folder we just unzipped and wait a bit for VSCode to load all the extensions. After that, the interface welcomes us with a list on the left with files that we have just seen in the folder.

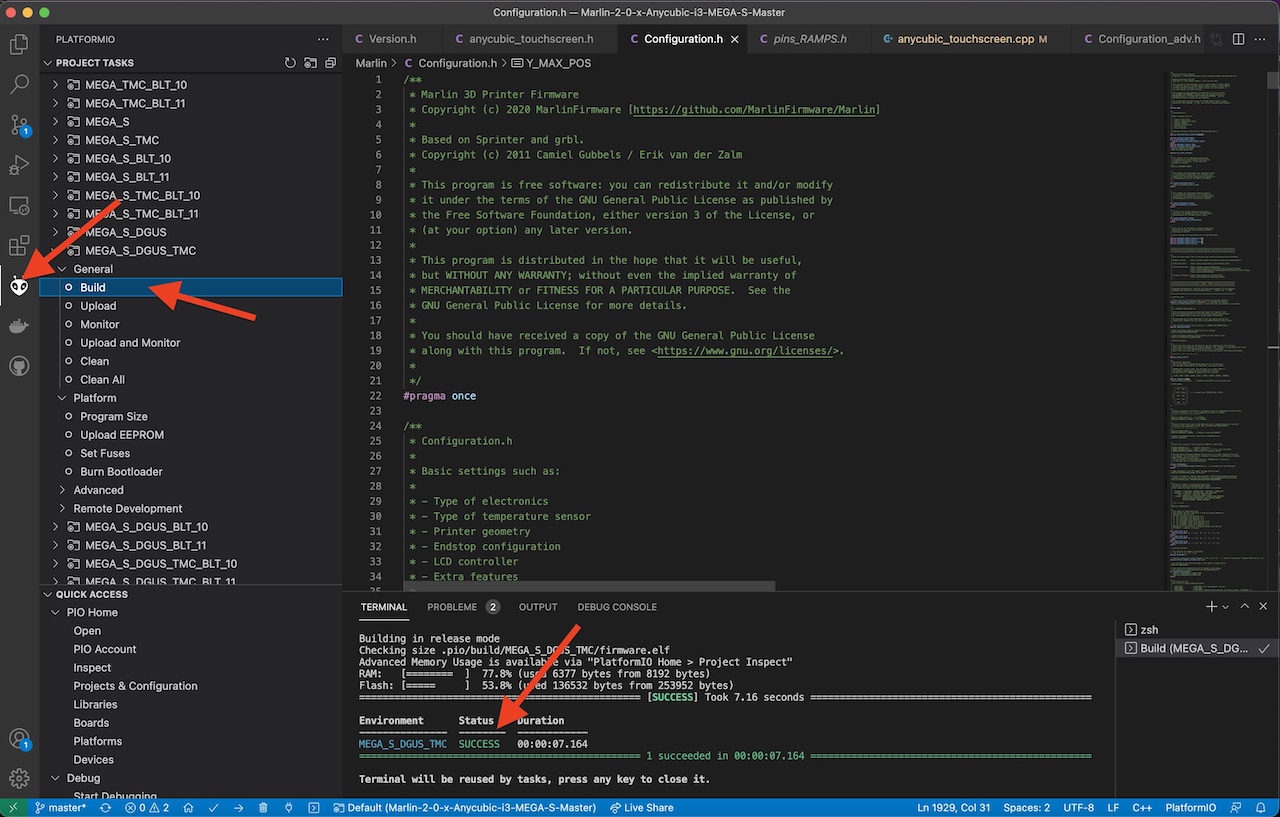
The first step after opening should be to build a variant of the firmware, i.e. to compile it. Here we click on the alien on the left, scroll down the list until we have found our printer and the appropriate configuration (here in the example a Mega S with DGUS clone display and TMC2208 drivers). There it is enough to "expand" this entry and click on build. Depending on the speed of the PC, compiling can take between a few seconds and several minutes.
After successfully compiling the firmware, there is a green SUCCESS lettering at the bottom of the terminal area and our selected configuration on the left.
Congratulations! You have compiled a firmware for the first time! :)
There are two options here. Either you connect the printer directly to the PC on which VSCode is also installed and instead of clicking "build" you click upload this time. PlatformIO takes care of the rest and the firmware is loaded directly onto the printer.
The second option is to backup the .hex file and then install it via Cura or Octoprint. To do this, we go exactly to the folder in which the source code is located. Hidden files may need to be shown, but the location where the firmware resides is always the same: /FIRMWAREFOLDER/.pio/build/[VARIANT]/firmware.hex

Now that we know how to compile the firmware ourselves, we can also make changes.
As an example I am changing the sensor pin here, which is normally used for the BLTouch sensor. If you follow this guide, the PIN 2 is used, but there is often a desire to use PIN 21, for example, since this is freely accessible on the mainboard.
So we navigate to /Marlin/src/pins/ramps/ and look for the pins_ramps.h file here. There is a define Z_MIN_PROBE_PIN, which you can change from 2 to 21. Then just save with CTRL+S and compile the firmware as described in section 5.

ATTENTION! Since version 1.5.0, the pin definitions for the Trigorilla mainboards can be found in separate files. In our case this is pins_TRIGORILLA_14.h.

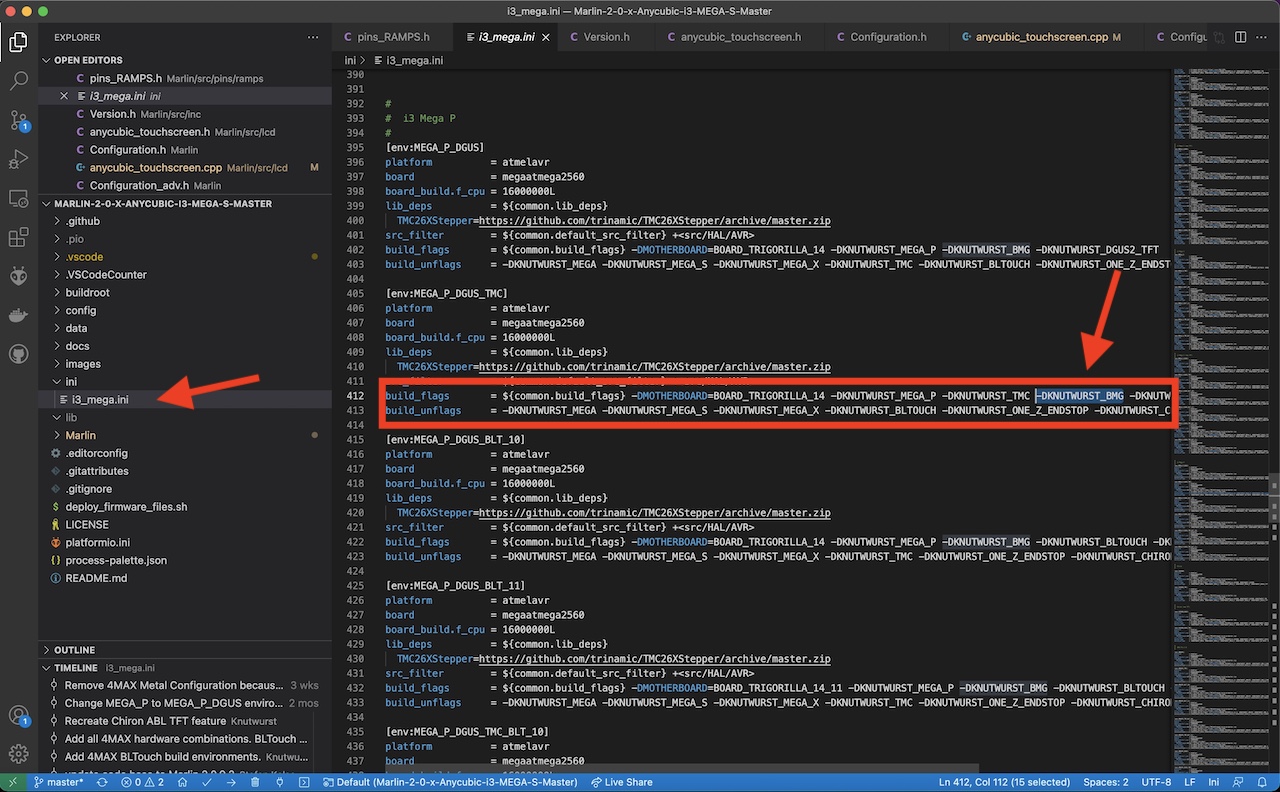
A last important feature of this Hybrid Firmware are the profiles mentioned above, which are used to control the individual printer configurations. These definitions can be found in many places in the source code, often with a #IF ENABLED(<configuration name>). Various paths are switched on and off or linked to conditions at compile time.
For example, the Bondtech Mini Geared (BMG) Extruder has certain properties and an opposite direction of travel compared to the MK8 or Titan Extruder. To enable these features, just set the KNUTWURST_BMG build flag. To declare it as a build flag, there must be a -D in front of the name. So for the Mega Pro, which is delivered with a BMG extruder, the flag -DKNUTWURST_BMG is set, which then adopts all these settings in the source code.
This also works with all other configurations/build flags and can also be applied to other printer configurations. This makes it easy to integrate new printers into the existing project or to adapt your own printer to your needs.
*Es muss jetzt keine großzügige Spende sein. Ein paar Cent reichen um mir zu zeigen, wer überhaupt Interesse daran hat und wem die Weiterentwicklung wichtig ist. So bleibt die Motivation da und ich weiß einfach, dass ich nicht für die Tonne programmiere ;)
*It doesn't have to be a generous donation. A few cents are enough to show me who is interested in further development. So the motivation stays and I just know that I am not programming for the bin ;)