This software takes an image and translates that into a schematic of a mosaic. It supports different materials, such as Perler Beads, LEGO, and DMC cross-stitching
The algorithm maps colors in the input image to the available colors, while generally preserving the feel of the image (aka dither).
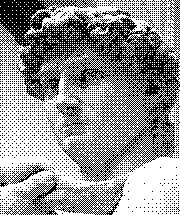
See [examples/fighter.png.html](an example) for what the output looks like.
Run this look with an image file as an input:
java -jar xsticher.jar myimage.png
It produces the schematic in myimage.png.html
Select materials. The following values are supported:
-p dmc-floss: DMC size 25 cotton embroidery floss. This is the default.-p lego: LEGO mosaic. As of this writing, the color palette is not complete.-p lego-mono: Monochrome LEGO mosaic that only consists of white, black, and 3 shades of grey in between.-p perler: Perler beads.
More can be added by placing a CSV file into src/main/resources
When this program color-maps the input image, all the colors available in the given material is weighed equally, and the program may end up selecting a color that is either expensive or of limited supply.
When this happens, you can use the -e option to exclude specific colors from the consideration of the algorithm.
The algorithm will find the next best match color.
Values are comma separated color codes. For example, -e B5200 would exclude a variant of white. Color codes can be
seen in the output schematic.
When your input image contains a lot of natural colors and gradations, the output will often contain a large number of similar colors. This adds the complexity to the design, and sometimes you prefer to reduce the # of colors used in the schematic.
The -2e option does this. You specify comma separated color codes, and those designated colors
will be remapped to another color that's already used in the schematic. And this is the key difference
between the -2e option and the -e option; the former replaces the specified color by another color that's already used
in the current design, while the latter replaces the specified color by another color available in the material.
Use a block dither algorithm, which tends to produce a block pattern in the output like the following:
This tend to work well when creating a large mosaic with materials of limited color options, such as LEGO.
Combine block dither algorithm (see above) with the default "nearest color" algorithm by applying them selectively to different regions of the same image.
This option takes another image as an argument and use that as the mask pattern like this: -ctk mask.png
The mask image should have transparent pixels and opaque pixels, and should be of the same size as the main image. The part of the main image specified by opaque colors in the mask image will receive the block dither algorithm, while others get the "nearest color" algorithm.
I wrote this mode to deal with video game graphics images that have clear border pixels. I wanted those to be mapped to one color to get a crisp line, while getting a good color match in other areas through the block dither algorithm.
Block dither algorithm acts on a block of pixels at a time (2x2, 3x3, 4x4, ...)
This algorithm selects the block size. For example, -b 2 would select 2x2 block.
Larger block size spreads colors among larger number of pixels, which is normally not practical for sizes of hand-assembled mosaic projects. I almost always use 2x2.
By default, the entire image gets processed, but you can select the specific rectangle to process with the -area option.
This option takes the -area WxH+X+Y form:
- W: width of the rectangle
- H: height of the rectangle
- X: X offset of the rectangle
- Y: Y offset of the rectangle
Some materials, such as LEGO, comes in pieces of different sizes. When doing a large mosaic, it is easier and cost-effective to use bigger tiles of various sizes, not just 1x1. This switch enables use of tiles.
This feature is still a work in progress and most notably it currently does not offer the control of tile sizes