💾 Latest Downloads, News and Changelogs (german)
This file describes the structure of EVSE-WiFi in version 1.x.x and is only valid for the ESP8266. For the use of EVSE-WiFi 2.0 (based on ESP32) it is recommended to use the dedicated hardware 'EVSE-WiFi 2.0 Base'. You can find further information on www.evse-wifi.de. The EVSE-WiFi 2.0 Base Module can be bought here.
EVSE-WiFi brings WiFi functionality to your EVSE WB/DIN to control your Charging Station very easy. It uses an ESP8266 to communicate with the EVSE WB charging controller via ModBus (UART) and offers a web interface to control nearly everything. Optional there is a possibility to connect an impulse meter via S0 or a Modbus meter (RS485-TTL Adapter is required) and an RFID reader to detect valid RFID tags.
If you want to support this project, I would be very happy about a donation.

- WiFi functionality (as an access point or as a WiFi client)
- Activate and deactivate the Simple EVSE WB via a web interface, RFID tags, API or a button
- 'Always Active' mode - no manual activation necessary
- HTTP-API to let other devices control EVSE-WiFi
- Setting the charging current via the web interface
- Displays the current charging power in kW (by impulses of a S0 or ModBus meter, optional)
- Displays the charged energy (kWh and km) and the cost of the charge (€)
- User management (RFID tags, optional)
- Log of the last charging processes with output of the charged energy quantity, charging time and costs of the charge (optionally which RFID tag the EVSE was enabled by and the user assigned to it)
- Rudimentary settings (WiFi settings, password for web interface, maximum charging current, etc.)
- Control over all EVSE WB/DIN modbus registers via web interface
- Output of all important parameters of the SimpleEVSE WB (Modbus)
- LED-Support (Pin D0)
If you do not have the time and desire to flash an ESP module and customize the libraries, you can also purchase the already prepared module in the shop with all wires and additional Hardware you need.
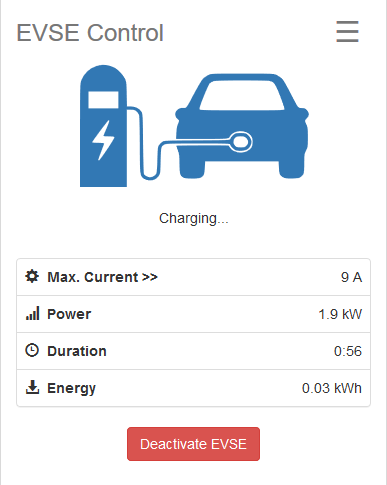
Control the Current your EVSE communicates to the vehicle. This page also shows additional data like metered energy and the charging time.

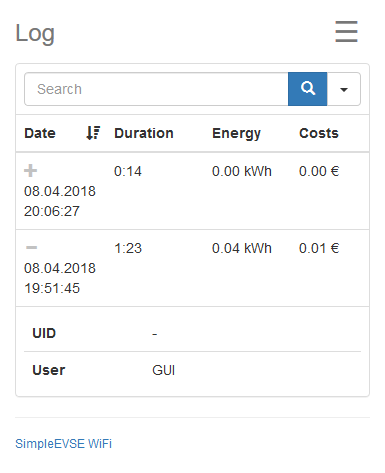
The log page shows the last charging activities.
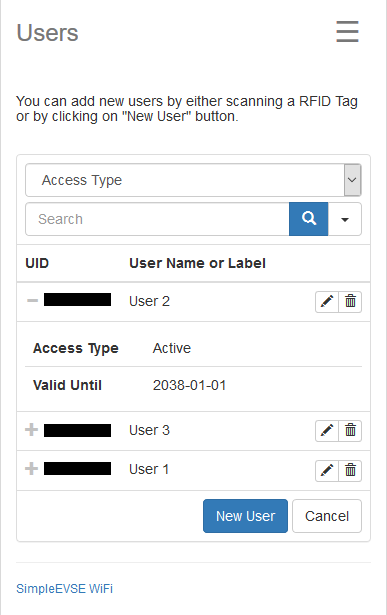
At the users page you can define valid RFID tags that can unlock the EVSE.
This file describes the structure of EVSE-WiFi in version 1.x.x and is only valid for the ESP8266. For the use of EVSE-WiFi 2.0 (based on ESP32) it is recommended to use the dedicated hardware 'EVSE-WiFi 2.0 Base'. You can find further information on www.evse-wifi.de. The EVSE-WiFi 2.0 Base Module can be bought here.
- A complete Wallbox based on EVSE Wallbox or EVSE DIN (min. Software revision 8 (2017-10-31) is needed - read the manual there for updating your EVSE software) Attention: revision 9 does not work, because there is a bug in the firmware (sold for a short time in 2018)
- An ESP8266 module or a development board like WeMos D1 mini or NodeMcu 1.0
- (optional) An electricity meter with S0 or RS485/Modbus interface. (At this time only SDM120 and SDM630 are supported for use with Modbus)
- (optional) A RFID Module (PN532 and Wiegand based RFID reader modules are not supported at this time)
- (optional) n quantity of Mifare Classic 1KB (recommended due to available code base) PICCs (RFID Tags) equivalent to User Number
SimpleEVSE-WiFi supports not only the control of the EVSE WB but also the use of a simple button or an RC522 RFID card reader to activate the charging process. With an optional electricity meter, the power requirements of the individual charging processes can be output.
This wiring is mandatory and absolutely needed to run SimpleEVSE-WiFi
| ESP8266-Pin | ESP8266-GPIO | EVSE WB |
|---|---|---|
| D1 | GPIO5 | TX |
| D2 | GPIO4 | RX |
| GND | GND |
| ESP8266-Pin | ESP8266-GPIO | Button |
|---|---|---|
| D4 | GPIO2 | Pin 1 |
| GND | Pin 2 |
| ESP8266-Pin | ESP8266-GPIO | electricity meter |
|---|---|---|
| D3 | GPIO0 | S0+ |
| GND | S0- |
| ESP8266-Pin | ESP8266-GPIO | LED |
|---|---|---|
| D0 | GPIO16 | Anode (+) |
| GND | Kathode (-) |
| TTL->RS485 | ESP8266-Pin |
|---|---|
| RX | RX |
| TX | TX |
| VCC | 5V |
| GND | GND |
| TTL->RS485 | Modbus Meter |
|---|---|
| A+ | A |
| B- | B |
| ESP8266-Pin | ESP8266-GPIO | RC522 |
|---|---|---|
| D5 | GPIO14 | SCK |
| D6 | GPIO12 | MISO |
| D7 | GPIO13 | MOSI |
| D8 | GPIO15 | SDA |
| GND | GND | |
| 3.3V | 3.3V |
Be sure to use a suitable power supply for ESP. At least 500mA is recommended!
*When you use an electricity meter with S0 interface be sure the S0 interface switches to GND, don't use 3.3V or 5V!
**To use a Modbus electricity meter via RS485, you need a extra piece of hardware to translate UART to RS485. In this project a PCB like this is required. Set your meter to baud rate 9600 and slave ID to "002". Until now only SDM120 and SDM630 Modbus meters are supported! If you have another one you can use it with the S0 interface.
To use EVSE-WiFi, the modbus functionallity of EVSE WB/DIN is needed! By default, modbus functionality is disabled. To activate it, pull AN input of the EVSE board to GND while booting for at least 5 times within 3 seconds. Modbus register 2001 will be set to 1 (Modbus is active). Attention: That change will not be saved! To save the settings, you have to give a R/W operation at a register >=2000. The easiest way to do this is to activate and deactivate EVSE through the WebUI in the "EVSE Control" page.
This file describes the structure of EVSE-WiFi in version 1.x.x and is only valid for the ESP8266. For the use of EVSE-WiFi 2.0 (based on ESP32) it is recommended to use the dedicated hardware 'EVSE-WiFi 2.0 Base'. You can find further information on www.evse-wifi.de. The EVSE-WiFi 2.0 Base Module can be bought here.
Attention: make sure that the EVSE WB/DIN is not connected to the ESP during the flash process via USB. It could cause overheating of the ESP.
Compiled firmware binary and flasher tool for Windows PCs are available in on www.evse-wifi.de. On Windows you can use "flash.bat", it will ask you which COM port that ESP is connected and then flashes it. You can use any flashing tool and do the flashing manually if you don't want to use the flash.bat.
Please install Arduino IDE if you didn't already, then add ESP8266 Core on top of it. Additional Library download links are listed below:
- Arduino IDE - The development IDE
- ESP8266 Core for Arduino IDE - ESP8266 Core
- ESPAsyncWebServer - Asyncrone Web Server with WebSocket Plug-in
- ESPAsyncTCP - Mandatory for ESPAsyncWebServer
- ESPAsyncUDP - Mandatory for ESPAsyncWebServer
- ModbusMaster - ModbusMaster Library for communicating with EVSE (NOTE: Use my Fork of ModbusMaster! Otherwise the wdt reset will be triggered in case of timeout error)
- SoftwareSerial SoftwareSerial to communicate with EVSE
- MFRC522 - MFRC522 RFID Hardware Library for Arduino IDE
- ArduinoJson - JSON Library for Arduino IDE
- NTPClientLib - NTP Client Library for Arduino IDE
- TimeLib - Mandatory for NTP Client Library
- ESP8266Ping - Needed for checking online Status
You also need to upload web files to your ESP with ESP8266FS Uploader.
- ESP8266FS Uploader - Arduino ESP8266 filesystem uploader
Unlisted libraries are part of ESP8266 Core for Arduino IDE, so you don't need to download them, but check that at least you have v2.4.0 or above installed.
When SimpleEVSE-WiFi starts for the first time it sets up a WiFi access point called 'evse-wifi'. You can connect without a password. To connect, open http://192.168.4.1 in your browser. The initial password is 'adminadmin'. You should first check the Settings to bring the ESP in Client mode and connect it to your local WiFi network. The ESP will be restarted afterwards. If it doesn't restart, press the 'RST' button once. Sometimes the ESP must first be manually reset (this only has to happen after flashing a new firmware).
The development of SimpleEVSE-WiFi is very time consuming. If you want to support this project, I would be very happy about a donation.
Since version 0.2.0 there is an HTTP API implemented to let other devices control your EVSE-WiFi. The API gives you the following possibilities of setting and fetching information.
gives you the following information of the EVSE WB in json:
| Parameter | Description |
|---|---|
| vehicleState | Vehicle state (ready / detected / charging) |
| evseState | EVSE State (active/not active) |
| maxCurrent | Maximum Current depending on PP-limit and |
| actualCurrent | Actual configured current in A (e.g. 20A) |
| actualPower | actual power consumption (when S0 meter is used) |
| duration | charging duration in milliseconds |
| alwaysActive | Always Active Mode enabled (true/false) |
| lastActionUser | The user name of the user who performed the last action (activate/deactivate) |
| lastActionUID | The UID of the user who performed the last action (activate/deactivate) |
| energy | charged energy of the current charging process in kWh |
| mileage | charged energy in km |
| meterReading | actual meter reading in kWh |
| currentP1 | actual current in A (phase 1) |
| currentP2 | actual current in A (phase 2) |
| currentP3 | actual current in A (phase 3) |
| useMeter | energy meter is configured in EVSE-WiFi (true/false) |
GET http://192.168.4.1/getParameters
returns JSON like this:
{
  "type": "parameters",
  "list": [{
    "vehicleState": 2,
    "evseState": false,
    "maxCurrent": 32,
    "actualCurrent": 32,
    "actualPower": 5.79,
    "duration": 1821561,
    "alwaysActive": false,
    "lastActionUser": "GUI",
    "lastActionUID": "GUI",
    "energy": 9.52,
    "mileage": 82.3,
    "meterReading": 54.35,
    "currentP1": 8.54,
    "currentP2": 8.54,
    "currentP3": 8.54,
    "useMeter": true
  }]
}returns the following information about the last log entries
| Parameter | Description |
|---|---|
| uid | The UID of the RFID tag that was used to activate EVSE |
| username | The username belongs to the UID |
| timestamp | Timestamp in seconds since Jan 01 1970 (Unix timestamp) |
| duration | Duration of the charging process in milliseconds |
| energy | Charged energy of the charging process in kWh |
| price | Defined price per kWh in cent |
GET http://192.168.4.1/getLog
returns JSON like this:
{
  "type": "latestlog",
  "list": [{
    "uid": "ABCD1234",
    "username": "GUI",
    "timestamp": 1523295915,
    "duration": 7504266,
    "energy": 10.32,
    "price": 21
  }, {
    "uid": "-",
    "username": "GUI",
    "timestamp": 1523568920,
    "duration": 1152251,
    "energy": 2.17,
    "price": 23
  }]
}using setCurrent() will set the current to the given value (e.g. 18A)
| Parameter | Description |
|---|---|
| current | Current to set in EVSE WiFi |
GET http://192.168.4.1/setCurrent?current=8
Sets the charging current to 8A and returns
S0_set current to 8A
In cases of Error, the answer would be
| Answer | Description |
|---|---|
| E0_could not set current - internal error | Internal error occured (unspecified) |
| E1_could not set current - give a value between x and y | Wrong value was given |
| E2_could not set current - wrong parameter | Wrong parameter was given |
will activate/deactivate EVSE WB
| Parameter | Description |
|---|---|
| active | can be true (activate EVSE) or false (deactivate EVSE) |
GET http://192.168.4.1/setStatus?active=true
Activates EVSE and returns
S0_EVSE successfully activated
In cases of Error, the answer would be
| Answer | Description |
|---|---|
| E0_could not activate EVSE - internal error | Internal error occured (unspecified) |
| E0_could not deactivate EVSE - internal error | Internal error occured (unspecified) |
| E1_could not process - give a valid value (true/false) | Wrong value was given |
| E2_could not process - wrong parameter | Wrong parameter was given |
| E3_could not activate EVSE - EVSE already activated! | EVSE is already in state "active" |
| E3_could not deactivate EVSE - EVSE already deactivated! | EVSE is already in state "deactive" |
reboots EVSE-WiFi via ESP.restart()
| Parameter | Description |
|---|---|
| reboot | must be true to reboot EVSE-WiFi |
GET http://192.168.4.1/doReboot?reboot=true
Returns
S0_EVSE-WiFi is going to reboot now...
In cases of Error, the answer would be
| Answer | Description |
|---|---|
| E1_could not do reboot - wrong value | Wrong value was given |
| E2_could not do reboot - wrong parameter | Wrong parameter was given |