LanguageGuide
Sequence diagrams are defined using a text-based DSL. The language used is heavily inspired
from js-sequence-diagram and is a subset
of the language used by websequencediagram.
Most diagrams written for these two services can be used with goseq. There are a few
extensions and differences between the language used by this tool and the other tool.
Comments similar to C/C++ can be included in sequence diagrams. The '#' comments supported by Shells and most other dynamic languages can also be used.
Comments starting with /* will continue until a */ has been encountered. Comments starting
with // or # will continue until the end-of-line.
/*
   This is a multi-lined
   command.
*/

// This is a single line comment.

# This is also a single line comment.
Comments that begin with #! declare a processing instruction, which can be used to configure how the sequence diagram
is to be generated. It is less about what the diagram should look like, and may be specific to the particular parser
and generator, which is why these are configured as comments instead of regular statements.
Goseq uses processing instructions to configure the output filename of a diagram. This can be done by adding a processing instruction of the form #!goseq <output-filename>. When present in the diagram, the generated SVG file will be saved to a file instead of written out to stdout.
#!goseq output.svg
#
# This diagram will be saved to output.svg, instead of being written to stdout by default.
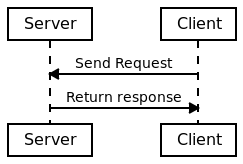
Client->Server: Send request
Server->Client: Return response
An action is an exchange between two participants. Actions are defined by specifying the source participant
and target participant separated with an arrow pattern (e.g. ->) and providing a remark following
the colon, which will appear above the arrow in the generated diagram.
Client->Server: Send request
Server->Client: Return response

Remarks continue to the end of the line. New-lines can be added by using the \n escape sequence.
If the participant is not recognised, it will be added to the diagram automatically from left to right.
Note that the arrow pattern must always point from source participant to the target participant.
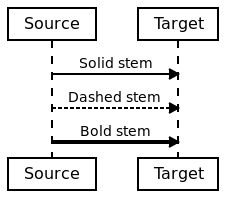
By using a different arrow pattern between the two participants, the style of the arrow stem and arrow head can be changed. The diagram below shows the currently supported arrow stems and arrow head:
Source->Target: Solid stem
Source-->Target: Dashed stem
Source=>Target: Bold stem
Source->Target: Solid arrow
Source->>Target: Open arrow
Source-\>Target: Upper barbed arrow
Source-/>Target: Lower barbed arrow

An action can use either the left or right keywords as either the source or target actor to reference
the extreme left or right side of the diagram. This can be used to create hanging arrows which do
not originate from a participant on the diagram:
left->Client: Fetch web page
Client->Server: Send request
Server->right: Do DB lookup
right->Server: Found web page
Server->Client: Return response
Client->left: Rendered web page

An action arrow that loops-back onto the originating participant can be added by using the same actor on both sides of the arrow. At the moment, the self referencing arrow will always be on the right side of the lifeline:
Client->Client: Check cache\nfor web page
Client->Server: [not in cache] Send request
Server->Server: Check server\ncache for web page
Server->Server: [in cache]\nRead from cache
Server->Client: Return response

Each diagram can have a title, which can be specified using the title keyword:
title: My Client Server Example

Client->Server: Send request
Server->Client: Return response

Participants can be explicitly declared using the participant keyword. This is not required as any
participants not recognised within an action will automatically be added to the end of the diagram.
However, this can be used to set properties on individual participants and also determine the order
in which participants appear in the diagram.
The order of the explicitly declared participants depend on the order of the participant keywords:
participants will appear from left to right:
participant Server
participant Client

Client->Server: Send Request
Server->Client: Return response
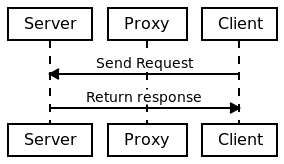
Participants that are not involved in any actions can also be added to the diagram using
the participant keyword:
participant Server
participant Proxy
participant Client

Client->Server: Send Request
Server->Client: Return response
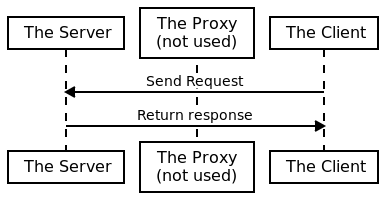
Finally, the label used by a participant can be specified by adding a remark to a participant
declaration in a similar way to remarks for actions.
participant Server: The Server
participant Proxy: The Proxy\n(not used)
participant Client: The Client

Client->Server: Send Request
Server->Client: Return response
Blocks can be used to indicate optional actions, repeatable actions or actions that may have multiple alternatives based on some condition.
Action alternatives can be defined using the alt keyword. Adding this keyword will
surround all the following actions within the block up to the end keyword:
Client->Server: Sender request
alt: [request in memory]
    Server->Server: Read from memory
end
Server->Client: Return response
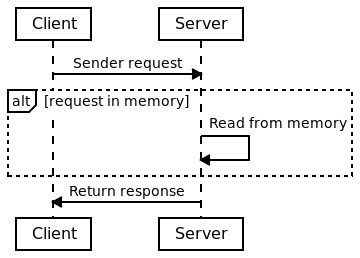
Note: the square bracket are not required by the alt block, but are usually included in
sequence diagrams that adhere to the UML standard.
Multiple "branches" can be added to an alternative block using either elsealt or else.
As many elsealt's can appear in an alternative block but only one else is permitted:
Client->Server: Sender request
alt: [request in memory]
    Server->Server: Read from memory
elsealt: [request in memcache]
    Server->Memcache: Read from memcache
else:
    Server->DB: Read from database
end
Server->Client: Return response
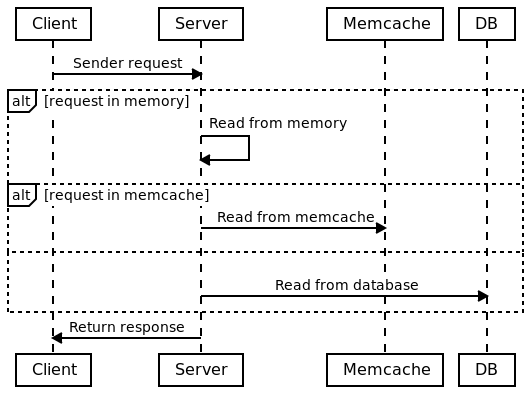
The alt, elsealt and else can take a remark. Note that the colon is required for each
of these three keywords, but not the end keyword. alt blocks can also be nested.
Parallel execution blocks can be added using the par keyword. This will surround the actions following the keyword up to the end keyword in an par block, indicating parallel threads of execution. Multiple "threads" can be added using either elsepar or else:
Client->Server: Request user login
par:
    Server->DB: Fetch user details
elsepar:
    Server->DB: Fetch account details
else:
    Server->DB: Fetch something else
end
Server->Client: Return details
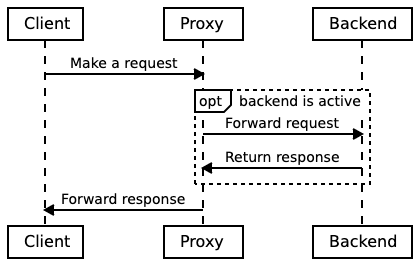
Optional execution blocks can be added using the opt keyword. This will surround the
actions following the keyword up to the end keyword in an opt block:
Client->Server: Request something
opt: [server has a cache]
    Server->Server: Check cache that\nsomething is there
end

A sequence of actions that may be executed multiple times can be represented using the
loop block:
Control->Rocket: Start launch sequence
loop: count down from 10
    Rocket->Rocket: Announce countdown
end
Rocket->Rocket: **Blastoff**

A block without any prefix can be represented using the block keyword:
Client->Proxy: Make a request
block: within DMZ
    Proxy->Backend: Forward request
    Backend->Proxy: Return response
end
Proxy->Client: Forward response

Characteristics of blocks can be modified with style attributes, which appear after the block directive:
Client->Proxy: Make a request
opt: backend is active
    Proxy->Backend: Forward request
    Backend->Proxy: Return response
end
Proxy->Client: Forward response
Client->Proxy: Make a request
opt(fullwidth="true"): backend is active
    Proxy->Backend: Forward request
    Backend->Proxy: Return response
end
Proxy->Client: Forward response
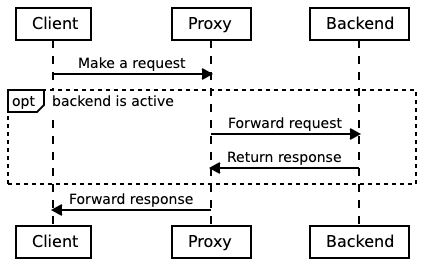
See Style Attributes for a list of possible style attributes that can be applied to blocks.
The following annotations can be added to the diagram.
Notes can be added to either side or over the life-line of one or many participants. This is done
using the note keyword, which takes one or two actors and a remark:
note right of Client: This is the client
note left of Server: This is the server
note over Client: This sends request\nto the server
note over Client,Server: They communicate using HTTP

Horizontal dividers can be added to vertically separate parts of the diagram. There are three
types of dividers: gap, spacer, frame or line. Dividers can also have an optional comment, which
will appear within the centre of the divider itself:
Client->Server: Is it ready?
horizontal gap: Some time passes
Server->Client: No.
horizontal frame: Some more\ntime passes\nthis time.
Client->Server: Is it ready now?
horizontal line
Server->Client: Yes

Certain characteristics of the sequence document can be modified using style attributes. These are use to control the appearance of constructs, such as participants.
Note: At the moment, only the style of participants can be modified.
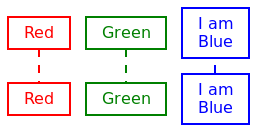
The appearance of participants can be modified by adding parenthesis after the participant name:
participant Red (color="red")
participant Green (color="green")
participant Blue (color="blue"): I am\nBlue
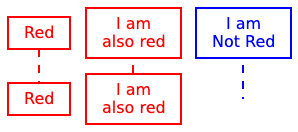
In addition to setting attributes on the constructs themselves, styles can be applied
to all constructs of a particular type using the style keyword. For example,
to adjust the style of all participants:
style participant (
    color="red"
)
participant Red
participant AlsoRed: I am\nalso red

Multiple style keywords can appear in a diagram, with each one applying to constructs that follow it:
style participant (
    color="red"
)

participant Red
participant AlsoRed: I am\nalso red

style participant (
    color="blue",
    footer="none"
)

participant NotRed: I am\nNot Red
See Style Attributes for a list of possible style attributes.