NOTE
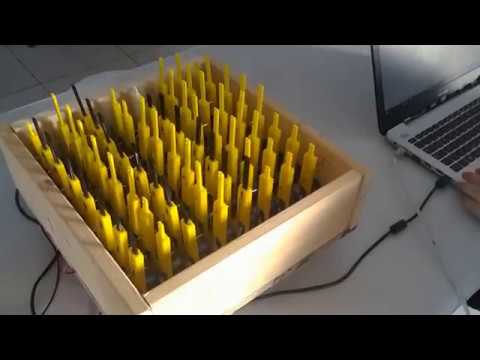
This is the prototype of PIC-TALK shape display. No longer this repo supported. Wiring must be made with care. Start the project with any inconvenience.
Version 1.0.4
This project is inspired by the project "inFORM" made by MIT Media Lab and we aim to make a small version with an appropriate price. We also aimed to use this project for visually impaired people in their educational lives.
This video gives the general purpose and construction of the project.
What things you need to install the system
| Material | Count |
|---|---|
| Servo Motors | 64 |
| Electronic Circuit | 1 |
| Arduino | 1 |
| Wooden Plates | 1 |
| Power Supply (5V 20A) | 1 |
| 3D Prints |
First of all we should print all of the parts from 3D printer. In first try we used model from DesignCell. But we changed the model to sit appropriate the cover. You can find all 3D designs in the folder. I also add the 3D parts to Thingiverse that you can download easily. We use Craftware as a slicer. After slice the models with these adjusments;
- 0.3mm Layer Height
- 50 mm/s Draw Speed
- No Raft- No Support
After 120 hours of printing now we're all done!

After that models be like that.

Put the model3 (in the folder) top of the rod.
After mounting each servo motor, let's put in the system. You should watch out the aligment of the motors.

The current circuit so basic and so easy to control the sytem. We use PCA9685 from Adafruit for controlling servo motors. You should adress the boards before wiring. Adressing can be like:
- 0x40
- 0x41
- 0x42
- 0x43

In the current system we use Arduino Nano that use AtMega328 as microcontroller. But it can be insufficient for memory. So we can use Atmega2560 as an alternative. We designed a PCB that we can control the system gerber files included in the project detail.
- Tested
You can control the system like
SET_SERVO(0000000011111111222222223333333344444444555555556666666677777777);
GO();0008800000088000000880008888888888888888000880000008800000088000 => (1/x)^2 + (1/y)^2
0000000000088000008888000888888008888880008888000008800000000000 => Cylinder
0000000000000000008888000088880000888800008888000000000000000000 => Square
8888888886333368863553688630036886300368863333688666666888888888 => (x)^2 + (y)^2
0000888800008888000088880000888888880000888800008888000088880000 => sign(xy)
0000000000033000003553000358853003588530003553000003300000000000 => sqrt(1-x^2-y^2)
0000000003333330035555300358853003588530035335300355553000000000 => pyramid
- Musa Sadık Unal - Initial work - musaunal.com
- Ersin Erturk - Initial work
- Add Leap Motion Interaction
- Eagle Schematic
- Preparing GUI
- Thanks to inFORM team for inspiration (Especially thanks to Daniel Leithinger)
- First 3D parts from DesignCell