Behavioral Cloning Project
The goals / steps of this project are the following:
- Use the simulator to collect data of good driving behavior
- Build, a convolution neural network in Keras that predicts steering angles from images
- Train and validate the model with a training and validation set
- Test that the model successfully drives around track one without leaving the road
- Summarize the results with a written report
"
Here I will consider the rubric points individually and describe how I addressed each point in my implementation.
My project includes the following files:
- model.py containing the script to create and train the model
- drive.py for driving the car in autonomous mode
- model.h5 containing a trained convolution neural network
- writeup_report.md summarizing the results
Using the Udacity provided simulator and my drive.py file, the car can be driven autonomously around the track by executing
python drive.py model.h5The model.py file contains the code for training and saving the convolution neural network. The file shows the pipeline I used for training and validating the model, and it contains comments to explain how the code works.
My model consists of a convolution neural network with three 3x3 filter sizes and two 1x1 filters and and depths between 160 and 320 (model.py)
The model includes Rectified RELU layers to introduce nonlinearity and eliminate vanishing gradiant problem, and the data is normalized in the model using a Keras lambda layer.
The model contains dropout layers in order to reduce overfitting (model.py).
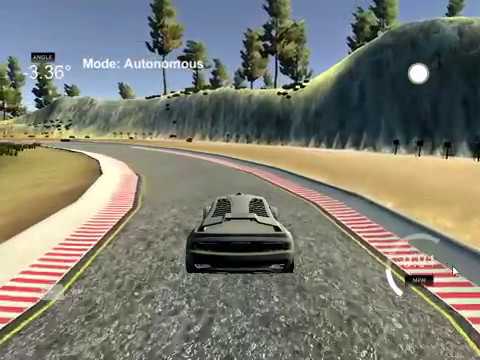
The model was trained and validated on different data sets to ensure that the model was not overfitting. The model was tested by running it through the simulator and ensuring that the vehicle could stay on the track. A video is uploaded in youtube of the driving simulator where vehicle is running autonomously. Also a video.mp4 is added in the git repo to show the recording of the center camera while the vehcile is on the move.
The model used an adam optimizer, so the learning rate was not tuned manually (model.py). I used the defaul learning rate of adam optimized (0.001)
Training data was chosen to keep the vehicle driving on the road. I used a combination of center lane driving, recovering from the left and right sides of the road and also agugmenting the data using flipping of the images collcted from three cameras.
For details about how I created the training data, see the next section.
The overall strategy for deriving a model architecture was to build a CNN model based on the paper of NVIDIA end-to-end selft driving car model. Paper Link
My first step was to use a convolution neural network model similar to the NVIDIA end-to-end driving model. I thought this model might be appropriate because It learns the entire processing pipeline needed to steer an automobile which is called as end-to-end modeling. Though, I have modified the archtecure so that it fits the input image sizes.
In order to gauge how well the model was working, I split my image and steering angle data into a training and validation set. I found that my first model had a low mean squared error on the training set but a high mean squared error on the validation set. This implied that the model was overfitting. In their last few layers thay have a fully connected layer of 1164 neurons. To combat the overfitting, I have removed it and added dropout of 0.5 to overcome the overfitting problem. I tried with different dropout rate and came up with 0.5 as the optimal value.
The final step is to run the simulator to see how well the car is driving around track one. In my model, I select the graphics quality 'fastest' before running the simulator. In my driver.py the the speed is set to 9 mph as cruising speed and the vehicle is able to drive autonomously around the track without leaving the road.
The final model architecture (model.py) consisted of a 5 convolution layers followed by 3 fully connected layers.
Here is a visualization of the architecture (note: visualizing the architecture is optional according to the project rubric)
| End-to-End CNN Model | Filter Size | Max polling size |
|---|---|---|
| Input Layer input size=(90,320,3) | - | |
| Normalization Layer | - | |
| Conv2D Layer | (5,5) | (2,2) |
| ELU Layer | - | |
| Conv2D Layer | (5,5) | (2,2) |
| ELU Layer | - | |
| Conv2D Layer | (5,5) | (2,2) |
| ELU Layer | - | |
| Conv2D Layer | (3,3) | (1,1) |
| ELU Layer | - | |
| Conv2D Layer | (3,3) | (1,1) |
| ELU Layer | ||
| Dropout | ||
| Flatten() | ||
| FC Layer 100 | ||
| ELU Layer | ||
| FC Layer 50 | ||
| ELU Layer | ||
| FC Layer 10 | ||
| ELU Layer | ||
| FC Layer 1 |
To capture good driving behavior, I first recorded two laps on track one using center lane driving. Here is an example image of center lane driving:

I then recorded the vehicle recovering from the left side and right sides of the road back to center so that the vehicle would learn to .... These images show what a recovery looks like starting from ... :


Then I repeated this process on track two in order to get more data points.
To augment the data sat, I also flipped images and angles thinking that this would ... For example, here is an image that has then been flipped:


After the collection process, I had 48216 number of data points. I then preprocessed this data by 1) Normalization using Lambda layer , and 2) Croping the top 50 pixels and bottom 20 pixels as they are not necessary to train the model.
model.add(Lambda(lambda x: x/127.5 - 1.,input_shape=(row, col, ch),output_shape=(row, col, ch)))
model.add(Cropping2D(cropping=((50,20), (0,0)), input_shape=(160,320,3)))
I finally trained the model using fit generator with the split of 80%, and 30% with training and validation dataset.
model.fit_generator(train_generator, samples_per_epoch=
            len(train_samples), validation_data=validation_generator,
            nb_val_samples=len(validation_samples), nb_epoch=25)
I used this training data for training the model. The validation set helped determine if the model was over or under fitting. The ideal number of epochs was 25 as evidenced by following graph I used an adam optimizer so that manually training the learning rate wasn't necessary.

With the model that I have developed has few limitaitons. In Simulator, if I select the graphics option other than fastest the vehcile goes off track. I think I need to train the model more and collect more dataset for this to fix. Also, I have not considered the Track two for this model during training and testing. Furthermore, I want to try the model with ResNet archtecture to test how it works. But it was fun to see the effect of a deep learning into action with an autonomous vehicle.