MapmyIndiaUIWidgets

The MapmyIndiaUIWidgets SDK for iOS allows you can build rich apps by quickly implement reday made UI components. Currently this SDK have a widget for Searching a place using AutoSuggest API.
MapmyIndia's keys must be set to initialize SDKs. Which can be set in two ways.
First Way You can also set these required keys programmatically. Add the following to your application:didFinishLaunchingWithOptions: method, replacing restAPIKey and mapSDKKey with your own API keys:
MapmyIndiaAccountManager.setMapSDKKey("MAP SDK_KEY")
MapmyIndiaAccountManager.setRestAPIKey("REST API_KEY")
MapmyIndiaAccountManager.setAtlasClientId("ATLAS CLIENT_ID")
MapmyIndiaAccountManager.setAtlasClientSecret("ATLAS CLIENT_SECRET")
MapmyIndiaAccountManager.setAtlasGrantType("GRANT_TYPE") //always put client_credentials
Second Way By adding following keys in Info.plist file of your project MapmyIndiaSDKKey, MapmyIndiaRestKey, MapmyIndiaAtlasClientId, MapmyIndiaAtlasClientSecret, MapmyIndiaAtlasGrantType.
Following are the dependency libraries which are reuired for MapmyIndiaUIWidgets and will be installed while installing MapmyIndiaUIWidgets.
This SDK is dependent on other MapmyIndia's library MapmyIndiaAPIKit. MapmyIndiaAPIKit is a wrapper library on MapmyIndia's APIs. For more information go to MapmyIndiaAPIKit.
This is MapmyIndia's Vector Maps SDK for IOS which lets you easily add Maps and web services to your own iOS app. For more details see MapmyIndiaMaps.
This library is available through CocoaPods. To install, simply add the following line to your podfile:
pod 'MapmyIndiaUIWidgets'On running pod install command it will automatically download and setup MapmyIndiaUIWidgets and dependent frameworks.
| Version | Dated | Description |
|---|---|---|
0.3.9 |
28 Sep, 2021 | Added support for xcode 13. |
0.3.8 |
30 Apr, 2021 | Added support for xcode 12.5. A parameter eLoc added in response of Autosuggest on launching Autocomplete View Controller from PlacePicker. A feature is added to show history in Autocomplete control which were previously chosen by user. An option of choosing Current Location is added in Autocomplete control. This can be hide based on configuration. A delegate function didRequestForCurrentLocation will be called on click on Current Location. |
0.3.7 |
12 March, 2021 | Fixed a crash while launching in ipad. |
0.3.6 |
08 Jan, 2021 | Feature of configuring appearance of attribution on Autocomplete is added. In PlacePicker on autocomplete, marker's location will set based on autocomplete and reverse geocoding will not be done. |
0.3.5 |
03 Dec, 2020 | Xcode 12.2 compatibility. In PlacePicker control on searching a place, map will be centered on basis of eLoc based on updated version 5.7.15 of map SDK. |
0.3.4 |
07 Nov, 2020 | Fixed an issue where search bar does not shows on presenting MapmyIndiaAutocompleteViewController. |
0.3.3 |
14 Oct, 2020 | Xcode 12 compatibility. |
0.3.2 |
24 Sep, 2020 | Fixed some minor bugs. |
0.3.1 |
21 Sep, 2020 | Search bar will be automatically focused on launch of Autosuggest controller. |
0.3.0 |
02 Sep, 2020 | A UI component PlacePickerView is added. |
0.2.2 |
13 Aug, 2020 | Cocoapods specification's structure changed. |
0.2.1 |
29 Jul, 2020 | Fixed an issue where MapmyIndiaUIWidgets was not packaging due to embeded MapmyIndiaAPIKit module. |
0.2.0 |
25 Jun, 2020 | Xcode 11.5 compatibility. |
0.1.0 |
25 Jun, 2020 | Fixed dependency version of MapmyIndiaAPIKit. Minimum dependency version will be 1.4.0. |
0.1.0-beta.1 |
21 Apr, 2020 | Initial first version release with a AutoComplete Control widget. |
The autocomplete service in the SDK for iOS returns place predictions in response to user search queries. As the user types, the autocomplete service returns suggestions for places such as businesses, addresses and points of interest.
You can add autocomplete to your app in the following ways:
Add an autocomplete UI control to save development time and ensure a consistent user experience.
Get place predictions programmatically to create a customized user experience.
The autocomplete UI control is a search dialog with built-in autocomplete functionality. As a user enters search terms, the control presents a list of predicted places to choose from. When the user makes a selection, a MapmyIndiaAtlasSuggestion instance is returned, which your app can then use to get details about the selected place.
Use the full-screen control when you want a modal context, where the autocomplete UI temporarily replaces the UI of your app until the user has made their selection. This functionality is provided by the MapmyIndiaAutocompleteViewController class. When the user selects a place, your app receives a callback.
To add a full-screen control to your app:
- Create a UI element in your main app to launch the autocomplete UI control, for example a touch handler on a UIButton.
- Implement the MapmyIndiaAutocompleteViewControllerDelegate protocol in the parent view controller.
- Create an instance of MapmyIndiaAutocompleteViewController and assign the parent view controller as the delegate property.
- Add a MapmyIndiaAutocompleteFilter to constrain the query to a particular type of place.
- Present the MapmyIndiaAutocompleteViewController using [self presentViewController...].
- Handle the user's selection in the didAutocompleteWithPlace delegate method.
- Dismiss the controller in the didAutocompleteWithPlace, didFailAutocompleteWithError, and wasCancelled delegate methods.
The following example demonstrates one possible way to launch MapmyIndiaAutocompleteViewController in response to the user tapping on a button.
import UIKit
import MapmyIndiaUIWidgets

class ViewController: UIViewController {

  override func viewDidLoad() {
    makeButton()
  }

  // Present the Autocomplete view controller when the button is pressed.
  @objc func autocompleteClicked(_ sender: UIButton) {
    let autocompleteController = MapmyIndiaAutocompleteViewController()
    autocompleteController.delegate = self

    // Specify a filter.
    let filter = MapmyIndiaAutocompleteFilter()
    autocompleteController.autocompleteFilter = filter

    // Display the autocomplete view controller.
    present(autocompleteController, animated: true, completion: nil)
  }

  // Add a button to the view.
  func makeButton() {
    let btnLaunchAc = UIButton(frame: CGRect(x: 5, y: 150, width: 300, height: 35))
    btnLaunchAc.backgroundColor = .blue
    btnLaunchAc.setTitle("Launch autocomplete", for: .normal)
    btnLaunchAc.addTarget(self, action: #selector(autocompleteClicked), for: .touchUpInside)
    self.view.addSubview(btnLaunchAc)
  }

}

extension ViewController: MapmyIndiaAutocompleteViewControllerDelegate {

  // Handle the user's selection.
  func didAutocomplete(viewController: MapmyIndiaAutocompleteViewController, withPlace place: MapmyIndiaAtlasSuggestion) {
    print("Place name: \(place.placeName)")
    print("Place ID: \(place.eLoc)")
    dismiss(animated: true, completion: nil)
  }

  func didFailAutocomplete(viewController: MapmyIndiaAutocompleteViewController, withError error: NSError) {
    // TODO: handle the error.
    print("Error: ", error.localizedDescription)
  }

  // User canceled the operation.
  func wasCancelled(viewController: MapmyIndiaAutocompleteViewController) {
    dismiss(animated: true, completion: nil)
  }

  // Turn the network activity indicator on and off again.
  func didRequestAutocompletePredictions(viewController: MapmyIndiaAutocompleteViewController) {
    UIApplication.shared.isNetworkActivityIndicatorVisible = true
  }

  func didUpdateAutocompletePredictions(viewController: MapmyIndiaAutocompleteViewController) {
    UIApplication.shared.isNetworkActivityIndicatorVisible = false
  }

}Use a results controller when you want more control over the text input UI. The results controller dynamically toggles the visibility of the results list based on input UI focus.
To add a results controller to your app:
- Create a MapmyIndiaAutocompleteResultsViewController.
- Implement the MapmyIndiaAutocompleteResultsViewControllerDelegate protocol in the parent view controller and assign the parent view controller as the delegate property.
- Create a UISearchController object, passing in the MapmyIndiaAutocompleteResultsViewController as the results controller argument.
- Set the MapmyIndiaAutocompleteResultsViewController as the searchResultsUpdater property of the UISearchController.
- Add the searchBar for the UISearchController to your app's UI.
- Handle the user's selection in the didAutocompleteWithPlace delegate method.
There are several ways to place the search bar of a UISearchController into your app's UI:
The following code example demonstrates adding a results controller, adding the searchBar to the navigation bar, and handling the user's selection:
class ViewController: UIViewController {

  var resultsViewController: MapmyIndiaAutocompleteResultsViewController?
  var searchController: UISearchController?
  var resultView: UITextView?

  override func viewDidLoad() {
    super.viewDidLoad()

    resultsViewController = MapmyIndiaAutocompleteResultsViewController()
    resultsViewController?.delegate = self

    searchController = UISearchController(searchResultsController: resultsViewController)
    searchController?.searchResultsUpdater = resultsViewController

    // Put the search bar in the navigation bar.
    searchController?.searchBar.sizeToFit()
    navigationItem.titleView = searchController?.searchBar

    // When UISearchController presents the results view, present it in
    // this view controller, not one further up the chain.
    definesPresentationContext = true

    // Prevent the navigation bar from being hidden when searching.
    searchController?.hidesNavigationBarDuringPresentation = false
  }
}

// Handle the user's selection.
extension ViewController: MapmyIndiaAutocompleteResultsViewControllerDelegate {
  func didAutocomplete(resultsController: MapmyIndiaAutocompleteResultsViewController, withPlace place: MapmyIndiaAtlasSuggestion) {
    searchController?.isActive = false
    // Do something with the selected place.
    print("Place name: \(place.placeName)")
    print("Place ID: \(place.eLoc)")
  }

  func didFailAutocomplete(resultsController: MapmyIndiaAutocompleteResultsViewController, withError error: NSError) {
    // TODO: handle the error.
    print("Error: ", error.localizedDescription)
  }

  // Turn the network activity indicator on and off again.
  func didRequestAutocompletePredictionsForResultsController(resultsController: MapmyIndiaAutocompleteResultsViewController) {
    UIApplication.shared.isNetworkActivityIndicatorVisible = true
  }

  func didUpdateAutocompletePredictionsFor(resultsController: MapmyIndiaAutocompleteResultsViewController) {
    UIApplication.shared.isNetworkActivityIndicatorVisible = false
  }
}
Note: For the search bar to display properly, your app's view controller must be enclosed within a UINavigationController.
The following code example shows adding the searchBar to the top of a view.
import UIKit
import MapmyIndiaUIWidgets

class ViewController: UIViewController {

  var resultsViewController: MapmyIndiaAutocompleteResultsViewController?
  var searchController: UISearchController?
  var resultView: UITextView?

  override func viewDidLoad() {
    super.viewDidLoad()

    resultsViewController = MapmyIndiaAutocompleteResultsViewController()
    resultsViewController?.delegate = self

    searchController = UISearchController(searchResultsController: resultsViewController)
    searchController?.searchResultsUpdater = resultsViewController

    let subView = UIView(frame: CGRect(x: 0, y: 65.0, width: 350.0, height: 45.0))

    subView.addSubview((searchController?.searchBar)!)
    view.addSubview(subView)
    searchController?.searchBar.sizeToFit()
    searchController?.hidesNavigationBarDuringPresentation = false

    // When UISearchController presents the results view, present it in
    // this view controller, not one further up the chain.
    definesPresentationContext = true
  }
}

// Handle the user's selection.
extension ViewController: MapmyIndiaAutocompleteResultsViewControllerDelegate {
  func didAutocomplete(resultsController: MapmyIndiaAutocompleteResultsViewController, withPlace place: MapmyIndiaAtlasSuggestion) {
    searchController?.isActive = false
    // Do something with the selected place.
    print("Place name: \(place.placeName)")
    print("Place ID: \(place.eLoc)")
  }

  func didFailAutocomplete(resultsController: MapmyIndiaAutocompleteResultsViewController, withError error: NSError) {
    // TODO: handle the error.
    print("Error: ", error.localizedDescription)
  }

  // Turn the network activity indicator on and off again.
  func didRequestAutocompletePredictionsForResultsController(resultsController: MapmyIndiaAutocompleteResultsViewController) {
    UIApplication.shared.isNetworkActivityIndicatorVisible = true
  }

  func didUpdateAutocompletePredictionsFor(resultsController: MapmyIndiaAutocompleteResultsViewController) {
    UIApplication.shared.isNetworkActivityIndicatorVisible = false
  }
}You can use the MapmyIndiaAutocompleteTableDataSource class to drive the table view of a UISearchDisplayController.
To use MapmyIndiaAutocompleteTableDataSource to display a search controller:
- Implement the MapmyIndiaAutocompleteTableDataSourceDelegate and UISearchDisplayDelegate protocols in the parent view controller.
- Create a MapmyIndiaAutocompleteTableDataSource instance and assign the parent view controller as the delegate property.
- Create an instance of UISearchDisplayController.
- Add the searchBar for the UISearchController to your app's UI.
- Handle the user's selection in the didAutocompleteWithPlace delegate method.
- Dismiss the controller in the didAutocompleteWithPlace, didFailAutocompleteWithError, and wasCancelled delegate methods.
The following code example demonstrates using the MapmyIndiaAutocompleteTableDataSource class to drive the table view of a UISearchDisplayController.
import UIKit
import MapmyIndiaUIWidgets

class ViewController: UIViewController, UISearchDisplayDelegate {

  var searchBar: UISearchBar?
  var tableDataSource: MapmyIndiaAutocompleteTableDataSource?
  var searchDisplayController: UISearchDisplayController?

  override func viewDidLoad() {
    super.viewDidLoad()

    searchBar = UISearchBar(CGRect(x: 0, y: 0, width: 250.0, height: 44.0))

    tableDataSource = MapmyIndiaAutocompleteTableDataSource()
    tableDataSource?.delegate = self

    searchDisplayController = UISearchDisplayController(searchBar: searchBar!, contentsController: self)
    searchDisplayController?.searchResultsDataSource = tableDataSource
    searchDisplayController?.searchResultsDelegate = tableDataSource
    searchDisplayController?.delegate = self

    view.addSubview(searchBar!)
  }

  func didUpdateAutocompletePredictionsForTableDataSource(tableDataSource: MapmyIndiaAutocompleteTableDataSource) {
    // Turn the network activity indicator off.
    UIApplication.sharedApplication().networkActivityIndicatorVisible = false
    // Reload table data.
    searchDisplayController?.searchResultsTableView.reloadData()
  }

  func didRequestAutocompletePredictionsFor(tableDataSource: MapmyIndiaAutocompleteTableDataSource) {
    // Turn the network activity indicator on.
    UIApplication.sharedApplication().networkActivityIndicatorVisible = true
    // Reload table data.
    searchDisplayController?.searchResultsTableView.reloadData()
  }

}

extension ViewController: MapmyIndiaAutocompleteTableDataSourceDelegate {
  func didAutocomplete(tableDataSource: MapmyIndiaAutocompleteTableDataSource, withPlace place: MapmyIndiaAtlasSuggestion) {
    searchDisplayController?.active = false
    // Do something with the selected place.
    print("Place name: \(place.name)")
    print("Place address: \(place.formattedAddress)")
    print("Place attributions: \(place.attributions)")
  }

  func didFailAutocomplete(tableDataSource: MapmyIndiaAutocompleteTableDataSource, withError error: NSError) {
    // TODO: Handle the error.
    print("Error: \(error.description)")
  }
}You can create a custom search UI as an alternative to the UI provided by the autocomplete widget. To do this, your app must get place predictions programmatically. Your app can get a list of predicted place names and/or addresses by using MapmyIndia's library MapmyIndiaAPIKit. For more information Goto.
This class represents a set of restrictions that may be applied to autocomplete requests. This allows customization of autocomplete suggestions to only those places that are of interest.
origin:
A location to use as a hint when looking up the specified address.
This property prioritizes results that are close to a specific location, which is typically the user’s current location. If the value of this property is nil – which it is by default – no specific location is prioritized.
zoom:
Zoom level to a location to use as a hint when looking up the specified address.
attributions:
It allows to get tokenize address in response. By default its value is false. If value true is passed then only in response of MapmyIndiaAtlasSuggestion addressTokens will be recieved which is of type MapmyIndiaAddressTokens
resultPlaceType:
On basis of this only specific type of Places in response will be returned.
Its data type is MMIPodTypeIdentifier which is derived from MapmyIndiaAPIKit
searchAreaRestrictions:
On basis of this only specific type of response returned.
This can be set either an object of MapmyIndiaElocFilter or MapmyIndiaBoundsFilter. Which are derived from MapmyIndiaAPIKit
country:
This is used to bias your search related to country region. Its datatype is MMIRegionTypeIdentifier(from MapmyIndiaAPIKit). By default it sets to India region only. Currently supported countries are Sri-Lanka, India, Bhutan, Bangladesh, Nepal. Default is India if none is provided
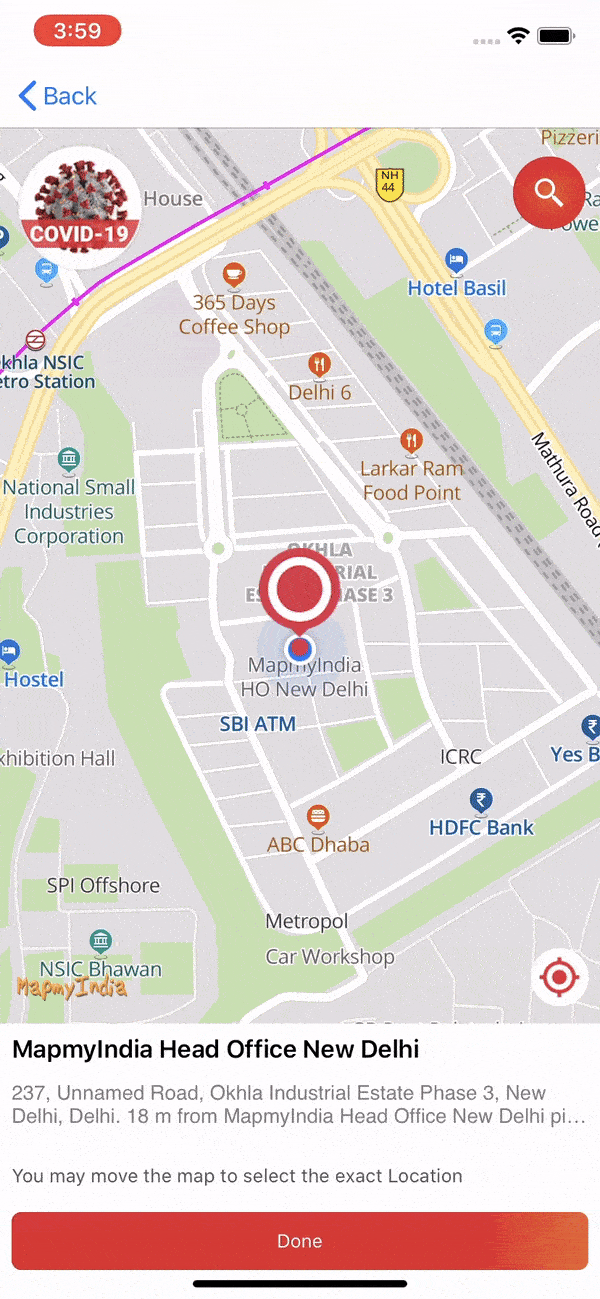
The Place Picker View is a UIView component that allows a user to pick a Place using an interactive map.
Users can select a location which from center of map after succesfully reverse geocoding that location.
PlacePickerView is class whose instance can be created and can be added to ViewController. Below is sample code to understand:
Swift
import UIKit
import MapmyIndiaMaps
import MapmyIndiaUIWidgets

class PlacePickerViewExampleVC: UIViewController {
    var mapView:MapmyIndiaMapView!
    var placePickerView: PlacePickerView!

    override func viewDidLoad() {
        super.viewDidLoad()
        mapView = MapmyIndiaMapView()
        // Do any additional setup after loading the view.
        placePickerView = PlacePickerView(frame: self.view.bounds, parentViewController: self, mapView: mapView)
        placePickerView.delegate = self
        self.view.addSubview(placePickerView)
    }
}

extension PlacePickerViewExampleVC: PlacePickerViewDelegate {
    func didFailedReverseGeocode(error: NSError?) {
        if let error = error {
            // failed for error
        } else {
            // No results found
        }
    }

    func didPickedLocation(placemark: MapmyIndiaGeocodedPlacemark) {
        // Add your code on successfully selecting location from picker view.
    }

    func didReverseGeocode(placemark: MapmyIndiaGeocodedPlacemark) {
        // Add your code on successfully retrieving a new location
    }
}As from above sample code PlacePickerViewDelegate is a protocol class which provides different delegate methods which can be used according to requirements.
On adding instance of PlacePickerView it will load a default view with a map marker image on map But default view can be modified with help of some properties which are described as below:
markerView:
View of marker on map can be ovrriden by using property 'markerView'. This is type of UIView so it can accept custom designed view and UIImageView as well.
let customView = UIView(frame: CGRect(x: 0, y: 0, width: 50, height: 200))
customView.backgroundColor = .red
placePickerView.markerView = customView
isMarkerShadowViewHidden:
A shadow of marker is shows by defualt on dragging map. Visibility of this shadow can be changed by using property 'isMarkerShadowViewHidden'.
placePickerView.isMarkerShadowViewHidden = truesearchButtonBackgroundColor:
Background color of search button can be changed by using property 'searchButtonBackgroundColor'.
placePickerView.searchButtonBackgroundColor = .yellowsearchButtonImage:
Image of search button can be changed by using property 'searchButtonImage'.
placePickerView.searchButtonImage = UIImage(named: "userSearch")!isSearchButtonHidden:
Visibility of search button can be changed by using property 'isSearchButtonHidden'.
placePickerView.isSearchButtonHidden = trueplaceNameLabelTextColor:
Font color of label of name of place can be changed by using property 'placeNameLabelTextColor'.
placePickerView.placeNameLabelTextColor = .blueaddressLabelTextColor:
Font color of label of address of place can be changed by using property 'addressLabelTextColor'.
placePickerView.addressLabelTextColor = .greenpickerButtonTitleColor:
Font color of titile of button of select a location to pick can be changed by using property 'pickerButtonTitleColor'.
placePickerView.pickerButtonTitleColor = .bluepickerButtonBackgroundColor:
Background color of button of select a location to pick can be changed by using property 'pickerButtonBackgroundColor'.
placePickerView.pickerButtonBackgroundColor = .bluepickerButtonTitle:
Title of button of select a location to pick can be changed by using property 'pickerButtonTitle'.
placePickerView.pickerButtonTitle = "Pick it"infoLabelTextColor:
Font color of label of tip info at bottom can be changed by using property 'infoLabelTextColor'.
placePickerView.infoLabelTextColor = .greeninfoBottomViewBackgroundColor:
Background color of container of label of tip info at bottom can be changed by using property 'infoBottomViewBackgroundColor'.
placePickerView.infoBottomViewBackgroundColor = .greenplaceDetailsViewBackgroundColor:
Background color of container of location info at bottom can be changed by using property 'placeDetailsViewBackgroundColor'.
placePickerView.placeDetailsViewBackgroundColor = .greenisBottomInfoViewHidden:
Visibility of tip info at bottom can be changed by using property 'isBottomInfoViewHidden'.
placePickerView.isBottomInfoViewHidden = trueisBottomPlaceDetailViewHidden:
Visibility of container of location info at bottom can be changed by using property 'isBottomPlaceDetailViewHidden'.
placePickerView.isBottomPlaceDetailViewHidden = trueisInitializeWithCustomLocation:
Initial location of place picker can be set by setting center of map but it will also required to set value of property 'isInitializeWithCustomLocation' to true.
placePickerView.isInitializeWithCustomLocation = true
placePickerView.mapView.setCenter(CLLocationCoordinate2DMake(28.612936, 77.229546), zoomLevel: 15, animated: false)A class MapmyIndiaAttributionsSettings is exist which represents a set of settings that can be applied to autocomplete to control appearance (Content Length, Size, Horizontal Content Alignment and Vertical Placement) of attribution. Appearance of attribution on can be controlled by different properties of MapmyIndiaAttributionsSettings.

attributionSize:
Size of attribution can be controlled by setting different values of this property. It is type of an enum MapmyIndiaContentSize. Which can be set to small, medium or large. By default it's value is medium.
attributionHorizontalContentAlignment:
Horizontal alignment of content of attribution can be controlled by setting different values of this property. It is type of an enum MapmyIndiaHorizontalContentAlignment. Which can be set to left, center or right. By default it's value is center.
attributionVerticalPlacement:
Placement (either before or after of autocomplete's results) of attribution can be controlled by setting different values of this property. It is type of an enum MapmyIndiaVerticalPlacement. Which can be set to before or after. By default it's value is before.
A property attributionSettings of type MapmyIndiaAttributionsSettings is exists in each class MapmyIndiaAutocompleteTableDataSource, MapmyIndiaAutocompleteViewController, MapmyIndiaAutocompleteResultsViewController and PlacePickerView whose values can be set in different scenarios accordingly.
Code snippet to configure appearance of attribution in MapmyIndiaAutocompleteViewController is below:
let vc = MapmyIndiaAutocompleteViewController()
vc.attributionSettings.attributionSize = .small
vc.attributionSettings.attributionHorizontalContentAlignment = .left
vc.attributionSettings.attributionVerticalPlacement = .after
Code snippet to configure appearance of attribution of Autocomplete in PlacePickerView is below:
placePickerView = PlacePickerView(frame: self.view.bounds, parentViewController: self, mapView: mapView)

let attributionSettings = MapmyIndiaAttributionsSettings()
attributionSettings.attributionSize = .small
attributionSettings.attributionHorizontalContentAlignment = .left
attributionSettings.attributionVerticalPlacement = .after

placePickerView.autocompleteAttributionSettings = attributionSettingsMapmyIndiaUIWidgets is available under the BSD license. See the LICENSE file for more info.
For any queries and support, please contact:
Email us at apisupport@mapmyindia.com
Stack Overflow
Ask a question under the mapmyindia-api
Support
Need support? contact us!
Blog
Read about the latest updates & customer stories
© Copyright 2019. CE Info Systems Pvt. Ltd. All Rights Reserved. | Terms & Conditions mapbox-gl-native copyright (c) 2014-2019 Mapbox.