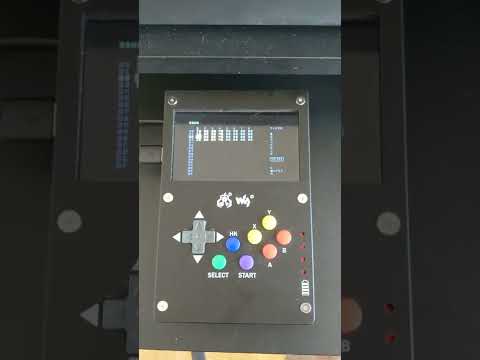
I made the device you see in the video above using the following hardware components:
- Raspberry Pi 4 (8GB)
- microSD card for Raspberry Pi OS (goes into the GamePi43 microSD card reader slot)
- Waveshare GamePi43
- 18650 rechargeable batteries
- Teensy 4.1 board
- Teensy 4.1 case mounted to the back of the GamePi43 with Gorilla tape
- microSD card for Dirtywave M8 (goes into the Teensy 4.1 microSD card reader slot)
- Short USB A to Micro USB cable
First and foremost, huge thanks to the authors, developers and contributors of the following resources:
- https://github.com/Dirtywave/M8HeadlessFirmware
- https://www.waveshare.com/wiki/GamePi43
- https://github.com/recalbox/mk_arcade_joystick_rpi
- https://github.com/sigrokproject/libserialport
- https://github.com/laamaa/m8c and laamaa#20
- https://github.com/laamaa/m8c/blob/main/AUDIOGUIDE.md
- https://github.com/rasprague/m8c-piboy
- https://www.matteomattei.com/web-kiosk-with-raspberry-pi-and-read-only-sd/
- http://matchbox-project.org/
- https://jackaudio.org/
- https://www.raspberrypi.com/for-home/
- https://www.pjrc.com/store/teensy41.html
without whom none of what is explained here would be possible! :)
First, you need to install Raspberry Pi OS to its microSD card using the Raspberry Pi Imager.
Make sure to install Raspberry Pi OS Lite (Legacy) and to enable ssh and wifi in the advanced options, if you plan to login remotely and wirelessly into your Raspberry Pi (recommended).
Reinsert the microSD card into your computer, open the config.txt file in the boot directory of the microSD card, add the following code at the end of config.txt:
max_usb_current=1
hdmi_force_hotplug=1
hdmi_group=2
hdmi_mode=87
hdmi_cvt=800 480 60 6 0 0 0
then save and eject the microSD card safely from your computer.
Insert the microSD card into the GamePi43 microSD card reader slot and switch on the device.
Login into your Raspberry Pi and update/upgrade the OS:
sudo apt update
sudo apt upgrade
sudo reboot
Login again and set the locale to en_US.UTF-8 using the raspi-config tool:
sudo raspi-configExit raspi-config and reboot:
sudo rebootLogin again and finish setting the locale:
sudo update-locale LC_ALL="en_US.UTF-8"
sudo update-locale LANGUAGE="en_US"
sudo reboot
Login again and check that your Raspberry Pi OS locale is properly set by typing the command locale and making sure it returns the following:
LANG=en_US.UTF-8
LANGUAGE=en_US:en
LC_CTYPE="en_US.UTF-8"
LC_NUMERIC="en_US.UTF-8"
LC_TIME="en_US.UTF-8"
LC_COLLATE="en_US.UTF-8"
LC_MONETARY="en_US.UTF-8"
LC_MESSAGES="en_US.UTF-8"
LC_PAPER="en_US.UTF-8"
LC_NAME="en_US.UTF-8"
LC_ADDRESS="en_US.UTF-8"
LC_TELEPHONE="en_US.UTF-8"
LC_MEASUREMENT="en_US.UTF-8"
LC_IDENTIFICATION="en_US.UTF-8"
LC_ALL=en_US.UTF-8
Install the packages needed to install RetroPie-Setup:
sudo apt install git lsb-releaseDownload the latest RetroPie-Setup script:
cd
git clone --depth=1 https://github.com/RetroPie/RetroPie-Setup.git
and execute it:
cd RetroPie-Setup
chmod +x retropie_setup.sh
sudo ./retropie_setup.sh
Select the Manage Packages and then the driver options and install the mkarcadejoystick from source.
Exit RetroPie-Setup and reboot:
sudo rebootLogin again and check that your joystick is properly set by typing the command less /etc/modprobe.d/mk_arcade_joystick_rpi.conf and making sure it returns the following:
options mk_arcade_joystick_rpi map=1
Install the Matchbox window manager:
sudo apt install --no-install-recommends xserver-xorg x11-xserver-utils xinit matchbox-window-manager joystickAdd tty group to pi user:
sudo gpasswd -a pi tty
sudo sed -i '/^exit 0/c\chmod g+rw /dev/tty?\nexit 0' /etc/rc.local
and reboot:
sudo rebootLogin again and install the packages needed to compile and install m8c (and libserialport):
sudo apt install git gcc make libsdl2-devsudo apt install autotools-dev autoconf libtoolDownload the source code for libserialport:
cd
git clone https://github.com/sigrokproject/libserialport.git
and compile + install it:
cd libserialport
./autogen.sh
./configure
make
sudo make install
sudo ln -s /usr/local/lib/libserialport.so.0.1.0 /usr/lib/libserialport.so.0.1.0
sudo ln -s /usr/local/lib/libserialport.so.0 /usr/lib/libserialport.so.0Download the source code for m8c:
cd
git clone https://github.com/marcora/m8c-gamepi43.git
and compile + install it:
cd m8c-gamepi43
make
sudo make installFollow steps 1 and 2 (not 3 and 4) of these instructions to install the Dirtywave M8 headless tracker onto the Teensy microSD card, insert it into the Teensy and then connect the Teensy to the GamePi43 using the USB cable.
Install JACK to connect audio from the Teensy to the GamePi43 (answer Yes when asked to "Enable realtime process priority?"):
sudo apt install jackd2Add audio group to pi user:
sudo usermod -a -G audio piand reboot:
sudo rebootLogin again and start m8c, it should automatically detect your Teensy:
m8cKill m8c with Ctrl+C.
Copy m8c configuration files to .local/share/m8c:
cd
cp m8c-gamepi43/config.ini .local/share/m8c
cp m8c-gamepi43/gamecontrollerdb.txt .local/share/m8c
Link m8c launcher script to your home directory:
cd
ln -s m8c-gamepi43/m8c.sh .
Open the .bashrc file in your home directory:
cd
nano -w .bashrc
and add the following code at the end of it:
if [ -z "${SSH_TTY}" ]; then
  xinit ~/m8c.sh
fi
save the file and close the text editor with Ctrl+X.
Set the Raspberry Pi OS to automatically login to console using the raspi-config tool:
sudo raspi-configExit raspi-config and reboot:
sudo rebootUpon reboot, if everything was done correctly, the GamePi43 will auto-login, launch m8c, and connect the audio.
In order to kill m8c and power off the device, press (X + Y + DownArrow) and move the power switch to off.
After all of this, I prefer to disable wifi and bluetooth to extend battery life and, when I need access to the Raspberry Pi OS on the GamePi43, ssh using direct connection via ethernet cable. To disable wifi and bluetooth add the following lines at the end of /boot/config.txt and reboot:
dtoverlay=disable-wifi
dtoverlay=disable-bt
If you are interested in adding the Dirtywave M8 headless tracker as an "app" in RetroPie or if you are interested in more complex launcher scripts and setups, please see the excellent work by Richard "spike" Sprague at https://github.com/rasprague/m8c-piboy, which has been the source of inspiration for this project of mine.