ShaderLesson1
This series relies on the minimal lwjgl-basics API for shader and rendering utilities. The code has also been Ported to LibGDX. The concepts should be universal enough that they could be applied to Love2D, GLSL Sandbox, iOS, or any other platforms that support GLSL.
As discussed, we need to write vertex and fragment scripts in order for our shader program to work. Our first shaders will be very basic, and simply output the color red (ignoring the texture).
Note: In this series, we will use text files (.vert and .frag) for easier editing. When you go to release and distribute your games, you may want to embed the GLSL in your Java source as a String. Eclipse includes a feature for pasting multi-line strings which will be helpful.
Follow along with the full source code here. It uses the SimpleGame class within the mdesl.tests package for convenience; if you are using the stable releases, you'll need to also include the lwjgl-basics-test-XX.jar in your class path.
Below is our setup code:
//load our shader program and sprite batch
try {
	//read the files into strings
	final String VERTEX = Util.readFile(Util.getResourceAsStream("res/shadertut/lesson1.vert"));
	final String FRAGMENT = Util.readFile(Util.getResourceAsStream("res/shadertut/lesson1.frag"));

	//create our shader program -- be sure to pass SpriteBatch's default attributes!
	ShaderProgram program = new ShaderProgram(VERTEX, FRAGMENT, SpriteBatch.ATTRIBUTES);

	//Good idea to log any warnings if they exist
	if (program.getLog().length()!=0)
		System.out.println(program.getLog());

	//create our sprite batch
	batch = new SpriteBatch(program);
} catch (Exception e) {
	// ... handle the exception ...
}
For convenience, we use the Util class to read our text files.
We then create our shader program and specify the attribute locations with the third parameter. This tells ShaderProgram how the attributes will be laid out; since SpriteBatch expects them to be in a specific order (i.e. Position is expected at index 0).
Then, we create our SpriteBatch using our custom shader. Now we can render our sprites as per usual, and they will appear as red boxes:
protected void render() throws LWJGLException {
	super.render();

	// start our batch
	batch.begin();

	// draw some sprites... they will all be affected by our shaders
	batch.draw(tex, 10, 10);
	batch.draw(tex, 10, 320, 32, 32);

	// end our batch
	batch.end();
}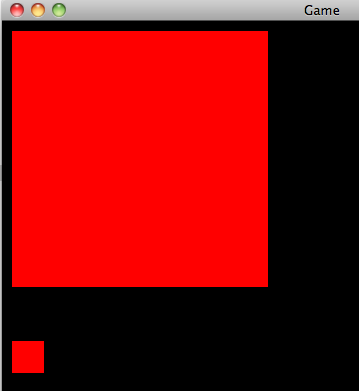
Bloody exhilarating, isn't it?
Let's take a look at what is going on. Here is the vertex shader, which works on every vertex that our SpriteBatch sends to GL:
//incoming Position attribute from our SpriteBatch
attribute vec2 Position;

//the transformation matrix of our SpriteBatch
uniform mat4 u_projView;

void main() {
	//transform our 2D screen space position into 3D world space
	gl_Position = u_projView * vec4(Position, 0.0, 1.0);
}
We simply take the Position attribute (given to us by our sprite batcher) -- such as (10, 10) -- and transform it into 3D world-space coordinates that OpenGL can work with.
Every fragment (or pixel) within our shape will then be modified by our fragment shader:
void main() {
	//final color: return opaque red
	gl_FragColor = vec4(1.0, 0.0, 0.0, 1.0);
}attribute vec2 Position;Seeing the above line, you may be wondering what exactly an attribute is in GLSL. Think back to our brick sprite in the Textures tutorial:

As we explained in the Textures tutorial, we need to give OpenGL four vertices to make up our quad. Each vertex contains a number of attributes, such as Position and TexCoord:
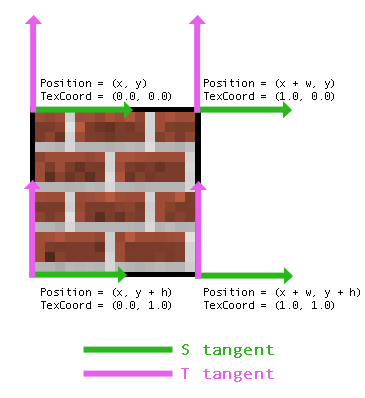
In our case, we are ignoring the TexCoord attribute since we don't need it. Instead, we only define the Position attribute, using a vec2 (2-component float vector) as the data type to represent (x, y). SpriteBatch expects the name and data type to match accordingly.
Attributes can only be declared in vertex shaders. Also, attributes are read-only since they are passed from SpriteBatch. So we cannot assign them a value in GLSL.
The next line in our vertex shader brings us to another topic, uniforms:
uniform mat4 u_projView;A uniform is like a script variable that we can set from Java. For example, if we needed to pass the mouse coordinates to a shader program, we would use a vec2 uniform and send the (x, y) values to the shader every time the mouse moves. Like attributes, uniforms are read-only in the shader, so we cannot assign values to them in GLSL.
In our case, the vertex shader needs to transform the screen space coordinates from our SpriteBatch into 3D world-space coordinates. We do this by multiplying our Position attribute by the combined transformation matrix of our SpriteBatch, which is named u_projView (or SpriteBatch.U_PROJ_VIEW). This leads to a 2D orthographic projection, where origin (0, 0) is at the top left. e.g. (32, 7) would be 32 pixels right, 7 pixels down.
gl_Position = u_projView * vec4(Position, 0.0, 1.0);Whenever we change the transformation matrix of our SpriteBatch (for example, when we call SpriteBatch.resize), it will update the u_projView uniform in our shader. It expects the name and data type to match; notice we are using mat4 as the GLSL data type to represent a 4x4 matrix.
Our fragment shader "returns" or "outputs" the color red; this is done by assigning a 4-component RGBA vector to gl_FragColor. This fragment shader is called on every pixel within our shape (in the case of SpriteBatch, rectangles). Thus, we end up with red boxes... Pretty bland.
gl_FragColor = vec4(1.0, 0.0, 0.0, 1.0);A vector is much like an array; it's a container which holds a fixed number of elements (2, 3, or 4). Here is a brief list of some data types available in desktop GLSL:
-
float- a simple float value, e.g. 1.0 -
vec2- a float Vector2, e.g. (x, y) -
vec3- a float Vector3, e.g. (x, y, z) or (r, g, b) -
vec4- a float Vector4, e.g. (r, g, b, a) -
int- an integer -
vec2i,vec3i,vec4i- as above, but expects integer type -
sampler2D- a special type which we will get to when dealing with texture sampling
Notice that some GLSL compilers are a little picky. For example, this might give us an error, because we are trying to give an int type where the compiler expects a float:
float x = 5; <-- error
vec2 v = vec2(10, 5); <-- another error
If you are working on desktop, you can append #version 120 to the top of your fragment and vertex shaders, which will introduce a more lenient compiler. If you are working on iOS, Android, or WebGL, you will need to do the following:
float x = 5.0;
vec2 v = vec2(10.0, 5.0);
We create vectors like so:
vec2 foo = vec2(1.0, 5.0); // => (1f, 5f)
vec3 bar = vec3(5.0, 1.0, 2.0); // => (5f, 1f, 2f)
vec4 white = vec4(1.0); // => (1f, 1f, 1f, 1f)
And we can access them in a number of ways:
//copies only the first three components, notice we need to use vec3
vec3 other = myVec.xyz;

//copies all four components
vec4 aColor = myVec.rgba;

//"swizzles" the (x, y) components
myVec.xy = myVec.yx;

//stpq are used for texture coordinates
vec2 texCoords = myVec.st;

//the first component
float x = myVec.x;

//we could even treat vectors as an array
float e0 = myVec[0];
GLSL doesn't care if you use rgba, xyzw, or stpq to access a vector, so long as it's consistent (you cannot do rgzw, for example).
Also useful to know is the const keyword, which is similar to Java's final, and allows us to declare constants. To demonstrate, we could have written our shader like so:
const vec3 RED = vec3(1.0, 0.0, 0.0);

void main() {
    gl_FragColor = vec4(RED, 1.0);
}
Our Position transformation could have been written in a variety of different ways:
gl_Position = u_projView * vec4(Position, 0.0, 1.0);
gl_Position = u_projView * vec4(Position.xy, 0.0, 1.0);
gl_Position = u_projView * vec4(Position.x, Position.y, 0.0, 1.0);
gl_Position = u_projView * vec4(vec3(Position, 0.0), 1.0);
etc...
For a nice GLSL cheat sheet, see here.
Check out Lesson 2 or go back to the shaders intro.
## Other APIs- Ported to LibGDX - Note that you can also pass a FileHandle to LibGDX's ShaderProgram, to avoid having to hardcode the source in a .java file.