ShaderLesson3
This series relies on the minimal lwjgl-basics API for shader and rendering utilities. The code has also been Ported to LibGDX. The concepts should be universal enough that they could be applied to Love2D, GLSL Sandbox, iOS, or any other platforms that support GLSL.
Now that you're familiar with some of the basic ideas behind GLSL, we can start getting into some more interesting effects. First, take a peek at Lesson 3's source code. As you can see, much of the code is the same as in the earlier lessons.
The most important change on the Java side can be seen in the resize method:
// called to resize the display
protected void resize() throws LWJGLException {
	super.resize();

	// resize our batch with the new screen size
	batch.resize(Display.getWidth(), Display.getHeight());

	// whenever our screen resizes, we need to update our uniform
	program.use();
	program.setUniformf("resolution", Display.getWidth(), Display.getHeight());
}
Here we are setting a uniform called resolution on our ShaderProgram object. We give it two float parameters, so the uniform will need to be of type vec2. Also note that, before sending our uniform data, we need to make our program active by calling use(). We declare our uniform in the fragment shader, although you can also use uniforms in vertex shaders.
Our vertex shader is exactly the same as in Lesson 2.
Our fragment shader looks like this:
//texture 0
uniform sampler2D u_texture;
//our screen resolution, set from Java whenever the display is resized
uniform vec2 resolution;
//"in" attributes from our vertex shader
varying vec4 vColor;
varying vec2 vTexCoord;
//RADIUS of our vignette, where 0.5 results in a circle fitting the screen
const float RADIUS = 0.75;
//softness of our vignette, between 0.0 and 1.0
const float SOFTNESS = 0.45;
//sepia colour, adjust to taste
const vec3 SEPIA = vec3(1.2, 1.0, 0.8);
void main() {
//sample our texture
vec4 texColor = texture2D(u_texture, vTexCoord);
//1. VIGNETTE
//determine center position
vec2 position = (gl_FragCoord.xy / resolution.xy) - vec2(0.5);
//determine the vector length of the center position
float len = length(position);
//use smoothstep to create a smooth vignette
float vignette = smoothstep(RADIUS, RADIUS-SOFTNESS, len);
//apply the vignette with 50% opacity
texColor.rgb = mix(texColor.rgb, texColor.rgb * vignette, 0.5);
//2. GRAYSCALE
//convert to grayscale using NTSC conversion weights
float gray = dot(texColor.rgb, vec3(0.299, 0.587, 0.114));
//3. SEPIA
//create our sepia tone from some constant value
vec3 sepiaColor = vec3(gray) * SEPIA;
//again we'll use mix so that the sepia effect is at 75%
texColor.rgb = mix(texColor.rgb, sepiaColor, 0.75);
//final colour, multiplied by vertex colour
gl_FragColor = texColor * vColor;
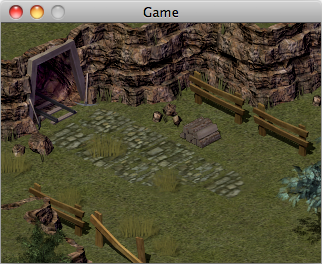
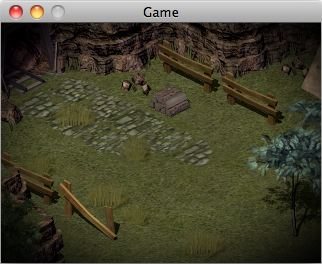
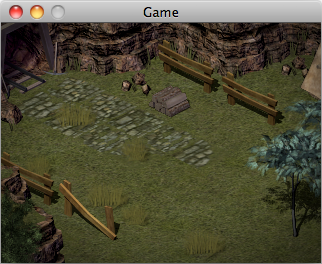
}What a beast! Here is the scene before any effects:
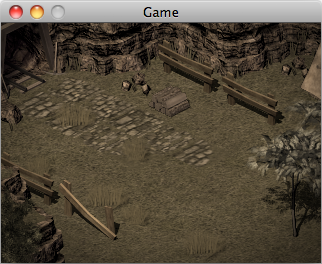
And here is our scene with vignette and sepia applied:
The steps involved:
- Step 1: The Basic Vignette
- Step 2: Circles,
step()andsmoothstep() - Step 3: Reducing strength with
mix() - Step 4: Grayscale & Sepia
To create the vignette effect, we first need to understand how to make a circle. A simple way of making a circle is to calculate the length of a vector from the quad center. To find the center, we need to determine how far the current fragment is along the x- and y-axis of our quad.
We use the built-in gl_FragCoord value, which gives us the (x, y) coordinates (in pixels) of the current fragment in the frame buffer. We divide this by the resolution width and height (e.g. 800, 600) to get values between 0.0 and 1.0.
gl_FragCoord.xy / resolution.xyNote that gl_FragCoord value uses a lower left origin, so (32, 10) would mean 32 pixels to the right, 10 pixels up from the bottom. However, since our circle is symmetrical and located at center, we do not need to worry about this difference in our specific demo.
We subtract (0.5, 0.5) so that we can determine the length from center, rather than lower-left (the origin).
//determine center
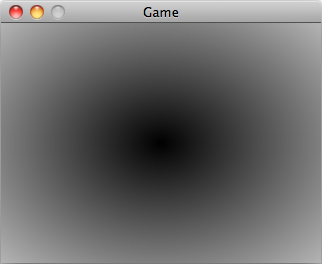
vec2 position = (gl_FragCoord.xy / resolution.xy) - vec2(0.5); We will use GLSL's built-in length() method to determine the length from the center point. Fragments at the center will have a length of zero (i.e. black), and it will increase as we move outward (i.e. into white/gray). We can test the shader so far:
//texture 0
uniform sampler2D u_texture;

//our screen resolution, set from Java whenever the display is resized
uniform vec2 resolution;

//"in" attributes from our vertex shader
varying vec4 vColor;
varying vec2 vTexCoord;

void main() {
	//sample our texture
	vec4 texColor = texture2D(u_texture, vTexCoord);

	//determine origin
	vec2 position = (gl_FragCoord.xy / resolution.xy) - vec2(0.5);

	//determine the vector length of the center position
	float len = length(position);

	//show our length for debugging
	gl_FragColor = vec4( vec3(len), 1.0 );
}
In fact, this is all we need to create a basic vignette effect. Try inverting the length (1.0 - len) and multiplying it by our colour:
gl_FragColor = vec4( texColor.rgb * (1.0 - len), 1.0 );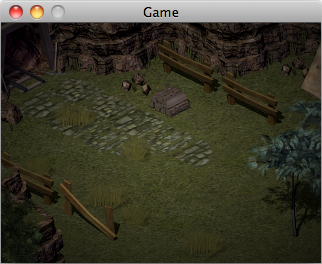
Another built-in we should look at is step(edge, x) and its variants. This function returns 0.0 if x is less than edge, otherwise it returns 1.0. It's useful to avoid if and else statements, which are expensive inside of fragment shaders. If we try it out, you'll notice we've created a sharp-edged circle:
//the radius of our circle
float r = 0.5;

gl_FragColor = vec4( vec3( step(r, len) ), 1.0 );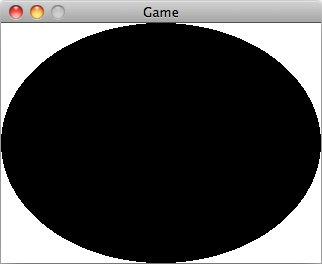
Our circle is squashed because of the aspect ratio. In order to correct for that, we need to include the following before we calculate the length:
position.x *= resolution.x / resolution.y;A variant of the step function is smoothstep(low, high, x), which returns 0.0 if x is less than low or 1.0 if x is greater than high. If x is between the two values, it will ease between zero and one with cubic Hermite interpolation. The function looks like this:
So we can adjust our circle to the following, to gain finer control over how smooth our vignette will look. Here is our updated code:
//the radius of our circle
float r = 0.5;

//the softness of our circle edge, between 0.0 and 1.0
float softness = 0.05;

gl_FragColor = vec4( vec3( smoothstep(r, r-softness, len) ), 1.0 );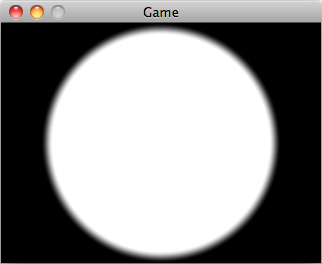
Using a softness of 0.01 produces a nicely anti-aliased circle, whereas 0.45 produces a nice falloff for a vignette effect.
Now we can move the radius and softness to constants, and test it out on our texture RGB. Note that we aren't correcting for the aspect ratio here:
//texture 0
uniform sampler2D u_texture;

//our screen resolution, set from Java whenever the display is resized
uniform vec2 resolution;

//"in" attributes from our vertex shader
varying vec4 vColor;
varying vec2 vTexCoord;

//RADIUS of our vignette, where 0.5 results in a circle fitting the screen
const float RADIUS = 0.75;

//softness of our vignette, between 0.0 and 1.0
const float SOFTNESS = 0.45;

void main() {
	//sample our texture
	vec4 texColor = texture2D(u_texture, vTexCoord);

	//determine center
	vec2 position = (gl_FragCoord.xy / resolution.xy) - vec2(0.5);

	//OPTIONAL: correct for aspect ratio
	//position.x *= resolution.x / resolution.y;

	//determine the vector length from center
	float len = length(position);

	//our vignette effect, using smoothstep
	float vignette = smoothstep(RADIUS, RADIUS-SOFTNESS, len);

	//apply our vignette
	texColor.rgb *= vignette;

	gl_FragColor = texColor;
}
Result:
Another useful function you should get familiar with is mix(x, y, a) which linearly interpolates between the values x and y. We can use it here to reduce the strength of the vignette, so that it's not so pronounced:
...
//our vignette effect, using smoothstep
float vignette = smoothstep(RADIUS, RADIUS-SOFTNESS, len);

//apply our vignette with 50% opacity
texColor.rgb = mix(texColor.rgb, texColor.rgb * vignette, 0.5);

gl_FragColor = texColor;
...
Above we blend the original texture colour with the vignette-applied texture colour based on the given weight, a value between 0.0 and 1.0. Specifying 1.0 would lead to the full vignette effect, whereas 0.0 would give us no change (i.e. output would be the original texture color). We use 0.5 to specify 50% strength/opacity for our vignette effect.
To add a sepia tone effect, we first need to convert to grayscale. This is done with the following standard snippet:
//uses NTSC conversion weights
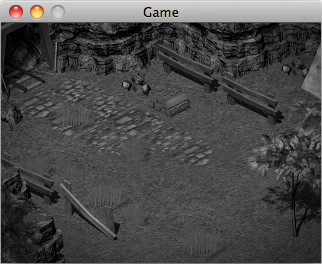
float gray = dot(texColor.rgb, vec3(0.299, 0.587, 0.114));If we were to output the gray value as vec4(gray, gray, gray, 1.0), we would end up with this:
Adding the sepia tone is simple enough. Define a SEPIA constant, adjust the red, green and blue values to taste, and then multiply it by our grayscale colour:
const vec3 SEPIA = vec3(1.2, 1.0, 0.8);
...
	gl_FragColor = vec4(vec3(gray) * SEPIA, 1.0);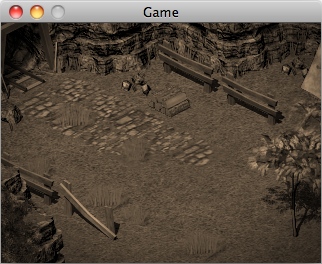
Lastly, we'll use mix() with the previous step so that the sepia is not so pronounced, and multiply our final texture colour by the vertex colour.
//create our sepia tone from some constant value
vec3 sepiaColor = vec3(gray) * SEPIA;

//again we'll use mix so that the sepia effect is at 75%
texColor.rgb = mix(texColor.rgb, sepiaColor, 0.75);

//final colour, multiplied by vertex colour
gl_FragColor = texColor * vColor;
If we specify our texture coordinates in the range [0.0 - 1.0], then we can use them to determine where the fragment lies within our quad, instead of relying on gl_FragCoord and a resolution uniform. For example, if our texture coordinates were (0.5, 0.5) then that fragment would be at the center.
vec2 position = vTexCoord.xy - vec2(0.5);The upside to this is that we could batch many sprites using our post-processing shader, and each one might have different dimensions.
The downside is that not all drivers will support non-power-of-two texture sizes. Typically, non-power-of-two textures will be padded with empty transparent pixels, and then rendered using smaller texture coordinates (i.e. drawRegion as we discussed earlier). Since we generally tend to render post-processing effects all using the same screen size, and since our screen size may not be power-of-two, our resolution solution is more flexible.
Continue to [Lesson 4] (https://github.com/mattdesl/lwjgl-basics/wiki/ShaderLesson4) or return to the start page.
Download the scene.png image here.