You signed in with another tab or window. Reload to refresh your session.You signed out in another tab or window. Reload to refresh your session.You switched accounts on another tab or window. Reload to refresh your session.Dismiss alert
This file contains bidirectional Unicode text that may be interpreted or compiled differently than what appears below. To review, open the file in an editor that reveals hidden Unicode characters.
Learn more about bidirectional Unicode characters
Go to Start Building Apps -> Create a New App -> Create an Integration
Complete the following fields:
Integration Name: Name for the Integration App
Contact Email: Email to be notified
Icon: Default icon
Description: Short description for the Integration App
RedirectUri(s): Valid URL https://[url] to be redirected
Scopes : spark:all
Click the Add Integration button to create the Webex Integration App.
Variables Outcome
Name
Value
WebexIntegrationClientId
Client ID
WebexIntegrationClientSecret*
Client Secret
Get Refresh Token
With the Integration Client ID and the Integration Client Secret values obtained in the section before, we will get a refresh token. This allows to us setup an authorization token for the functional test that will not expire.
Open the OAuth Authorization URL using a web browser, It will take you to the URL you set as a RedirectUri(s). In the address bar you will see: http://[YOUR_REDIRECT_URL]/?code=[CODE].
client_id (Add the Client ID of the Webex Integration App)
client_secret (Add the Client Secret of the Webex Integration App)
code (The authorization code from the previous step. ex: [CODE])
redirect_uri (Must match the one used in the RedirectUri(s) set in the Webex Integration App)
While the access_token will be valid for 90 days, we don't need to wait that long to request a new access token. The functional test will requests a new access token (using the provided refresh_token) every time it runs.
Variables Outcome
Name
Value
RefreshToken*
refresh_token
Create a Webhook
To connect the functional test with Webex, we need to create a Webhook.
In the Try It section, complete the following fields:
name: Name for the Webhook
targetUrl: Replace the BotName value with the one used in the Azure pipeline variableshttps://<BotName>.azurewebsites.net/api/messages
resource: messages
event: created
secret: Secret string to secure the communications
Click on Run to create the Webex Webhook
Variables Outcome
Name
Value
WebexWebhookName
Webhook Name
WebexWebhookSecret*
Webhook Secret
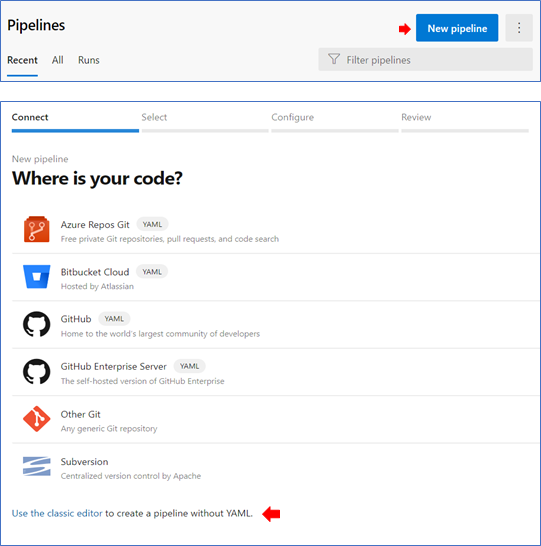
Set up a build pipeline
Create a new build pipeline. Then, select the Use classic editor option.
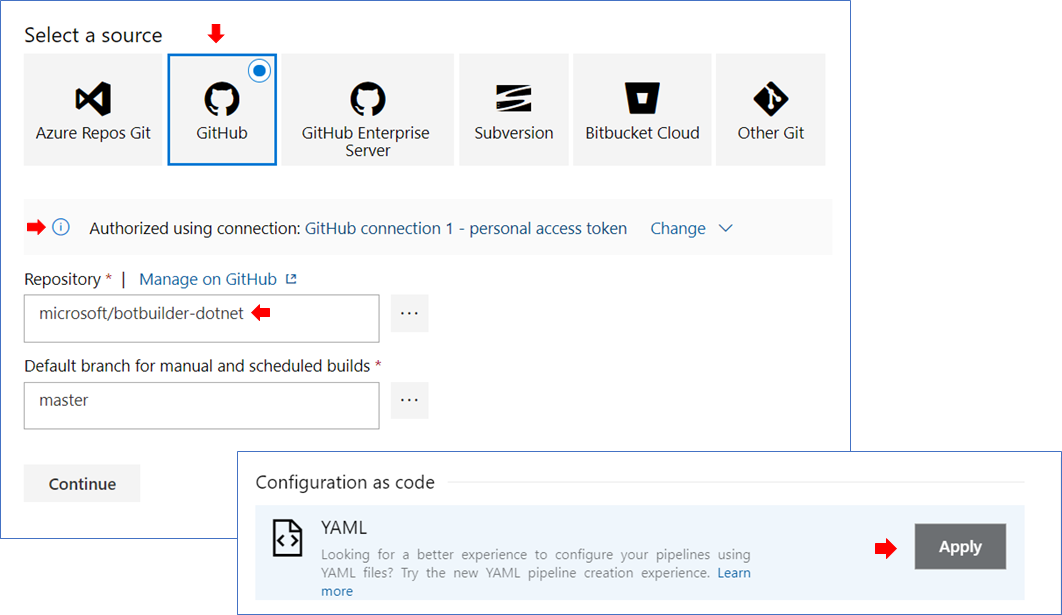
Configure the repository and branch. Then, in the configuration as code, click on Apply for the YAML file option.
In section YAML, write the build name and select the build YAML file inside the folder build/yaml in the root of the directory.
Setup variables
The following are the variables we need to add to the pipeline. It is a good idea to prefix their names with "Webex" or something to make them more relatable to Webex, since more than one set of functional tests may be running in the same pipeline.
✔️ No Binary Compatibility issues for Microsoft.Bot.Builder.dll compared against version 4.6.3
✔️ No Binary Compatibility issues for Microsoft.Bot.Builder.AI.Luis.dll compared against version 4.6.3
✔️ No Binary Compatibility issues for Microsoft.Bot.Builder.AI.QnA.dll compared against version 4.6.3
✔️ No Binary Compatibility issues for Microsoft.Bot.Builder.ApplicationInsights.dll compared against version 4.6.3
✔️ No Binary Compatibility issues for Microsoft.Bot.Builder.Azure.dll compared against version 4.6.3
✔️ No Binary Compatibility issues for Microsoft.Bot.Builder.Dialogs.dll compared against version 4.6.3
✔️ No Binary Compatibility issues for Microsoft.Bot.Builder.Integration.ApplicationInsights.Core.dll compared against version 4.6.3
✔️ No Binary Compatibility issues for Microsoft.Bot.Builder.Integration.AspNet.Core.dll compared against version 4.6.3
✔️ No Binary Compatibility issues for Microsoft.Bot.Builder.TemplateManager.dll compared against version 4.6.3
✔️ No Binary Compatibility issues for Microsoft.Bot.Builder.Testing.dll compared against version 4.6.3
✔️ No Binary Compatibility issues for Microsoft.Bot.Configuration.dll compared against version 4.6.3
✔️ No Binary Compatibility issues for Microsoft.Bot.Connector.dll compared against version 4.6.3
✔️ No Binary Compatibility issues for Microsoft.Bot.Schema.dll compared against version 4.6.3
✔️ No Binary Compatibility issues for Microsoft.Bot.Streaming.dll compared against version 4.6.3
Add this suggestion to a batch that can be applied as a single commit.This suggestion is invalid because no changes were made to the code.Suggestions cannot be applied while the pull request is closed.Suggestions cannot be applied while viewing a subset of changes.Only one suggestion per line can be applied in a batch.Add this suggestion to a batch that can be applied as a single commit.Applying suggestions on deleted lines is not supported.You must change the existing code in this line in order to create a valid suggestion.Outdated suggestions cannot be applied.This suggestion has been applied or marked resolved.Suggestions cannot be applied from pending reviews.Suggestions cannot be applied on multi-line comments.Suggestions cannot be applied while the pull request is queued to merge.Suggestion cannot be applied right now. Please check back later.
Description
This pull request adds a YAML file to set up a build pipeline for Webex Functional Test.
Changes made
We added the file
botbuilder-dotnet-ci-webextest.ymlinside thebuild/yamlfolder.Variables Summary
This is a summary of the variables you will need to get before setting up the Azure pipeline
Setting Up
The next steps will guide you through the configuration of a Build pipeline based on the YAML files.
Prerequisites
Create a Bot in Webex
Go to Webex Developer portal, log in with a Webex developer account.
Go to Start Building Apps -> Create a New App -> Create a Bot
Complete the fields and click the Add Bot button.
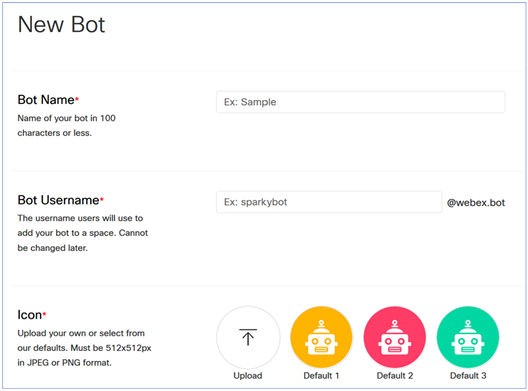
Once created, it will display the Bot's Access token and Bot ID values.

Get Room ID
With the Bot Username value set in the section before, we will create a Room Id using the Webex Message API documentation.
Go to the Webex Message API documentation, log in with a Webex developer account.
In the Try It section, complete the fields:
toPersonEmail: Bot Username in format @webex.bot
text:
Create Room IdClick on Run to get the Room Id value from the API JSON response.
Get the Room Id value from the API JSON response.
Create Integration
Go to the Webex Developer portal, log in with a Webex developer account.
Go to Start Building Apps -> Create a New App -> Create an Integration
Complete the following fields:
Default iconspark:allClick the Add Integration button to create the Webex Integration App.
Get Refresh Token
With the Integration Client ID and the Integration Client Secret values obtained in the section before, we will get a refresh token. This allows to us setup an authorization token for the functional test that will not expire.
Go to the Webex Developer My Apps portal, log in with a Webex developer account.
Select the Integration App created before.
Open the OAuth Authorization URL using a web browser, It will take you to the URL you set as a RedirectUri(s). In the address bar you will see:
http://[YOUR_REDIRECT_URL]/?code=[CODE].
Make a POST request to https://api.ciscospark.com/v1/access_token with the next values:
x-www-form-urlencodedauthorization_code)While the access_token will be valid for 90 days, we don't need to wait that long to request a new access token. The functional test will requests a new access token (using the provided refresh_token) every time it runs.
Create a Webhook
To connect the functional test with Webex, we need to create a Webhook.
Go to the Webex Create WebHook API documentation, log in with a Webex developer account.
In the Try It section, complete the following fields:
https://<BotName>.azurewebsites.net/api/messagesmessagescreatedClick on Run to create the Webex Webhook
Set up a build pipeline
Create a new build pipeline. Then, select the Use classic editor option.
Configure the repository and branch. Then, in the configuration as code, click on Apply for the YAML file option.
In section YAML, write the build name and select the build YAML file inside the folder
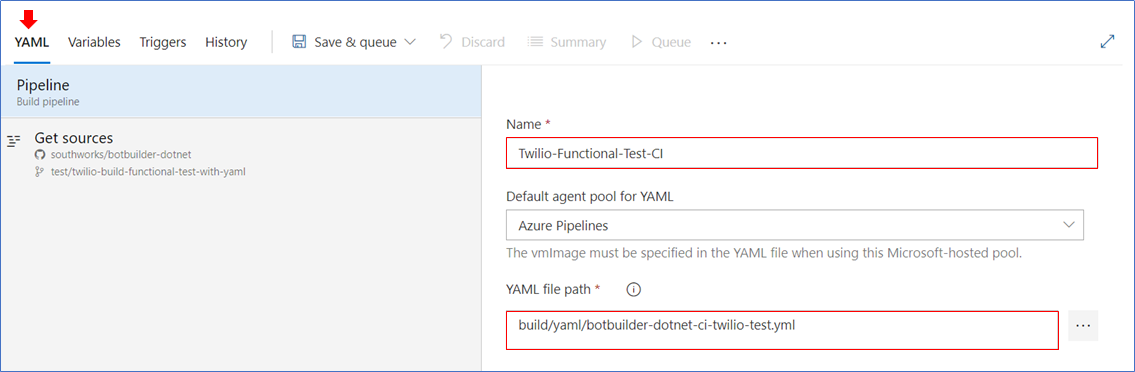
build/yamlin the root of the directory.Setup variables
The following are the variables we need to add to the pipeline. It is a good idea to prefix their names with "Webex" or something to make them more relatable to Webex, since more than one set of functional tests may be running in the same pipeline.
*Set these variables as private.