Source Learning: https://realpython.com/mobile-app-kivy-python/
One of the best ways to learn a new skill is by creating something useful. With that in mind, you’ll use Kivy to build a calculator that supports the following operations:
- Addition
- Subtraction
- Multiplication
- Division
For this application, you’ll need a series of buttons in some kind of layout. You’ll also need a box along the top of your app to display the equations and their results.
Now that you have a goal for the UI, you can go ahead and write the code:
from kivy.app import App
from kivy.uix.boxlayout import BoxLayout
from kivy.uix.button import Button
from kivy.uix.textinput import TextInput


class MainApp(App):
    def build(self):
        self.operators = ["/", "*", "+", "-"]
        self.last_was_operator = None
        self.last_button = None
        main_layout = BoxLayout(orientation="vertical")
        self.solution = TextInput(
            multiline=False, readonly=True,halign="right", font_size=55
        )

        main_layout.add_widget(self.solution)
        buttons = [
            ["7", "8", "9", "/"],
            ["4", "5", "6", "*"],
            ["1", "2", "3", "-"],
            [".", "0", "C", "+"],
        ]

        for row in buttons:
            h_layout = BoxLayout()
            for label in row:

                button = Button(
                    text=label,
                    pos_hint={"center_x": 0.5, "center_y": 0.5},
                )

                button.bind(on_press=self.on_button_press)
                h_layout.add_widget(button)

            main_layout.add_widget(h_layout)

        equals_button = Button(
            text="=", pos_hint={"center_x": 0.5, "center_y": 0.5}
        )

        equals_button.bind(on_press=self.on_solution)
        main_layout.add_widget(equals_button)

        return main_layout
Here’s how your calculator code works:
- In lines 8 to 10, you create a list of operators and a couple of handy values, last_was_operator and last_button, that you’ll use later on.
- In lines 11 to 15, you create a top-level layout main_layout and add a read-only TextInput widget to it.
- In lines 16 to 21, you create a nested list of lists containing most of your buttons for the calculator.
- In line 22, you start a for loop over those buttons. For each nested list you’ll do the following:
- In line 23, you create a BoxLayout with a horizontal orientation.
- In line 24, you start another for loop over the items in the nested list.
- In lines 25 to 39, you create the buttons for the row, bind them to an event handler, and add the buttons to the horizontal BoxLayout from line 23.
- In line 31, you add this layout to main_layout.
- In lines 33 to 37, you create the equals button (=), bind it to an event handler, and add it to main_layout.
The next step is to create the .on_button_press() event handler. Here’s what that code looks like:
def on_button_press(self, instance):
    current = self.solution.text
    button_text = instance.text

    if button_text == "C":
        # Clear the solution widget
        self.solution.text = ""
    else:
        if current and (
            self.last_was_operator and button_text in self.operators):
            # Don't add two operators right after each other
            return
        elif current == "" and button_text in self.operators:
            # First character cannot be an operator
            return
        else:
            new_text = current + button_text
            self.solution.text = new_text

    self.last_button = button_text
    self.last_was_operator = self.last_button in self.operators
Most of the widgets in your application will call .on_button_press(). Here’s how it works:
- Line 41 takes the instance argument so you can access which widget called the function.
- Lines 42 and 43 extract and store the value of the solution and the button text.
- Lines 45 to 47 check to see which button was pressed. If the user pressed C, then you’ll clear the solution. Otherwise, move on to the else statement.
- Line 49 checks if the solution has any pre-existing value.
- Line 50 to 52 check if the last button pressed was an operator button. If it was, then solution won’t be updated. This is to prevent the user from having two operators in a row. For example, 1 */ is not a valid statement.
- Lines 53 to 55 check to see if the first character is an operator. If it is, then solution won’t be updated, since the first value can’t be an operator value.
- Lines 56 to 58 drop to the else clause. If none of the previous conditions are met, then update solution.
- Line 59 sets last_button to the label of the last button pressed.
- Line 60 sets last_was_operator to True or False depending on whether or not it was an operator character.
The last bit of code to write is .on_solution():
def on_solution(self, instance):
    text = self.solution.text
    if text:
        solution = str(eval(self.solution.text))
        self.solution.text = solution
Once again, you grab the current text from solution and use Python’s built-in eval() to execute it. If the user created a formula like 1+2, then eval() will run your code and return the result. Finally, you set the result as the new value for the solution widget.
Note: eval() is somewhat dangerous because it can run arbitrary code. Most developers avoid using it because of that fact. However, since you’re only allowing integers, operators, and the period as input to eval(), it’s safe to use in this context.
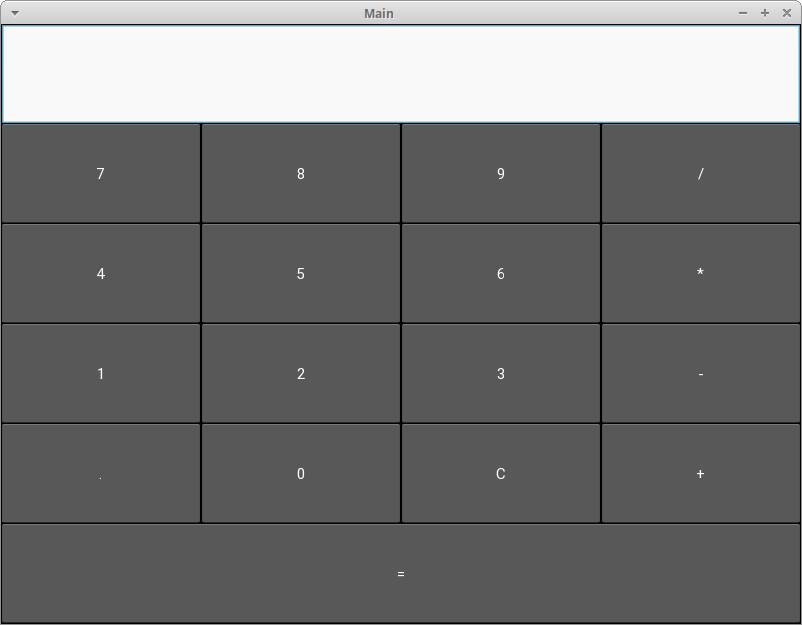
When you run this code, your application will look like this on a desktop computer:
Here’s the full code for the calculator:
from kivy.app import App
from kivy.uix.boxlayout import BoxLayout
from kivy.uix.button import Button
from kivy.uix.textinput import TextInput

class MainApp(App):
    def build(self):
        self.operators = ["/", "*", "+", "-"]
        self.last_was_operator = None
        self.last_button = None
        main_layout = BoxLayout(orientation="vertical")
        self.solution = TextInput(
            multiline=False, readonly=True, halign="right", font_size=55
        )
        main_layout.add_widget(self.solution)
        buttons = [
            ["7", "8", "9", "/"],
            ["4", "5", "6", "*"],
            ["1", "2", "3", "-"],
            [".", "0", "C", "+"],
        ]
        for row in buttons:
            h_layout = BoxLayout()
            for label in row:
                button = Button(
                    text=label,
                    pos_hint={"center_x": 0.5, "center_y": 0.5},
                )
                button.bind(on_press=self.on_button_press)
                h_layout.add_widget(button)
            main_layout.add_widget(h_layout)

        equals_button = Button(
            text="=", pos_hint={"center_x": 0.5, "center_y": 0.5}
        )
        equals_button.bind(on_press=self.on_solution)
        main_layout.add_widget(equals_button)

        return main_layout

    def on_button_press(self, instance):
        current = self.solution.text
        button_text = instance.text

        if button_text == "C":
            # Clear the solution widget
            self.solution.text = ""
        else:
            if current and (
                self.last_was_operator and button_text in self.operators):
                # Don't add two operators right after each other
                return
            elif current == "" and button_text in self.operators:
                # First character cannot be an operator
                return
            else:
                new_text = current + button_text
                self.solution.text = new_text
        self.last_button = button_text
        self.last_was_operator = self.last_button in self.operators

    def on_solution(self, instance):
        text = self.solution.text
        if text:
            solution = str(eval(self.solution.text))
            self.solution.text = solution


if __name__ == "__main__":
    app = MainApp()
    app.run()
It’s time to deploy your application!
Now that you’ve finished the code for your application, you can share it with others. One great way to do that is to turn your code into an application that can run on your Android phone. To accomplish this, first you’ll need to install a package called buildozer with pip:
$ pip install buildozer
Then, create a new folder and navigate to it in your terminal. Once you’re there, you’ll need to run the following command:
$ buildozer init
This will create a buildozer.spec file that you’ll use to configure your build. For this example, you can edit the first few lines of the spec file as follows:
[app]
# (str) Title of your application
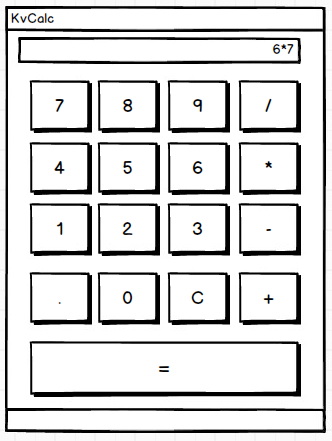
title = KvCalc
# (str) Package name
package.name = kvcalc
# (str) Package domain (needed for android/ios packaging)
package.domain = org.kvcalc
Feel free to browse the rest of the file to see what else you can change.
At this point, you’re almost ready to build your application, but first, you’ll want to install the dependencies for buildozer. Once those are installed, copy your calculator application into your new folder and rename it to main.py. This is required by buildozer. If you don’t have the file named correctly, then the build will fail.
Now you can run the following command:
$ buildozer -v android debug
The build step takes a long time! On my machine, it took 15 to 20 minutes. Depending on your hardware, it may take even longer, so feel free to grab a cup of coffee or go for a run while you wait. Buildozer will download whatever Android SDK pieces it needs during the build process. If everything goes according to plan, then you’ll have a file named something like kvcalc-0.1-debug.apk in your bin folder.
The next step is to connect your Android phone to your computer and copy the apk file to it. Then you can open the file browser on your phone and click on the apk file. Android should ask you if you’d like to install the application. You may see a warning since the app was downloaded from outside Google Play, but you should still be able to install it.
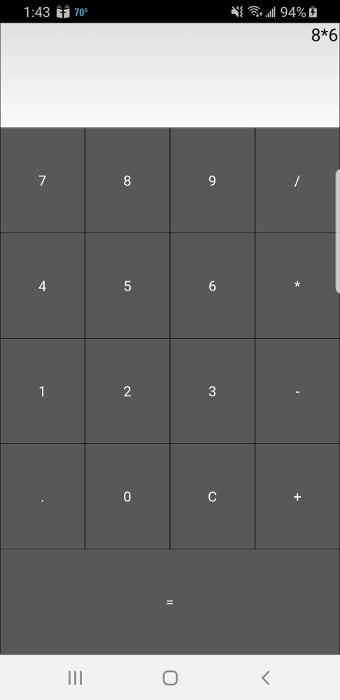
Here’s the calculator running on my Samsung S9:
The buildozer tool has several other commands you can use. Check out the documentation to see what else you can do.
You can also package the app using python-for-android if you need more fine-grained control. You won’t cover this here, but if you’re interested, check out the project’s quickstart.
The instructions for building an application for iOS are a bit more complex than Android. For the most up-to-date information, you should always use Kivy’s official packaging documentation. You’ll need to run the following commands before you can package your application for iOS on your Mac:
$ brew install autoconf automake libtool pkg-config
$ brew link libtool
$ sudo easy_install pip
$ sudo pip install Cython==0.29.10
Once those are all installed successfully, you’ll need to compile the distribution using the following commands:
$ git clone git://github.com/kivy/kivy-ios
$ cd kivy-ios
$ ./toolchain.py build python3 kivy
If you get an error that says iphonesimulator can’t be found, then see this StackOverflow answer for ways to solve that issue. Then try running the above commands again.
If you run into SSL errors, then you probably don’t have Python’s OpenSSL setup. This command should fix that:
$ cd /Applications/Python\ 3.7/
$ ./Install\ Certificates.command
Now go back and try running the toolchain command again.
Once you’ve run all the previous commands successfully, you can create your Xcode project using the toolchain script. Your main application’s entry point must be named main.py before you create the Xcode project. Here is the command you’ll run:
./toolchain.py create <title> <app_directory>
There should be a directory named title with your Xcode project in it. Now you can open that project in Xcode and work on it from there. Note that if you want to submit your application to the App Store, then you’ll have to create a developer account at developer.apple.com and pay their yearly fee.