Tip Forming and Purging
There are two parts to an MMU toolchange that are critical to get set up correctly: tip forming and purging. Tip forming is optional if you go the extra step and configure a filament cutting option, but even if you do, it is advisible to have the ability to create decent tips for times when you are not using the cutter or want to fallback to the "traditional" method. Purging is the process of removing reminants of the old filament (and color) so that your print has clean color changes with sharp edges. Let's look at setting up those two cababilities.


 Tuning Filament Tips
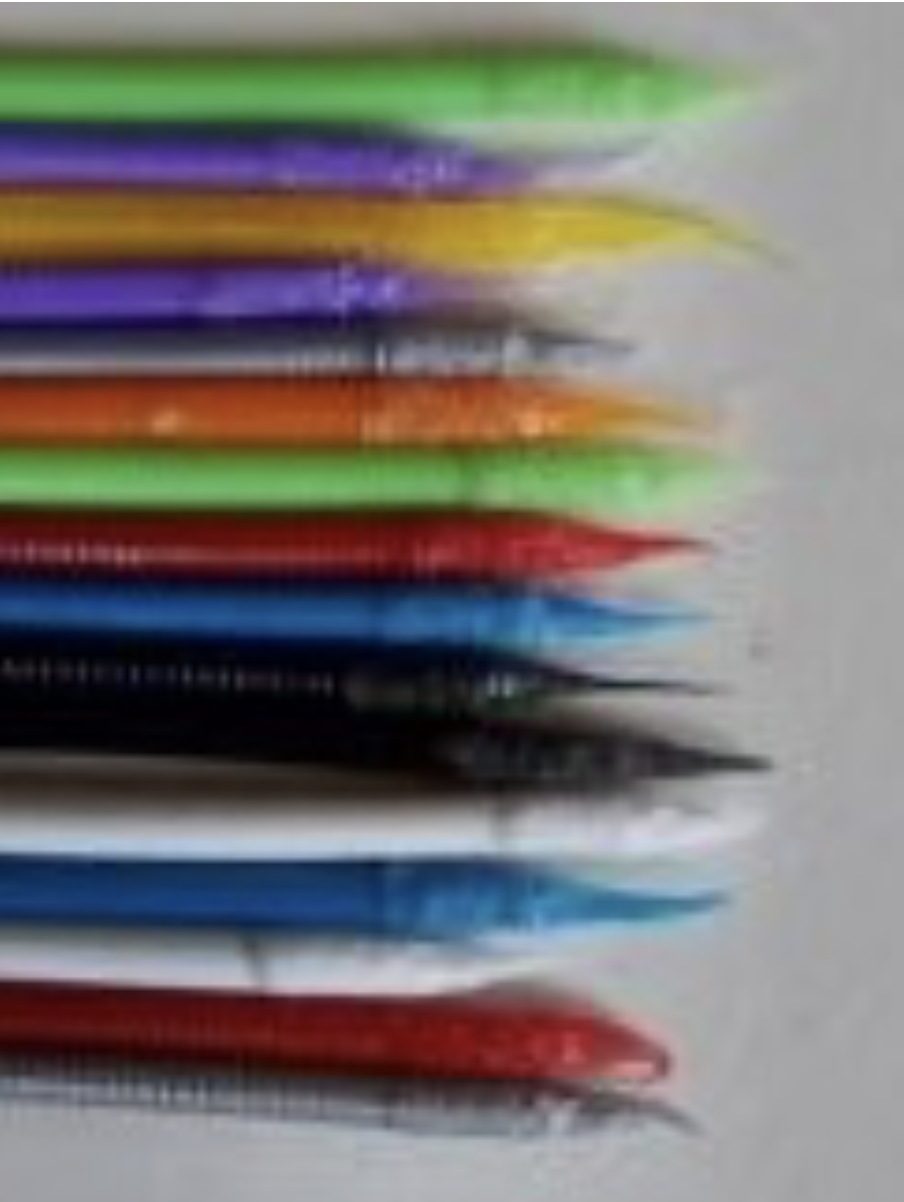 The shape of filament tips is of crucial importance for a reliable system. The filament tips need to look like tiny spears, free of any blobs or long hairs. Here are some proper tips that won’t cause any issue:
A very solid base for filament profile multimaterial section is to use the default filament Prusa MMU profiles. To do that, add an Prusa printer + MMU from the system presets printers, and then select the MMU printer (NOT the Single one). From there, you’ll be able to access the list of filament system presets built for MultiMaterial (they have the @MMU tag in their name, only use those).
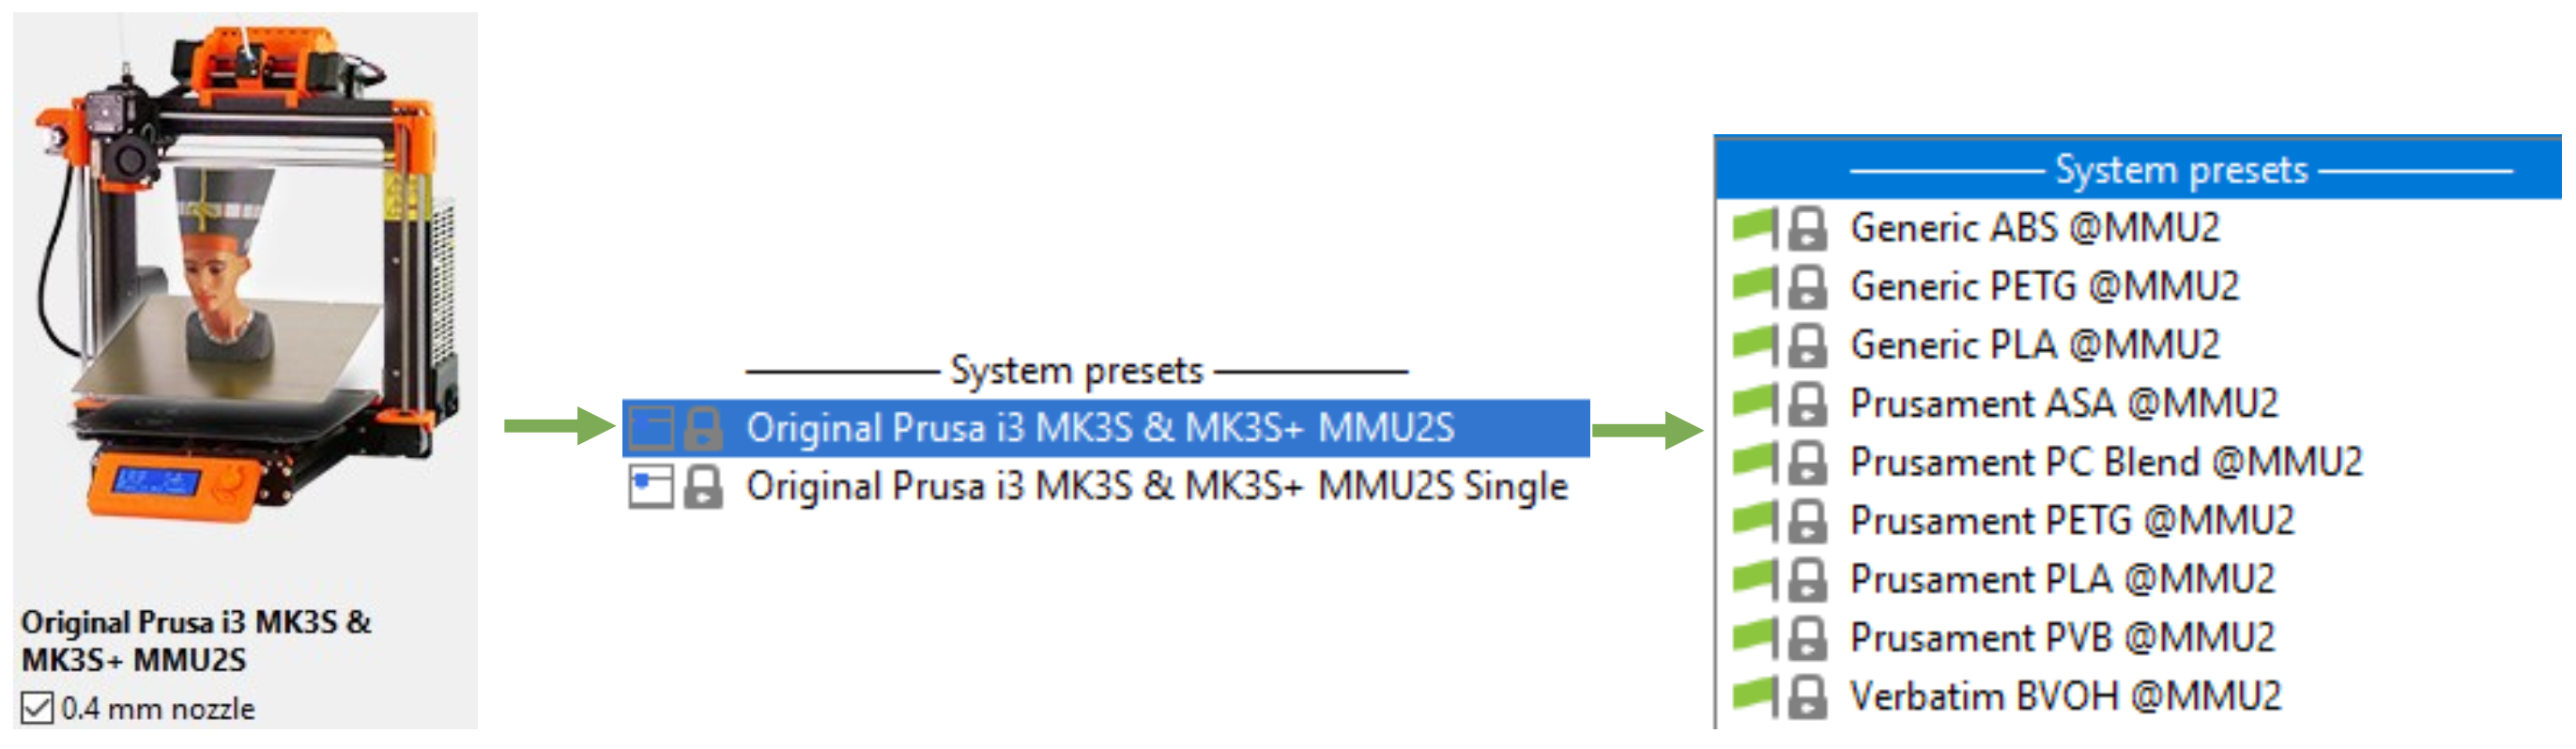
Use the filament type of your choice (ABS, PETG, PLA etc.) and use their Multimaterial section settings (Filament Settings) as the basi for your own filaments profiles.
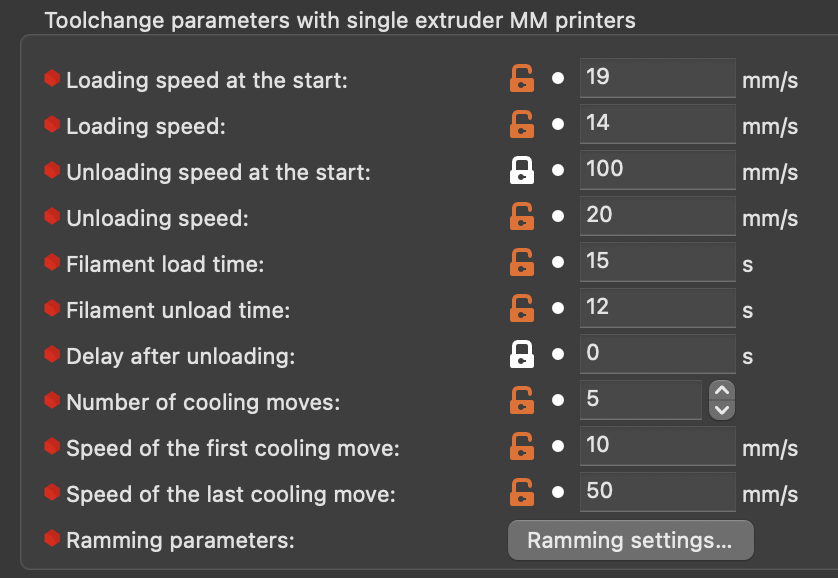
Also, even if not using the slicer tip forming and ONLY using Happy Hare tip forming, you might still want to consult the Prusa Slicer / Super Slicer reference as a starting point for _MMU_FORM_TIP macro variables since they mimick the behavior of these slicers.
Happy Hare has a default macro to form tips. It uses a similar approach to Super Slicer / Prusa Slicer and thus the leanings from one can be applied to the other. The macro is defined in mmu_form_tip.cfg but the configuration variables are in mmu_macro_vars.cfg under the _MMU_FORM_TIP_VARS section. Tuning tips is a pain (hence the advent of filament cutting) but it can be made easier by following this procedure:
- Remove the bowden tube from your toolhead so you can freely pass in filament
- Cut a 400mm piece of filament you are trying to tune
- Set you extruder temperature
- Hold the fragment of filament up to the extruder gears and type:
MMU_LOAD EXTRUDER_ONLY=1(assuming the rest of the MMU setup is complete this will load the filament to the nozzle)
- Extrude a few more mm of filament (via console or your favorate UI like Mainsail) to esure the extruder is primed. then:
MMU_TEST_FORM_TIP(this will run the tip forming macro and eject the filament for inspection)
- To make adjustments you can specify any of the marco variables on the command line. They are sticky so you don't have to set each one each time. E.g.
MMU_TEST_FORM_TIP cooling_moves=5 unloading_speed=15(although shown chaning two parameters at once it is ofter better to do one at a time so you understand the effect)
- After each test, reinsert the filament and run the
MMU_LOAD EXTRUDER_ONLY=1command again.
It might take 40-50 attempts until you start to home in on the optimum values for your particular extruder.
Important
The parameters your just set will only be valid until klipper is restarted. To make this persistent, make sure you edit mmu_marco_vars.cfg and your chosen settings.
In the slicer there are 3 different options when it comes to defining the purging volumes for multi-filament prints:
- Manual definition
- Manual matrix volume
- Advanced purging volume using filament pigmentation
The manual volume definition is simple to setup but lacks depth and may result in wasted filament, the matrix one becomes complicated if you have a high number of tools and finally the advanced purging volume algorithm requires a filament profile for each different pigmentation value. The latter offers the most control and elinination of waste.
Although we are initially talking about how the slicer can create the purge volume matrix who will see later how that information can be passed into Happy Hare for use with custom purge systems that don't require a wipe tower!
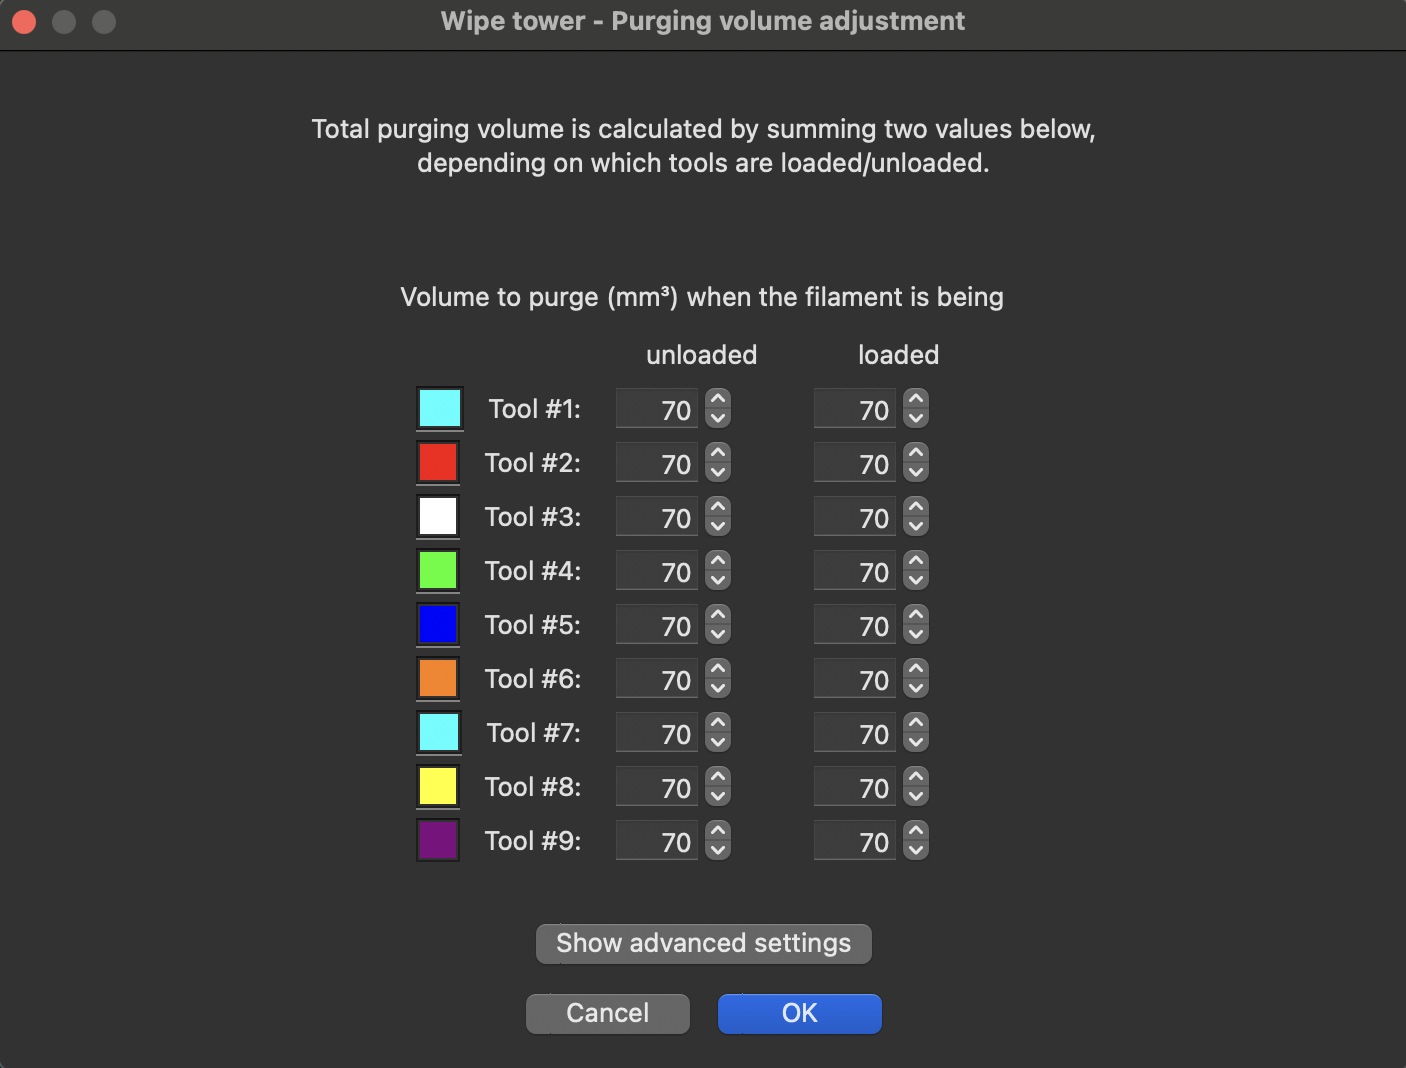
This option allows you to define the total purge volume for each tool by defining the unloaded and loaded values. For instance, swapping from Tool 0 to Tool 1, the purge volume used will be the sum of the Tool 0 unloaded and the Tool 1 loaded.
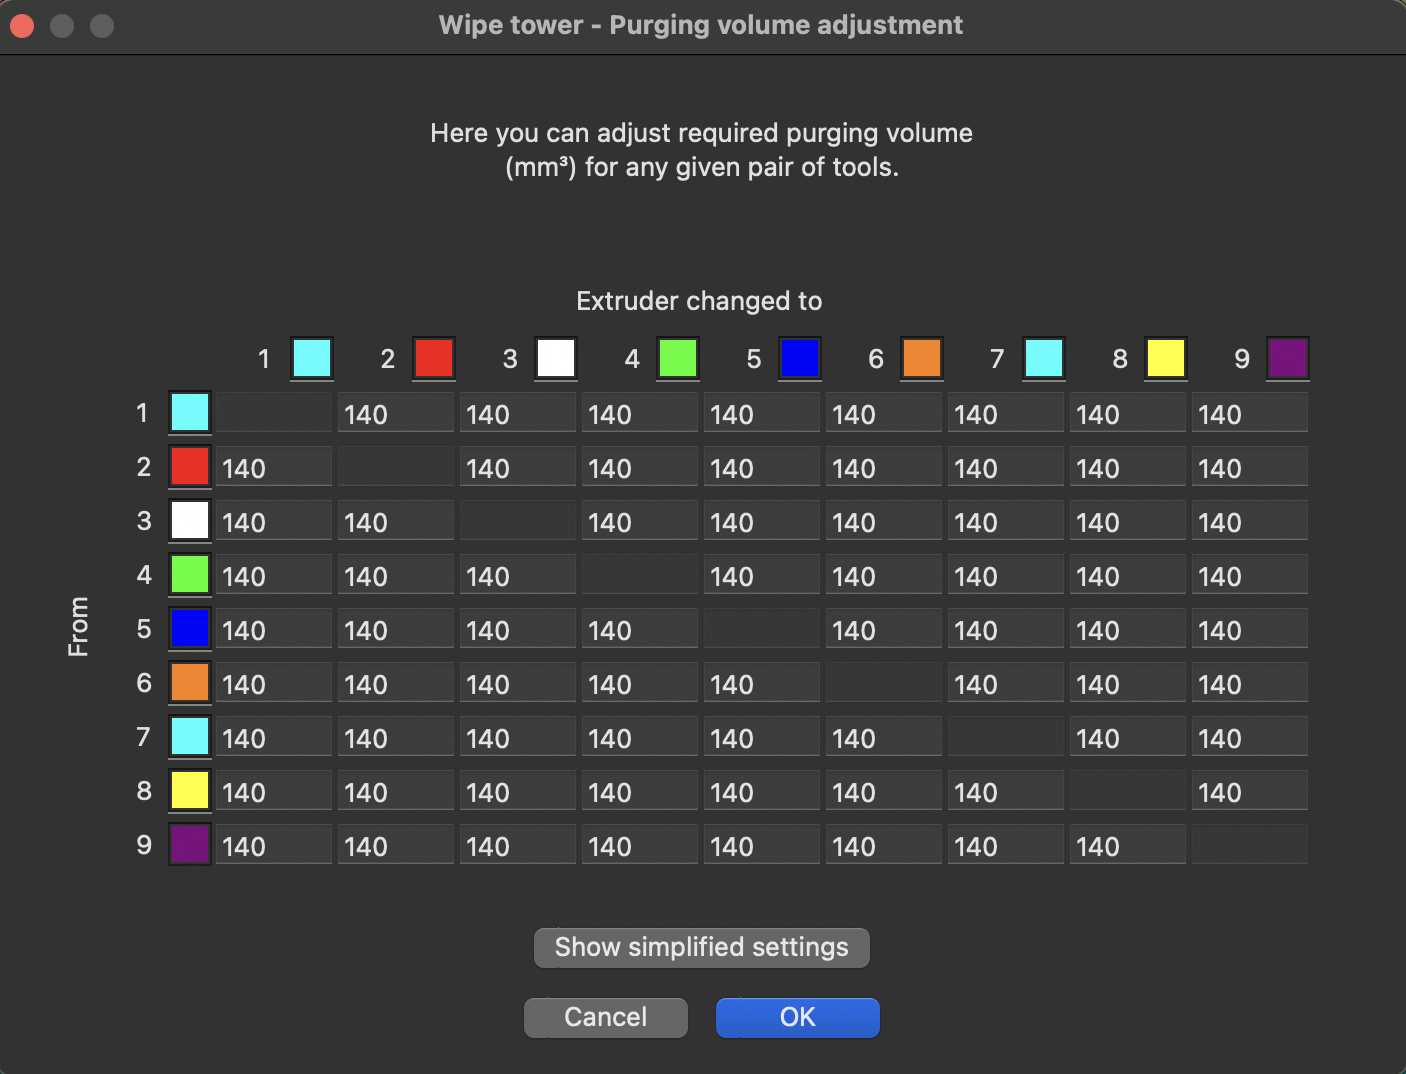
Clicking on the Show advanced settings in the manual purging volume panel will pop the purging matrix. With this, you can define every single transition precisely, from whatever tool to whatever tool you have. As you can see, when you have a lot of tools you’ll have to track a lot of transitions, which can be painful.
If you enable the Advanced wiping volume option in the Printer settings, Single Extruder MM setup section, the slicer will use the Pigment percentage, ranging from 0 to 1, to define the purge volume for each swap. You can adjust the different values of this option to finely tune the final purging volume. Note that if you have the same profile for filaments of different colors, you’ll need to duplicate those filament profiles and adjust, for each, the pigment percentage value. Don’t forget to select the proper filament profile for each tool.
Normally the purging logic is performed by the slicer and written into the g-code. The purged filament will be deposited onto the wipe tower (that is why enable wipe tower must be checked to access the purge matrix and then disabled if you want to use the volumes but not the wipe tower.
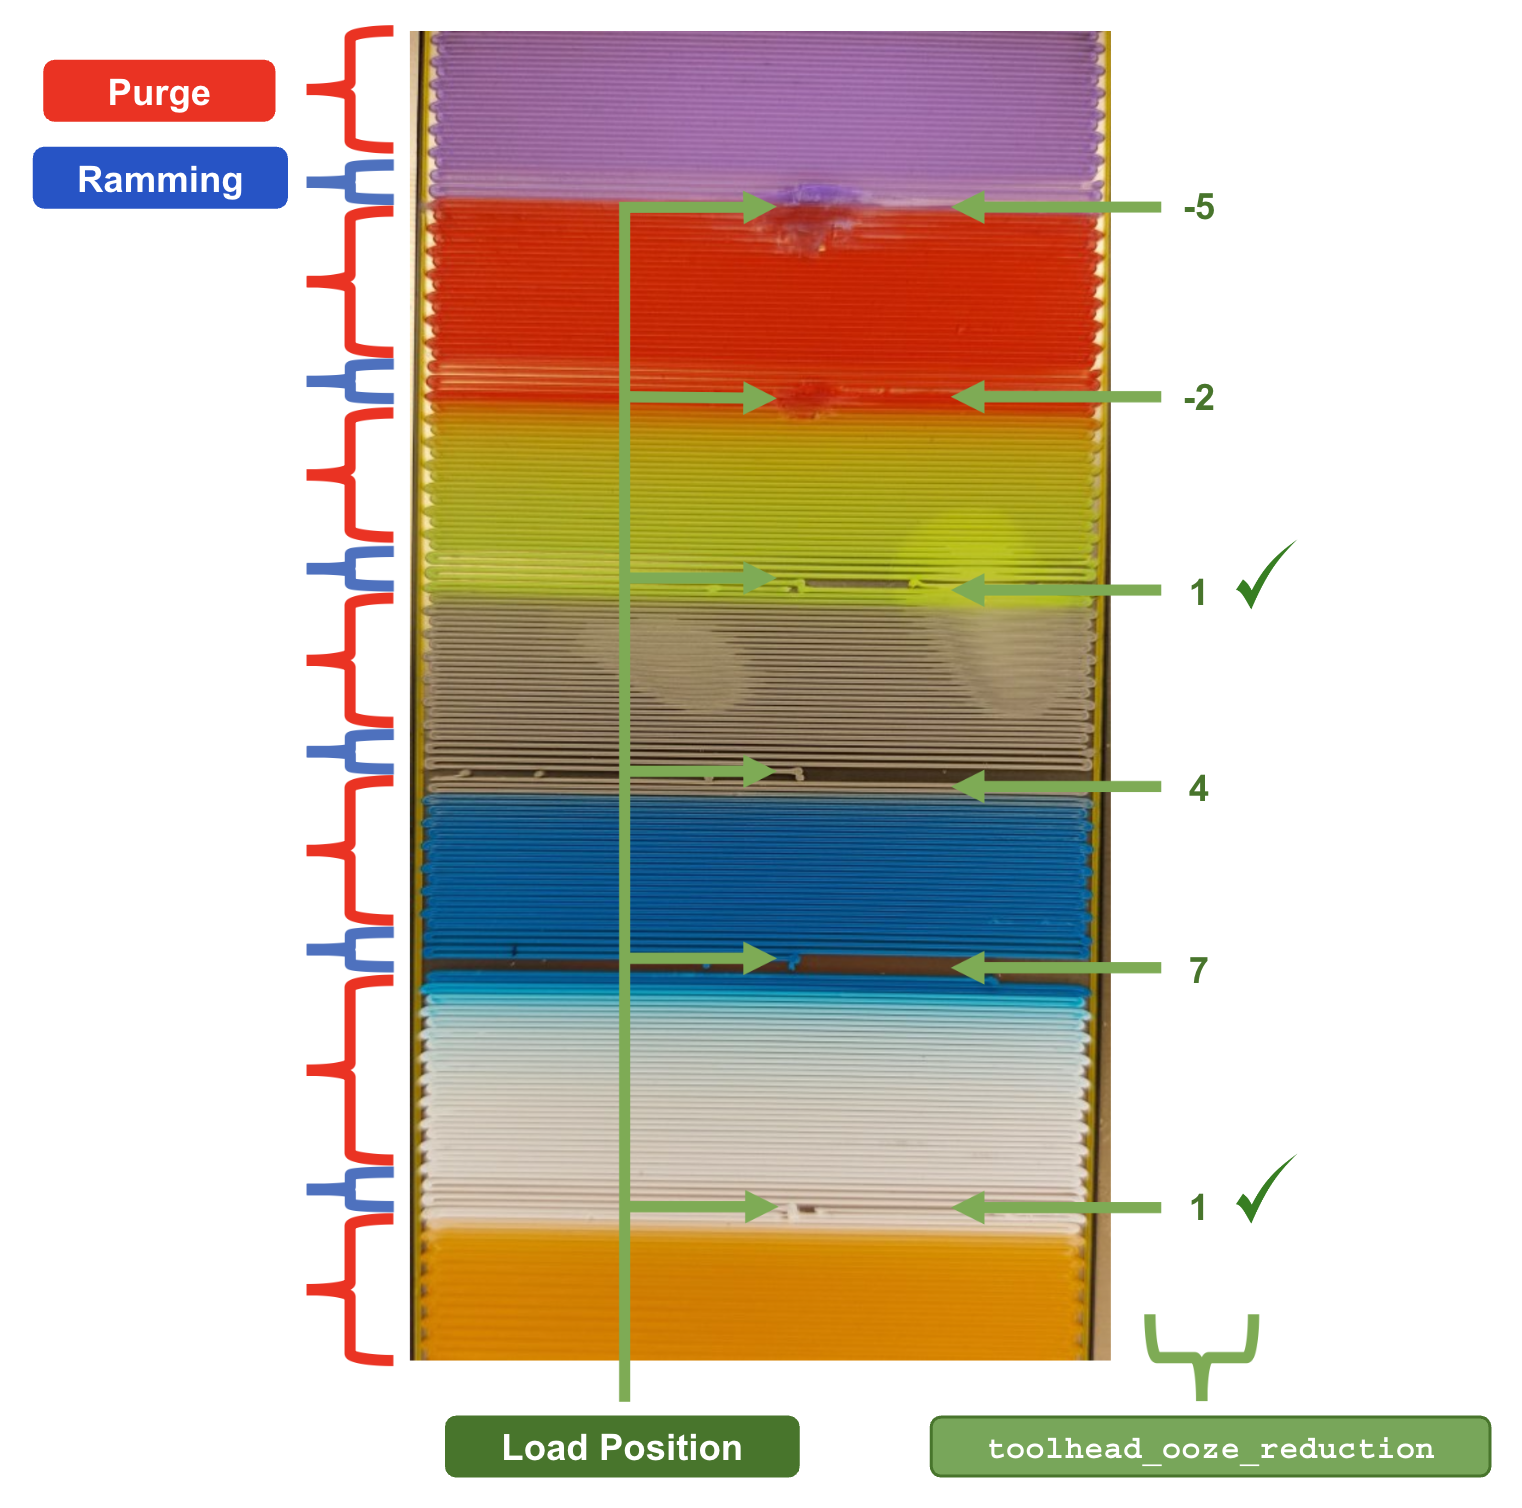
Even with purge volumes setup correctly the configuration of your toolhead parameters also come into play. Let's assume that you have correctly defined your toolhead geometry here noting that these settings are based on the CAD of your toolhead and are not designed to be tunables. Ok, with that said it is still necessary to fine tune the purging process and altough the toolhead dimensions will effect this, the correct parameter to tune is toolhead_ooze_reduction defined in mmu_parameters.cfg. This controls a "delta" in the theoretical loading distance. Typically this would be 0 or a small positive value to reduce the load distance so that the extruder doesn't prematurely extrude plastic.
Once you are printing your first multi filament print, check the purge tower to verify that the toolhead_ooze_reduction value is well tuned (at that your dimensional settings are correct). If you notice over extrusion during loads (i.e., plastic blobs on the purge tower after a load) you need to increase the toolhead_ooze_reduction value.
If you notice big gaps on the purge tower after a load, you need to decrease the toolhead_ooze_reduction value. Note that although small negative values are allowed, going negative almost certainly means that the toolhead_extruder_to_nozzle or toolhead_sensor_to_nozzle are too long. Here is an example purge tower here, with values for the toolhead_ooze_reduction from -5 to +7 mm. In this example, the proper value seems to be around 1 mm. Note that because there is some uncertainty in this process (because of the filament tip shape), there will be some slight differences even when the value is the same, as shown in the green to grey and white to orange transitions.
Tweaking this is something that can be done in print with:
MMU_TEST_CONFIG toolhead_ooze_reduction=N
Just don't forget to persist the final result in mmu_parameters.cfg when the print is done.
The wipe tower is a great solution for handling the purge necessary when changing tools (Prusa Slicer also has an experiemental "purge to infil" to minimize waste) but it has the downside of taking up a large portion of the build plate. To avoid this an add-on purging system can be used during the toolchange allowing the wipe tower to be disabled! A great example of such a system is Blobifier by Sjon Huisman. In fact the additional macro to drive Blobifier is supplied in the Happy Hare "config/mmu/addons/" directory. It can be added to Happy Hare with a single line addition in mmu_macros_vars.cfg.
Setting up a purge system is beyond the scope of this page but such a system will require purging volumes discussed above. These purge volumes can be automatically pre-processed from the g-code and stored by Happy Hare for the duration of the print. This information is made available to your macros through printer variables, e.g. printer.mmu.slicer_tool_map. The other way to setup purge volumes is via the MMU_SLICER_TOOL_MAP command. All three of these commands would estabish the simple 9-tool matrix shown in the illustration above from Prusa Slicer. Read more about this command here and here
MMU_SLICER_TOOL_MAP PURGE_VOLUMES=70
MMU_SLICER_TOOL_MAP PURGE_VOLUMES=70,70,70,70,70,70,70,70,70 "list of 9 elements"
MMU_SLICER_TOOL_MAP PURGE_VOLUMES=70,70,70,70,70,70,70,70,70,70,... "list of 18 or 81 elements"
> MMU_SLICER_TOOL_MAP DETAIL=1
Purge Volume Map:
To -> T0 T1 T2 T3 T4 T5 T6 T7 T8
T0 - 140 140 140 140 140 140 140 140
T1 140 - 140 140 140 140 140 140 140
T2 140 140 - 140 140 140 140 140 140
T3 140 140 140 - 140 140 140 140 140
T4 140 140 140 140 - 140 140 140 140
T5 140 140 140 140 140 - 140 140 140
T6 140 140 140 140 140 140 - 140 140
T7 140 140 140 140 140 140 140 - 140
T8 140 140 140 140 140 140 140 140 -
Note
The CNC world and Happy Hare use tool names that are zero-based. Thus T0 is the first tool. Some slicers prefer to start with tool T1(!) Unfortunately this can lead to confusion but since the actual gcode will always contain T0 that is the preferred numbering convention. Sorry Prusa.
Tuning a tip forming macro is time consuming and very frustrating, mainly because filament type and temperature have a configurable effect meaning its hard to find the sweet spot. You can, however, do away with tip forming altogether and cut the end of the filament instead.
- Advantages:
- Guarantees clean tips without hairs for reliable filament loading
- No need to beat your head against the wall tuning tip forming
- Works with all filament types
- Disadvantages:
- Additional hardware
- Blade is a consumable that will need to be replaced
- Wastes a little more filament and time when purging (if cutter is in toolhead)
Whilst it is possible to added a cutter at the MMU (see EREC), tip cutting is generally achieved by a toolhead mounted cutter. Usually the cutter is activated by moving the toolhead to a specific position which has a depressor or a servo retractable arm which pushes on the activation mechanism of the toolhead cutter as the toolhead moves into the cutting position.
Tip cutting is activated by changing form_tip_macro to _MMU_CUT_TIP in mmu_parameters.cfg telling Happy Hare to use the tip cutting routine instead of the tip forming routine.
Tip cutting is activated when Happy Hare sees a tool change command in the g-code. When this happens, happy hare starts by moving the toolhead to the prime tower location (or other specified location), then preparing the toolhead for cutting.
The toolhead is prepared with a few cooling moves, then positions the filament to the cutting position. The cooling moves help keep the cut tip from jamming up while the filament swap happens.
The filament is then moved to the cutting position (inside the toolhead, the toolhead doesn't move during this operation), which is tuned by the user to cut the filament using the minimum necessary amount of filament behind while still having a good tip.
Then, the toolhead is moved to the cutting staging position. This is a position just outside the cut position which is a safe location from which to start the cut move.
Next the toolhead makes a slow approach to the depressor, then a quick move to cut the filament, a quick retract move, then a slow move back to the staging position.
Finally, Happy Hare unloads the filament, loads the new filament, then purges, and resumes printing.
The bulk of tip cutting, and indeed, the only user editable parameters, is in mmu_macro_vars.cfg. There are several parameters which need attention, but this isn't overwhelming. Just take it step by step, as laid out in the config file. For detailed explanation of all the parameters read Configuring mmu_macro_vars.cfg.
- Slicer Setup
- Toolchange Movement
- [Tip Forming and Purging]