


Overlay for running GPU shaders on top of Windows desktop.
- applies shader effects on top of any window on the desktop
- includes RetroArch shader library covering:
- CRT monitor simulation
- image upscaling
- TV / VHS simulation
- softening, denoising, blur, sharpen and many more
- works with most emulators, retro platforms and pixel art editors including:
- excellent companion for pixel art drawing showing shaded and/or aspect-ratio corrected preview
- you can even use it on top of YouTube, Twitch or modern games
- saving and loading profiles
- multiple operating modes, including borderless fullscreen
Latest release (v0.7, 19 Dec 2021):
- load .png/.jpg image file as input
- lock capture area to clone a portion of the screen
- free resizing & scaling support in Windowed Clone mode
- option to account for display DPI scaling in pixel size adjustment
- shader fixes
https://github.com/mausimus/ShaderGlass/releases/download/v0.7/ShaderGlass-0.7-win-x64.zip
Follow ShaderGlass on itch.io for latest updates.
- Windows 10, version 2004 (build 19041) or Windows 11
- will work on version 1903 but in limited capacity (no Desktop Glass mode)
- Windows 11 allows the removal of yellow border around capture
- DirectX 11-capable GPU
If the app reports missing libraries please install Visual C++ Redistributable 2019
Demonstration video (YouTube):
In this mode a transparent floating window will apply a shader to anything behind it. This mode is not OBS-friendly, use Window Glass or Clone modes to capture ShaderGlass. Requires Windows 10 2004 - on 1903/1909 you will see only a black window if you switch to this mode.
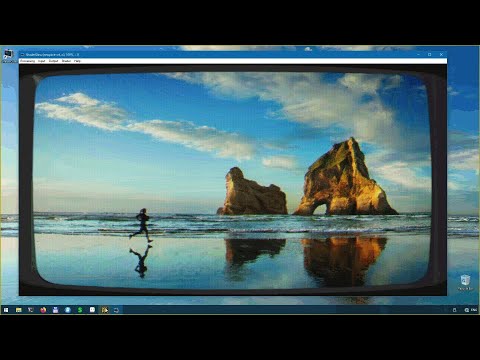
Wikipedia in Chrome processed by crt-geom shader which applies scanlines and CRT curvature.

When capture is fixed to a specific window it's easier to tune scaling to match the input and image can also be recaptured (screenshot/OBS etc.)
Amiga version of The Secret of Monkey Island (1990) running in FS-UAE with crt-interlaced-halation shader applied.

Ninja (1986) for the Atari XL running in Altirra with a TV-OUT simulation shader.

The Crimson Diamond (2020), a modern AGS game softened using crt-fast-bilateral-super-xbr shader.

Police Quest (1987) with its massive half-EGA pixels, aspect-ratio corrected and post-processed using newpixie-crt shader.

Rick Dangerous (1989) with C64 monitor shader applied.

Currently supported options are:
-
Input -> Desktop - captures the whole desktop or an individual monitor, defaults to Glass mode
- Lock Current Area - always capture current area even if ShaderGlass window is moved
-
Input -> Window - captures the selected window, defaults to Clone mode
-
Input -> File... - load a .png or .jpg file as input
-
Input -> Capture Cursor - whether to include mouse cursor in capture
-
Input -> Remove Yellow Border - disables yellow frame around captured area (forced security feature); currently only supported on Windows 11
-
Input -> Pixel Size - indicates the size of input pixels (pre-scaling), i.e. if you run a game in x3 scaling mode set this to x3 as well so that ShaderGlass can tell the original resolution
- Adjust for DPI Scale - if your source always applies Windows DPI Scaling when displaying images (for example browsers) enable this option to take it into account; most emulators don't do this however
-
Output -> Mode - overrides default mode for the input type:
-
Glass (default for Desktop) - ShaderGlass window appears transparent, you have to position it over the window or area you'd like to capture
-
Clone (default for Window) - ShaderGlass copies the content of capture so you can position it anywhere; this mode is also faster and more compatible
-
-
Output -> Window - override mouse behavior:
-
Solid (default for Clone) - ShaderGlass window area is solid (traps mouse events), with the only exception of passing focus to captured window when clicked
-
Click-through (default for Glass) - ShaderGlass window area is transparent and clickable/scrollable-through to window(s) underneath
-
-
Output -> Scale - apply additional scaling to the output if you'd like it to be larger; using no pre-scaling and only output scaling should result in best performance
- Free - allow manual resizing of ShaderGlass window (Window Clone and File modes only)
-
Output -> Aspect Ratio Correction - presets for common aspect ratio correction factors (DOS, etc.), applied horizontally to preserve scanline count
- If you select Custom you can enter your own correction ratio expressed as pixel height (1.0 being square pixel). For example, in MS-DOS era a picture of 320x200 resolution (16:10) was displayed on a 4:3 screen meaning each pixel was 1.2x tall on screen, 1.2 = (16/10) / (4/3)
-
Output -> Frame Skip - in order to improve performance divide frame rate by n (capture is done at VSync rate)
-
Output -> Take Snapshot - export current picture in .png format
-
Output -> Fullscreen (Ctrl+Shift+G) - turn ShaderGlass into a topmost fullscreen borderless window, in Glass mode you will still see yellow outline around the screen but if you can use Window Glass (surrounding black bars) or Window Clone (top-left aligned) with your source then you can avoid yellow edges; press Ctrl+Shift+G to revert
-
Shader - choose RetroArch shader to apply, or none shader for testing
- Parameters - show and modify active shader's parameters
You can save and load profile files which will store all the options. It's also possible to pass profile file path on the command line and ShaderGlass will load it on startup.
ShaderGlass.exe [-p|--paused] [-f|--fullscreen] [profile.sgp]
You can pass profile filename as a command-line parameter to ShaderGlass.exe and it will be auto-loaded.
In addition -p will launch in paused mode, and -f will launch in fullscreen mode.
In order to achieve the best effect it's necessary to tune parameters to match your input:
-
if you use scaling in your input, use nearest-neighbour (i.e. no smoothing) and set Input -> Pixel Size to match
-
moving/resizing the window slightly might also help find the best fit for downscaling pixels
-
use Window Clone mode if you can, it's fastest and most compatible; if you need mouse click-through use Glass mode
Always check that input is crisply pixelated using the "none" shader as there is often implicit scaling happening (for example even when Chrome displays an image at 100%, Windows DPI scaling is still applied). The none shader should display a pixelated image with no smoothing whatsoever, try to match Input Pixel Size setting with your input's size to achieve that.
All shaders start using default Parameters as defined by their authors, but you can also tweak them using Shader -> Parameters menu option.

Most emulators (DOSBox, FS-UAE, Altirra etc.) will capture mouse by default so you can use them in Window Clone mode. ShaderGlass window will remain topmost so just position it over the game window and Alt-Tab to the game to have mouse and focus captured.
ScummVM doesn't capture mouse cursor by default so for best results follow below steps:
- Use Window Clone mode, set Input/Output/Shader options to your liking
- Switch Output Window to Click-through
- Click or Alt-Tab to ScummVM game window so that it has focus
- Press Ctrl-M which will force ScummVM to capture mouse
This way you should have the mouse captured by ScummVM so that it remains within the game window until you press Ctrl-M again. You can apply output scaling and/or aspect ratio correction in ShaderGlass and enjoy the game.
Built using Visual Studio 2019 using ISO C++ 20, Windows SDK 10.0.20348, Windows Capture API and DirectX 11.
ShaderGlass includes a limited implementation of RetroArch shader back-end. ShaderGen is a command-line tool for converting Slang shaders into .h files which can be merged into ShaderGlass. The conversion process requires:
- glslang for converting Slang/GLSL shaders to SPIR-V
- SPIR-V cross-compiler for converting those to HLSL (DX11 format)
- Direct3D Shader Compiler (fxc.exe) for pre-compiling into bytecode
-
ShaderGlass application is provided under GNU General Public License v3.0
-
Includes precompiled shaders from libretro/RetroArch shader repository. Please refer to copyright notes within shader code for detailed copyright and license information about each shader.
-
App icon courtesy of Icons-Land
-
Big kudos to RetroArch team, emulator developers and the wide retro community!