Note: The jekyl markdown code used by Github will not display this page correctly on github pages. I recommend looking at the repo version of this page so it will display correctly.
- Machine Deployment
- Configuration Management & Deployment
- Container Management
- Software Engineering
- Vagrant = single work flow for spinning up environments
- Vagrant box = packaging format for vagrant
- Packer = Create machine images for multiple platforms with a single custom config
- Cloud-init = Python scripts & Utils to handle early init of cloud instances
- Terraform = infrascture deployment tool (tf files)
- Ansible = configuration management tool (playbooks)
Vagrant - vagrantup.com
- Tool for building and managing virtual machine environments
- Allow single work flow for spinning up environments. Dev can mirror Prod.
- Machines provisioned on a provider (Docker, AWS, etc)
- Vagrantfiles describes, configures, and provisions the machines you'll need.
- Available boxes: https://app.vagrantup.com/boxes/search
- Can download from the hasicorp vagrantup site. DOWNLOAD: https://www.vagrantup.com/downloads.html
- use brew... I tried this method, however vagrant 2.0.0 had been previously installed and no longer works. But the system will not use the latest version. Tried uninstalling and deleting everything I can but still can't use the version installed with brew.
-
Install the latest version of VirtualBox. I had a version that was out of date and would no longer run on MacOS.
-
Creating a vagrant file...
# set current directory to be a Vagrant environment and create a Vagrantfile
#   within ~/Projects/vagrant/
$ vagrant init- Edit vagrant file
$ atom ~/Projects/vagrant/Vagrantfile- Bring up vagrant
# Setup environment Create and configure guest machines according to Vagrantfile
$ vagrant up
# ALSO:
$ vagrant up --PROVIDER=VirtualBox --debug- See machine running
# status of machines in env
$ vagrant status- connect to the machine instance
# connect
$ vagrant ssh default- stop and destroy the machine (all resources)
$ vagrant destroy# make sure your vagrant file is valid
$ vagrant validate
$ vagrant provision
# runs a half and an up
$ vagrant reload- Configure your Vagrantfile. This will pull down a ghost blog container to run in docker and map port 80 to 2368 on the counter
Vagrant.configure("2") do |config|
  config.vm.provider "docker" do |d|
    d.image = "ghost"
    d.ports = ["80:2368"]
  end
end- Run vagrant
$ vagrant up- Find the docker container ID and connect to docker instance
$ docker ps
$ docker exec -i -t [container-id] /bin/bash- Map the local file (in the host vagrant file folder) to the folder on the virtual machine
Vagrant.configure("2") do |config|
  config.vm.box = "ubuntu/trusty64"
  config.vm.synced_folder ".", "/vagrant"
end- Use SSH versus VAGRANT SSH to connect from the localhost to vagrant
$ ssh vagrant@localhost -p 2222 -i ~/.vagrant.d/insecure_private_key- default password is vagrant
- to get the info from vagrant...
$ vagrant ssh-config- Clone Sample Vagrantfile: https://github.com/linuxacademy/content-LPIC-OT-vagrant-puppet
$ git clone https://github.com/linuxacademy/content-LPIC-OT-vagrant-puppet.git vagrant- Setup the vagrant file
Vagrant.configure("2") do |config|
  config.vm.define "web" do |web|
    web.vm.box = "ubuntu/trusty64"
    web.vm.hostname = "web.vagrant.vm"
  end

  config.vm.define "db" do |db|
    db.vm.box = "ubuntu/trusty64"
    db.vm.hostname = "db.vagrant.vm"
  end
end- launch the webserver only
$ vagrant up web- Add provisioning to the Vagrantfile
Vagrant.configure("2") do |config|
  config.vm.define "web" do |web|
    web.vm.box = "ubuntu/trusty64"
    web.vm.hostname = "web.vagrant.vm"
    web.vm.provision "she;;" do |shell|
      shell.inline = "apt update -y
      shell.inline = "apt install apache2 -y"
    end
  end

  config.vm.define "db" do |db|
    db.vm.box = "ubuntu/trusty64"
    db.vm.hostname = "db.vagrant.vm"
  end
end- relaunch what is up (only the web so far)
$ vagrant reload --provision- Add Puppet provider to the Vagrantfile
Vagrant.configure("2") do |config|
  config.vm.define "web" do |web|
    web.vm.box = "ubuntu/trusty64"
    web.vm.hostname = "web.vagrant.vm"
    web.vm.provision "she;;" do |shell|
      shell.inline = "apt update -y
      shell.inline = "apt install apache2 -y"
    end
  end
  config.vm.define "db" do |db|
    db.vm.box = "ubuntu/trusty64"
    db.vm.hostname = "db.vagrant.vm"
    db.vm.provision "puppet" do |puppet|
      puppet.manifest_path = "puppet/manifests"
      puppet.manifest_file = "default.pp"
      puppet.module_path = "puppet/modules"
      puppet.hiera_config_path = "puppet/hiera.yaml"
    end
  end
end- Validate for errors in Vagrantfile and launch the db server
$ vagrant validate
$ vagrant up db- Connect to the container and verify mysql is installed
# once server launches...
$ vagrant ssh db
$ sudo su
$ mysql# check for docker
$ docker -v
# install vagrant - link from the downloads section
$ sudo yum install -y https://releases.hashicorp.com/vagrant/2.2.3/vagrant_2.2.3_x86_64.rpm
$ vagrant -v
$ create Vagrantfile and map host port to vagrant port 80:2368
$ sudo yum install nano
$ nano Vagrantfile
Vagrant.configure("2") do |config|
config.vm.provider "docker" do |d|
d.image = "ghost"
d.ports = ["80:2368"]
end
end
# launch and verify
$ sudo vagrant up
$ docker ps
$ docker images
$ curl http://localhost
# pull up web browser- Log into instance with Vagrant and Docker installed
- Setup Dockerfile
$ sudo su
$ yum install nano
$ cd root/docker
$ nano Dockerfile
FROM node:alpine
COPY code /code
WORKDIR /code
RUN npm install
EXPOSE 3000
CMD ["node", "app.js"]- Setup Dockerfile
$ nano Vagrantfile

ENV['VAGRANT_DEFAULT_PROVIDER'] = "docker"

Vagrant.configure("2") do |config|
  config.vm.provider "docker" do |d|
    d.build_dir = "."
    d.ports = ["80:3000"]
  end
end- Use Vagrant to launch the Docker image "node:alpine"
$ mkdir code
$ vagrant validate
$ vagrant up

$ docker images
$ docker ps- see if the docker:alpine image port 3000 is mapped to localhost:80
$ curl localhost- to edit the js code... just cd into the code/ folder
$ vagrant reload
- Vagrant Box: packaging format for vagrant
- great for versioning changes, go back, fix a problem and rolls it out
- Download Vagrant Boxes: https://app.vagrantup.com/boxes/search
$ vagrant box add <ADDRESS>
$ vagrant box list
# tell you if box is outdated
$ vagrant box outdated
$ vagrant box outdated --global
# prune out old versions of boxes
$ vagrant box prune
$ vagrant box prune -n
# remove a specific box
$ vagrant box remove <NAME>
# repackage - reconstruct the box file
$ vagrant box repackage <NAME> <PROVIDER> <VERSION>
$ vagrant box repackage ubuntu64 virtualbox 0
# download and install the new box and you must update the individual running box
$ vagrant box update
$ vagrant box update --box centos/7
# remove and readd box
$ vagrant box remove ubuntu64
$ vagrant box add ubuntu64
# automatically create the Vagrantfile for precise64
$ vagrant init hashicorp/precise64- Go into project folder "vagrant_box"
- Download Ubuntu 18.04 using curl
- Open virtual box and create a new box "ubuntu64-base, 512MB, 40GB, dynamic alloc
- Disable audio, USB, set network port forwarding SSH 2222:22
- Setup storage, CD-ROM, Virtual, vagrant_box, d/l file
- Networking, set as NAT
- Start machine in Virtual box, setup, add User: vagrant Pass: vagrant
- Guided install for disk, automatically add security updates
- Software Selection: OpenSSH Server, Basic Ubuntu Server, Yes for GRUB
- Before restart, In Virtual Box: Eject the disk
- Log into Ubuntu instance
- Setup security
$ passwd root; vagrant
$ echo "vagrant ALL=(ALL) NOPASSWD:ALL" | tee -a /etc/sudoers.d/vagrant- Get the vagrant public key: https://raw.githubusercontent.com/hashicorp/vagrant/master/keys/vagrant.pub
- Get the key, setup SSH, install packages
$ mkdir /home/vagrant/.ssh
$ chmod 0700 /home/vagrant/.ssh
$ wget https://raw.githubusercontent.com/hashicorp/vagrant/master/keys/vagrant.pub
$ mv vagrant.pub authorized_keys
$ chmod 600 authorized_keys
$ chown -R vagrant ~/.ssh/
$ echo "AuthorizedKeysFile %h/.ssh/authorized_keys" | tee -a /etc/ssh/sshd_config
$ service ssh restart
$ apt install -y gcc build-essential git linux-headers-$(uname -r) dkms- VirtualBox Menu Bar: Devices: Insert Guest Additions CD image
$ mount /dev/cdrom /mnt
$ /mnt/VBoxLinuxAdditions.run- Compress all empty space out of filesystem
$ dd if=/dev/zero of=/EMPTY bs=1M
$ rm -f /EMPTY- Turn Ubuntu into a Vagrant Box from home OS to create a package.box
$ vagrant package --base ubuntu64-base

$ vagrant box add ubuntu64 package.box

$ vagrant box list- Run the new box and connect!
$ vagrant init ubuntu64 -m
$ cat Vagrantfile
$ vagrant up
$ vagrant ssh- Can create a box file
- Can download a box file
- METADATA.JSON - lists metadata for box
- PACKAGE.BOX - box information file
- When executing a vagrant init, what flag would you use to overwrite a Vagrantfile if one has already been created.
- vagrant -f
- Which command returns all installed boxes?
- vagrant box list
- When executing vagrant destroy, what flag would you use so that you are not prompted to confirm that you want to destroy the resources?
- vagrant -f
- What are the three ways that Vagrant will try and detect a provider?
- Execute vagrant up with the --provider flag. Use the VAGRANT_DEFAULT_PROVIDER environmental variable in your Vagrantfile. Example: ENV['VAGRANT_DEFAULT_PROVIDER'] = '' Vagrant will go through all of the config.vm.provider calls in the Vagrantfile and try each in order.
- Fill in the blank. The primary function of the _ _ _ _ _ _ _ _ _ is to describe the type of machine required for a project, and how to configure and provision these machines.
- Vagrantfile
- What file format should the info file be in?
- JSON
- When creating a base box, what are the default settings that should configured?
- Set the root password to vagrant.
- Create a vagrant user for SSH access to the machine.
- Configure the SSH user to have passwordless sudo configured.
- Which of these is true about Docker Base Boxes?
- The Docker provider does not require a Vagrant box.
- Which of the following commands will create a new Box file from a Box imported into Vagrant.
- vagrant box repackage
- What are the three different components of a Box?
- A Box Information File
- A Box Catalog Metadata File
- A Box File
- Create machine images for multiple platforms with a single custom config
- Runs on all OS
- Create multiple images for multiple platforms in parallel
- Works in parallel with shell scripts/Pupper/Chef (does not replace config mgmt tool)
- Don't make changes to a server, you must replace it
- Template are in JSON
- Template structure (array):
- builders = what are we defining
- description = what the template does
- min_packer_version = optional
- post-processors = what actions to take next (tagging or publishing to a repo)
- provisioners = how are we going to configure the machine image
- variables = pass in at run time of packer build
$ packer build
# bring a template up to date
$ packer fix
# learn what the template is doing (vars, definitions, etc)
$ packer inspect
# check syntax and config
$ packer validate- Example builders: Amazon AMI, Azure, Docker, HyperV, OpenStack, VirtualBox, VMware
- Example provisioners:
- Ansible (Ansible local or Ansible remote = tranditional via SSH)
- Chef (Chef Solo = locally)
- File = upload files
- PowerShell for Windows
- Pupper (Pupper Master Server)
- Shell = use shell command or scripts
- Post-processors:
- Amazon Import = used to import to amazon and create an AMI
- Checksum = post processor
- Docker Push = Push to remote repo
- Docker Tag
- Google Compute Image Exporter = create a tabball and upload to GC Storage
- Shell = can execute shell scripts or inline
- Vagrant
- vSphere
$ cd /usr/local/bin
$ wget <packer zip file>
$ yum install unzip
$ unzip <packer zip file>
$ rm <packer zip file>
$ cd
$ packer --version$ mkdir packer
$ nano packer.json
{
"variables": {
"repository": "la/express",
"tag": "0.1.0"
},
"builders": [
{ "type": "docker",
"author": "<your name>",
"image": "node",
"commit": "true",
"changes": [
"EXPOSE 3000"
]
}
],
"provisioners": [
{
"type": "shell",
"inline": [
"apt update && apt install curl -y",
"mkdir -p /var/code",
"cd /root",
"curl -L https://github.com/linuxacademy/content-nodejs-hello-world/archive/v1.0.tar.gz -o code.tar.gz",
"tar zxvf code.tar.gz -C /var/code --strip-components=1",
"cd /var/code",
"npm install"
]
}
],
"post-processors": [
{
"type": "docker-tag",
"repository": "{{user `repository`}}",
"tag": "{{user `tag`}}"
}
]
}
$ packer validate
# fix errors
$ packer build -var 'tag=0.0.1' packer.json
$ docker images
# you will see any docker images from the past and this one
$ docker run -dt -p 80:3000 la/express:0.0.1 node /var/code/bin/www
$ docker ps
# you should see the docker image running
- Python scripts & Utils to handle early init of cloud instances such as:
- setting a default locale, an instance hostname
- generating instance ssh private keys && adding to ~/.ssh/authorized_keys
- set ephemeral mount points
- configuring network devices
- Comes installed on: Ubuntu Cloud Images, Fedore, Devial, RHEL, CentOS
$ cloud-init init = run by the OS but can be run on the CLI
$ cloud-init modules = activates modules using a config key
$ cloud-init single
$ cloud-init dhclient-hook
$ cloud-init features = not always installed
$ cloud-init analyze = cloud-init logs and data
$ cloud-init devel = run the dev tools
$ cloud-init collect-logs = collect and tar debug info
$ cloud-init clean = remove logs and artifacts so cloud-init can re-run
$ cloud-init status = reports cloud-init status or wait on completion- cloud-init works in 2 Formats:
- GZIP,
- mime multi-part archive
- script types
- User Data Script
- Include Files
- Cloud config data
- Upstart job = content in /etc/init
- Cloud Boothook = content in /var/lib/cloud
- Part handler = custom code
- Example:
#!/bin/sh
echo "Hello World. The time is now $(date -R)!" | tee /root/output.txt- See cloud-init modules: https://cloudinit.readthedocs.io/en/latest/topics/modules.html
-
Use Cloud9 to create a Packer File that will create an AMI
-
Install Packer on Cloud9 Server
- AWS Console search Cloud9, Open IDE
- Use the GUI console interface
- Goto packer.io, Download, Copy the link
$ sudo su
$ cd /usr/local/bin
$ wget <packer.io link>
$ unzip pack*.zip
$ rm packer*.zip
$ exit
# packer --version- Cloud9 GUI: File: Net File: packer.json
{
  "variables": {
    "instance_size": "t2.small",
    "ami_name": "ami-make1up",
    "base_ami": "ami-from-AWS",
    "ssh_username": "ec2-user",
    "vpc_id": "",
    "subnet_id": ""
  },
  "builders": [
    {
      "type": "amazon-ebs",
      "region": "us-east-1",
      "source_ami": "{{user `base_ami`}}",
      "instance_type": "{{user `instance_size`}}",
      "ssh_username": "{{user `ssh_username`}}",
      "ssh_timeout": "20m",
      "ami_name": "{{user `ami_name`}}",
      "ssh_pty": "true",
      "vpc_id": "{{user `vpc_id`}}",
      "subnet_id": "{{user `subnet_id`}}",
      "tags": {
        "Name": "App Name",
        "BuiltBy": "Packer"
      }
    }
  ],
  "description": "AWS image",
  "provisioners": [
    {
      "type": "shell",
      "inline": [
        "sudo yum update -y",
        "sudo yum install -y git"
      ]
    }
  ]
} - In GUI prompt
$ packer validate
$ packer build -var 'ami_name=ami-make1up' -var 'base_ami=ami-1853ac65' -var 'vpc_id=' -var 'subnet_id=' packer.json
- Copy AMI-ID & Verify in EC2

- In the root directory (of an instance), create a packerfile.json with the following contents:
- Create a variable called repository, the default values should be la/express.
- Create a variable called tag; the default values should be 1.0.
- It should use the Docker builder.
- The type should be docker.
- Set the author to use your name.
- Use the node image.
- Set commit to true.
- In the changes setting, expose port 3000.
- Create an inline shell provisioner. The provisioner will need to execute an apt-get update and install curl:
- Create a directory call code in /var.
- Use curl to download the application tar file to root: curl -L https://github.com/linuxacademy/content-nodejs-hello-world/archive/v1.0.tar.gz -o code.tar.gz
- Untar the file to /var/code. tar zxvf code.tar.gz -C /var/code --strip-components=1
- Go to /var/code and execute an npm install.
- Create a docker-tag post-processor:
- Set repository to use the repository variable.
- Set tag to use the tag variable.
$ echo '{
  "variables": {
    "repository": "la/express",
    "tag": "0.1.0"
  },
  "builders": [
    { "type": "docker",
      "author": "<your name>",
      "image": "node",
      "commit": "true",
      "changes": [
        "EXPOSE 3000"
      ]
    }
  ],
  "provisioners": [
    {
      "type": "shell",
      "inline": [
        "apt update && apt install curl -y",
        "mkdir -p /var/code",
        "cd /root",
        "curl -L https://github.com/linuxacademy/content-nodejs-hello-world/archive/v1.0.tar.gz -o code.tar.gz",
        "tar zxvf code.tar.gz -C /var/code --strip-components=1",
        "cd /var/code",
        "npm install"
        ]
    }
  ],
  "post-processors": [
    {
    "type": "docker-tag",
    "repository": "{{user `repository`}}",
    "tag": "{{user `tag`}}"
    }
  ]
}' > packerfile.json
- Validate the packerfile.json.
$ packer validate packerfile.json- Build the docker image by Executing packer build.
$ packer build --var 'repository=la/express' --var 'tag=0.0.1' packerfile.json
# show the images that exist
$ docker images- Start a Docker container by executing:
$ docker run -dt -p 80:3000 la/express:0.0.1 node /var/code/bin/www
# validate running
$ docker ps
$ curl localhost-
Idempotency - apply an operation multiple times without changing the result
- tools will avoid repeating tasks
- tools will maint the desired state when run multiple times
- Note: Puppet isn't idempotent by default - you have to force it!
-
Reasons for Configuration management:
- Quick provisioning of New Servers; Quick recovery
- Version Control for servers
- Replicated environments
- Resolves configuration drift from the desired state
- It's a problem is the configuration is lost!
- Automation plays a huge role in the solution!

- Puppet = declarative configuration management tool for *nix and Windows; client/server model
- Domain Specific Language (DSL) similar to Ruby
- Resource types:
- Users
- Groups
- Files/Directory
- Package
- Service
- Modules hold Manifest files
- Mainfest files hold resource types
$ puppet apply    // apply manifests locally to system
$ puppet agent    // apply manifests to puppet magest by applying catalog
$ puppet cert     // list and manage built-in cert authority
$ puppet module   // pull down modules or create our own
$ puppet resource // inspect or manipulate
$ puppet parse // validate puppet files-
Chef = configuration management tool written in Ruby; client/server model
-
recieps and cookbooks are written locally & need Chef Dev kit installed locally to test code
-
declarative approach
-
testing tools:
- cookstyle - ensure best practices and uniformity
- foodcritic - analyzed Ruby code against rules, enforce behaviors and returns violations
- chefspec - simulated run and looks for problems
- inspec - opensource testing framework for compliance
- Test Kitchen - tests cookbook across any platform, providers or testing suites
-
resources describe infrastructure
- Recipe groups Resources
- Cookbook structures Recipes
-
chef-client is the agent
- register and auth the node
- build the node object
- synch cookbooks
-
chef-server-ctl command line utility
- start and stop services
- reconfig server
- gather chef logs
- backup and restore chef server
$ chef-server-ctl
$ chef-server-ctl restore BACKUP_PATH
$ chef-server-ctl backup-recover
$ chef-server-ctl cleanse   // undo the recover or reconfigure
$ chef-server-ctl gather-logs
$ chef-server-ctl ha-status
$ chef-server-ctl show-config
$ chef-server-ctl  restart SERVICE_NAME
$ chef-server-ctl  service-list
$ chef-server-ctl  start SERVICE_NAME
$ chef-server-ctl  status
$ chef-server-ctl  stop SERVICE_NAME
$ chef-solo     // exec locally
$ knife         // interact with chef server
$ knife cookbook
$ knife cookbook generate COOKBOOK_NAME
$ knife cookbook delete COOKBOOK_NAME[version]
$ knife cookbook download COOKBOOK_NAME[version]
$ knife cookbook list
$ knife cookbook metadata
$ knife cookbook show COOKBOOK_NAME
$ knife cookbook upload COOKBOOK_NAME- Ansible = agentless IT automation tool for config mgmt, software provisioning, app
- Playbooks
- Multi-tier rollouts
- Default config loc
/etc/ansible/hosts - ANSIBLE_CONFIG - environment variables
- ansible.cfg - looks in current dir, home dir and
/etc/ansible/ansible.cfg
$ ansible
$ ansible-config
$ ansible-console   // REFL console for executing Ansible tasks
$ ansible-dock
$ ansible-galaxy    // upload rolls for sharing packages
$ ansible-inventory
$ ansible-playbook
$ ansible-pull
$ ansible-vault     // encrypt/decrypt secrets
$ ansible -i- Ansible Vault = used to encrypt sensitive data so you can share or place in source
$ ansible-playbook --ask-vault-pass
$ ansible-playbook --vault-password-file:<file>
$ ansible-vault create file.yml
$ ansible-vault edit file.yml
$ ansible-vault rekey file.yml
$ ansible-vault encrypt file.yml
$ ansible-vault decrypt file.yml
$ ansible-vault view file.yml
- On Ansible Server
$ adduser ansible
$ passwd ansible
$ visudo
> add under root to /etc/sudoers: ansible ALL=(ALL)    NOPASSWD: ALL
$ su ansible
$ ssh-keygen- On Client Server
$ adduser ansible
$ passwd ansible
$ visudo
> add under root to /etc/sudoers: ansible ALL=(ALL) NOPASSWD: ALL- On Ansible Server
$ ssh-copy-id <client_ip>
$ exit   // back to root
$ vi /etc/ansible/hosts
> add to the top of the file: client
$ cd /home/cloud_user
$ cp playbook.yml /home/ansible
$ chown ansible:ansible playbook.yml
$ su ansible -
$ ansible-playbook playbook.yml- On Client Server (as root)
$ elinks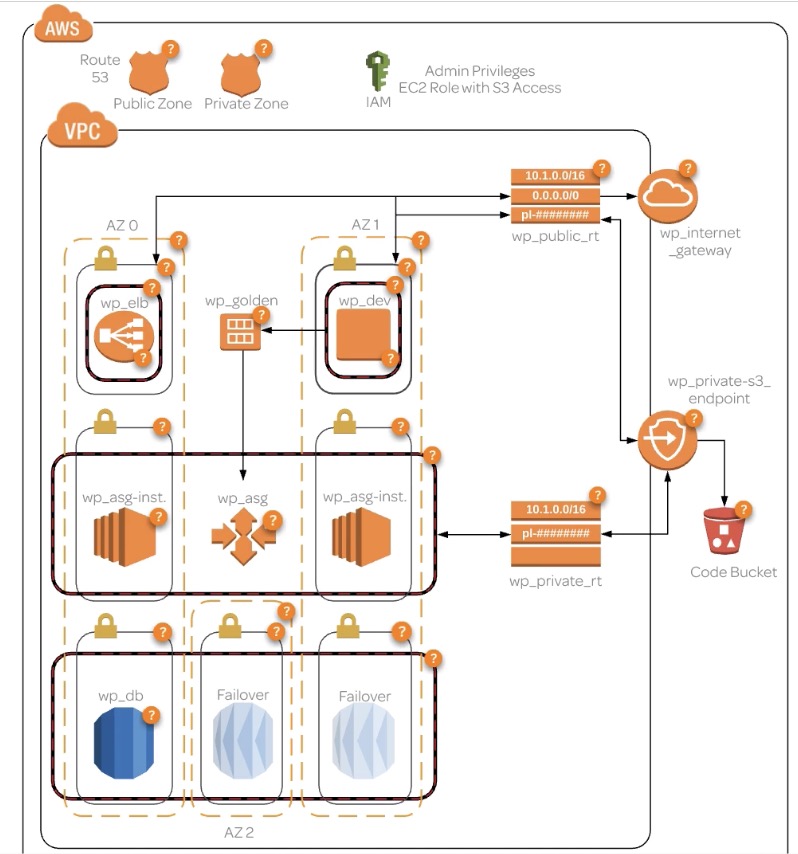
- a Private Hosted Zone which will have a CNAME to a database
- a Public Hosted Zone with a domain dev.domain to an EC2 bastion host and a www.domain with alias to ELB
- a wp_vpc (wordpress) with many subnets
- 2 public subnets for high available web servers
- 2 private subnets for EC2 instances with webservers the load balancer will pull from
- 3 private subnets for RDS databasers
- 2 route tables for public and private
- 1 IGW
- 4 SGs
- Private = All traffic, Source VPC IP Address
- Public = port 80, Source 0.0.0.0/0
- Dev = port 80 & 22, Source myIP
- RDS = port 3306, Source Other Security Groups in VPC
- 1 S3 Private Endpoint so autoscaling instances can access Code Bucket repos without access to the internet

- Setup Billing: Budgets: Create Budget, set name, period, start and end date, budgeted amt,
- THIS WILL ONLY NOTIFY YOU, NOT STOP ANYTHING
- Set Notifications!!!
- Note: When you run `$ terraform destroy' make sure it destroys the same number of resources that you created

- Dev server is created with WP
- Golden AMI is created to be used with launch configuration that deploys to autoscaling group
- Traffic to www.domain points to ELB, which accesses the autocaling group
- Code modified on dev env is forwarded to an S3 endpoint with a Code Bucket
- Script on the autoscaling instances pulls from the code bucket (set intervual)
- All servers are able to access the private zone domain db.domain

- Terraform will have admin priv in IAM
- Terraform builds the entire environment
- Terraform calls an ansible playbook
- Ansible provisions dev server using wordpress.yml
- Ansible creates Golden AMI for use by launch configuration to deploy instances to AG
- Developer access dev server via dev.domain
- Developer configures the db settings and connection
- Developer inidiates ansible to run the s3update.yml in dev env to deploy from dev to code bucket
- Autoscaling Group will pull the code from Code Bucket to connect to the db
- Traffic to www.domain will now go to ELB to access the webserver that access the db
- Create a Ubuntu EC2 instance
$ sudo su -
$ python --version
$ apt update
$ apt install python-pip
$ pip install --upgrade pip- Download terraform (can find the newest on the hashicorp site)
$ curl -O https://releases.hashicorp.com/terraform/0.11.2/terraform_0.11.2_linux_amd64.zip
$ mkdir /bin/terraform
$ unzip terraform* -d /bin/terraform
$ ls /bin/terraform- Add terraform to the system path
$ terraform --version
# NOTE: Can't be found because not in the path
$ export PATH=$PATH:/bin/terraform
$ terraform --version- Install AWS CLI
$ pip install awscli --upgrade
$ aws --version
$ apt update- Install Ansible
$ apt install software-properties-common
# probably already installed
$ apt-add-repository ppa:ansible/ansible
$ apt udpate
$ apt install ansible
$ ansible --version- Generate key to access server and add identity to ssh agent (MAY NEED TO RUN THIS AT EVERY LOGIN)
$ ssh-keygen
> /root/.ssh/kryptonite
$ ssh-agent bash
$ ssh-add ~/.ssh/kryptonite
$ ssh-add -l- Modify Ansible Config
$ apt install nano
$ nano /etc/ansible/ansible.cfg
# DISABLE:
> host_key_checking = false- Create working directory
$ mkdir terransible
$ cd terransible- Setup what can't be setup with terraform
- IAM: Add User: terransible; Programatic Access; Policy: Administrator Access; Create User; Download Credentials
- Route 53
- Have a domain purchased. If you use a different Registrar you will need to do a few extras
- Log into server and setup creds
- Recommended creating profile
$ sudo su -
$ aws configure --profile terransible_lab
$ aws ec2 describe-instances --profile terransible_lab
# NOTE: may not have any instances listed- Gather information for domain and create a Route53 Reusable Delegation Set
- Copy, paste and same this to a local file
$ aws route53 create-reusable-delegation-set --caller-reference 1234 --profile terransible_lab
$ nano route53.nfo
> paste delegation set in- Add delegation set to Route53
- Add/Edit Nameservers; Update

- Create files (two tf files for variables)
- NOTE: make sure you add *.tfvars to .gitignore
$ cd /home/user/terransible
$ touch main.tf terraform.tfvars variables.tf
$ touch userdata aws_hosts wordpress.yml s3update.yml$ terraform init
$ terraform plan- Main terraform file
- Declaration of variables
- All you variables that will change based upon implementation
- DO NOT UPLOAD THIS TO GITHUB
- Update S3 code bucket from DEV server
- Change the prod wp-config back to dev URL in the DEV environment
- Install Apache
- Download, Extract and Deploy Wordpress
- Verify:
- Your IP Address (or of the server your applying from)
- Delegation set ID is added to tfvars file
$ terraform fmt --diff
$ terraform plan
$ terraform apply- If you need to make changes, you can apply perform the above again!
- Go to dev.domain
- Create wordpress account and setup. Change settings to www.domain
- Any WP plug-in installed should be on the DEV instance - can add an S3 to store images
- Run the Code Bucket Ansible Playbook
$ ansible-playbook -i aws_hosts s3update.yml- Terraform: command not found - may need to add it to the path
- Key isn't added - need to ssh-add
- Ansible can't connect - check ansible.cfg host_key_checking = false
- Test a major change access -
ansible -i aws_hosts -u ec2-user -m ping dev
- What will happen if Terraform makes a change in a later version that isn't supported by your script?
- The script may break, Terraform does not automatically fix errors.
- What is one command that you can use to access your ssh agent?
- ssh-agent bash
- What two Route 53 Zone types are available?
- Public, Private
- What must be set to "False" in order for the Ansible-playbook to avoid issues connecting to an AWS instance for the first time?
- host_key_checking
- What is a prerequisite for installation of the AWS CLI
- python-pip
- What command allows you to setup your AWS CLI with your credentials and region?
- aws configure
- What three things could cause your Ansible Playbook called by Terraform not to run successfully on the AWS instance?
- key not added to ssh-agent, Incorrect Security Group rules, host_key_checking set to true
- What happens if a variable defined in your main.tf (or other infrastructure) file is not listed in your variables.tf file?
- The apply will fail
- What punctuation is used to encapsulate a list of multiple items in a Terraform *.tf file.
- brackets
- What Terraform command will deploy the scripted infrastructure?
- terraform apply
- What Terraform command will "clean up" the code in the tf files?
- terraform fmt
- What switch for the command that runs an Ansible Playbook is used to specify a custom inventory file?
- -i
- What command runs an Ansible Playbook?
- ansible-playbook
- What AWS feature allows us to access AWS repositories privately as well as the S3 bucket all without using an Internet Gateway for our instances?
- S3 VPC Endpoint
- What must be modified for the Terraform command to run by just using the command "Terraform"?
- The PATH
- What command will initialize the Terraform directory and download required plugins?
- terraform init
- What happens if you don't specify the value of a variable in the variables.tf file in the terraform.tfvars file?
- A terraform apply will ask you for the value before applying
- What AWS product allows us to server traffic to multiple private instances without exposing them to the public?
- Elastic Load Balancer
- When creating your static nameservers used in Route 53, where must you set those nameservers in order for the deployment to work correctly and the zones to propagate to the internet?
- nameservers field in your registrar
- What command will allow you to list keys associated with your ssh-agent?
- ssh-add -l
- What Route 53 feature allows you to reuse nameservers for multiple deployments?
- reusable-delegation-set
- Containers = application with all it's parts and dependencies in a loosely isolated environment
- Docker = make it easy to create, deploy and run apps by using containers running on the host kernel
- Components:
- server as a daemon
- REST API
- CLI
- Docker Images - built from a series of layers based upon instructions in the Dockerfile
- only last layer is not read-only
- difference between a comainer and an image is the image is a container + writable layer
- Docker Volumes - Used to handle persistent data in docker because easy to backup
- Docker Networks - connect containers together or non-docker workloads
- Bridged network connection - software bridge fwds traffic between segments and isolates containers
- Host network - docker uses directly
- Overlay - allow swarm services
- Macvlan - allows assignment of MAC access to physical interface of a container
- Overlay network - sits on top of host network to create a distributed network
- Dockerfile - instructions for automatically building Docker images
- executed in order!
- can use environment variables ${variable_name}
- FROM instruction - base image
- RUN to execute command
- CMD defaults from an executin container
- LABEL is metadata
- MAINTAINER is the autoerh of the generated images
- EXPOSE informs docker that a container listens on a network port
- ENV sets environment variable
- ADD copies files/dirs to the Docker image
- COPY copies files/dirs to the Docker container
- ENTRYPOINT allows you to config a container that will run as an executable
- VOLUME is the mount point
- USER sets the user name instructions are exec as
- WORKDIR
- ARG defines a variable that users can pass at build-time
$ docker attach    // attach to a running container (like SSH but if you detach you shut it down)
$ docker build     // build image from a Dockerfile
$ docker exec      // run a command in a running container
$ docker exec -it nginx-test /bin/bash   // connect to this container with a bash shell
$ docker images
$ docker inspect . // low level info about Docker object
$ docker logs
$ docker network
$ docker network inspect <network-name>
$ docker node .     // manage swarm nodes
$ docker ps .       // list running continares (-a --all)
$ docker pull       // retrieve from registry
$ docker push       // push to a registry
$ docker restart
$ docker rm         // remove container
$ docker rmi        // remove images
$ docker run        // run a command in a new container
$ docker run -d --name=static-site -p 80:80 la/static:latest
$ docker start / stop
$ docker swarm
$ docker volume     // manage volumes
$ docker volume ls
$ docker volume rm <volume>- pull down repo
$ git clone https://github.com/linuxacademy/content-express-demo-app.git- create dockerfile
FROM node

RUN mkdir -p /var/node
ADD content-express-demo-app/ /var/node
WORKDIR /var/node
RUN npm install

CMD bin/www- build image
$ docker build -t la/app-node -f Dockerfile .
$ docker images- Create Dockerfile
FROM nginx
VOLUME /usr/share/nginx/html
VOLUME /var/log/nginx
WORKDIR /usr/share/nginx/html- Build image
$ docker build -t la/static-site:latest -f Dockerfile .
$ docker images- Create volume for NGINX code and logs
$ sudo su
$ docker volume create nginx-code
$ docker volume create nginx-logs
$ docker volume ls
$ docker run -d --name=static-side -p 80:80 --mount source=nginx-code,target=/usr/share/nginx/html --mount source=nginx-logs,target=/var/log/nginx la/static-site:latest
$ docker ps
$ ls /var/lib/docker/volumes
$ ls /var/lib/docker/volumes/nginx-code/_data/
$ vi /var/lib/docker/volumes/nginx-code/_data/index.html- look at the webpage served from the IP address
- Create network: App-bridge on nginx
$ docker network create app-bridge
$ docker network ls
$ docker run -dt --name my-app --network app-bridge nginx:latest
$ docker ps
$ docker inspect <name>- Docker Compose = install Compose to use a yml file to deploy multi-container Docker applications
- file must be called docker-compose.yml unless you use
$ docker-compose -f - for instance, run nginx in one container and redis in another
- file must be called docker-compose.yml unless you use
$ docker-compose build -h
$ docker-compose up         // runs in forground
$ docker-compose up -d      // runs not in forground (detach mode)
$ docker-compose ps
$ docker-compose start stop // runs in background
$ docker-compose rm         // delete the build (only)
$ docker-compose logs
$ docker-compose pause unpause
$ docker-compose down       // stop and remove all container, networks, etc
$ docker-compose restart- Dockerfile
FROM nginx
WORKDIR /usr/share/nginx/html
COPY index.html ./- docker-compose.yml
version: `3.3`
services:
  redis:
    image: redis:latest
  webapp:
    build:
      context: ./build
      dockerfile: Dockerfile
    volumes:
      - nginx-vol:/usr/share/nginx/html
    networks:
      - nginx-net
    links:
      - redis
volumes:
  nginx-vol:
networks:
nginx-net:- check, build and bring up nginx container linked to redis
$ docker-compose config
$ docker-compose build
$ docker-compose up -d- another set of linked servers - APACHE <-> SQL
version: `3.3`
services:
  db:
    image: mysql:5.7
    volumes:
      - db_data:/bar/lib/mysql
    restart: always
    environment:
      MYSQL_ROOT_PASSWORD: R@@tP4SSw3333rd
      MYSQL_DATABASE: app_name
      MYSQL_USER: db_user
      MYSQL_PASSWORD: 4pp_R@@tP4SSw3333rd
  webapp:
    image: php:7.0-apache
    volumes:
      - app_data:/var/www/html
      - app_logs:/var/logs/apache2
    restart: always
    links:
      - db
volumes:
  db_data:
  app_data:
app_logs:- Kubernetes = Open source container orchestration tool developed by Google for their workloads
- container deployment and rollout controls
- will keep containers running and handle control changes
- allows custom settings for compute and memory
- cluster can run anywhere with a mix of virtual env, on prem, etc
- has built in service discover and autoscaling
- clusters linked so if one goes down the other can take over
- Pod = Processes running on a cluster, representing a unit of a deployment (single container or tightly coupled containers)
- no persistence in a pod, to protect the data, create a replicaset
- deployments are better to use than a replicaset
$ kubectl get pod nginx-pod-demo
$ kubectl create -f pod.yml
$ kubectl delete pod nginx-pod-demo
$ kubectl create -f replicaset.yml
$ kubectl get replicasets
$ kubectl get pods
$ kubectl delete pod <pod-name>   // a new one will automatically be created in it's place
$ kubeget pods
$ kubectl scale --replicas=4 replicaset/replicaset-demo   // bump up to 4
$ kubectl delete replicaset <replicaset-name>             // to get rid of replciaset
#
$ kubectl get deployments
$ kubectl scale --replicas=4 deployment/nginx-deployment
$ kubectl delete deployment nginx-deployment- Create 2 "Cloud Native Kubernetes" Servers
- Setup master
$ kubeadm init --pod-network-cidr=10.244.0.0/16
$ mkdir -p $HOME/.kube
$ sudo cp -i /etc/kubernetes/admin.conf $HOME/.kube/config
$ sudo chown $(id -u):$(id -g) $HOME/.kube/config- Install flannel on master
$ kubectl apply -f https://raw.githubusercontent.com/coreos/flannel/v0.9.1/Documentation/kube-flannel.yml- Grab the
$ kube joincommand from the master to paste into the 2nd server - On the master run
$ kubectl get nodesand you should see both servers
- RESTful APIs - Stateless REpresentrational State Transfer w/ a separation of client and server
- REST requires a client make a request to the server (Includes: HTTP verb, Header, Resource path, Message body) and Server sends content type and response code
- HTTP verbs: GET, POST, PUT, DELETE
- CRUD: Create, Read, Update, Delete
- Header content: Accept, MIME,
- Paths: must have a representational path such as /customers or /customers/:id
- Response: 200 OK, 201 Resource created, 202 Accepted, 204 No Content to return, 400 Bad Request, 401 Unauthorized, 403 Forbidden, 404 Not Found, 405 Not Allowed, 409 Conflict, 500 Server Error
- SOA - Service Oriented Architecture is a distributed systems architecture that is loosely coupled, uses standard interfaces and protocols and has seamless cross-platform integration
- Building a service must be a logical presentation of a business activity that is self-contained
- Standardized service description docs, autonomous, discoverable, reusable
- SOA
- Microservices - Variant of SOA, more fine grained but small and loosely coupled, modular, flexible, scalable, maintainable
- Better than monolithic architecture because services are small and lower impact deployments
- Protocols must be lightweight (like rest or message queueing)
- Independent: Codebase, Running processes, Built independently, Deployed independently, Scaled independently,
- Easy ti use CI/CD
- AccuRev
- CVS
- Subversion
- Git
- Mercurial
- Perforce
- ClearCase
- RTC
- Agile is a set of values and principles that break down solos in oranizations by using: Active planning, Evolutionary dev, Early delivery, CI, Rapid and flexible response
- Individuals and interactions more than processes and tools
- Working software more than comprehensive documentation
- Collaboration vs negotiation
- Respond to change!
- Iteriations: Define/plan, Develop, Integrate and Test, Review, Feedback, Release/Incorporate, Adjust/Track, REPEAT
- Repetition of a very short dev cycle
- Write test case around model, run (fails), write some code, run test, refactor code, REPEAT
- Continuous Integration - practice of frequently merging code; execution of automated tests to verify the build; execution of automated tests = A LOT OF WORK
- CI Server - developer commits code to CI server and automatically performs a buildl executes tests and notifies if the build fails
- WHY?
- Early detection of certain types of bugs to eliminate problems with bugs in large releases
- Allows for continuous testing
- Encourages good coding practices
- Continuous Delivery - practice of continuously maintaining code in a deployable state; code always in a deployable state and can take minutes
- CD Stages: automated build, automated test, manual acceptance testing = deployable artifact or package & deployment to prod
- WHY?
- New features to customers quicker
- Less rollback and smaller rollback with small problems or bugs = Lower risk
- Fearless deployments
-
Jenkins = self-contained open source automation tool built in Java 8 for building, testing, deliverying and delopying and suports version control tools
-
Avail: Docker image, Java 8 WAR archive, source code, package manager
-
Interface: CLI, Web GUI, REST APIs
-
Vocab:
- Artifact - immutable file generated by a build, archived by Jenkins
- Core - Primary Jenkins application (all pluggins built on)
- Downstream - trigger other projects of pipelines are "downstream"
- Fingerprint - hash to track
- Master - Central process that controlls config, pluggins, renders UIs
- Node - capable of exec pipelines and projects
- Project - User configured desc of work used to test or deploy code
- Pipeline - USer defined model of CD pipeline
- Plugin
- Stage - Part of a pipeline defining distinct subets of a pipeline
- Step - USed in pipelines and projets
- Upstream - triggered by something
- Workspace - disposable dir on filesystem executing the work
-
Pluggin:
- Copy Artifact - copy articact from one project to another
- Fingerprint - generates as a build set
- Docker Pipeline - build and use a container from a pipeline
- Docker Build & Publish - build docker image and public results to a docker registry
- Git - pull from github
-
Artifact repository = used with Jenkins to produce binary artifacts; source control for binary artiface (uses artifactory and nexus)
-
Artifactory - support for docker, yum, apt, npm, maven, NuGet, Ruby gems, Chef supermarket, Puppet forge, Python pypy server
- Git isn't the best for binary but you can point to git
- supports orchistraton tools (such as Chef, Kube, Helm, Mesos, Puppet, Docker Swarm)
- Storage can use S3, GCP Storage, Azure blob
-
Nexus - supports repo tools and IDEs
-
Jenkins Pluggins - Used to extend Jenkins; access from the GUI:8080
- jenkins.wiki.io
$ yum install -y java
$ wget -O /etc/yum.repos.d/jenkins.repo http://pkg.jenkins-ci.org/redhat/jenkins.repo
$ rpm --import https://jenkins-ci.org/redhat/jenkins-ci.org.key
$ yum install -y java
$ yum install -y jenkins
$ service jenkins start
# make sure jenkins always startes up upon reboot
$ chkconfig jenkins- Setup on GUI:8080
$ cat /var/lib/jenkins/secrets/initialAdminPassword- Junkins Slave
- Docker Certification Distro (versus CentOS)
- install:
#### ON SLAVE SERVER
$ yum install java -y
$ useradd -d /var/lib/jenkins jenkins
$ su jenkins -s /bin/bash
$ cd /var/lib/jenkins
$ mkdir .ssh
$ chmod 700 .ssh/
$ cd .ssh
$ touch authorized_keys
# drop back to root
$ exit
$ passwd jenkins
#### ON MASTER SERVER
$ su jenkins -s /bin/bash
$ ssh-keygen
$ ssh-copy-id jenkins@slaveserver
### ON SLAVE SERVER
$ cat /var/lib/jenkins/.ssh/authorized_keys
# you will now see the MASTER SERVER key is copies to the SLAVE SERVER
$ su jenkins -s /bin/bash
$ cd /var/lib/jenkins
$ chmod 700 .ssh/
$ chmod 600 authorized_keys
### ON MASTER SERVER
$ ssh jenkins@slaveserver-
Browser to masterserver:8080
-
Manage Jenkins: Manage nodes: New node "slave node"
-
Set executors as 2, remote dir /var/lib/jenkins
-
Launch slave agents via SSH, Host: slaveserver, Credentials: SSH Username w/ private key: username: Jenkins, From home master, Manual trusted key verification strategy
-
Install packer into bin, install unzip, install git
-
Setup on Github
- Get the public key, copy and paste into SSH & GPG keys
$ cat /var/lib/jenkins/.ssh/id_rsa.pub- Jenkins: Create new job: "Docker Build with Packer", Freestype Projects
- Restrict where project can be run, enter build slave,
- This project is paramarized, name: repo_name, default value: la/express
- Source code: git
- Clone or download SSH link, paste into Repo URL
- Build, execute shell, Command: /usr/local/bin/packer build -var "repository=${repo_name}" -var "tag=${BUILD_NUMBER}" packer.json
- Save, Build w/ parameters
- On Slave CLI:
$ docker images
$ ls /var/lib/jenkins/workspace- New item: Freestyle Project: "NodeJSTDD"
- Git: https://github.com/linuxacademy/content-lpic-ot-701-tdd.git
- Color ANSI Console Output: xterm
- Build step: Execute shell:
$ npm install
$ npm test- Add post action build: Publish JUunit Test Results: report.xml
- Save: Build Now
- Add port to firewall, reload firewall and check open ports
$ firewall-cmd --zone=public --permanent --add-port=8080/tcp
$ firewall-cmd --reload
$ firewall-cmd --zone=public --permanent --list-ports
$ cat /var/lib/jenkins/secrets/initialAdminPassword- create admin
- Create New Job: "BuildAppImage" as FreeStyle Project
- This Project is Paramaterized and "string"
- Name: repo_name; value: la/express;
- Source code Management: Git; https://github.com/linuxacademy/content-lpic-ot-701-packer-docker
- Execute Shell; Command: /user/local/bin/packer build -var "repository=${repo_name}" - var "tag=${BUILD_NUMBER}" packer.json
- Execute Build: Build
$ docker images- Pro versus Community - all the capabilities, not as pretty
- Possible to get using
$ vagrant up
[EDIT]