3.3 Model
Now it is time to get our hands dirty and start creating the actual loading code. The goal of this tutorial is to create another class that represents a model in its entirety, that is, a model that contains multiple meshes, possibly with multiple objects. A house, that contains a wooden balcony, a tower and perhaps a swimming pool could still be loaded as a single model. We'll load the model from a OBJ file and turn it into TMesh objects we've created in the [last](3.2 Mesh) tutorial.
Without further ado, I present you the class structure of the IModel interface and corresponding TModel class:
type
  IModel = interface
  ['{29B5AB25-129C-4CA6-B368-146577F298F6}']
    procedure Draw;
  end;

type
  TModel = class(TInterfacedObject, IModel)
  private
    FMeshes: TObjectList<TMesh>;
    FDirectory: String;
    FShader: IShader;
  private
    procedure LoadModel(const APath: String);
    ...
  protected
    { IModel }
    procedure Draw;
  public
    constructor Create(const APath: String; const AShader: IShader);
    destructor Destroy; override;
  end;
The TModel class contains a list of TMesh objects and requires us to give it a file location (in assets.zip) in its constructor. It then loads the file right away via the LoadModel method that is called in the constructor. We also store the directory of the file path that we'll later need when loading the material library and textures.
The Draw method is nothing special and basically loops over each of the meshes to call their respective Draw method:
procedure TModel.Draw;
var
  I: Integer;
begin
  for I := 0 to FMeshes.Count - 1 do
    FMeshes[I].Draw;
end;
ℹ️ instead of a
for..toloop, you can also use afor..inloop here (as infor Mesh in FMeshes do). However, using enumerators is a bit less efficient than using plainforloops, so I tend to avoid them in places where performance is important (although that is arguably not the case here).
With the help of the TParser class we created in the last tutorial, the LoadModel method can look like this:
procedure TModel.LoadModel(const APath: String);
var
  Parser: TParser;
begin
  FDirectory := TPath.GetDirectoryName(APath) + '/';
  Parser := TParser.Create(APath);
  try
    ParseOBJ(Parser);
  finally
    Parser.Free;
  end;
end;
Note that we extract the directory name from the file path since we need it later to locate material libraries and textures. (Remember to use forward slashes (/) instead of back slashes, since forward slashes work on all platforms).
Parsing an OBJ file now reduces to reading commands and arguments until the end of the file has been reached, and handling each command we want to support:
procedure TModel.ParseOBJ(const AParser: TParser);
var
  Command, Arg1, Arg2, Arg3: String;
  Position: TVector3;
  TexCoord: TVector2;
begin
  while AParser.ReadLine(Command, Arg1, Arg2, Arg3) do
  begin
    case Command.Chars[0] of
      'f': if (Command = 'f') then
             { Parse face vertex... };

      'm': if (Command = 'mtllib') then
             LoadMtlLib(Arg1);

      'o': if (Command = 'o') then
             { Start a new object/mesh. Store previous mesh if any. }
             StoreMesh;

      'u': if (Command = 'usemtl') then
           begin
             { 1. Lookup material in material library (using Arg1 as material name). }
             { 2. Load the textures for the material by calling LoadMaterialTexture }
             { 3. Add the textures to the list of textures... }
           end;

      'v': if (Command = 'v') then
           begin
             Position := ToVector3(Arg1, Arg2, Arg3);
             { Add position to list of positions... }
           end
           else if (Command = 'vt') then
           begin
             TexCoord := ToVector2(Arg1, Arg2);
             { Flip Y coordinate to make texture align with OpenGL }
             TexCoord.Y := 1 - TexCoord.Y;
             { Add texture coordinate to list of texture coordinates... }
           end
           else if (Command = 'vn') then
             { Add normal to list of normals... }
  end;
  StoreMesh;
end;
A little trick I often use when recognizing a string (like a Command in this example) is to use the first character of the string in a case-statement. This is faster than creating one long if-then-else chain for each possible value. (You could also use a dictionary to look up strings, but this method is even faster).
I did not show the source code for each specific command here. There are a few helper records and methods involved in handling these commands, and it would be too much code to show here. Besides, we want to focus this tutorial series on OpenGL and not on file parsing. But if you are interested in the inner workings, then by all means consult the source code in the Sample.Classes unit.
I'll just highlight some pieces and gotcha's here.
The ToVector3 helper just converts 3 strings to a TVector3 record:
class function TModel.ToVector3(const AX, AY, AZ: String): TVector3;
begin
  Result.X := StrToFloat(AX, USFormatSettings);
  Result.Y := StrToFloat(AY, USFormatSettings);
  Result.Z := StrToFloat(AZ, USFormatSettings);
end;
As you might expect, this resolves to just a call to StrToFloat. Beware however that floating-point values in OBJ files always use periods (.) to separate decimals. By default, StrToFloat will use a decimal separator that is specific to the current region. If that is not a period (but a comma (,) for example), then parsing will fail. So it is always a good idea to create a custom TFormatSettings record that always sets the decimal separator to a period:
USFormatSettings := TFormatSettings.Create('en-US');
USFormatSettings.ThousandSeparator := ',';
USFormatSettings.DecimalSeparator := '.';
Also note that when parsing texture coordinates, the that Y coordinate is flipped (TexCoord.Y := 1 - TexCoord.Y;). This is to account for images files being loaded top-down while OpenGL expects them bottom-up.
To code above hints to a call to LoadMaterialTexture that is used to load a texture that is defined in the material library. This method looks like this:
function TModel.LoadMaterialTexture(const AFilename: String;
  const AKind: TTextureKind): TTexture;
begin
  Result.Load(FDirectory + AFilename, AKind);
end;
It just calls TTexture.Load to load the image file from assets.zip from the same directory as where the OBJ file is located:
ℹ️ Note that we make the assumption that texture file paths in model files are local to the actual model object e.g. in the same directory as the location of the model itself.
Some models found over the internet still use absolute paths for their texture locations which won't work on each machine. In that case you probably want to manually edit the file to use local paths for the textures (if possible).
procedure TTexture.Load(const APath: String; const AKind: TTextureKind);
var
  Width, Height, Components: Integer;
  Data: TBytes;
  Image: Pointer;
  SupportsMipmaps: Boolean;
begin
  FKind := AKind;

  { Generate OpenGL texture }
  glGenTextures(1, @FId);
  glBindTexture(GL_TEXTURE_2D, FId);

  { Load texture }
  Data := TAssets.Load(APath);
  Assert(Assigned(Data));
  Image := stbi_load_from_memory(Data, Length(Data), Width, Height, Components, 3);
  Assert(Assigned(Image));

  { Set texture data }
  glTexImage2D(GL_TEXTURE_2D, 0, GL_RGB, Width, Height, 0, GL_RGB, GL_UNSIGNED_BYTE, Image);

  { Generate mipmaps if possible. With OpenGL ES, mipmaps are only supported
    if both dimensions are a power of two. }
  SupportsMipmaps := IsPowerOfTwo(Width) and IsPowerOfTwo(Height);
  if (SupportsMipmaps) then
    glGenerateMipmap(GL_TEXTURE_2D);

  { Set texture parameters }
  glTexParameteri(GL_TEXTURE_2D, GL_TEXTURE_WRAP_S, GL_REPEAT);
  glTexParameteri(GL_TEXTURE_2D, GL_TEXTURE_WRAP_T, GL_REPEAT);

  glTexParameteri(GL_TEXTURE_2D, GL_TEXTURE_MAG_FILTER, GL_LINEAR);
  if (SupportsMipmaps) then
    glTexParameteri(GL_TEXTURE_2D, GL_TEXTURE_MIN_FILTER, GL_LINEAR_MIPMAP_LINEAR)
  else
    glTexParameteri(GL_TEXTURE_2D, GL_TEXTURE_MIN_FILTER, GL_LINEAR);

  { Free original image }
  stbi_image_free(Image);

  { Unbind }
  glBindTexture(GL_TEXTURE_2D, 0);
  glErrorCheck;
end;
This code should be familiar from [previous](1.4 Textures) tutorials. It loads the image using the Stb-Image library and converts it to an OpenGL texture. One thing to note here is that we only enable mipmaps (and mipmap filtering) if the width and height of the texture are both a power of two. As you may recall from the [Textures](1.4 Textures) tutorial, this is a requirement of OpenGL ES 2.0.
The IsPowerOfTwo function uses a simple bit hack from the Bit Twiddling Hacks web page:
function IsPowerOfTwo(const AValue: Cardinal): Boolean; inline;
begin
  Result := ((AValue and (AValue - 1)) = 0);
end;The most interesting part of the TModel.ParseOBJ method is the call to StoreMesh, which converts the currently parsed positions, texture coordinates, normals and textures into a mesh:
type
  TFaceVertex = packed record
    PositionIndex: UInt16;
    NormalIndex: UInt16;
    TexCoordIndex: UInt16;
  end;

procedure StoreMesh;
var
  Mesh: TMesh;
  V, Vn: TArray<TVector3>;
  Vt: TArray<TVector2>;
  F: TArray<TFaceVertex>;
  Vertices: TArray<TVertex>;
  Indices: TArray<UInt16>;
  Textures: TArray<TTexture>;
  I: Integer;
begin
  { ... at this point, the currently parsed positions, texture coordinates etc.
    will be in the V, Vt, Vn, F and Textures arrays... }

  SetLength(Vertices, Length(F));
  SetLength(Indices, Length(F));
  for I := 0 to Length(F) - 1 do
  begin
    Indices[I] := I;
    Vertices[I].Position := V[F[I].PositionIndex];
    Vertices[I].Normal := Vn[F[I].NormalIndex];
    Vertices[I].TexCoords := Vt[F[I].TexCoordIndex];
  end;

  Mesh := TMesh.Create(Vertices, Indices, Textures, FShader);
  FMeshes.Add(Mesh);
end;
While parsing the OBJ file, the arrays V, Vn, Vt, F and Textures will be populated with positions, normals, texture coordinates, face definitions and textures respectively. We need to convert this data to an array of TVertex records (called Vertices) and an array of indices into these vertices (called Indices).
The F array contains 3 vertices for each triangle. Each vertex defines the indices into the V, Vn and Vt arrays. So, to convert the data, we walk through every face vertex in the F array and lookup it corresponding position, normal and texture coordinate in the V, Vn and Vt arrays.
The Indices array is super simple to populate: we just set each value to its corresponding index.
ℹ️ Note that we could optimize the creation of the
Verticesarray here by checking for duplicate face vertices in theFarray and sharing those vertices. However, we keep it simple here and convert eachTFaceVertexto aTVertexand create a simple sequential array ofIndices.
Back in the TModel.ParseOBJ method, you'll see that the LoadMtlLib method is called when the mtllib command is encountered. Parsing a MTL file is similar to parsing an OBJ file:
procedure TModel.LoadMtlLib(const APath: String);
var
  Parser: TParser;
begin
  Parser := TParser.Create(FDirectory + APath);
  try
    ParseMTL(Parser);
  finally
    Parser.Free;
  end;
end;

procedure TModel.ParseMTL(const AParser: TParser);
var
  Command, Arg1, Arg2, Arg3: String;
begin
  while AParser.ReadLine(Command, Arg1, Arg2, Arg3) do
  begin
    if (Command = 'newmtl') then
      { Start a new material. Store previous material if any.... }
    else if (Command.StartsWith('map_')) then
    begin
      { We only care about the "map_*" commands }

      if (Command = 'map_Kd') then
        { Add Arg1 to the list of diffuse maps... }
      else if (Command = 'map_Ks') then
        { Add Arg1 to the list of specular maps... }
    end;
  end;

  { Store the last parsed material... }
end;
Nothing new here. Refer the the [OBJ Files](3.1 OBJ Files) tutorial to fresh up on the MTL file format.
We're not completely done yet, since there is still a large (but not completely necessary) optimization we want to make. Most scenes re-use several of their textures onto several meshes; think of a house again that has a granite texture for its walls. This texture could also be applied to the floor, its ceilings, the staircase, perhaps a table and maybe even a small well close by. Loading textures is not a cheap operation and in our current implementation a new texture is loaded and generated for each mesh even though the exact same texture has been loaded several times before. This quickly becomes the bottleneck of your model loading implementation.
So we're going to add one small tweak to the model code by storing all of the loaded textures globally and wherever we want to load a texture we first check if it hasn't been loaded already. If so, we take that texture and skip the entire loading routine saving us lots of processing power. To be able to actually compare textures we need to store all the loaded textures in a dictionary that is indexed by the file path:
type
  TModel = class(TInterfacedObject, IModel)
  private
    FMeshes: TObjectList<TMesh>;
    FLoadedTextures: TDictionary<String, TTexture>;
    ...
  end;
Then in the LoadMaterialTexture method we check if the texture has already been loaded by looking it up in the dictionary (using a case-insensitive file path). If found, we skip the texture loading/generation part and simply use the located texture record as the mesh's texture. If not found, we create a texture and add it to the dictionary. The (updated) method is shown below:
function TModel.LoadMaterialTexture(const AFilename: String;
  const AKind: TTextureKind): TTexture;
var
  LowerFilename: String;
begin
  LowerFilename := AFilename.ToLower;
  if (FLoadedTextures.TryGetValue(LowerFilename, Result)) then
    Exit;

  Result.Load(FDirectory + AFilename, AKind);
  FLoadedTextures.Add(LowerFilename, Result);
end;
So now we do not only have an extremely versatile model loading system, but we also have an optimized one that loads objects quite fast.
⚠️ Loading 3D models can still be quite slow though, because the model file has to be parsed and all textures must be loaded and decompressed (from JPEG or PNG format). To speed up the loading process, you usually convert model files to a binary format that is compact and fast to load. You also may want to use texture compression to store textures in a compressed format that the GPU understands, so it doesn't have to decompressed when loaded, and saves memory on the GPU. One problem with that approach though is that different systems support different compressed texture formats. For example, on iOS you should stick to the PVRTC format, and on Android you would best stick to the ETC format. On Windows and macOS there are yet other formats that may be supported directly by the GPU.
So let's give our implementation a spin by actually importing a model created by genuine artists, not something done by the creative genius that I am (you got to admit, those containers were probably one of the most beautiful cubical shapes you've seen). Because I don't want to give myself too much credit I'll occasionally allow some other artists to join the ranks and this time we're going to load the original nanosuit used by Crytek's game Crysis. The model is exported as a .obj file together with a .mtl file that contains the model's diffuse, specular and normal maps (more about those later). The model is part of the assets.zip file in the source code repository.
ℹ️ The version in the repository is a modified version where each texture file path was modified to a local relative path instead of an absolute path if downloaded from the original source. The same goes for other model files used in tutorials to come.
Now in the code, declare an IModel variable and pass in the model's file location in the constructor. The model should then automatically load and (if there were no errors) draw the object in the game loop using its Draw function and that is it. No more buffer allocations, attribute pointers and render commands, just a simple one-liner:
var
  OurModel: IModel;
begin
  { During initialization: }
  OurModel := TModel.Create('models/nanosuit.obj', FShader);

  { Each frame: }
  OurModel.Draw;
end;
Then if you create a simple set of shaders where the fragment shader only outputs the object's diffuse texture color the result looks a bit like this:
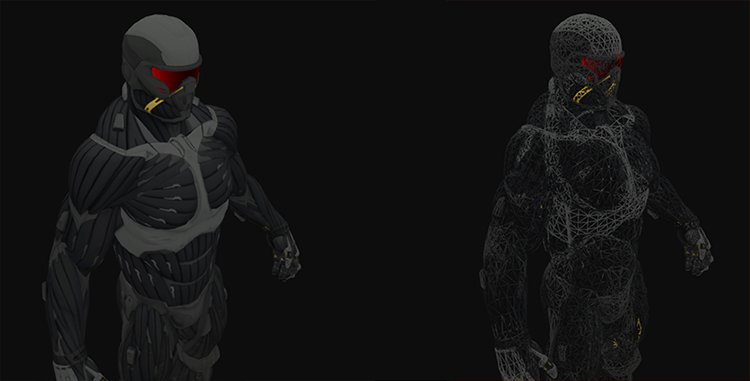
You can find the complete source code here.
We could also get more creative and introduce two point lights to the render equation as we learned from the [Lighting](2.5 Light Casters) tutorials and together with specular maps get amazing results:
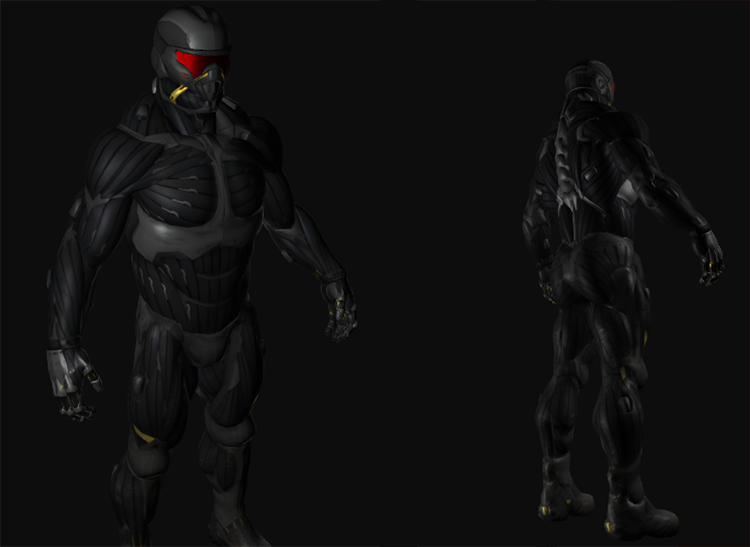
Even I have to admit that this is maybe a bit more fancy than the containers we've used so far. There are quite a few resource websites that offer free 3D models for you to download in OBJ/MTL format. Do note that some models still won't load properly, have texture paths that won't work or might use OBJ features that we don't support. Another reason to use your own binary model format...
| ⬅️ [3.2 Mesh](3.2 Mesh) | Contents | [4.1 Depth Testing](4.1 Depth Testing) ➡️ |
|---|