4.3 Blending
Blending in OpenGL is also commonly known as the technique to implement transparency within objects. Transparency is all about objects (or parts of them) not having a solid color, but having a combination of colors from the object itself and any other object behind it with varying intensity. A colored glass window is a transparent object; the glass has a color of its own, but the resulting color contains the colors of all the objects behind the glass as well. This is also where the name blending comes from, since we blend several colors (of different objects) to a single color. Transparency thus allows us to see through objects.
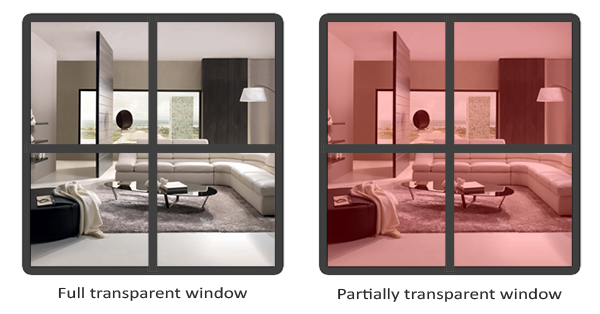
Transparent objects can be completely transparent (it lets all colors through) or partially transparent (it lets colors through, but also shows some of its own colors). The amount of transparency of an object is defined by its color's alpha value. The alpha color value is the 4th component of a color vector that you've probably seen quite often now. Until this tutorial, we've always kept this 4th component at a value of 1.0 giving the object 0.0 transparency, while an alpha value of 0.0 would result in the object having complete transparency. An alpha value of 0.5 tells us the object's color consist of 50% of its own color and 50% of the colors behind the object.
The textures we've used so far all consisted of 3 color components: red, green and blue, but some textures also have an embedded alpha channel that contains an alpha value per texel. This alpha value tells us exactly which parts of the texture have transparency and by how much. For example, the following window texture has an alpha value of 0.25 at its glass part (it would normally be completely red, but since it has 75% transparency it largely shows the website's background through it, making it seem a lot less red) and an alpha value of 0.0 at its corners:

We'll soon be adding this windowed texture to the scene, but first we'll discuss an easier technique to implement transparency for textures that are either fully transparent or fully opaque.
Some images do not care about partial transparency, but either want to show something or nothing at all based on the color value of a texture. Think of grass; to create something like grass with little effort you generally paste a grass texture onto a 2D quad and place that quad into your scene. However, grass isn't exactly shaped like a 2D square so you only want to display some parts of the grass texture and ignore the others.
The following texture is exactly such a texture where it either is full opaque (an alpha value of 1.0) or it is fully transparent (an alpha value of 0.0) and nothing in between. You can see that wherever there is no grass, the image shows the website's background color instead of its own.

So when adding vegetation like grass to your scene we don't want to see a square image of grass, but rather only show the actual grass and be able to see through the rest of the image. We want to discard the fragments that show the transparent parts of the texture, not storing the fragment into the color buffer. Before we get into that we first need to learn how to load a transparent texture.
To load textures with alpha values we need to tell Stb-Image to load the RGBA (4) components of the image instead of the RGB (3) components. Note that Stb-Image will still load most alpha-less textures just fine, it simply stores an alpha value of 1.0 wherever one is omitted.
{ Request 4 components (RGBA) instead of 3 (RGB) }
Image := stbi_load_from_memory(Data, Length(Data), Width, Height, Components, 4);
Don't forget to change the texture generation procedure as well:
{ Use GL_RGBA instead of GL_RGB }
glTexImage2D(GL_TEXTURE_2D, 0, GL_RGBA, Width, Height, 0, GL_RGBA, GL_UNSIGNED_BYTE, Image);
ℹ️ The
LoadTexturehelper function takes care of this for us if you set the optionalAAlphaparameter toTrue.
Also make sure that you retrieve all 4 color components of the texture in the fragment shader, not just the RGB components:
void main()
{
  // gl_FragColor = vec4(vec3(texture2D(texture1, TexCoords)), 1.0);
  gl_FragColor = texture2D(texture1, TexCoords);
}
Now that we know how to load transparent textures it's time to put it to the test by adding several of these leaves of grass throughout the basic scene introduced in the [depth testing](4.1 Depth Testing) tutorial.
We create a small array where we add several TVector3 variables to represent the location of the grass leaves:
const
  VEGITATION: array [0..4] of TVector3 = (
    (X: -1.5; Y: 0.0; Z: -0.48),
    (X:  1.5; Y: 0.0; Z:  0.51),
    (X:  0.0; Y: 0.0; Z:  0.70),
    (X: -0.3; Y: 0.0; Z: -2.30),
    (X:  0.5; Y: 0.0; Z: -0.60));
Each of the grass objects is rendered as a single quad with the grass texture attached to it. It's not a perfect 3D representation of grass, but it's a lot more efficient than actually loading complex models. With a few tricks, like adding several more rotated grass quads at the same position, you can still get good results.
Because the grass texture is added to a quad object we'll need to create another VAO again, fill the VBO and set the appropriate vertex attribute pointers. Then after we've drawn the floor and the two cubes we're going to draw the grass leaves:
glBindTexture(GL_TEXTURE_2D, FTransparentTexture);
FTransparentVAO.BeginRender;

for I := 0 to Length(VEGITATION) - 1 do
begin
  Model.InitTranslation(VEGITATION[I]);
  FUniformMVP.Apply(Model);
  FTransparentVAO.Render;
end;
FTransparentVAO.EndRender;
Running your application will now probably look a bit like this:
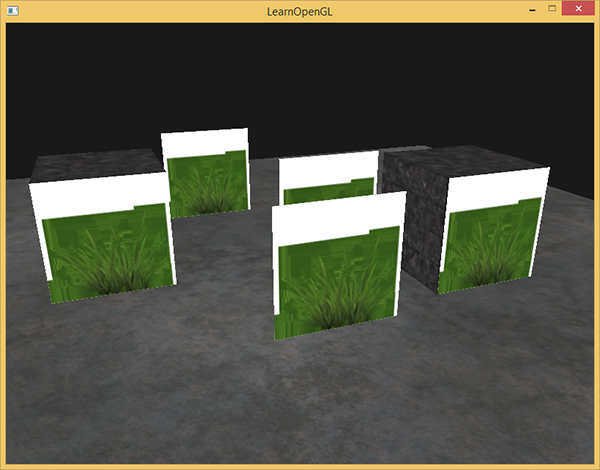
This happens because OpenGL by default does not know what to do with alpha values, nor when to discard them. We have to manually do this ourselves. Luckily this is quite easy thanks to the use of shaders. GLSL gives us the discard command that (once called) ensures the fragment will not be further processed and thus not end up into the color buffer. Thanks to this command we can check in the fragment shader whether a fragment shader gets an alpha value below a certain threshold and if so, discard the fragment as if it had never been processed:
#ifdef GL_ES
precision mediump float;
#endif
varying vec2 TexCoords;
uniform sampler2D texture1;
void main()
{
vec4 texColor = texture2D(texture1, TexCoords);
if (texColor.a < 0.1)
discard;
gl_FragColor = texColor;
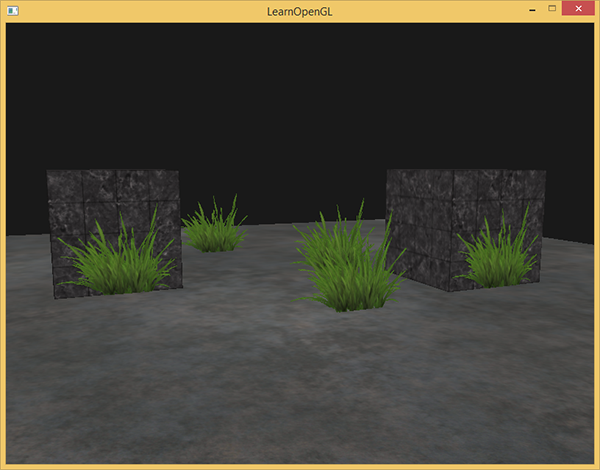
}Here we check if the sampled texture color contains an alpha value lower than a threshold of 0.1 and if so, discard the fragment. This fragment shader ensures us that it only renders fragments that are not (almost) completely transparent. Now it'll look like it should:
ℹ️ Note that when sampling textures at their borders, OpenGL interpolates the border values with the next repeated value of the texture (because we set its wrapping parameters to
GL_REPEAT). This is usually okay, but since we're using transparent values, the top of the texture image gets its transparent value interpolated with the bottom border's solid color value. The result is then a slightly semi-transparent colored border you might see wrapped around your textured quad. To prevent this, set the texture wrapping method toGL_CLAMP_TO_EDGEwhenever you use alpha textures:glTexParameteri( GL_TEXTURE_2D, GL_TEXTURE_WRAP_S, GL_CLAMP_TO_EDGE); glTexParameteri( GL_TEXTURE_2D, GL_TEXTURE_WRAP_T, GL_CLAMP_TO_EDGE);Again, the
LoadTexturehelper function takes care if this if you set theAAlphaparameter toTrue.
You can find the source code here.
⚠️ Usingdiscardin GLSL can have a negative impact on performance, especially on mobile devices. It may be more efficient to use blending instead, as discussed in the next section. (This may sound counter-intuitive since blending seems more computationally intensive.)
While discarding fragments is great and all, it doesn't give us the flexibility to render semi-transparent images; we either render the fragment or completely discard it. To render images with different levels of transparency we have to enable blending. Like most of OpenGL's functionality we can enable blending by enabling GL_BLEND:
glEnable(GL_BLEND); Now that we've enabled blending we need to tell OpenGL how it should actually blend.
Blending in OpenGL is done with the following equation:

- Csource: the source color vector. This is the color vector that originates from the texture.
- Cdestination: the destination color vector. This is the color vector that is currently stored in the color buffer.
- Fsource: the source factor value. Sets the impact of the alpha value on the source color.
- Fdestination: the destination factor value. Sets the impact of the alpha value on the destination color.
After the fragment shader has run and all the tests have passed, this blend equation is let loose on the fragment's color output and with whatever is currently in the color buffer (previous fragment color stored before the current fragment). The source and destination colors will automatically be set by OpenGL, but the source and destination factor can be set to a value of our choosing. Let's start with a simple example:
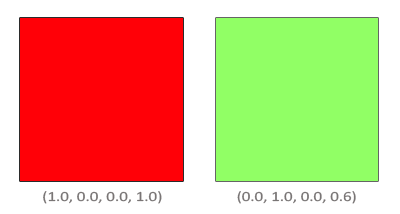
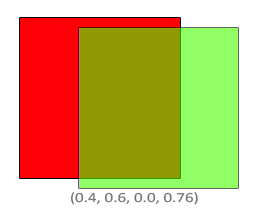
We have two squares where we want to draw the semi-transparent green square on top of the red square. The red square will be the destination color (and thus should be first in the color buffer) and we are now going to draw the green square over the red square.
The question then arises: what do we set the factor values to? Well, we at least want to multiply the green square with its alpha value so we want to set the Fsource equal to the alpha value of the source color vector which is 0.6. Then it makes sense to let the destination square have a contribution equal to the remainder of the alpha value. If the green square contributes 60% to the final color we want the red square to contribute 40% of the final color e.g. 1.0 - 0.6. So we set the Fdestination equal to one minus the alpha value of the source color vector. The equation thus becomes:
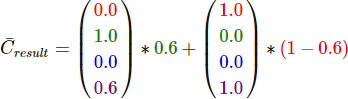
The result is that the combined square fragments contain a color that is 60% green and 40% red giving a dirty color:
The resulting color is then stored in the color buffer, replacing the previous color.
So this is great and all, but how do we actually tell OpenGL to use factors like these? Well it just so happens that there is a function for this called glBlendFunc.
The glBlendFunc(sfactor: GLenum; dfactor: GLenum) function expects two parameters that set the option for the source and destination factor. OpenGL defined quite a few options for us to set of which we'll list the most common options below. Note that the constant color vector Cconstant can be separately set via the glBlendColor function.
| Option | Value |
|---|---|
| GL_ZERO | Factor is equal to 0. |
| GL_ON | Factor is equal to 1. |
| GL_SRC_COLOR | Factor is equal to the source color vector Csource. |
| GL_ONE_MINUS_SRC_COLOR | Factor is equal to 1 minus the source color vector: 1-Csource. |
| GL_DST_COLOR | Factor is equal to the destination color vector Cdestination. |
| GL_ONE_MINUS_DST_COLOR | Factor is equal to 1 minus the destination color vector: 1-Cdestination. |
| GL_SRC_ALPHA | Factor is equal to the alpha component of the source color vector Csource. |
| GL_ONE_MINUS_SRC_ALPHA | Factor is equal to 1−alpha of the source color vector Csource. |
| GL_DST_ALPHA | Factor is equal to the alpha component of the destination color vector Cdestination. |
| GL_ONE_MINUS_DST_ALPHA | Factor is equal to 1−alpha of the destination color vector Cdestination. |
| GL_CONSTANT_COLOR | Factor is equal to the constant color vector Cconstant. |
| GL_ONE_MINUS_CONSTANT_COLOR | Factor is equal to 1 minus the constant color vector Cconstant. |
| GL_CONSTANT_ALPHA | Factor is equal to the alpha component of the constant color vector Cconstant. |
| GL_ONE_MINUS_CONSTANT_ALPHA | Factor is equal to 1−alpha of the constant color vector Cconstant. |
To get the blending result we had from the two squares earlier, we want to take the alpha of the source color vector for the source factor and 1−alpha for the destination factor. This translates to the glBlendFunc as follows:
glBlendFunc(GL_SRC_ALPHA, GL_ONE_MINUS_SRC_ALPHA); ℹ️ you can speed up alpha blending a little by using pre-multiplied textures. If you look at the blend equation for
glBlendFunc(GL_SRC_ALPHA, GL_ONE_MINUS_SRC_ALPHA), you will notice that the first half of the equation (Cresult=Csource * Fsource + ...) multiplies the source color with the source alpha value. Since these calculations are independent of the other (destination) texture, we could perform them once in advance so that OpenGL doesn't have to do them every frame. That is, we modify every pixel in the source texture so its R, G and B values are multiplied with its Alpha value (hence the name pre-multiplied texture). We can then change the blend function toglBlendFunc(GL_ONE, GL_ONE_MINUS_SRC_ALPHA)and save some precious CPU/GPU cycles each frame.
It is also possible to set different options for the RGB and alpha channel individually using glBlendFuncSeparate:
glBlendFuncSeparate(GL_SRC_ALPHA, GL_ONE_MINUS_SRC_ALPHA, GL_ONE, GL_ZERO);This function sets the RGB components as we've set them previously, but only lets the resulting alpha component be influenced by the source's alpha value.
OpenGL gives us even more flexibility by allowing us to change the operator between the source and destination part of the equation. Right now, the source and destination components are added together, but we could also subtract them if we want. glBlendEquation(mode: GLenum) allows us to set this operation and has 3 possible options:
- GL_FUNC_ADD: the default, adds both components to each other: Cresult = Src + Dst.
- GL_FUNC_SUBTRACT: subtracts both components from each other: Cresult = Src - Dst.
- GL_FUNC_REVERSE_SUBTRACT: subtracts both components, but reverses order: Cresult = Dst - Src.
Usually we can simply omit a call to glBlendEquation because GL_FUNC_ADD is the preferred blending equation for most operations, but if you're really trying your best to break the mainstream circuit any of the other equations might suit your needs.
Now that we know how OpenGL works with regards to blending it's time to put our knowledge to the test by adding several semi-transparent windows. We'll be using the same scene as in the start of this tutorial, but instead of rendering a grass texture we're now going to use the transparent window texture from the start of this tutorial.
First, during initialization we enable blending and set the appropriate blending function:
glEnable(GL_BLEND);
glBlendFunc(GL_SRC_ALPHA, GL_ONE_MINUS_SRC_ALPHA);
Since we enabled blending there is no need to discard fragments so we'll reset the fragment shader to its original version:
#ifdef GL_ES
precision mediump float;
#endif

varying vec2 TexCoords;

uniform sampler2D texture1;

void main()
{
  gl_FragColor = texture2D(texture1, TexCoords);
}
This time (whenever OpenGL renders a fragment) it combines the current fragment's color with the fragment color currently in the color buffer based on its alpha value. Since the glass part of the window texture is semi-transparent we should be able to see the rest of the scene by looking through this window.
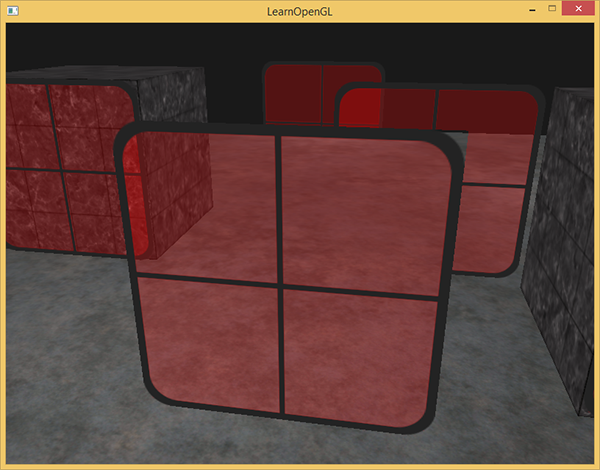
If you take a closer look however, you might notice something is off. The transparent parts of the front window are occluding the windows in the background. Why is this happening?
The reason for this is that depth testing works a bit tricky combined with blending. When writing to the depth buffer, the depth test does not care if the fragment has transparency or not so the transparent parts are written to the depth buffer as any other value. The result is that the entire quad of the window is checked for depth testing regardless of transparency. Even though the transparent part should show the windows behind it, the depth test discards them.
So we cannot simply render the windows however we want and expect the depth buffer to solve all our issues for us; this is also where blending gets a little nasty. To make sure the windows show the windows behind them, we have to draw the windows in the background first. This means we have to manually sort the windows from furthest to nearest and draw them accordingly ourselves.
ℹ️ Note that with fully transparent objects like the grass leaves we have the option to simply discard the transparent fragments instead of blending them, saving us a few of these headaches (no depth issues).
To make blending work for multiple objects we have to draw the farthest object first and the closest object as last. The normal non-blended objects can still be drawn as normal using the depth buffer so they don't have to be sorted. We do have to make sure those are drawn first before drawing the (sorted) transparent objects. When drawing a scene with non-transparent and transparent objects the general outline is usually as follows:
- Draw all opaque objects first.
- Sort all the transparent objects.
- Draw all the transparent objects in sorted order.
One way of sorting the transparent objects is to retrieve the distance of an object from the viewer's perspective. This can be achieved by taking the distance between the camera's position vector and the object's position vector. We then store this distance together with the corresponding position vector in an array and sort the array by distance.
First, we declare a TWindow type that contains the position and its distance from the camera:
type
  TWindow = record
    Position: TVector3;
    Distance: Single;
  end;
We keep track of an array of windows and a comparer that is used to sort the windows:
FSorted: TArray<TWindow>;
FComparer: IComparer<TWindow>;
We construct the comparer using an anonymous method that sorts the windows by distance, so that windows with the largest distance (furthest from the camera) appear first:
SetLength(FSorted, Length(WINDOWS));
FComparer := TComparer<TWindow>.Construct(
  function(const Left, Right: TWindow): Integer
  begin
    if (Left.Distance > Right.Distance) then
      Result := -1
    else if (Left.Distance < Right.Distance) then
      Result := 1
    else
      Result := 0;
  end);
Finally, during each frame we calculate the distance of each window from the camera, store it in the array and sort it:
for I := 0 to Length(WINDOWS) - 1 do
begin
  FSorted[I].Position := WINDOWS[I];
  FSorted[I].Distance := FCamera.Position.DistanceSquared(WINDOWS[I]);
end;
TArray.Sort<TWindow>(FSorted, FComparer);
ℹ️ Note that we use the
DistanceSquaredmethod here instead ofDistance. We don't really care about the actual distance from the camera. We only want to know if one window is further or closer to the camera than another. You should use theDistanceSquaredmethod in those cases because it is faster thanDistance(by avoiding a square root calculation).
Now we can render each window in the correct order:
FTransparentVAO.BeginRender;
for I := 0 to Length(FSorted) - 1 do
begin
  Model.InitTranslation(FSorted[I].Position);
  FUniformMVP.Apply(Model);
  FTransparentVAO.Render;
end;
FTransparentVAO.EndRender;
This relatively simple approach to sorting transparent objects fixes the previous problem and now the scene looks like this:
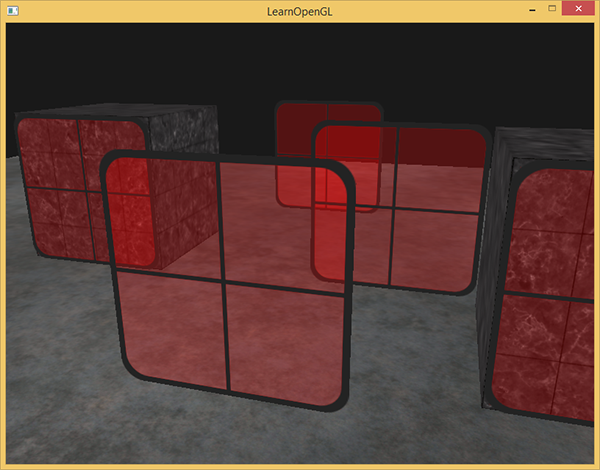
You can find the complete source code with sorting here.
While this approach of sorting the objects by their distance works well for this specific scenario, it doesn't take rotations, scaling or any other transformation into account and weirdly shaped objects need a different metric than simply a position vector.
Sorting objects in your scene is a difficult feat that depends greatly on the type of scene you have, let alone the extra processing power it costs. Completely rendering a scene with solid and transparent objects isn't all that easy. There are more advanced techniques like order independent transparency but these are out of the scope of this tutorial. For now you'll have to live with normally blending your objects, but if you're careful and know the limitations you can still get fairly decent blending implementations.
| ⬅️ [4.2 Stencil Testing](4.2 Stencil Testing) | Contents | [4.4 Face Culling](4.4 Face Culling) ➡️ |
|---|