


Getting Started • Documentation • Under the Hood • Need Help? • About • Credits
Open Source is amazing. It lets us create new things without having to re-invent the wheel every time. Well, at least in theory. Most things have been done by someone, somewhere, but only a fraction is published and documented. And that's likely because many developers don't like the overhead of writing documentation. So, let's make it dead simple!
git-template contains all the essential files to make your repository useful and pretty. Copy templates, fill in your details and get back to do the things you love most. It's that simple, really. Check out the documentation to learn about our design principles.
- best of git: embraces common design practices used in dozens of repositories
- skim-able: most relevant info is visible at first glance
- pre-formatted: the design is ready-to-use, just fill in your details
- self documenting: instead of placeholders, this file contains details about itself
This readme is a template and a usage example of itself, so technically no separate example is needed.
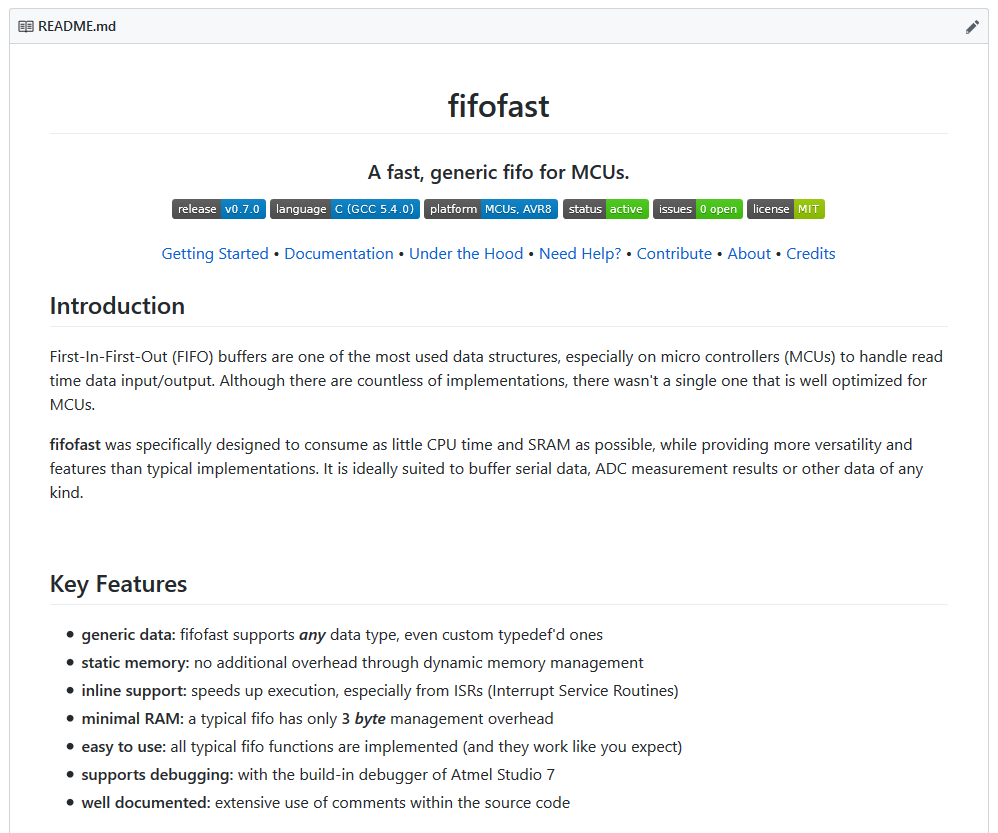
The screenshot below is from one of my projects, which uses this template. You can find that project and many more under related projects.
You've never written a readme and want to do it right straight from the start? Then just follow the steps below. If you run into problems, please ask for clarification.
There are countless programs that can edit markdown formatted files:
-
markdownify [Windows, free]
My personal favorite. The code is highlighted and converted into a live preview. The UI is intuitive and minimalistic. Local links are supported and even images from the internet (such as badges) are shown in the preview. -
markdown editor [Web, free]
Not as good as markdownify, but available without installing anything. Its formatting closely resembles how it will look on GitHub. -
Any text editor
You may already use Notepad++, Atom or any other editor. They all work, but may not offer a preview and therefore I wouldn't recommend them to beginners.
- Copy this repository
Clone it or hit Download and extract the .zip file.
-
Copy the files to your repo
If you don't have any of the included files, just drag + drop them into your existing repository. -
Edit it
Open the file with the editor of your choice and tailor it to your project. Delete everything you don't need, add stuff you think is missing. It's your readme after all.
No one reads anything on the internet. [link]
Not even your readme. Especially not if you treat it like many people and just dump a bunch of information about your project in it. So let's take a more interesting approach.
Your readme is the landing page for your project, the first thing every visitor sees. To convince someone to stay, you have no more than a few seconds. So make them count:
-
State Your Purpose
All your creative efforts have a reason. Start by telling why your project exists and why anyone should have interest in it. As humans we crave meaning and purpose more than anything else. Be short and precise. -
First Things First
Outline the the scope of your project. Even if visitors are inspired by your why, it dosen't matter if it does not fit their requirements, no matter how great your code is. And that is ok. Badges are a perfect tool to visualize what your project is and what it isn't. -
No Clutter
Get rid of everything else. No worries, you can bring it up later, but for for now it's just distraction. When in doubt, be generous with white space. Less is More.
People don't read, they scan. [link]
If a paragraph seems useless, they skip to the next. This results in an F-shaped pattern of attention. Naturally you should place important things at the beginning of the page. Limit your paragraphs to one idea and try to indicate it at its start.
Additionally you can provide **visual clues** with a good formatting:
- meaningful images
- bullet lists
- variation in typeface (link, bold, etc)
- code snippets
- quotes
- white space
Together these changes can increase the comprehension of your text by up to 124%.
The term "Readme Driven Development" was coined by Tom Preston-Werners and this blog post. The key takeaway is, that you should write your readme prior to anything else. No code, not documentation, no use cases should be written before a readme. This allows you to clarify your thoughts and remind you of the things you need to implement. I honestly think it's a good practice to follow.
Of course, that readme will be vastly different from the readme you are reading write now. There will be almost no formatting, minimal links, no pictures and no badges.
This doesn't mean that you have to start over to adopt this template. Just copy & paste your notes into the chapters "Documentation" and "Under The Hood".
The structure of your readme should follow the principles laid out in the previous two sections. Each project has some different requirements, so feel free to remove or add new chapters to the template.
These are the contents of my ideal readme. They are described in the next chapter in detail.
README.md
├───┬── Banner
│   ├── Summary
│   ├── Badges
│   └── Quick Links
├───┬── Introduction
│   ├── Key Features
│   ├── (Dependencies)
│   └── Usage Example
├── Getting Stated (Install & Configure)
├── Documentation (Usage/API/Testing)
│   ├── ...
│   └── ...
├── Under the Hood (Internals)
│   ├── ...
│   └── ...
├── Support
│   ├── FAQ
│   ├── Get Help
│   └── Contribute
├── About
│   ├── Status
│   ├── Known Issues
│   ├── Planned Features
│   ├── Changelog
│   └── Contact (The Author/Maintainer)
├── Credits and References
│   ├── Projects Used
│   ├── Related Projects
│   └── Additional Resources
└── License
Start the readme with the name of your project in a large font. Alternatively you can create a banner or a logo to stand out. If you feel like it, you can even use some ASCII art. Although you can use ASCII art, github can't be conviced to center it.
Write a single line to summarize the essence of the project. It doesn't even have to be a full sentence. Expressing clearly what your goal is can be insanely hard, but is a crucial part of the introduction. If you can't tell what this is all about, who else will be?
Metadata is best added in form of badges right below the summary. They help viewers to decide whether your project meets their requirements. The information is picked up intuitively:
The left side classifies the category, the right side the value. The background color can be customised to illustrate the value. Often they are click-able and take you to a page with more detailed information. There are even a few dynamic badges based on data from the GitHub API or external tools.
Badges should be used to provide additional information only. Meaningless badges de-valuate the important ones. A recent study shows that the number of downloads (and therefore the community interest) is greatest with 4 to 6 badges. If yours fit into one line, you should be generally fine, though.
For more details about which badges you should consider, check out the included badges.md file.
Many readmes have a table of contents (TOC), which adds a lot of bloat to the beginning of the readme. Most of the links won't be used anyway. So instead I suggest to add a single line of quick links, inspired by markdownify's readme.
Each link refers to a main chapter of the readme. The first chapters "Introduction", "Key Features" and "Getting Started" are visible without scrolling and don't need a link. Note that the keywords don't have to match up with the chapters title. For example I prefer "Need Help?" instead of "Support" as it seems more friendly to me.
The introduction should be short and to the point as described in documentation.
Generally I'd suggest to split the introduction into two short paragraphs:
- Why does your project exist? What was the problem, that had to be addressed?
- How does your project address that problem? What does it do in a nutshell?
The second paragraph should ideally start with the projects name in bold, followed by a verb describing what it does. Limit yourself to about 5 lines per paragraph.
Make a bullet list of your projects best features. This is more about what aspects you value, than all the great things it can do. You probably already know what you what to put there anyway.
A picture, screenshot or a few lines of code say more than a thousand words. Choose a common use case and demonstrate how intuitive and straightforward your project handles that situation. Link to more complex examples if you want to.
Assume your viewer has a general understanding of programming, but does not know your tools or workflow well. The very first experience should work out-of-the-box, so give detailed starting instructions. Breaking it down into manageable steps can be very helpful for this. Link to all the software that has to be installed. Make starting as trivial as you can.
The "Getting Started" section in this readme seems ridiculous, I know, and I've definitely overdone it a bit (every programmer can edit a text file, I hope). However I think it illustrates my point quite nicely.
Quite often you hear documentation belongs in a separate document and that is definitely true for large project. But for the smaller projects I don't consider it required.
Your documentation should tell the reader how to use the software and not how it works. Write about what each function does, what their arguments are, what it returns. That sort of thing. When in doubt, give examples.
You've done something clever and are eager to talk about it? Now you can! write about the internals of your project to your hearts content. Everyone who got this far actually cares about the details, so most of the viewers care about what you have to say. Talk about how it all came to be, what problems you've face, what didn't work or teach a few cool tricks. But if you don't want to, that's fine too.
Provide help for the most common issues and error messages; a FAQ can be particularly useful. Offer some way of asking all questions that are not answered yet. You can use the build-in issue tracker or an external tool for this.
Although many GitHub users will know how to contribute to a project, be friendly to the new users and point them to your CONTRIBUTING.md for additional information.
The about section contains any meta information about the project. Explain the current status, list major known issues, planned features, give a short changelog (but that can be a separate file, too) and offer some way of contacting you.
Say "Thanks" to all the people, whose work somehow helped you and include a link, if applicable. You should do this even if you're not obligated by any license. A little appreciation can go a long way (and make someones day).
Every project needs a license. If you don't, now one is allowed to do anything with your code. Considering you put all this effort into publishing it, I dont think that's what you want. If you are unsure what license is best for you, visit choosealicense.com.
The most popular license is the MIT License. It is permissive and short enough to be understood without a lawyer. It is recommended by Tom Preston-Werner on his blog.
You might be tempted to give up all your rights and put your project int "public domain", but this simply does not work in some countries. This answer on opensource.stackexchange.com explains some issues quite well. If you still want to do that, the CC0 1.0 License might be the best option. It's advantage above other "public domain" licenses is it's fallback clause to function as a license.
That said, I am not a lawyer and will not take responsibility for any choice you make.
-
Q: But why should I use your template and not this, this, this, this or that?
A: Feel free to use whatever you like. I've read them and many more (yes, even the long blocks of text), but wasn't particularly happy with any of those option. So I made my own. You may use it, too. -
Q: It's all too much!
A: Delete whatever you don't need: Sections, badges, formatting; nothing is set in stone. In fact for each of my projects I will copy this readme and delete a good part of it. But having a single, complete readme ensures that all derived works share the same structure. -
Q: You love badges, don't you?
A: YES, as long as they are useful. Please do not add a bunch of them in the middle of your readme, unless you're writing about badges. -
Q: Nobody asked these questions, right?
A: Uhhh, maybe? Look, I did need examples to fill this section. And nobody is going to notice anyway. Not this far down in the document, on the fourth question. There's no way. Have I told that I'm on instructables.com? I've still got a few pro membership codes, just tell me if you want one. I bet it takes months until someone notices this. -
Q: What's your favorite color?
A: This is getting ridiculous. Don't you have something better to do than reading a made up FAQ?
Your question or problem wasn't solved in the FAQ? No worries! Just open up a new issue in the GitHub issue tracker. Please provide all information to reproduce your problem. If you don't have a GitHub account (and can't be bothered to create one,) you can contact me directly.
Spotted an error? Open an issue or submit a pull request.
There is no CONTRIBUTING.md yet, sorry. Contributions will inherit the license of this project. If you have any questions, just ask.
This project is currently classified as
The developers intend to keep the code in working condition by updating dependencies, fixing bugs and solving issues.
Without a doubt the readme is an important part of open source projects. I wanted to get it right with everything I publish. This template is the result of my research. I do not consider it perfect, but "good enough" for most repositories. Major changes are not planned.
- none (that are reported)
- Add a CONTRIBUTING.md file
This project uses Semantic Versioning 2.0.0. During initial development (0.x.x versions) any major increase is substituted with a minor increase (0.1.0->0.2.0 instead of 0.1.0->1.0.0).
The message of each commit contains detailed information about the changes made. The list below is a summary about all significant improvements.
- 0.1.0 (latest)
- initial release
If you haven't done so already, please check out Get Help for the fastest possible help on your issue. Alternatively you can find my public email address on my profile.
-
Awesome Readme - A curated list of awesome READMEs
Thanks @matiassingers for all the examples, hints and inspiration! This template would be quite different without you. -
Structured README
Unfortunatly I found this little gem just after this readme was completed, but we share many common ideas. Thanks @shaloo! -
markdownify - A minimal markdown editor desktop app
A intuitive and responsive editor with all the features you could wish for. It even fetches badges from the internet and displays them! It may sound odd, but it has been quite fun to write this readme. Thanks @amitmerchant1990 for that great tool! -
shields.io - badges as a service
A very clever solution to deliver custom and scalable badges. Thanks to the whole @badges team! -
Text ASCII Art Generator
Get any in a variety of ASCII Art fonts. It's very simple and intuitive to use. Thanks @patorjk!
- fifofast - A fast, generic fifo for MCUs.
- unittrace - A simple testing and debugging tool for MCUs inspired by MinUnit.
- ahk-utf8-anywhere - Turn keywords into utf8 characters anywhere you need to.
Want yours to be listed here, too? Create a merge request or get in touch.
All works referenced throughout this readme are listed below for your convenience. Thank you for sharing your thoughts and ideas with the world.
- How to Write Documentation for People that Don't Read by Kevin Burke
- How Users Read on the Web by Jakob Nielsen
- F-Pattern in Reading Digital Content
- Do You Have A 7 Second Website?
- Start with why TED Talk by Simon Sinek
- Study on badges on GitHub, or as a pdf - "Adding Sparkle to Social Coding: An Empirical Study of Repository Badges in the npm Ecosystem"
- Readme Driven Development by Tom Preston-Werner, founder of GitHub (@mojombo)
- Sample Readme by @fvcproductions
- Open Source Project Template by @cfpb
- Art of README by @noffle
- Standard Readme by @richardlitt
- Zalando's README Template by @zalando
- choosealicense.com
- License MIT
- License CC0
- License CC0 - fallback clause
- How can I place software in the public domain? on opensource.stackexchange.com
- Open Source (Almost) Everything by Tom Preston-Werner (@mojombo)
This project is proudly licensed under the MIT license.
The MIT license was chosen to give you the freedom to use this project in any way you want, while protecting all contributors from legal claims. Good code works, great code works for everyone. If this code has become a part of one of your projects, a link back to us would be highly appreciated. Thanks!