Eclipse Setup Tips
#Eclipse Development Environment Setup
Below you'll find a step by step procedure for setting up your development environment in Eclipse (recommended). The reason this is recommended is because it is known by this author that by using the PyDev plugin,
(Python Plugin: in Eclipse click "help > Eclipse Marketplace" in the search field type PyDev or Python)
you can run both the Python version of NuPIC and the Java version side by side! (This text was written during the "porting phase" of htm.java which is occurring rapidly and may not apply by the time you read this.)
If you have Eclipse already setup, you can skip step 1 and 2.
1.) Download Eclipse - link can be found here
2.) Setup your workspace - Eclipse's concept for a container directory that contains project information relevant to the work you're doing. Give your workspace a name.
3.) Install Gradle - Nothing to do with Eclipse (yet). This is a system install and you will end up installing both Gradle as a separate tool and the Gradle plugin, information can be found here . Confirm that Gradle is installed correctly by going to your "terminal" or command line and typing "gradle -Pskipbench check" from just inside the htm.java directory. You should see the the project build and tests run and finish with a "success" message.
If instead, you get following error (for example, in Windows)
C:\Users\XYZ\Documents\GitHub\htm.java>gradle -Pskipbench check
'gradle' is not recognized as an internal or external command,
operable program or batch file.
Then it means that PATH environment variable is not set. An immediate workaround is to set it with this command in Linux/ Mac
export PATH=$PATH:/usr/bin/gradle-2.4/bin
and with this command in Windows
C:\Users\XYZ\Documents\GitHub\htm.java>set PATH=C:\Program Files\gradle-2.4\bin;%PATH%
If when executing "gradle -Pskipbench check" command once again, you`ll get following error
C:\Users\XYZ\Documents\GitHub\htm.java>gradle -Pskipbench check
:compileJava FAILED

FAILURE: Build failed with an exception.

* What went wrong:
Execution failed for task ':compileJava'.
> invalid source release: 1.8

* Try:
Run with --stacktrace option to get the stack trace. Run with --info or --debug option to get more log output.

BUILD FAILED

Total time: 53.05 secs
Then it means that the PATH to JVM picked by gradle is not the one used by Eclipse project.
To fix this immediately set the path to the folder where appropriate JDK version resides. In this case to jdk/jre 1.8 with this command in Mac
export JAVA_HOME=`/usr/libexec/java_home -v1.8*`
and with this command in Windows
C:\Users\XYZ\Documents\GitHub\htm.java>set JAVA_HOME=C:\Program Files\Java\jre1.8.0_45
If everything went right you`ll get this output
C:\Users\XYZ\Documents\GitHub\htm.java>gradle -Pskipbench check
:compileJava UP-TO-DATE
:processResources UP-TO-DATE
:classes UP-TO-DATE
:compileTestJava UP-TO-DATE
:processTestResources UP-TO-DATE
:testClasses UP-TO-DATE
:test
:check

BUILD SUCCESSFUL
4.) Open Eclipse in your newly created workspace, and install the Gradle plugin. Click on the top menu bar "Help > Eclipse Marketplace". In the search field type Gradle, and hit <enter>. Look for Gradle Integration for Eclipse (4.4) 3.6.4.RELEASE plugin, that worked well lately.

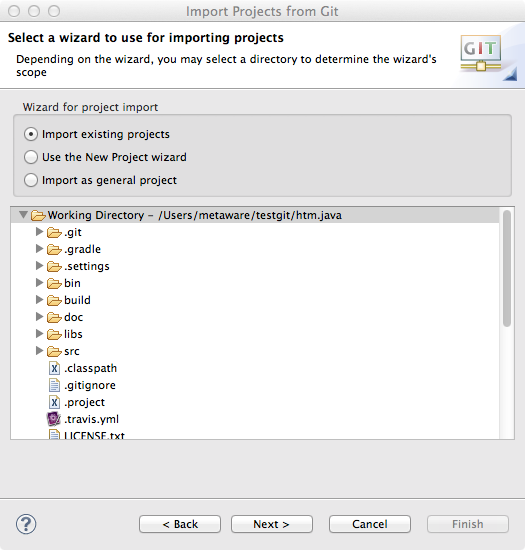
5.) Import your project as a Git Project. From the top menu in Eclipse, choose "File > Import...", then choose "Git > Projects from Git" ... hit next.

...then choose "Existing local repository"

... it should look like the following (after clicking "Add" and locating your htm.java clone directory)

... Import existing projects should already be selected. If not, select it and click "Finish"
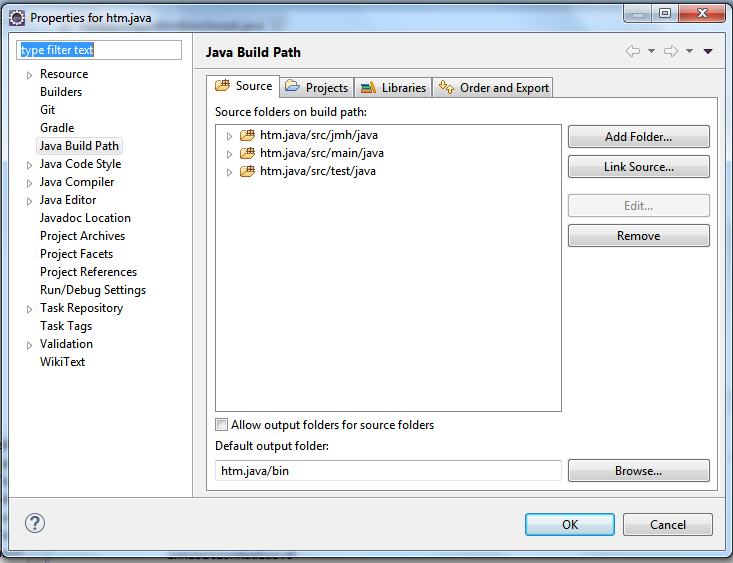
6.) Now setup your build path. Right-click on your project root in the "Package Explorer" tab and choose "Properties" at the bottom of the menu. On the next dialog, click "Java Build Path" and then add two source directories (from the "Source" tab) to your path by clicking "Add Folder..." twice and selecting a.) src/main/java, b.) src/test/java, c.) src/jmh/java as shown below:
... Add the libs/jars to the path. Right click on your project root and at the bottom of the menu click "Properties" again. From the "Libraries" tab, click on "Add JARs" - navigate to "libs" and select all the jars (hold down the key and select each and every jar). as seen below:
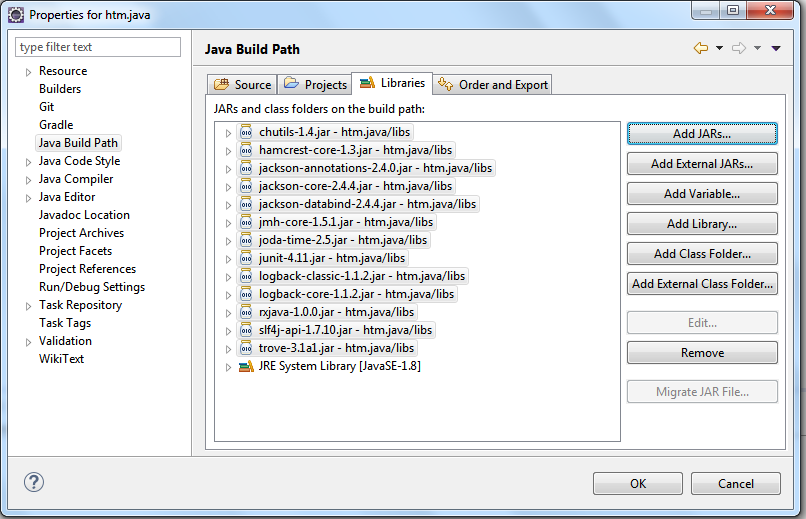
This will allow you to build the project! :-)
To get the tests to run, from the top menu bar, click on the tiny black down-arrow to the right of the round green button with the right-facing white arrow. This is your "Run" button used to launch any Java executables. You can set up run configurations from here, but usually if you have a test class or any Java file with a "public static void main(String[] args) method in it, you can just right-click anywhere in the file or right-click the file in the "Package Explorer" and click "Run As" > "Application" or "JUnit test".
As always, your mileage may vary depending on exact setups, but this should help 90% of developer environments to get configured correctly!
Happy Hacking! :-)