Exploring the Demo
A good way to try out and understand OSMD by experiment is exploring our demo.
We have a Public Demo using the version of our last release, or you can run the local demo, see Debugging for instructions.
You can either select a sheet from our samples in the top left, or load your own sheet (musicxml or mxl) simply by dragging and dropping it onto the page.
Here's an example of exploring and manipulating a sheet in the demo:

// Let's try something easy:
osmd.Version
// 1.3.0-dev

// Let's make the rest note in the first measure red:
osmd.graphic.measureList[0][0].staffEntries[0].graphicalVoiceEntries[0].notes[0].sourceNote.noteheadColor = "#FF0000" // for the piano note, try measureList[0][1].
osmd.graphic.measureList[0][0].staffEntries[1].graphicalVoiceEntries[0].notes[0].sourceNote.noteheadColor = "#0000FF" // blue note on "Auf"
osmd.render()

// An alternative method to get the notes, e.g. if you want to do this before render (before graphic is defined):
//osmd.Sheet.SourceMeasures[0].VerticalSourceStaffEntryContainers[0].StaffEntries[0].VoiceEntries[0].Notes[0].noteheadColor
osmd.Sheet is the data model, and osmd.graphic (GraphicSheet) adds visual information. osmd.Sheet uses Note, osmd.graphic uses GraphicalNote, which refers to the Note via graphicalNote.sourceNote. See our Music Sheet Object Model.
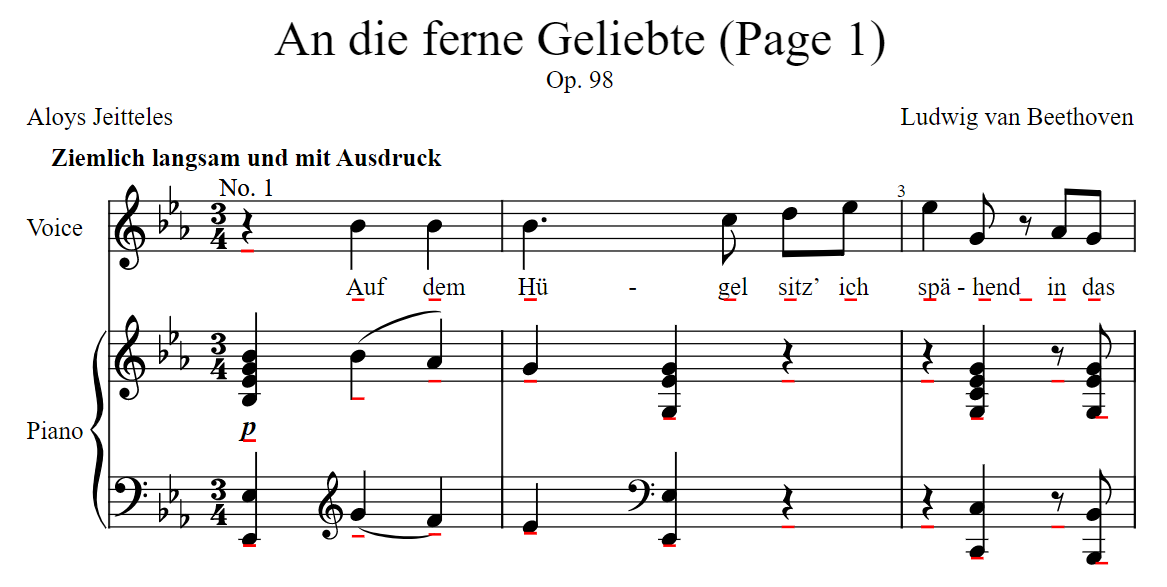
// let's try removing the subtitle:
osmd.setOptions({drawSubtitle: false, defaultColorRest: "#AAAAAA"})
osmd.render() // don't forget to re-render after making changes!

// also remove the title of the sheet, and only draw measure numbers at the start of a music system (line):
osmd.setOptions({drawTitle: false}) // requires re-render
osmd.EngravingRules.RenderMeasureNumbersOnlyAtSystemStart = true
osmd.render()

// some metrics:
osmd.graphic.measureList[0][0].staffEntries[0].graphicalVoiceEntries[0].notes[0].boundingBox.absolutePosition
// PointF2D {x: 22.4995200625, y: 23.22}
osmd.graphic.measureList[0][0].staffEntries[0].graphicalVoiceEntries[0].boundingBox.relativePosition
// PointF2D {x: 0, y: 0.5}
osmd.graphic.measureList[0][0].staffEntries[0].boundingBox.relativePosition
// PointF2D {x: 10.943856, y: 0}
Try some more options like drawCredits: false which will disable drawing the title, composer and lyricist, or drawMeasureNumbersOnlyAtSystemStart, which should be self-explaining.
And don't forget to call osmd.render() after changes!
If you want to change the color of notes without re-rendering, try notes[0].getSVGGElement() or getSVGId() and manipulate the SVG directly:
const graphicalNote = osmd.graphic.measureList[0][0].staffEntries[0].graphicalVoiceEntries[0].notes[0];
graphicalNote.getSVGGElement().children[0].children[0].children[0].style.fill = "#FF0000";
or e.g. for quarter notes:
osmd.cursor.GNotesUnderCursor()[0].getSVGGElement().children[0].children[0].children[0].style.stroke = "#FF0000"; // stem
osmd.cursor.GNotesUnderCursor()[0].getSVGGElement().children[0].children[1].children[0].style.fill = "#FF0000"; // notehead
If using cursor notes: You need the GraphicalNote here, not the Note from osmd.cursor.NotesUnderCursor(). So either use osmd.cursor.GNotesUnderCursor(), or get the GraphicalNote from Note via osmd.EngravingRules.GNote(note).
You can also try changing some of our engraving constants (EngravingRules) like osmd.EngravingRules.DistanceBetweenVerticalSystemLines or osmd.EngravingRules.MeasureNumberLabelOffset, which sets the vertical distance of the measure number labels to the staff line.
Caution: Change EngravingRules at your own risk, we can't test every variation of changes of these, and not all EngravingRules are meant to be changed (like unit).
Our supported set of options are the OSMDOptions.
You can also use the Cursor to select notes organically, as in the webpack example project:
var cursor = osmd.cursor;
cursor.show();
cursor.next();
const cursorVoiceEntry = cursor.Iterator.CurrentVoiceEntries[0];
const lowestVoiceEntryNote = cursorVoiceEntry.Notes[0];
console.log("Stem direction of VoiceEntry under Cursor: " + cursorVoiceEntry.StemDirection);
console.log("base note of Voice Entry at second cursor position: " + lowestVoiceEntryNote.Pitch.ToString());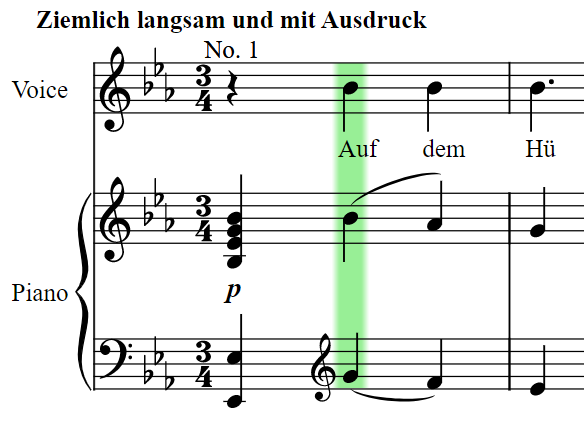
Or in Typescript:
let cursor: Cursor = osmd.cursor;
cursor.show();
cursor.next();
const cursorVoiceEntry: VoiceEntry = cursor.Iterator.CurrentVoiceEntries[0];
const baseNote: Note = cursorVoiceEntry.Notes[0];
console.log("Stem direction of VoiceEntry under Cursor: " + StemDirectionType[cursorVoiceEntry.StemDirection]);
console.log("base note of Voice Entry at second cursor position: " + baseNote.Pitch.ToString());
https://github.com/opensheetmusicdisplay/webpack-usage-example/blob/master/index.ts
You can add any number of cursors, e.g. a second cursor with the measure type (highlights current measure):
let cursorsOptions = [{type: 0, color: "#33e02f", alpha: 0.5, follow: true}, {type: 3, color: "#999999", alpha: 0.1, follow: false}];
osmd.setOptions({cursorsOptions: cursorsOptions});
osmd.enableOrDisableCursors(true);
osmd.cursors[1].show();
Then if you want to highlight another measure, use cursor.next() or cursor.previous() until the cursor's current measure number is as desired (probably via osmd.cursors[1].GNotesUnderCursor()[0].parentVoiceEntry.parentStaffEntry.parentMeasure)

Try this code in the demo, just paste it into the browser console:
for (let i=0; i<osmd.GraphicSheet.MeasureList.length; i++) {
    const bbox = osmd.GraphicSheet.MeasureList[i][0].staffEntries[0].graphicalVoiceEntries[0].notes[0].getSVGGElement().getBBox();
    console.log(`pos: (${bbox.x}, ${bbox.y})`);
    osmd.Drawer.DrawOverlayLine({x: bbox.x / 10, y: bbox.y / 10}, {x: bbox.x / 10 + 2, y: bbox.y / 10}, osmd.GraphicSheet.MusicPages[0])
}
(This method is only possible with the SVG backend, unless you use the second method with Skybottomlines further below) MusicXML: note_height_skyline_test_sample.zip
OSMD units are usually pixels divided by 10, that's what DrawOverlayLine uses, though that's only the case at the default zoom level (1). OSMD unit positions and distances don't change with zoom level, but the positions of SVG or canvas elements (in pixels) do.
One OSMD unit is also the distance between two lines in a staffline (e.g. from the low E to the low G in the treble clef), regardless of zoom level.
For a more sophisticated version that respects other elements like articulations and fingerings, we need more sophisticated code:
for (let i=0; i<osmd.GraphicSheet.MeasureList.length; i++) {
    const measure = osmd.GraphicSheet.MeasureList[i][0];
    const se = measure.staffEntries[0];
    const y = se.getHighestYAtEntry(); // gets the highest absolute y value above the StaffEntry/Notes and other graphical elements, using OSMD's SkyBottomLineCalculator
    const x = se.PositionAndShape.AbsolutePosition.x;
    console.log(`x: ${x}, y: ${y}`);
    osmd.Drawer.DrawOverlayLine({x: x - 0.5, y: y}, {x: x + 0.5, y: y}, osmd.GraphicSheet.MusicPages[0])
}
Functions like getHighestYAtEntry() were only added after OSMD 1.3.0, so if you don't have them yet, you can re-implement them from here.

For the same with the bottomline, just substitute getHighestYAtEntry() with getLowestYAtEntry(), and use the bottomline sample.
note_height_skyline_bottomline_samples.zip

By the way, most of these draw methods like DrawOverlayLine return the SVG element they were drawing, so you can save it and remove it again later, to undo the drawing:
osmd.Drawer.backend.removeNode(mySvgNode)
As a bonus, here's a version that underlines the lowest position under every staff entry in every vertical measure:
for (let i=0; i<osmd.graphic.measureList.length; i++) {
	const measures = osmd.graphic.measureList[i];
	for (let j=0; j<measures.length; j++) {
		const measure = measures[j];
		for (const se of measure.staffEntries) {
			const y = se.getLowestYAtEntry();
			const x = se.PositionAndShape.AbsolutePosition.x;
			console.log(`x: ${x}, y: ${y}`);
			osmd.Drawer.DrawOverlayLine({x: x - 0.5, y: y}, {x: x + 0.5, y: y}, osmd.graphic.MusicPages[0])
		}
	}
}
If your sheet has multiple parts (e.g. voice+piano, or SATB 4-part choir arrangement), you can choose to not render certain parts:
osmd.sheet.Instruments[2].Visible = false
see https://github.com/opensheetmusicdisplay/opensheetmusicdisplay/issues/981#issuecomment-790025087:

(note that instruments[2] means index 2, which is the 3rd instrument from above)
Every graphical object has a member PositionAndShape, of the class BoundingBox, which in turn has a relativePosition and absolutePosition.
The absolutePosition is the absolute position in our positioning system.
However, it's not the pixel position in the SVG, because our positions remain constant e.g. independent of zooming.
The relativePosition is relative to the object's parent. For a GraphicalVoiceEntry, which contains all the notes of a voice at a point of time (e.g. 3 for a chord), it's relative to the StaffEntry, whose position is relative to the measure's position.
Many sheet music objects have a logical and graphical counterpart. The Note e.g. contains the pitch and length of a note, while the GraphicalNote contains this Note and its GraphicalVoiceEntry, which in turn has a VoiceEntry. Same for SourceStaffEntry and GraphicalStaffEntry.
Our y-position starts at the top line of the system. 1 is the distance between one line and the next (e.g. for treble clef: top line (F) to line below (D), regardless of zoom level. In Vexflow or SVG, it's 10 pixels at 100% zoom, but will differ if you change osmd.zoom.
(Note: The class of the boundingBox member is actually PositionAndShape. We are considering refactoring it to BoundingBox)
To further understand OSMD and its classes, have a look at the Directory Layout and Code Structure, and of course the Code itself.
Also, just have another look through the OSMDOptions and EngravingRules, but also any public methods in often used classes like GraphicalNote, Note, Cursor, GraphicalMeasure, and so on. And of course, have a look at the other Wiki pages.
Note: This article was initially inspired by my comment on a user question in an Issue. Feel free to ask us for help on OSMD!