Rasp is a small and clean, yet powerful module that allows for programming on a raspberry pi on barebones. Please note that this is currently not complete, but feel free to report any bugs through a Github issue or a pull-request if you have a solution.
Below is a program that simply prints Hello, World! to the console.
#include <rasp.h>

int main() {
	rinit();
	printf("Hello, World!\n");
}
If you're familiar with programming in C, you should already understand some parts of this program. Let's first look at the first line.
#include <rasp.h>This just includes the module into your script. Doing this saves you time by just including the whole module instead of having to worry about individual parts. Next is the fourth line.
rinit();This procedure initializes all other modules, and should be placed by default at the top of the main function. If you know what you're doing, feel free to initialize the modules individually or even manually on your own. The last main line is the main part.
printf("Hello, World!\n");"printf" stands for print-formatted. This means you can print things other than strings, and is just a stripped down of the printf function available in the c standard library. The last character in the string is a \n. This is an escape character, and is used to put the terminal's head to the next line. On some platforms (such as Windows/MS-DOS), you're required to also put a \r to return the console to beginning of the line, but this is an abstraction on the platform (similar to unix-based operating systems).
As displayed above, Rasp contains functions to print to the console. The first function is putchar, which just puts a character to the console. It just takes in the character to be printed. The next function is printf, which formats and prints something to the console. If you've programmed in C, you should be somewhat familiar to this function. Rasp's printf implementation only supports basic types (%c, %s, %d, %u, %x, and %o). The last main function is panic, which initiates a panic. A panic is when something is printed, and execution halts immediately after. This should be used for fatal and unresolvable errors.
Serial is the protocal used to communicate with other devices. It's very simple. You can read a character, and write a character. That's it! In Rasp, those are the two main functions for serial communication. The first function is sread. It accepts no parameters, and just returns the character that was read. The next function is swrite. It accepts 1 parameter (the character to br written), and returns nothing. Note that these two functions will spin until the serial line is ready to reading/writing. Serial is also what the printf function uses internally to print characters to a terminal.
GPIO stands for general-purpose IO. These are the pins located on the Raspberry Pi board. These pins follow a very simple concept too. You can get, and set the pins to 0 or 1 (on or off). Rasp has three main functions for GPIO communication. The first is gget, which takes in the pin number and returns it's value (an integer with the value 0 or 1). The second function is gset, which sets the pin's value to 1. This function accepts the pin number and returns nothing. The last function is gclr, which setse the pin's value to 0. This function accepts the pin number and returns nothing.
Now, you might ask why on earth I had the idea to implement spinlocks when everything is running in 1 core. My answer to that is uh, stop complaining? I know they're basically useless when theres only 1 core that's doing stuff. But again, this is just a library. The three main functions are slock, srele, and stry. The first acquires a spinlock, the second releases it, and the third tries to acquires it. A spinlock is essentiallly just an integer, and all these functions take in the pointer to that integer.
Like any CPU, the Raspberry Pi's computer has to handle interrupts. Interrupts are what allow external devices to communicate with the CPU. Upon recieveing an interrupt, the CPU then stops whatever it's doing and jumps to an interrupt handler. An interrupt handler is just a function that handles the interrupt and knows exactly what to do. Once the interrupt handler is done, it'll restore control to whatever was executing before the interrupt. Normally, operating systems will also call the scheduler to see if the current process needs to be swapped. This is not the case for Rasp, since it's not really an operating system, and everything is just 1 process. This however, does not mean that it does not do any interrupt handling. Rasp provides functions to implment interurpt handlers.
In the Arm architecture, there is a system of lines. Each line corresponds to an interrupt handler, and is used to distinguish types of interrupts and ensure they go to the correct handler.
Rasp has a few functions. The main one is iset, which registers an interrupt handler. It takes in the line number for the interrupt handler and the pointer to the handler itself. Another function is ihandle, which is the main interrupt dispatcher. It takes in the line number of the interrupt. Note that this function should not be called (that's why I'm putting it here). The last main function is ienable, which enables interrupts on a specific line. This is so other devices know what interrupts can be called and what can't. It takes in the interrupt line number that should be enabled, and doesn't return anything.
Making an interrupt handler is pretty simple. At the end of the day, it's just a function. You just have to remember to actually register that interrupt handler. This can be done by creating your own initialization function and registering that interrupt handler.
int myhandler() {
	printf("interrupt on line %d", IRQLINE);
}
Now that we have our interrupt handler, we need to register it by making our own initialization function. Note that we have to call this function in our main function. We need to make sure we disable interrupts in the beginning (so that they don't mess up our initialization), and then re-enable them at the end. We also have to enable interrupts at our line to let the CPU know that we're ready to handle interrupts at it.
int myinit() {
	// disable interrupts
	cli();

	// register handler
	// and enable line
	iset(IRQLINE, myhandler);
	ienable(IRQLINE);

	// initialize other stuff here
	// re-enable interrupts
	sti();
}
Memory is another very important part of any computer. It's what allows the computer to save information. Rasp's implementation of memory management is exactly like the one in the C standard library. The first function is malloc, which is short for memory-allocate, and allocates some memory. It takes in the number of bytes to allocate, and returns the pointer to the beginning of the allocated memory. The second function is free, which frees previously allocated memory. It only takes in the pointer to the memory. The last function is realloc, which reallocates memory. This function just allocates a new block of memory of a given size, copies memory over from the old block to the new one, and frees the old block. It takes in the pointer to the old block, the number of bytes the new block should be, and returns the pointer to the new block.
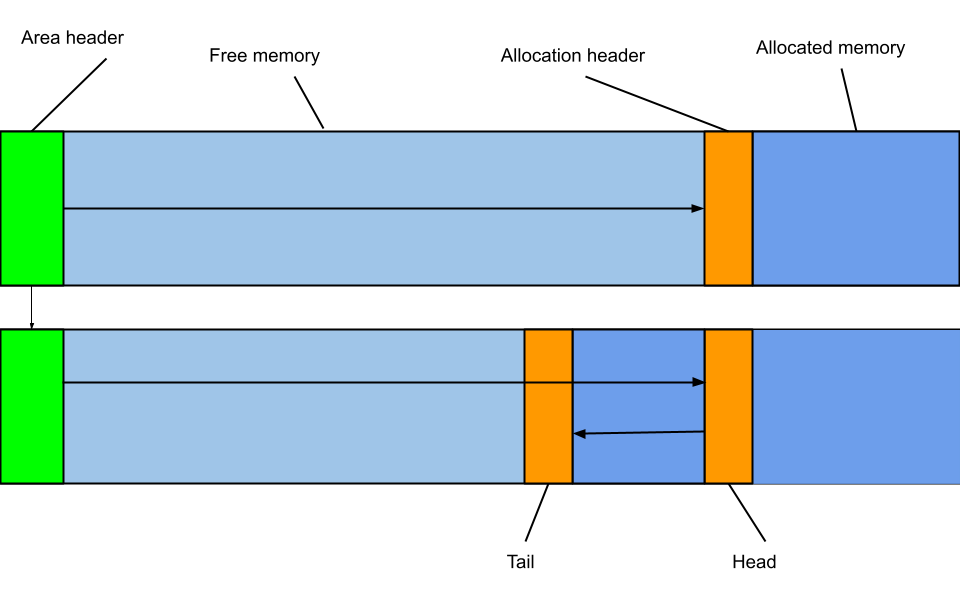
The free function not requiring a size of memory to be freed is a feature that was made to mimic what most C programmers are used to, and was a little complicated. A diagram is available below to aid with understanding.
Note that calloc has not been implemented since it's just a malloc with a memset. Here's an implementation of it if you just want it.
char *calloc(int size, int unit) {
	int n = size * unit;
	char *mem = malloc(n);

	memset(mem, 0, n);
	return mem;
}
Memory is split into a linked list of areas. Eash area has a fixed size which is calculated upon start-up. This is done so that we don't accidently write to memory that's reserved by the BIOS or mapped to device registers or something else. Each memory area has a header, which stores information about it's size and boundaries, headers, and link to next area.
Each memory allocation has a header that corresponds to it. Each allocation header keeps track of the size, pointer to corresponding memory area header, and pointer to next header (if existent).