
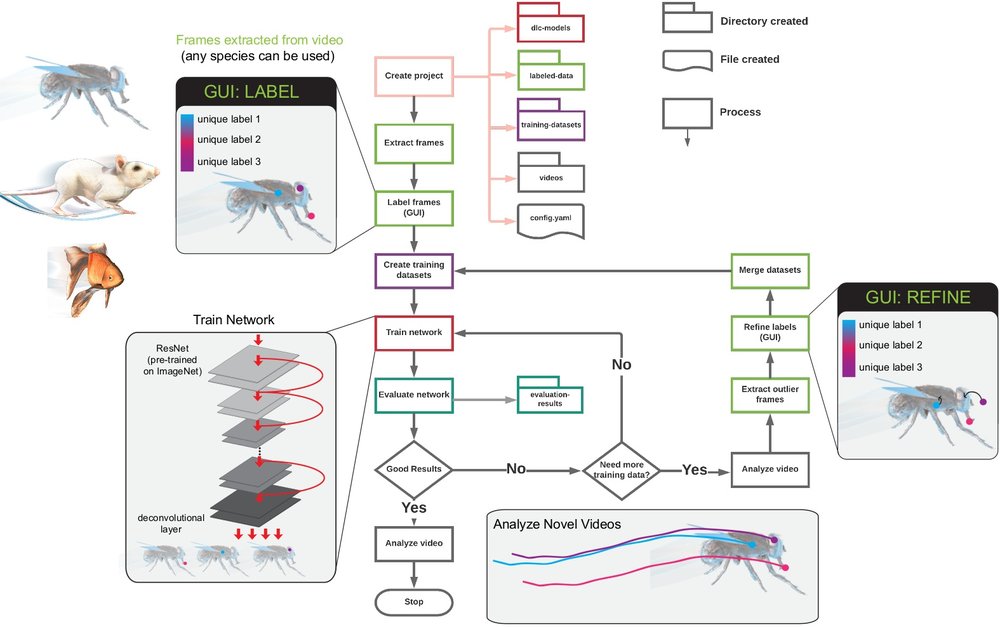
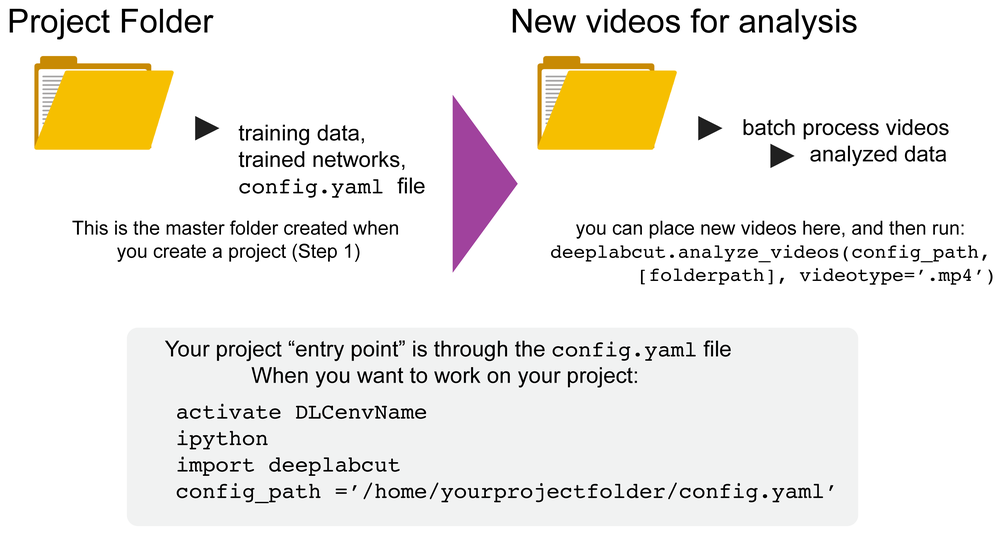
DeepLabCut is a software package for markerless pose estimation of animals performing various tasks. The software can manage multiple projects for various tasks. Each project is identified by the name of the project (e.g. TheBehavior), name of the experimenter (e.g. YourName), as well as the date at creation. This project folder holds a config.yaml (a text document) file containing various (project) parameters as well as links the data of the project.
You can have as many projects on your computer as you wish. You can have DeepLabCut installed in an environment and always exit and return to this environment to run the code. You just need to point to the correct config.yaml file to jump back in! The documentation below will take you through the individual steps.
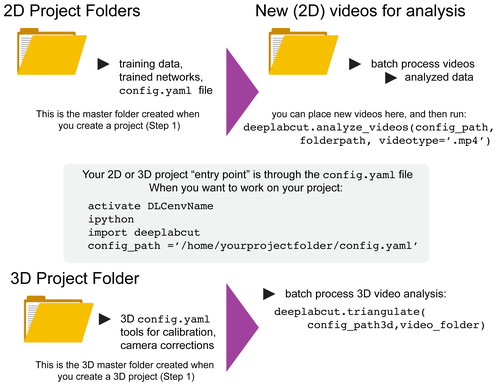
NEW as of 2.0.7 we support 3D analysis directly inside our package. Please see the 3D details here. Here are some tips for scaling up your 2D analysis: https://github.com/AlexEMG/DeepLabCut/wiki/Batch-Processing-your-Analysis
You can get started by using our demo Jupyter Notebooks (#1), or use iPython from the program terminal/cmd (#2), or, as of 2.1+, you can use our Project Manager GUI (#3)!
This page contains a list of the essential functions of DeepLabCut as well as demos. There are many optional parameters with each described function, which you can find here. For additional assistance, you can use the help function to better understand what each function does.

We provide Jupyter notebooks for using DeepLabCut on both a pre-labeled dataset, and on the end user’s own dataset. See all the demo's here! Please note that GUIs are not easily supported in Jupyter in MacOS, as you need a framework build of python. While it's possible to launch them with a few tweaks, we recommend using terminal - it's more fun and still easy, so please follow the instructions below!
*please note, we provide a quick-guide of the commands at the bottom of this page.
Also, if you are using MacOS, you must use pythonw vs. typing ipython, but otherwise it's the same.
If you are using DeepLabCut on the cloud, you cannot use the GUIs and you need to first set DLClight=True. Please read more here, and in our Protocol paper here.
Open an ipython session and import the package by typing in the terminal:
ipython
import deeplabcut
TIP: for every function there is a associated help document that can be viewed by adding a ? after the function name; i.e. deeplabcut.create_new_project?. To exit this help screen, type :q.
Start iPython, or if you are using MacOS, you must use pythonw vs. typing ipython, but otherwise it's the same.
If you are using DeepLabCut on the cloud, you cannot use the GUIs and you need to first set DLClight=True. Please read more here, and in our Protocol paper here.
Open an ipython session, import the package, and launch by typing in the terminal:
ipython
import deeplabcut
deeplabcut.launch_dlc()
That's it! Follow the GUI for details
deeplabcut.create_new_project(`Name of the project',`Name of the experimenter', [`Full path of video 1',`Full path of video2',`Full path of video3'], working_directory=`Full path of the working directory',copy_videos=True/False)
- Note, if you are a Ubuntu user the path should look like:
['/home/username/yourFolder/video1.mp4']; if you are a Windows user, it should look like:[r'C:\username\yourFolder\video1.mp4'] - Note, you can also put
config_path =in front of the above line to create the path to the config.yaml that is used in the next step, i.e.config_path=deeplabcut.create_project(...))- If you do not, we recommend setting a variable so this can be easily used! Once you run this step, the conig_path is printed for you once you run this line, so set a variable for ease of use, i.e. something like:
config_path = '/thefulloutputpath/config.yaml'
- just be mindful of the formatting for Windows vs. Linux, see below.
(more details here)
- open the config.yaml file (in a text editor (like atom, gedit, vim etc.)), which can be found in the subfolder created when you set your project name, to change parameters and identify label names!
(PLEASE see more details here)
- set the config_path (LINUX):
config_path = '/home/computername/DeepLabCut/yourprojectname/config.yaml'
- set the config_path (WINDOWS):
config_path = r'C:\home\computername\DeepLabCut\yourprojectname\config.yaml'
- or you already set it as a variable in step "create_new_project" directly above.
mini-demo: create project and edit the yaml file

deeplabcut.extract_frames(config_path,`automatic/manual',`uniform/kmeans', crop=True/False)
(more details here) *update: as of 2.0.5 checkcropping=True is dropped; you now just the option to directly draw a rectangle over the image to crop before extraction (i.e. there no need to manually change in config.yaml then check).
deeplabcut.label_frames(config_path)
(more details here)
mini-demo: using the GUI to label

deeplabcut.check_labels(config_path)
(more details here)
deeplabcut.create_training_dataset(config_path,num_shuffles=1)
(more details here)
deeplabcut.train_network(config_path,shuffle=1)
(more details here)
deeplabcut.evaluate_network(config_path,Shuffles=[1], plotting=True)
(more details here)
- Please note that novel videos DO NOT need to be added to the config.yaml file. You can simply have a folder elsewhere on your computer and pass the video folder (then it will analyze all videos of the specified type (i.e.
videotype='.mp4'), or pass the path to the folder or exact video(s) you wish to analyze:
deeplabcut.analyze_videos(config_path,[`/fullpath/project/videos/'], videotype='.mp4', save_as_csv=True)
Here are some tips for scaling up your analysis: https://github.com/AlexEMG/DeepLabCut/wiki/Batch-Processing-your-Analysis
You can also filter the predicted bodyparts by:
deeplabcut.filterpredictions(config_path,[`/fullpath/project/videos/reachingvideo1.avi'], shuffle=1)
Note, this creates a file with the ending filtered.h5 that you can use for further analysis. This filtering step has many parameters, so please see the full docstring by typing: deeplabcut.filterpredictions?
Create videos:
deeplabcut.create_labeled_video(config_path, [`/analysis/project/videos/reachingvideo1.avi',`/fullpath/project/videos/reachingvideo2.avi'],filtered=True)
Plot the outputs:
deeplabcut.plot_trajectories(config_path,[`/fullpath/project/videos/reachingvideo1.avi'],filtered=True)
(more details here)
deeplabcut.extract_outlier_frames(config_path,[`videofile_path'])
(more details here)
(refinement and augmentation of the training dataset)
deeplabcut.refine_labels(config_path)
mini-demo: using the refinement GUI, a user can load the file then zoom, pan, and edit and/or remove points:

When done editing the labels, merge:
deeplabcut.merge_datasets(config_path)
Now, create a new training set and re-train (same steps as above)!
(more details here)
In ipython/Jupyter notebook:
deeplabcut.nameofthefunction?
In python or pythonw:
help(deeplabcut.nameofthefunction)
You can exit an environment and easily jump back into a project by simply:
Linux/MacOS formatting example:
source activate yourdeeplabcutEnvName
ipython
import deeplabcut
config_path ='/home/yourprojectfolder/config.yaml'
Windows formatting example:
activate yourdeeplabcutEnvName
ipython
import deeplabcut
config_path = r'C:\home\yourprojectfolder\config.yaml'
Now, you can run any of the functions desribed in this documentation.
There is also helper code to further analyze your data or scale up analsis here: https://github.com/AlexEMG/DLCutils/
The 12 main steps to take you from project creation to analyzed videos:
Open ipython in the terminal:
import deeplabcut
Create a new project:
deeplabcut.create_new_project(‘project_name’,‘experimenter’,[‘path of video 1’,‘path of video2’,..])
Set a config_path variable for ease of use:
config_path = ‘yourdirectory/project_name/config.yaml’
Extract frames:
deeplabcut.extract_frames(config_path)
Label frames:
deeplabcut.label_frames(config_path)
Check labels [OPTIONAL]:
deeplabcut.check_labels(config_path)
Create training dataset:
deeplabcut.create_training_dataset(config_path)
Train the network:
deeplabcut.train_network(config_path)
Evaluate the trained network:
deeplabcut.evaluate_network(config_path)
Video analysis:
deeplabcut.analyze_videos(config_path, [‘path of video 1’,‘path of video2’, ...])
Plot results (trajectories):
deeplabcut.plot_trajectories(config_path, [‘path of video 1’,‘path of video2’,..])
Create a video:
deeplabcut.create_labeled_video(config_path, [‘path of video 1’,‘path of video2’,..])
Return to readme.