A Keras implementation of a Single-Image Super-Resolution Residual Convolutional Neural Network (CNN).
The goal is to obtain a network that successfully increases the resolution of an image in a manner that outperforms the generic "bicubic" method.
The model's architecture used in this project can be visualized here.
- Warning
- Demonstrations
- Dataset
- Getting Started (installation and predictions)
- Built With
- Author
- License
- Acknowledgments
This is still a Work In Progress.
Hardware and time limitations prevent me from perfecting this project too much, but it has already reached a decent state. :)
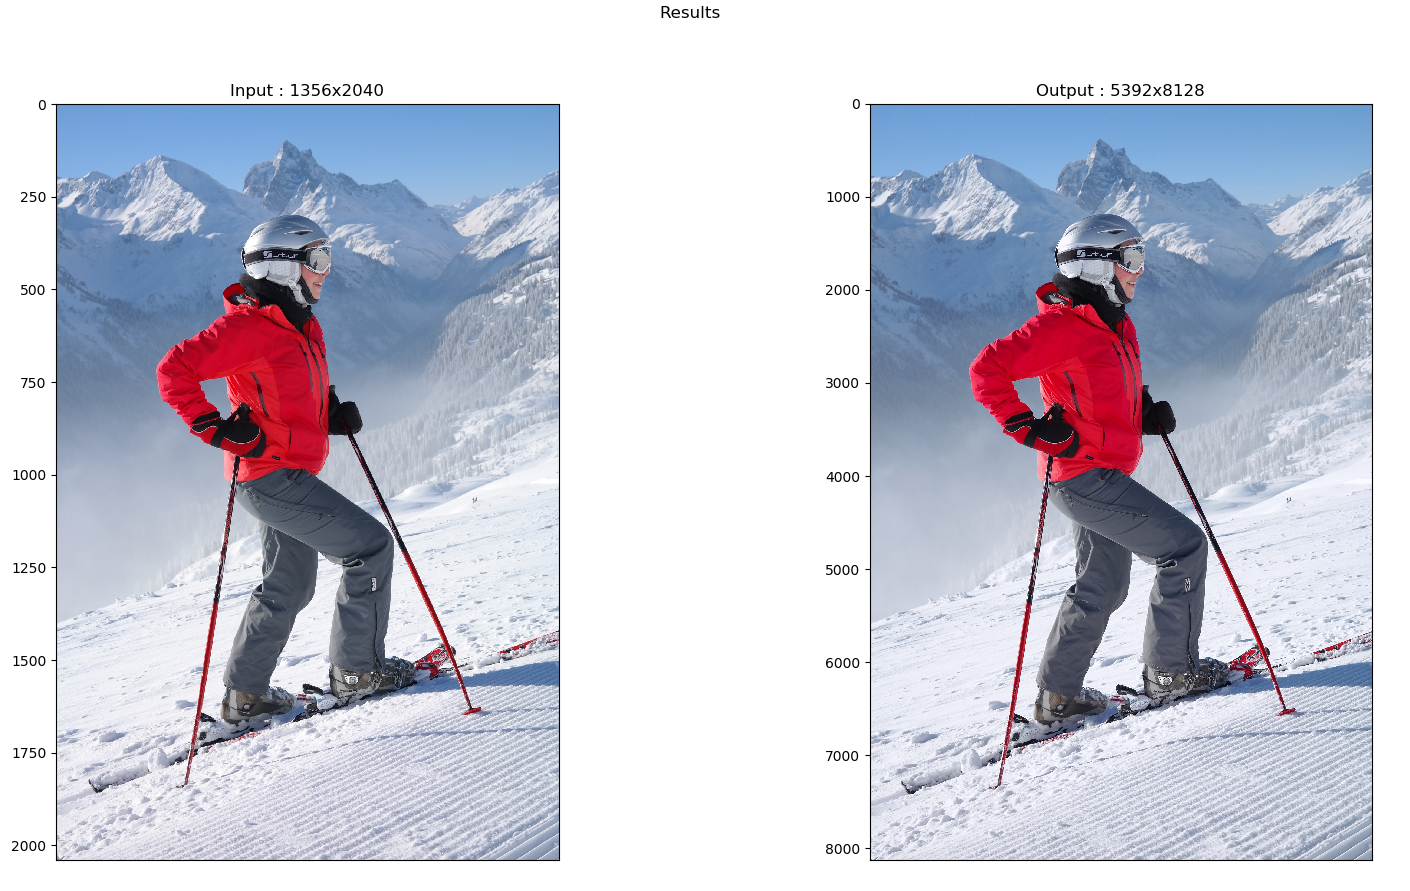
The demonstrations below are showing images that were originally HR, which were then reduced in size (which pixelated them). This is exactly the kind of images the network was trained on (though the images shown were never used during training, of course).
This means that the network most probably has learned how to increase the resolution of images which possibly had certain patterns associated with the way images have their resolution reduced when they are down-sized.
Using the network on an image that actually had a low resolution in the first place might not give the same results.
To better counter the bias related to the learning of "reversing the reduction algorithm", different algorithms to reduce the size of the HR images should have been employed rather than always using the same one.
It might also be interesting to integrate more data augmentation within the training phase of the model.
The latest results came from the model that was trained with the Adadelta optimizer with the whole dataset:
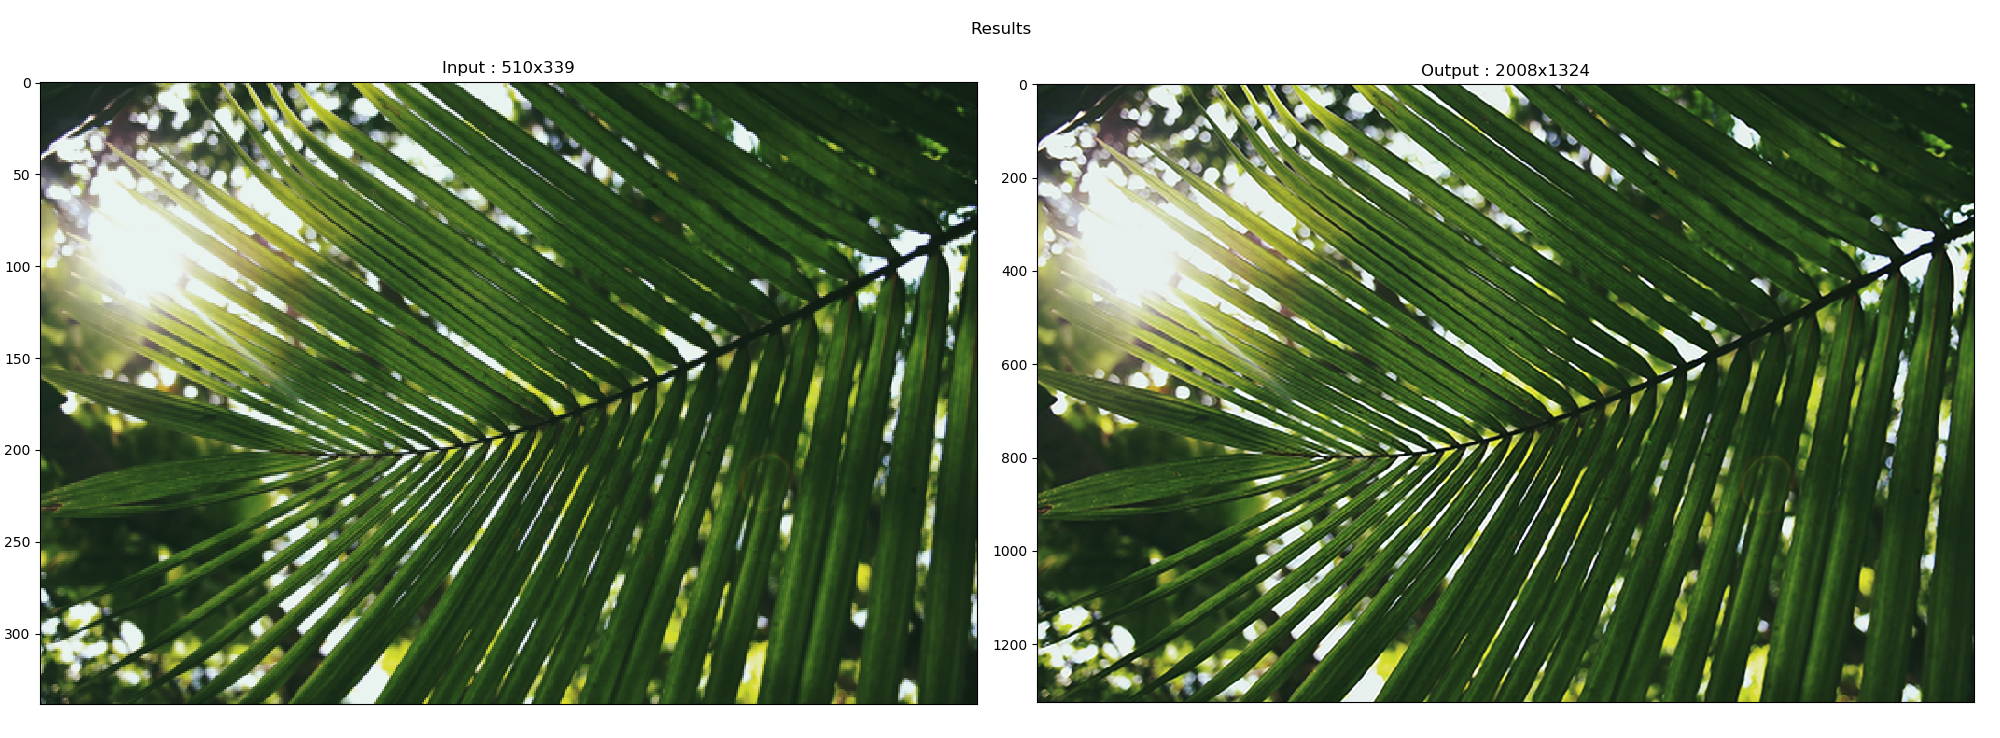
And if you're curious, here is an older result that came from another model that was trained with only 14 images that were data-augmented (that one used the Adam optimizer):
All those images used were, of course, never revealed to the network during training.
More examples of results can be found here, though there are demonstrations using older models included in there as well.
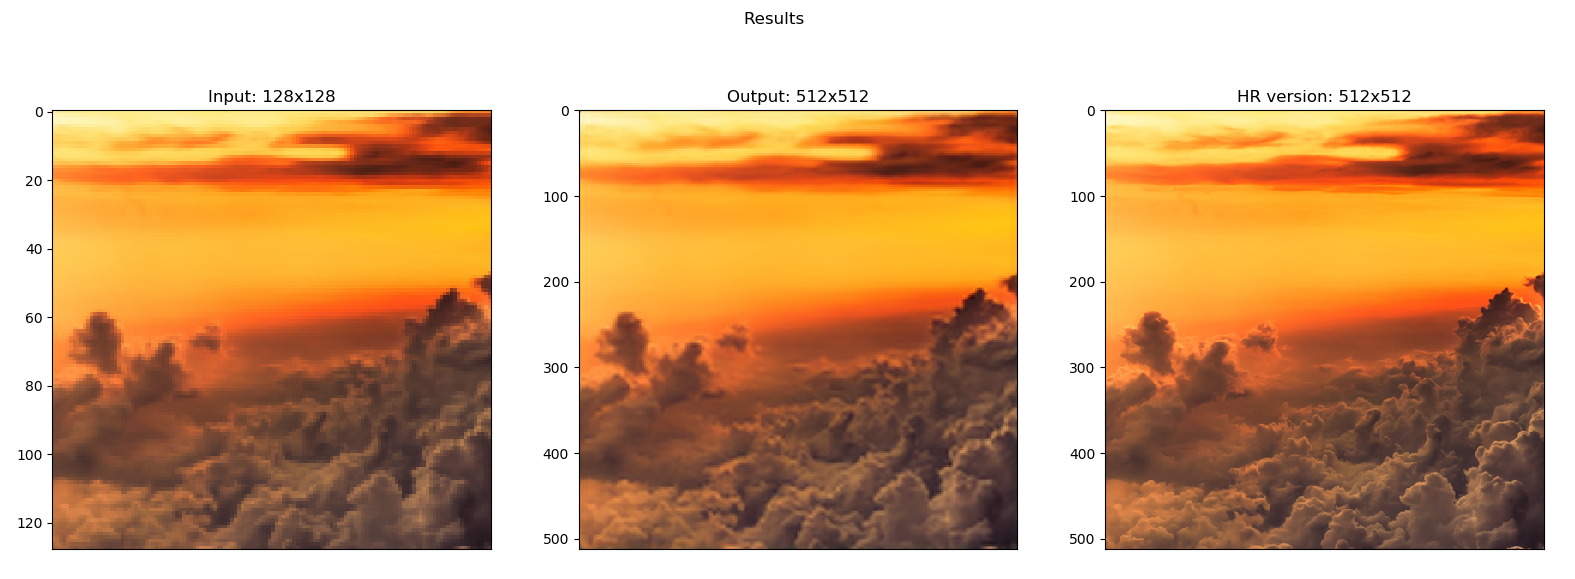
About the "Warning on bias" section, here is an actual example that came from the wild: a low-resolution image that came as is.

Here is the result after going through the network:

Here is the result after using Paint to just quadruple the size of the input:
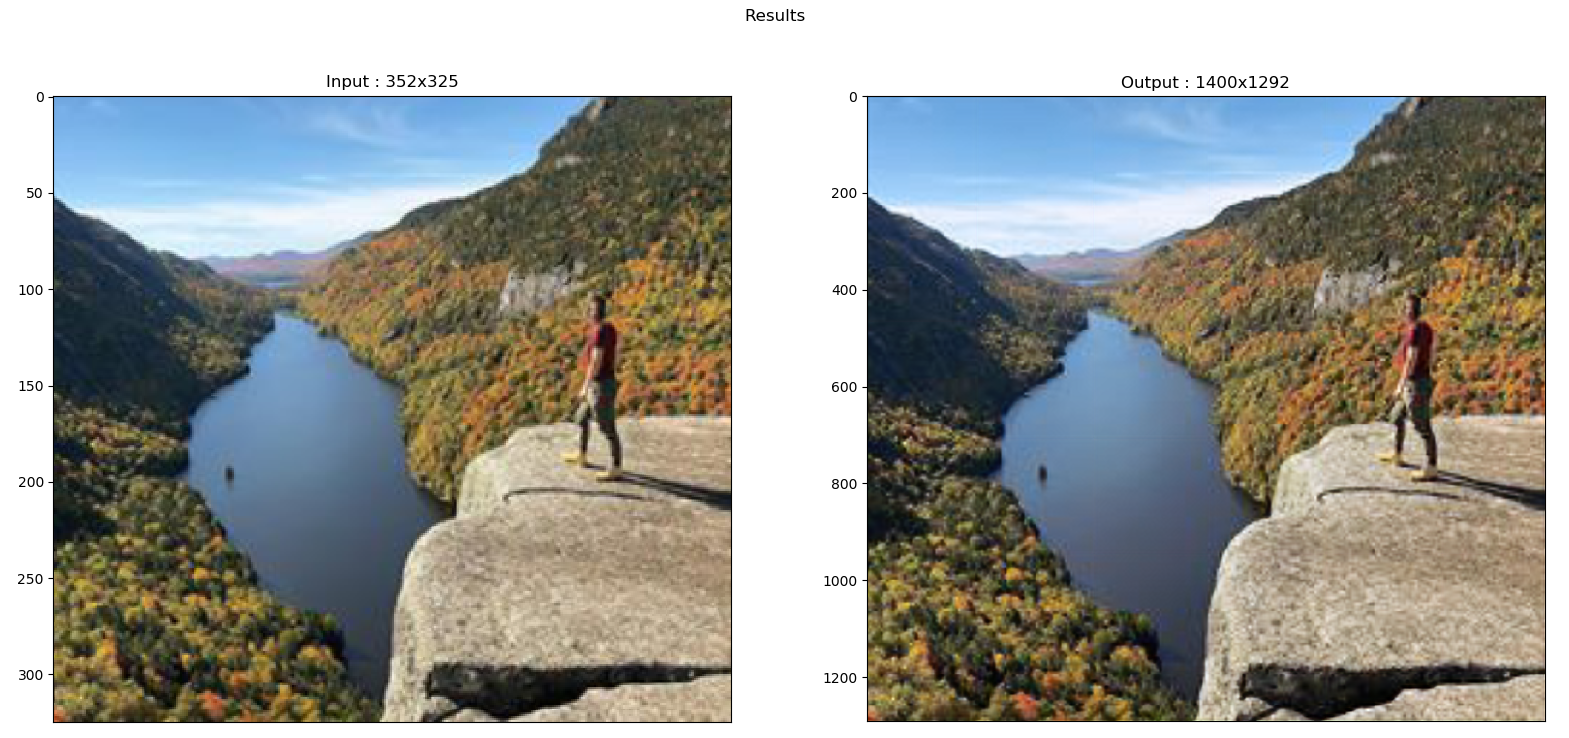
Thus resulting in the following "Results" comparing-image that my code spits out after running the prediction on the image (through the predict.py command-line):
You can download it here (7.1GB).
These instructions will get you a copy of the project up and running on your local machine for development and testing purposes. See deployment for notes on how to deploy the project on a live system.
You will need a virtual environment that contains the following packages if you want to mess with the code:
tensorflow
keras
numpy
matplotlib
graphviz
scikit-image (skimage)
pillow (PIL)
hdf5 (h5py?)
For simple predictions through the command line, though, you will only need:
tensorflow
keras
numpy
matplotlib
scikit-image (skimage)
hdf5 (h5py?)
There are two pre-trained models in the save folder. All these files include the weights AND the optimizer's state (so that you can train with that too). Both models use the Adadelta optimizer and were trained using the whole dataset.
During training, the models always take an input image, split it in smaller parts, and takes a few of those parts to train with.
sobel_model.h5: Used a Sobel Filter to sort all the parts and select only the more relevant sections of an input image (thus discarding sections which contain only a single color, for example).
random_model.h5: Randomly took a few of the parts to train with.
Both models were trained for less than 20 epochs. As mentioned earlier, due to time and resource limitations, I cannot provide you with better models, but you can definitely keep training them: they were far from overfitting. Be aware that the Sobel module makes training approximately 5 times longer.
Use the following line to import the project on your computer.
git clone https://github.com/payne911/SR-ResCNN-Keras-.git
You can then open it with your preferred IDE and start messing around. Minor tweaks will most probably be done through the constants.py file which is more or less the "Controler" of the flow.
Put your image inside the input folder, and run the following command (after activating your virtual environment):
python predict.py your_image.png
This will process your entire image and output the result. The enhanced-resolution image will be saved in the output folder. To set a custom name for the saved image, use:
python predict.py your_image.png -s=your_custom_name.png
For a full list of the commands available to you:
python predict.py -h
To run the code through a command line, activate your virtual environment and type (though as it is it isn't really recommended since you most probably do not have a dataset set up at proper place for the default variables to work out fine... you'll have to actually modify the constants.py file):
python train.py
Based on the variables set in the constants.py file, the behavior of the program will be different.
For now, I'll just be lazy and copy paste its content so that you can have a rough idea of the possibilities:
############################
##        PREPARE         ##
############################
crops_p_img = 10    # Number of samples/crops taken per HR image (to get the target output size)
augment_img = True  # Augment data with flips (each image will generate an extra flipped image)


############################
##       SAVE/LOAD        ##
############################
load_model = True    # Should we load a saved model from memory ?
save_dir   = 'save'  # folder name where the model will be saved
model_name = random_model.h5  # Name of the model that is to be loaded/saved

def get_model_save_path():
    return save_dir + '/' + model_name


############################
##         MODEL          ##
############################
scale_fact = 4    # resolution multiplication factor
res_blocks = 3    # amount of residual blocks the network has (+1)


############################
##        TRAINING        ##
############################
# Adjust "crops_p_img", "img_height", "img_width" and "batch_size" to maximize memory usage of GPU.
# "augment_img" will double the amount of pixels calculated below.
# Amount of pixels per batch seen by GPU: "crops_p_img" x "batch_size" x "img_width" x "img_height"
img_width   = 64   # size of the output of the network (play around along with batch_size to maximize memory usage)
img_height  = 64   # this size divided by the scale_fact is the input size of the network
img_depth   = 3    # number of channels (RGB)
epochs      = 10   # amount of times the training data is used
batch_size  = 4    # amount of images to be cropped
verbosity   = 2    # message feedback (0, 1 or 2): higher means more verbose
val_split   = 0.1  # percentage of the dataset to be used for validation
hr_img_path = 'dataset/DIV2K/DIV2K/DIV2K_train_HR/'  # Where the training dataset is.
# hr_img_path = 'pictures/HR/'  # Use this when you want to test the initialization of the filters.
second_path = 'pictures/HR/'  # Path used for Diagnose.


############################
##       EVALUATION       ##
############################
add_callbacks = True      # TensorBoard and visualization/diagnostic functionalities (slows down training)
log_dir       = './logs'  # directory where the Callbacks logs will be stored
tests_path    = 'input/'  # path to the folder containing the HR images to test with

def get_log_path():
    print("Current TensorBoard log directory is: " + log_dir + '/' + datetime.datetime.now().strftime("%Y-%m-%d_%H-%M-%S"))
    return log_dir + '/' + datetime.datetime.now().strftime("%Y-%m-%d_%H-%M-%S")


############################
##       PREDICTION       ##
############################
input_width   = 64  # width  size of the input used for prediction
input_height  = 64  # height size of the input used for prediction
overlap = 16 # amount of overlapped-pixels for predictions to remove the erroneous edges todo: figure out how many! (tried predict.py on HR-skier "7.png" and still saw edges)- PyCharm - The IDE used
- Keras - The wrapper on TensorFlow framework
- Python 3.6
- Jérémi Grenier-Berthiaume
See also the list of contributors who participated in this project.
This project doesn't yet have a license applied. Reproduce at your own risk.
My thanks go to:
- sds: a kind StackOverflow user that has helped understand a few things when I was just starting with this project.
- this repo which provided me with some insights on the actual implementation discussed in this paper.
- Stanford University's course on CNN: YouTube videos and syllabus.
- Bowen Peng (GitHub: bloc97) for providing me with a Gist that helped me introduce the Sobel Filter in the training phase.
Notes to self.
[-] Train new model should also try out the "Conv2DTranspose"
[-] Integrate random size-reduction algorithms for the training-set generation
[-] Integrate `requirements.txt` (https://stackoverflow.com/questions/7225900/how-to-install-packages-using-pip-according-to-the-requirements-txt-file-from-a)
[-] Subtract mean of images during training
[-] Use x_test to generate bicubic enlargments
[-] Use Keras ImagePreProcessing object for data augmentation?
[-] Provide the "Weights" and "Architecture JSON" for both models
[-] Create Android Application that uses the model as a Proof of Concept
[-] Stand-alone prediction repo
[-] Switch from RGB channels to CbCrY