##Introduction This is a simple realtime HTML Dashboard that works together with the new Varnish Agent 2 (https://github.com/varnish/vagent2).
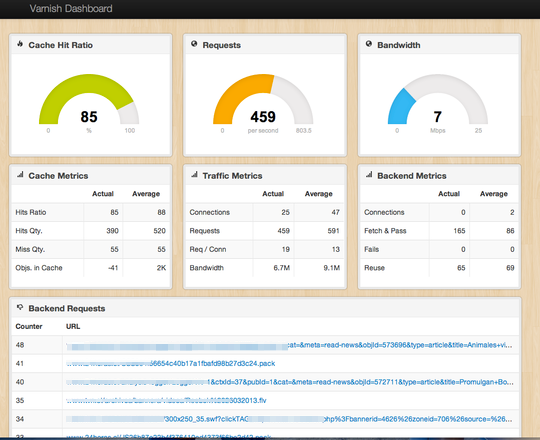
The previous image was taken from a live site using Varnish.
Important Note
The Backend Requests is a list of all the URL fetched from the backend. For this to work you need to add the following instruction to the vcl_recv routine:
sub vcl_recv {
  set req.http.X-Full-Uri = req.http.host + req.url;
....
##How to use it
1. Install Varnish Agent 2
The agent must be installed in the same server running Varnish Cache. You can clone and compile the source code or install it using the following packages for Debian/Ubuntu and RHEL/CentOS: http://users.varnish-software.com/~kristian/agent/
I recommend that you read the docs on the GitHub repo and this post: http://kly.no/posts/2013_01_22_Varnish_Agent.html
You may have to create a file with username and password: /etc/varnish/agent_secret. Every line of this file is a user and a password with the following format:
username:password2. Clone this Repo
For this guide we are going to assume that the Dashboard will be located at /var/www/html/Varnish-Agent-Dashboard. So lets create the directory and clone the repo:
mkdir -p /var/www/html
cd /var/www/html
git clone git://github.com/ITLinuxCL/Varnish-Agent-Dashboard.git
3. Run the Agent and use the Dashboard
Now you are ready to use the Dashboard, just run the Agent like the following example:
varnish-agent -H /var/www/html/Varnish-Agent-Dashboardand visit http://VARNISH_IP:6085/html/