WebUIUsingTheLinePrinter
The B5500 supported several line printer models, with speeds ranging from 475 to 1040 lines per minute. A B5500 system could have up to two line printers, identified as LPA and LPB.
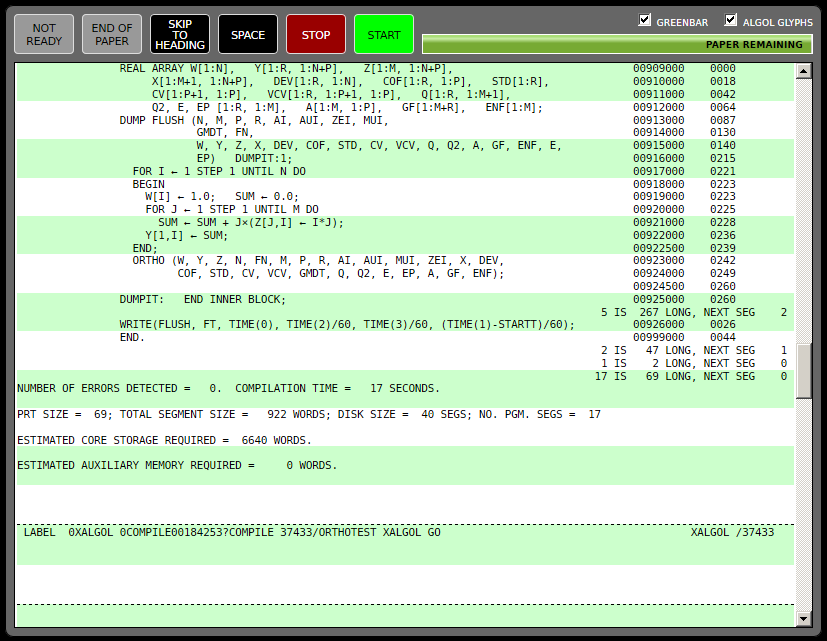
The line printer interface we have developed for the web-based emulator is modeled after the 1040 line-per-minute B329. This interface opens in a separate window when the POWER ON button is activated on the emulator console.
The B329 had additional buttons and lamps related to the mechanical nature of the printer (e.g., print-check errors), but those controls are not relevant to operation under the emulator.
The printer used standard pin-feed continuous forms. It had a punched-paper carriage-control tape to define vertical skip positions on a page of forms, but the carriage tape is not presently supported by the emulator. All skip-to-channel printer commands are treated as skip-to-channel-1 (form feed) commands. These result in a dashed horizontal line being placed at that point in the paper area of the printer's window.
The printer supports both single- and double-spaced printing of output. Zero-spaced printing (overprinting) is not supported -- such lines are printed with single spacing. The channel-12 "skip over perforation" feature of the printer is also not supported.
The printer interface consists of several buttons, lamps, and other controls, plus an area that displays the "paper" with a number of the most-recently printed lines. Lines are printed in this area as they are received from one of the B5500's I/O Control Units. The area will scroll as lines are added to the end.
The text of the printed lines is stored in your workstation's memory. To avoid flooding memory during large print runs, the capacity of the "paper" area is limited to 150,000 lines, which is roughly equivalent to a case of the stock "greenbar" pin-feed paper that was used with these printers. Once this limit is reached, the printer will go not-ready and the END OF PAPER button/indicator will illuminate. See below for how you can clear the paper area and continue printing.
You can virtually remove "paper" from the printer by selecting and copying lines of text from the paper area and then pasting them into another application, such as a text editor, from which they can be saved to your local file system. This copy/paste technique is the only reasonably convenient way to capture data from the browser-based emulator. Some browsers may also allow you to save the paper-area contents to a file or print the area to your local printer. See below for more details on capturing the output of the printer.
Lines of text are composed using the ASCII equivalent of the emulator's version of the B5500 64-character set:
    0 1 2 3 4 5 6 7
    8 9 # @ ? : > {
    + A B C D E F G
    H I . [ & ( < ~
    | J K L M N O P
    Q R $ * - 0 ; {
      / S T U V W X
    Y Z , % ! = } "
The B5500 used five special Algol characters that do not have ASCII equivalents. The emulator uses the following ASCII substitutions for them:
-
~for left-arrow -
|for the multiplication sign -
{for less-than-or-equal -
}for greater-than-or-equal -
!for not-equal
As an option, the printer will render the special Algol characters using their appropriate Unicode glyphs. See below for instructions on how to enable and disable this feature. The five Unicode glyphs are:
- U+00D7: small-cross (multiplication sign)
- U+2190: left-arrow
- U+2260: not-equal
- U+2264: less-than-or-equal
- U+2265: greater-than-or-equal
The user interface for the emulated line printer consists of the following controls and indicators:
- NOT READY -- this white indicator illuminates when the printer is in a not-ready status. The printer becomes ready when the START button is clicked. It becomes not-ready when the STOP button is clicked or when the paper-area limit is reached.
- END OF PAPER -- this white button/indicator lights when the paper-area limit is reached. This condition will also change the printer status to not-ready and illuminate the NOT READY indicator. When the END OF PAPER indicator is lit, clicking it will make the printer ready again, but the next line printed will trigger the paper-area limit, making the printer not-ready again. The button is not active except when lit. To resume continuous printing, you must first clear the paper area, as discussed below.
- SKIP TO HEADING -- clicking this black button when the printer is in a not-ready status will simulate a skip-to-channel-1 operation. Clicking this button three times in succession will initiate clearing the paper area, as discussed in more detail below. The button is not active when the printer is in a ready status.
- SPACE -- clicking this black button when the printer is in a not-ready status will simulate a single-space operation. The button is not active when the printer is in a ready status.
- STOP -- clicking this red button will stop the printer and place it in a not-ready status. The NOT READY button will illuminate. The button is not active when the printer is not ready.
- START -- clicking this green button will place the printer in a ready status. The NOT READY lamp will go out. The MCP should sense the status change within a second or two and begin (or resume) printing if any I/Os to the unit are currently queued.
The purpose of the END OF PAPER button was to incrementally print the last few lines on the last page of box of paper, so that it would clear the lower pin-feed tractor. Once that page was completed, the first page of a new box of paper could be loaded into the printer. The emulated printer simply reproduces this behavior.
To the right of the buttons is a progress bar showing the relative amount of "paper" left before the paper-area limit is reached. Each time you clear paper from the printer, this bar resets all the way to the right. As lines are printed, the length of the bar will decrease towards to left in proportion to the number of lines printed.
In the upper-right of the unit's window is a checkbox labeled ALGOL GLYPHS. When this box is checked, the five special Algol characters will be rendered using their Unicode glyphs. When the box is unchecked, those characters will be rendered using their ASCII substitutions, as described above. Toggling the checkbox will convert the characters in the paper area between Unicode glyphs and the ASCII substitution glyphs. The initial setting for this box is taken from the "Algol Glyphs" setting for the printers in the current system configuration.
To the left of the ALGOL GLYPHS checkbox is another checkbox labeled GREENBAR. When this box is checked, the paper area will be formatted with alternating green and white bars, similar to that found on traditional pin-feed continuous forms. Toggling the checkbox will alternately remove and reinstate the green bars. The initial setting for this box is checked.
As mentioned above, you can stop the printer at any time and make it not-ready to copy or save lines of text from the paper area and/or clear the paper area.
In the normal case, there is nothing you need to do with the printer except watch the lines go by as they are printed. If you want to save the printed output, select the portion you wish to keep and copy/paste it into another application. If your browser supports it, you may also be able to print the paper area or save it as a text file to your local file system. When printing directly to a printer for your workstation, the dashed lines in the paper area should force a from feed on the workstation printer.
When the paper-area limit is reached, the printer will stop, go not-ready, and illuminate the END OF PAPER button. Clicking the END OF PAPER button will allow one additional line to be printed, then the unit will go not-ready again. You can continue clicking the button as many times as desired.
To resume continuous operation of the printer after the paper-area limit is reached, you must clear the paper area. As described above, with the unit in a not-ready state, click the SKIP TO HEADING button three times in succession. A confirmation dialog will display, asking if you want to clear the paper. When you click the OK button on this dialog, the paper area will be cleared and the paper supply reset to the maximum. At this point you can click the START button to resume printing. Make sure you copy or save any text from the print area you want to keep before clearing the paper area.
As an alternative way to capture the contents of the paper area, double-click anywhere in the text of the paper area. The emulator will open a temporary window and copy the entire contents of the "paper" to it, clearing the printer paper area in the process. From there, you can save the text in the temporary window to a file, print it, or copy/paste it into another application. When you have finished with the temporary window, simply close it.