WebUIUsingTheConsole
Compared to virtually every other computer system of the 1960s, the Burroughs B5500 had an extraordinarily minimalist operator console -- just five buttons and six lights, plus a few more on the Teletype SPO (supervisory printer/keyboard). The best image we have of the Console is from the 1968 Burroughs Corporation annual report:
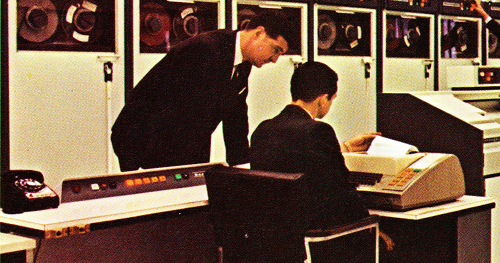
That image shows the B5500 at the City of Montreal, Canada. In the foreground is the L-shaped console desk, with the Teletype Model 33 SPO. You can see part of a card reader behind the SPO and magnetic tape drives in the background.
We have tried to be faithful to the design of the Console in our representation of it for the web-based user interface:

There were lots more lights, buttons, and switches on the maintenance panels in the Display and Distribution (D&D) Unit, but those were intended for use in maintenance and diagnosing hardware problems, not operating the system. They were usually behind the D&D cabinet door, out of sight, and thanks to an interlock switch on the door, powered off.
The Console is the central control for the web-based emulator. To display the Console, navigate to the emulator's home page, B5500Console.html in the webUI/ directory of emulator files on your web server or your local file system. If you are running the emulator from our hosting site, simply go to
The home page will look similar to this:
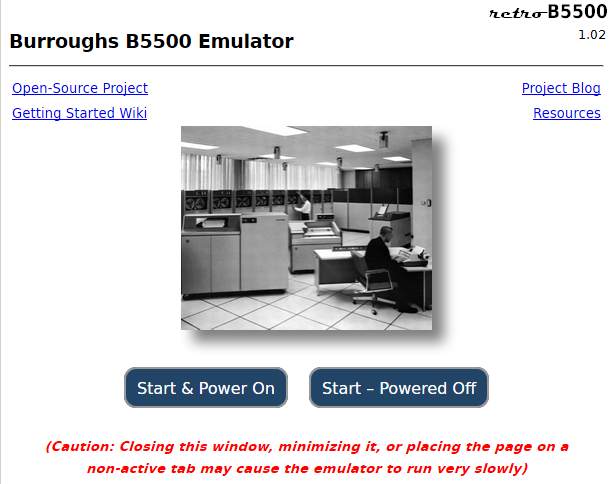
On the home page, click one of the "Start" buttons. This will open a small window for the Console.
- The Start & Power On button will open the Console window and automatically power up the emulator, as if you had subsequently clicked the Console's green POWER ON button.
- The Start - Powered Off button will simply open the Console window without powering up the emulator. You may wish to use this button if you want to make configuration changes before running the emulator, as such changes can be made only when the emulator is in a powered-off state.
Once the Console window is open, you may move it around on your screen, or even minimize it. Closing the Console window will implicitly halt the system and power down the emulator. The emulator will display a warning dialog if you attempt to close the Console window while the emulator is powered up.
The Console is used to power the system on and off, initiate a load (boot) of the operating system, and halt the system. The A/B Normal/Control lights give a basic indication of system activity by showing when the two processors (A and B) are operating in Normal and Control State, respectively. All other operations are handled through the SPO.
From left to right, the controls on the Console are:
- HALT button -- clicking this red pushbutton halts the system. This initiates an immediate termination of all processing. The only way to continue after halting is to click LOAD and reboot the system. The button illuminates when power is on and the system is halted.
-
NOT READY light -- this white indicator illuminates when one of the components of the system that did not have its own ready/not ready indicator is in a not-ready or off-line state. It applies to processors, I/O units, memory modules, and the first drum (if present). The emulator handles this in a similar manner and will illuminate this indicator if, at the time the system is powered on, any of the following conditions are true, as they will prevent the system either from booting or from supporting the MCP:
- No Processor is enabled in the current configuration.
- One of the enabled processors is not designated as P1, the control processor.
- No I/O Control Units (channels) are enabled.
- Memory module 0 (having addressees 00000-07777 octal) is not enabled.
- The SPO device is not enabled in the configuration.
- The DKA device (Disk File Control A) is not enabled in the configuration.
- MEMORY CHECK -- this red light illuminates when a memory parity error is detected by either processor. The emulator does not presently generate memory parity errors, however.
- LOAD -- clicking this black pushbutton when the emulator is in a halted state clears all registers in the system and initiates a load operation. It is inoperative while the system is running. When loading from disk, 63 sectors (1890 words) are read into memory starting at location 20 octal. When loading from cards, one binary card is read into memory starting at location 20 octal. If the read is successful, Processor 1 then starts executing at that address.
- CARD LOAD SELECT -- this yellow button/light controls whether a load operation reads from the first disk1 or the first card reader. In its normal position, load is from disk. When pressed, the physical button latched inward and illuminated, enabling load from cards. In the web-based emulator, the state of the button toggles each time you click it, but the button only illuminates.
- A NORMAL -- this yellow light illuminates when Processor A is operating in Normal State (i.e., running user code).
- A CONTROL -- this yellow light illuminates when Processor A is operating in Control State (i.e., running MCP code).2
- B NORMAL -- this yellow light illuminates when Processor B is operating in Normal State.
- B CONTROL -- this yellow light illuminates when Processor B is operating in Control State.
- POWER ON -- clicking this green light/button initiates a power-up sequence for the system. The button is illuminated while power is applied to the system. In the web-based emulator, clicking this button first runs a brief lamp test. The emulator then loads the current configuration parameters, initializes the internal emulator components, and opens a series of sub-windows for the peripheral devices configured for the system -- SPO, card reader, line printer, etc.
- POWER OFF -- clicking this black pushbutton initiates a power shutdown sequence for the system. In the web-based emulator, clicking this button halts the processor(s) and closes the peripheral sub-windows.
When the Console window first opens, only the POWER ON button is activated. Once power is applied and the emulator is initialized, the POWER OFF and LOAD buttons become active and POWER ON is disabled. Once LOAD is clicked, HALT becomes active and LOAD is deactivated. When power is on, POWER OFF can be clicked at any time, even while the system is running programs.
When the SPO window opens, it will print a short message indicating the emulator version. Please wait for this message to finish printing before attempting to click the LOAD button. The LOAD button will not function until the SPO is on line and goes to REMOTE status.
Once you load the system, there is generally nothing further you need to do with the Console -- except watch the pretty lights -- until you are ready to halt the system. The SPO window will probably be the one you use the most.
The emulator, like the B5500, is fairly robust. You can halt or power off the system at any time. You can even just quit the browser. We recommend, however that you do an orderly shutdown when you are finished with the system -- click HALT, then POWER OFF, then close the Console window, and then quit the browser if desired.
To reboot a running system, click HALT and then LOAD. You may halt the system and power it off, then power it back on and do a load without quitting the browser. In order to change the emulator configuration, you must halt and power down the emulator.
You may move and resize the emulator windows in any way you wish, including the Console window. You may also minimize any of the windows, but do not close the peripheral windows. Closing one of those will render that device inoperable until the emulator is reinitialized with the POWER ON button. Closing the Console window will halt and power down the emulator.
Some web browsers, particularly Firefox, slow the execution of Javascript scripts while they run in a non-active tab of a window. The emulator has a performance throttling mechanism that attempts to run the B5500 processor at its real speed. To keep this mechanism from falling behind in terms of real time, avoid opening the B5500 Console in a window with multiple tabs where one of the other tabs is the active one. It is best to open the Console in its own window, or at least keep it as the active tab in a window. If you need to use the browser to access other web sites at the same time the emulator is running, we recommend that you open separate browser windows to do so.
See the Running the Emulator page for more information on using the Console to start the emulator and operate it.
Since the emulator is not a physical system, it is often difficult to tell exactly what is happening while it runs. To give a better view of what is happening within the system (and because it was sort of a cool thing to do), the emulator displays a series of white annunciator lights in two rows below the standard buttons and lights. If you are a purist and don't want to see these additional lights, you can toggle their display off and on by clicking the Burroughs logo in the upper-right corner of the Console.
Clicking the retro-B5500 logo (or the plain B5500 logo if the Console is in purist mode) while the emulator power is off will open a sub-window from which you can examine and alter the system configuration. Processors, I/O Units, memory modules, peripheral devices, and a disk subsystem can be included or excluded from the configuration. Multiple, named configurations can be stored and recalled, so you can easily maintain different configurations for different purposes. You can also maintain multiple disk subsystems and switch among them. See Configuring the System for details.
In non-purist mode, the Console displays the names of the current system configuration and current disk subsystem above the Burroughs logo. It also displays the current version of the emulator below the Burroughs logo and to the left of the retro-B5500 logo.
The MEMORY CHECK indicator was a lamp and not a pushbutton on the B5500. If you click this lamp while the emulator is in a powered-on state, however, the Console will generate a full dump of processor and core memory state in a separate window. You may then save the contents of this window to a file or copy/paste it into another program for analysis. Simply close the window when you are finished with it.
The NOT READY indicator was also a lamp and not a pushbutton on the B5500. If you click this lamp while the emulator is in a powered-on state, however, the Console will generate a tape image of full dump of core memory state in a separate window. This tape image can be read and formatted by the B5500 DUMP/ANALYZE utility. You may save the contents of this window to a text file or copy/paste it into another program for saving as a file that can be input to the dump analysis utility. Simply close the window when you are finished with it.
Note: Prior to release 1.00, clicking the NOT READY indicator allowed you to toggle Processor B into and out of the current system configuration. With the implementation of the interface for system configuration in that release, however, this behavior has been replaced by the one described above. The number of processors in the system is now controlled through the configuration interface.
The Console attempts to update its display every 50 milliseconds. This update period applies not only to the annunciators below, but also to the A/B Normal/Control lights described above. Generally, an annunciator is illuminated if the corresponding element of the system had any activity since the last update of the display. The A/B Normal/Control lights use multiple shades of yellow to simulate lamp intensity, which in turn indicates the relative amount of time a processor is in each state.
The top row of annunciators displays activity for the I/O Units (channels), external interrupts, and Processor 2 control for the system:
-
IOU1-- I/O unit 1 busy (i.e., an I/O is active on this unit) -
IOU2-- I/O unit 2 busy -
IOU3-- I/O unit 3 busy -
IOU4-- I/O unit 4 busy -
TIMR-- Interval timer interrupt (fires every 1.067 [64/60] second) -
IOBZ-- I/O busy interrupt (i.e., no I/O unit available) -
KBD-- Keyboard request interrupt -
PR1F-- Printer 1 finished interrupt -
PR2F-- Printer 2 finished interrupt -
IO1F-- I/O unit 1 finished interrupt -
IO2F-- I/O unit 2 finished interrupt -
IO3F-- I/O unit 3 finished interrupt -
IO4F-- I/O unit 4 finished interrupt -
P2BZ-- Processor 2 busy interrupt -
INQ-- Remote inquiry request interrupt -
SPEC-- Special interrupt #1 (not used) -
DK1F-- Disk file control #1 read check finished -
DK2F-- Disk file control #2 read check finished -
P2BF-- Processor 2 busy flip-flop3 -
HP2F-- Halt Processor 2 flip-flop
The second row of annunciators displays activity for the peripheral devices in the system:
-
DRA-- Drum #1 -
DRB-- Drum #2 -
DKA-- Head-per-Track disk control #1 -
DKB-- Head-per-Track disk control #2 -
SPO-- Supervisory keyboard/printer -
CPA-- Card punch -
CRA-- Card reader #1 -
CRB-- Card reader #2 -
LPA-- Line Printer #1 -
LPB-- Line Printer #2 -
DCA-- Data Communications Adapter -
PRA-- Paper tape reader #1 -
PRB-- Paper tape reader #2 -
PPA-- Paper tape punch #1 -
PPB-- Paper tape punch #2 -
MTA-MTTMagnetic tape units 1-16 (lettersG,I,O, andQare not used)
At the far right of the lower portion of the Console are two statistics that indicate how well the emulator for Processor 1 is performing:
- P1 Slack: the exponential moving average for the percentage of time the emulated processor is delaying its execution in order to throttle its performance to that of a real B5500. Numbers closer to 100% indicate the processor emulation is using relatively small amounts of your workstation's physical processor. Numbers closer to zero indicate the emulator is unable to run at the speed of a real B5500.
-
P1 Delay: the exponential moving average amount of time (in milliseconds) that processor emulation is delayed during throttling, in excess of the amount of time it requested to be delayed. This is somewhat an indication of how precise the Javascript
setTimeout()mechanism is in your browser. This value may fluctuate in response to the intensity of the instruction stream, I/O activity, browser overhead (e.g., memory garbage collection), or interference from other programs running on your workstation. If this value continuously increases, however, it means that your workstation is unable to run the emulator at the speed of a B5500.
HTLM5 standards specify that setTimeout() for browsers must have a precision of at least four milliseconds, so you should see values no higher than the 3-4ms range for a compliant browser. Lower values are better, as all of the emulation takes place on one Javascript thread, and shorter delays allow the emulation to switch among processor and I/O tasks more efficiently.
Beginning with emulator version 0.20, we use the Javascript performance.now() API to measure time more accurately, but that does not affect the precision of the Javascript setTimeout() function.
The emulator makes an effort to smooth out variations in delay timing by measuring the deviation between the delays it requests and those it actually receives, then using that deviation to adjust future delays in order to compensate the difference. When the emulator needs to delay for a period shorter than four milliseconds (which most browsers will treat as a delay for at least four milliseconds), it uses the postMessage() API to effect a short yield to any pending events or browser overhead functions, again allowing the delay deviation mechanism to compensate by adjusting future delays. The goal of the compensation mechanism is to produce reasonably accurate timing on average, so that the emulator appears to be running at the speed of a real B5500.
The "Application Cache" feature, which allowed the emulator to be installed as a web application on your local workstation and be used without access to a a network connection, has been deimplemented as of release 1.05. The draft web standard that defined this feature has been withdrawn. Both Google Chrome and Mozilla Firefox deprecated the feature in 2016, and announced it will be removed from their browsers in a future release.
If you would like to run the emulator off line, you can do so by running a web server on your local workstation. Please see the discussion that topic on the Getting Started wiki page.
____________
1 On the B5000 and early B5500s, hardware load operated from sector 0 of the first drum device (DRA). Later B5500s were modified to load from sector 1 of the first Head-per-Track disk device (DKA). Systems wired to load from drum but without a drum device used a one-card bootstrap program to load the KERNEL bootstrap program from sector 1 of the disk, which in turn loaded the MCP. Such systems were thus effectively always booted from cards.
2 The B5000 and B5500 could have two processors, which were physically identified as Processor A and Processor B. Both processors were identical, with their identification determined by where they were plugged into the D&D. Based on a manual switch in the Central Control Unit, one processor could be designed as Processor 1, the control processor. The other (if present) would then be Processor 2. Only Processor 1 could run in Control State, execute MCP code, and respond to interrupts. Processor 2, if present and enabled, could run only user programs in Normal State, and was essentially a slave to Processor 1.
3 P2BF primarily serves to inhibit P1 from initiating a program on P2, so it is always illuminated for a system where a second processor is disabled or not configured.