Grocery Tutorial
This tutorial will give you a quick introduction of Cellfie plugin. We are going to guide you step-by-step through the process of building an ontology from Excel spreadsheets. We are going to spend the time to complete an ontology model about grocery items.
In this short tutorial you will learn:
- how to work with the Cellfie plugin UI,
- some basic mapping syntax to create the rules that will translate tabular data into OWL axioms,
- how to import the generated OWL axioms into your OWL ontology.
A good knowledge about OWL 2 language is necessary to get the meaning of the OWL axioms mentioned in this tutorial.
The estimated completion time: 30-45 minutes.
The Cellfie plugin is part of Protégé 5.x distribution so you don't need to do any installation. However, you might need to upgrade the version occasionally by checking it manually at File > Check for plugins....
For the tutorial, you will need to download these files:
- Grocery ontology -- alternative URL: https://git.io/vPhdf,
- Excel workbook -- alternative URL: https://git.io/vSLqS
- (optional: key answers) Transformation rules -- alternative URL: https://git.io/vSLq7
(Use "Save Link As..." from the right mouse click if the download didn't occur immediately)
Open the grocery ontology using Protégé by double-clicking the OWL file. If you already opened Protégé then load the grocery ontology using the File > Open... menu.
Go to the menu bar and select Tools > Create axioms from Excel workbook... to start the Cellfie plugin. Select the Excel file to load and Cellfie will appear with the content of the Excel file.
Working with Cellfie is about creating the Transformation Rules that define the mapping between the tabular data and the OWL axiom structure. The rule is written in Manchester Syntax that is very user-friendly for writing OWL axioms in a plain text.
The following steps will show you how to create these rules for different OWL axiom types.
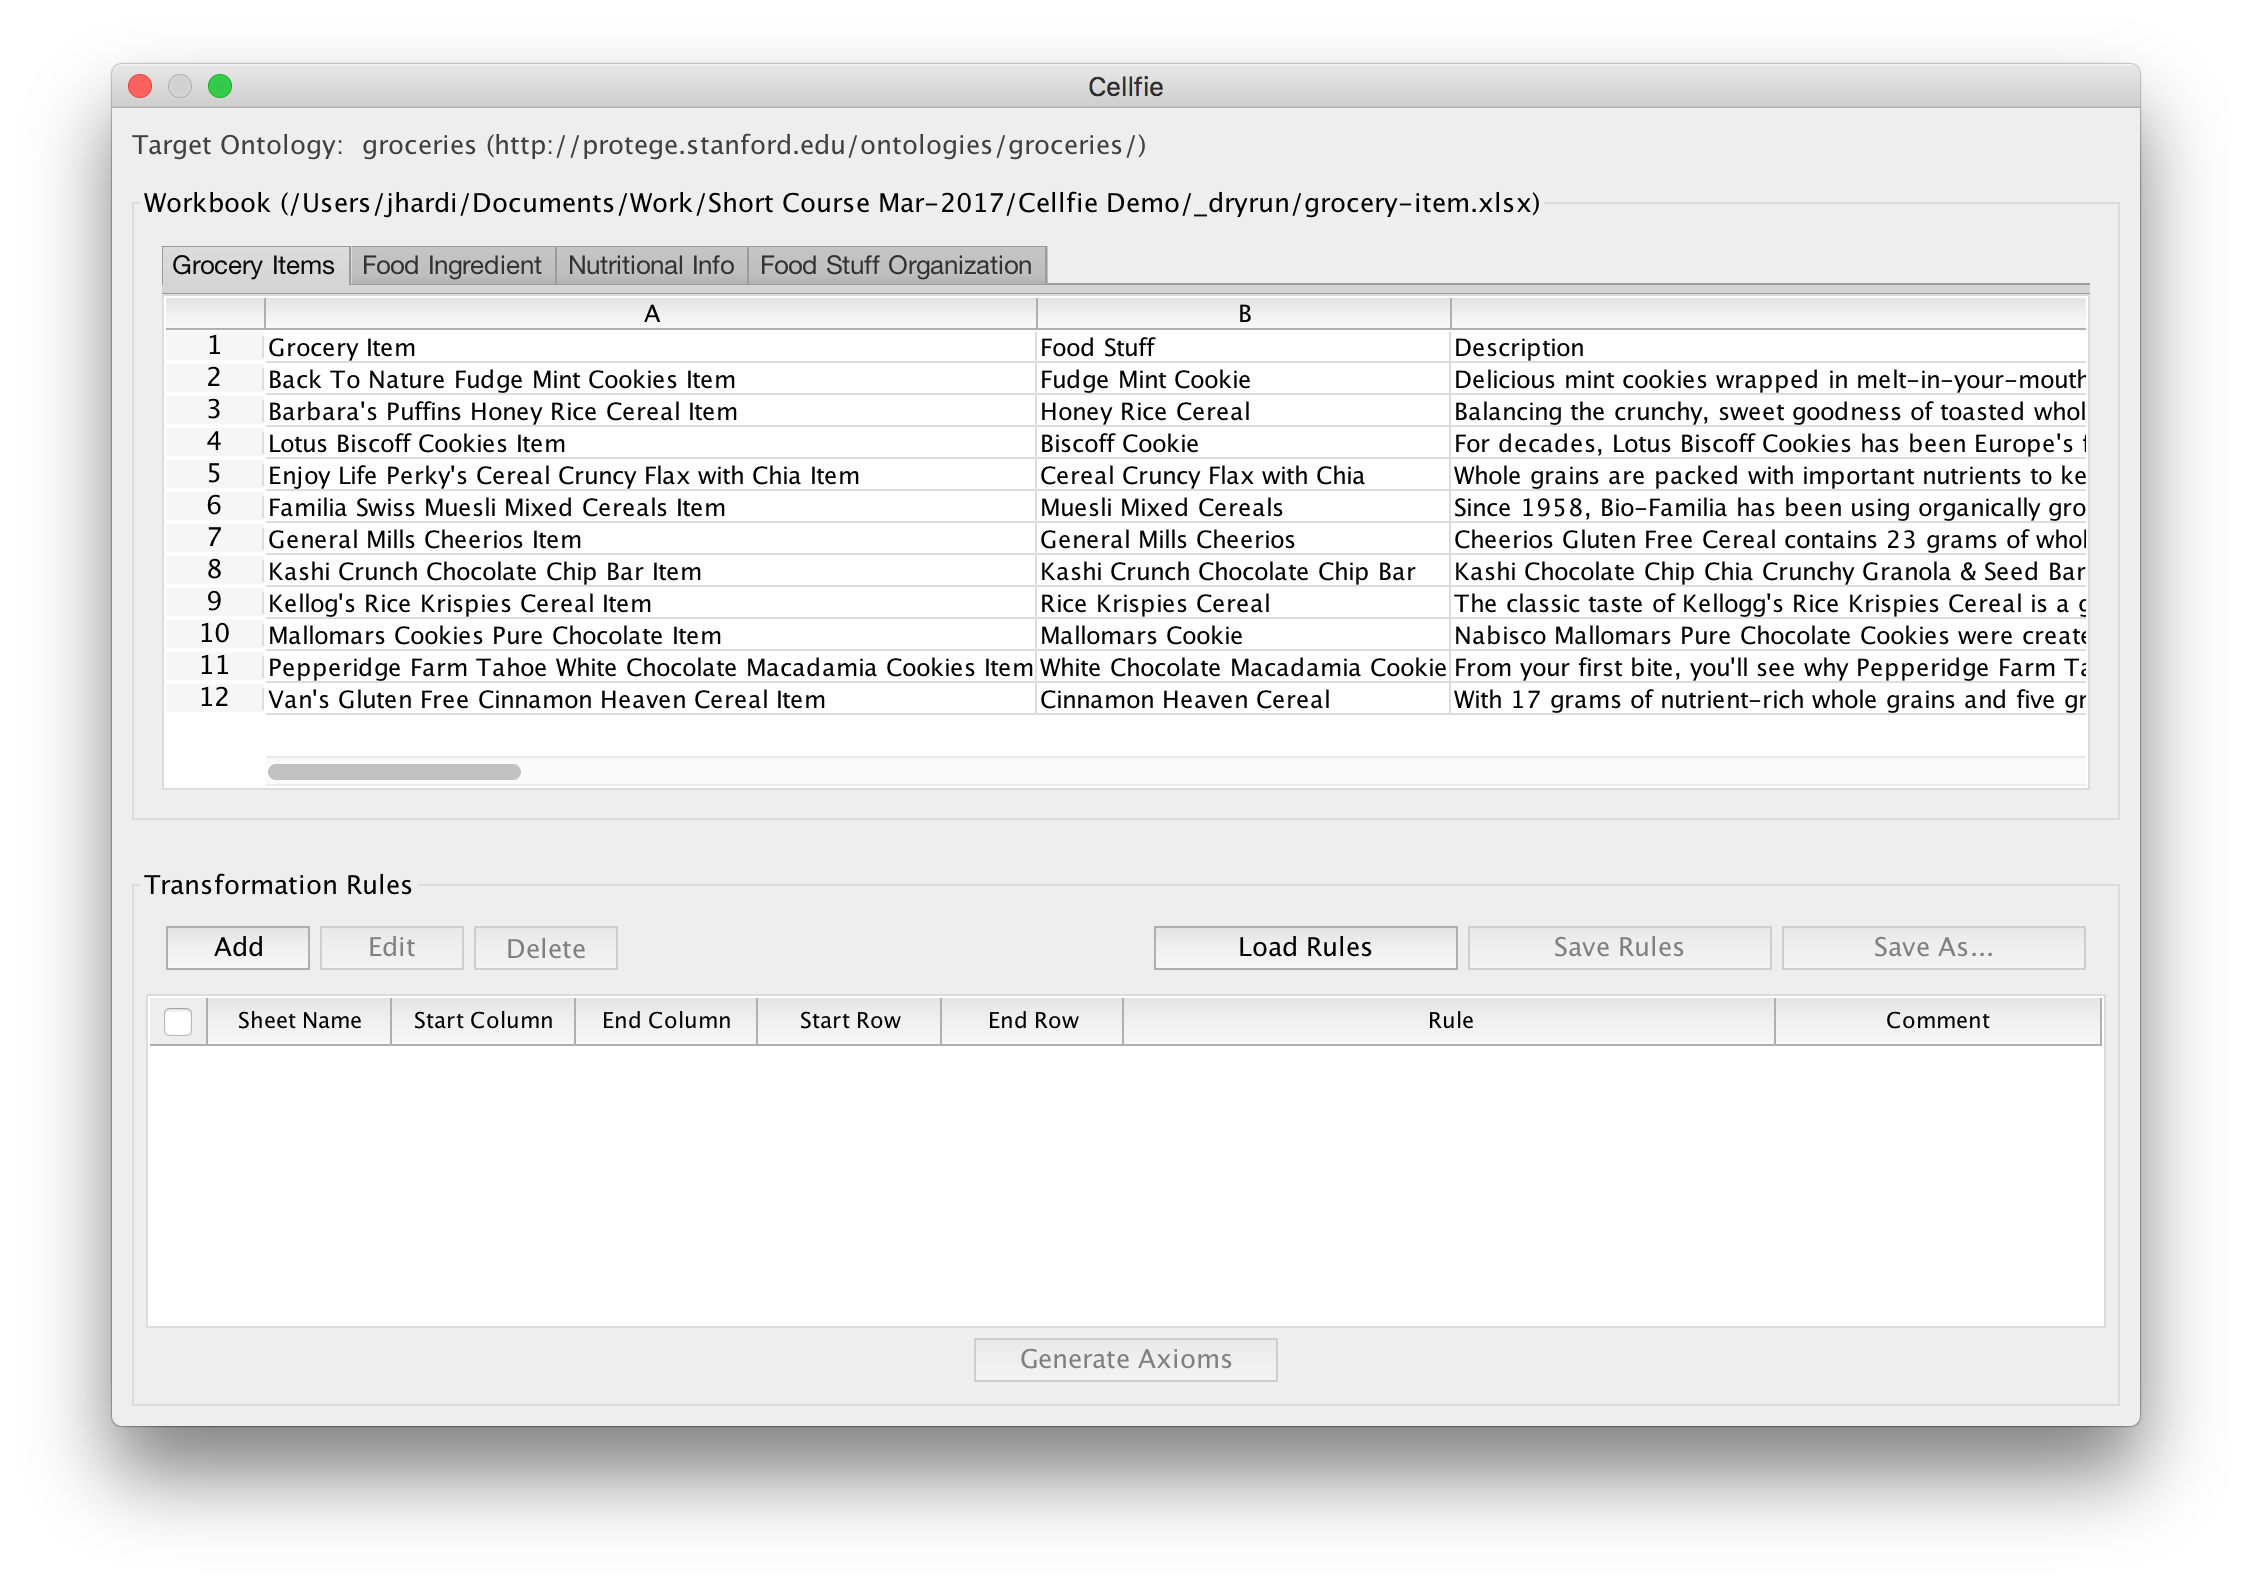
In this step, we are going to create a simple rule for the class declaration axiom. We are going to use the "Grocery Items" sheet from the example Excel workbook.
In the Cellfie window on your screen, find and click the Add button and fill out the create form as below:
- Sheet name:
Grocery Item - Start column:
A - End column:
A - Start row:
2 - End row:
+
The input values above specify a cell range selection from A2 to A14 in the "Grocery Item" sheet. Notice the character '+' at the "End row" field. This "wildcard" character will instruct Cellfie to replace the character with the last row index in the spreadsheet. It will work similarly if you put this wildcard into the "End column" field, such that, Cellfie will look the last column label instead.
Note: Starting from Cellfie version 2.1.0, you can click-and-drag inside the Workbook view to fill out the cell range selection automatically.
Next, type the expression below inside the "Rule" field and select OK to save it.
Class: @A*
Explanation: The
@A*is called the cell reference notation. The notation is composed of 3 elements:@,column-name,row-number. Use the asterisk*to specify the "go-through-all" meaning. For example, in the expression above, the asterisk will go through all the rows within the specified cell range selection, such that, Cellfie will look for values at cell: A2, A3, ..., A13, A14.
Click the "Generate Axioms" button at the bottom and a preview window will appear with a list of generated axioms. Those class axioms are the result of executing our initial rule.
For now, close the preview window by selecting the "Cancel" button.
In this step, we are going to create a rule for the subclassof axioms. We are going to append this rule into our previous rule.
Do a double-click on our previous rule and go to the "Rule" field. Modify the string to apprear as follows:
Class: @A*
   SubClassOf: GroceryItem
Explanation: When an entity name is explicitly mentioned in the rule, Cellfie will require the name to be present in the ontology, or otherwise it will complain: entity not found. In the example above, the class
GroceryItemmust already be typed in the ontology.
Select "Generate Axioms" to see the output preview. And again, for now, select "Cancel" to close the window.
In this step, we are going to create a rule for the some-value restriction axioms. We are going to append again this rule into our previous rule.
Do a double-click on our previous rule and go to the "Rule" field. Modify the string to appear as follows:
Class: @A*
   SubClassOf: GroceryItem, containsFoodStuff some @B*
Select "Generate Axioms" and see the output preview.
Exercise 1: Go to the "Food Ingredient" sheet and create one SubClassOf rule. Hint: the rule should use the SomeValuesFrom restriction of
hasIngredientproperty.
Exercise 2: Go to the "Food Stuff Organization" sheet and create another SubClassOf rule. Hint: the rule should reflect the concept hierarchy between the columns.
In this step, we are going to append a rule for the annotation assertion axiom using two annotation properties, namely rdfs:comment and foaf:depiction
Go again to our previous rule and modify the string to appear as follows:
Class: @A*
   SubClassOf: GroceryItem, containsFoodStuff some @B*
   Annotations: rdfs:comment @C*,
                foaf:depiction @D*
Explanation: Cellfie will use "string" as the default datatype for the annotation value. Later we are going to show you how to assign different datatypes in the rule.
For now, we want to change the value type into an IRI so append the IRI directive after the cell reference notation like so:
Class: @A*
   SubClassOf: GroceryItem, containsFoodStuff some @B*
   Annotations: rdfs:comment @C*,
                foaf:depiction @D*(IRI)
We want also to add a detail about the language used in the comment text by appending the xml:lang directive like so:
Class: @A*
   SubClassOf: GroceryItem, containsFoodStuff some @B*
   Annotations: rdfs:comment @C*(xml:lang="en"),
                foaf:depiction @D*(IRI)
Select "Generate Axioms" and see the output preview.
In this step, we are going to create a rule for the class assertions axiom. We are going to use another sheet namely the "Nutritional Info" sheet for this rule.
Create a new rule by clicking the Add button and fill out the create form as below:
- Sheet name:
Nutritional Info - Start column:
A - End column:
A - Start row:
2 - End row:
+
Individual: @A*(mm:hashEncode)
   Types: NutritionalInformation
Explanation: Every OWL entity requires a unique identifier for a precise referencing. Often the data presented in the spreadsheet may not give you the cell for showing the identifier. Cellfie provides two options to generate a unique identifier by drawing it out either from the cell value or the cell address. The
mm:hashEncodewill generate the hash string based on the cell value and themm:uuidEncodewill generate a unique identifier based on the cell address in the spreadsheet.
Select "Generate Axioms" and see the output preview.
In this step, we are going to append a rule for the property assertion axiom. We are going to connect some values into our class assertions.
Let's reuse the previous rule and modify the string to appear as follows:
Individual: @A*(mm:hashEncode)
   Types: NutritionalInformation
   Facts: hasTotalFat @B*,
          hasSaturatedFat @C*,
          hasSugar @I*
Select "Generate Axioms" and see the output preview.
Did you notice the string type in all property assertion values? Similar to our annotation assertion example, Cellfie will use "string" as the default datatype for the property value. You can change it by explicitly specifying the datatype name in the rule.
Note: Cellfie supports 13 standard datatypes which are:
-
xsd:string(by default) xsd:booleanxsd:doublexsd:floatxsd:longxsd:integerxsd:shortxsd:bytexsd:decimalxsd:dateTimexsd:datexsd:time-
rdf:PlainLiteral(automatically assumed if you usexml:langdirective)
Modify the previous property assertion rule by assigning the proper datatype for our nutritional facts as follows:
Individual: @A*(mm:hashEncode)
   Types: NutritionalInformation
   Facts: hasTotalFat @B*(xsd:decimal),
          hasSaturatedFat @C*(xsd:decimal),
          hasSugar @I*(xsd:integer)
Select "Generate Axioms" and see the output preview.
In this step, we are going to introduce some built-in functions that are useful for cell value manipulation.
We are going to create a custom numeric presentation by using the mm:decimalFormat function. Let's have a nice decimal format for the total fat and the saturated fat as follows:
Individual: @A*(mm:hashEncode)
   Types: NutritionalInformation
   Facts: hasTotalFat @B*(xsd:decimal mm:decimalFormat("##0.00")),
          hasSaturatedFat @C*(xsd:decimal mm:decimalFormat("##0.00")),
          hasSugar @I*(xsd:integer)
Next, we are going to do a text extraction using the mm:capturing function. The function uses a regular expression (regex) to find a string-pattern matching. Let's add the amount of sodium by capturing its value without the measurement unit as follows:
Individual: @A*(mm:hashEncode)
   Types: NutritionalInformation
   Facts: hasTotalFat @B*(xsd:decimal mm:decimalFormat("##0.00")),
          hasSaturatedFat @C*(xsd:decimal mm:decimalFormat("##0.00")),
          hasSugar @I*(xsd:integer),
          hasSodium @F*(xsd:integer mm:capturing("([0-9]+)"))
Select "Generate Axioms" and see the output preview.
Exercise 3: Add a label annotation using the
rdfs:labelproperty with the value appeared as "Nutritional Information for x" where x is coming from each cell in column A. Hint: use themm:prependfunction to print the sub-text "Nutritional Information for " before the cell value.
In this step, we are going to create a new rule for the individual value restriction axiom from the "Nutritional Info" sheet.
Add a new rule and fill out the create form as below:
- Sheet name:
Nutritional Info - Start column:
A - End column:
A - Start row:
2 - End row:
+
Class: @A*
   SubClassOf: hasNutritionalInfo value @A*(mm:hashEncode)
Notice that we are using the same hash encoding to generate the identifier for the value restriction. This is important because we want to be able to reference these values to the previous class assertions that we've created previously.
Select "Generate Axioms" and see the output preview. Notice the same identifier for referencing.
Finally, we are done making the transformation rules and ready to produce the results as an ontology. We call the action of producing the ontology as the "import generated axioms" action.
There are two options to import axioms to an ontology:
- Add to current ontology, that is, Cellfie will insert all the generated axioms to the currently active ontology in Protégé.
- Add to a new ontology, that is, Cellfie will create a new ontology and insert all the generated axioms. The new ontology will have an import axiom that will point to the original ontology.
These options to import axioms are available in the "Generate Axioms" window. So click the "Generate Axioms" button and click the Add to current ontology button.
Switch the window to Protégé and see the new axioms are properly inserted into our existing grocery ontology.
MappingMaster provides the functionality to import bulk spreadsheet data to OWL ontology constructs. For more information please refer to the MappingMaster wiki to get the complete syntax and functions guide.
If you have a spreadsheet that encodes a class hierarchy, you can perform a bulk data import using Cellfie. Download and run this example to learn how the import could be done in Cellfie.
If you have questions about MappingMaster or Cellfie, please address them to us via Protégé User Support mailing list.