Colorimetry plan #979
Comments
|
Here is the "all in one sequence" approach! And here's a link to sequencer for this, although the GitHub comment encoding messes it up, but copy-paste it into a browser, and drag the sample image in to the top and the
|
|
@jywarren what do you say about automating the input values of x and y instead of typing the coordinates. Like how about having a click and drag option. So you can click and drag until where you need to crop and when you do so the values of x and y will get updated automatically. |
|
at https://github.com/publiclab/SmART-Form we overlaid a semi-transparent image of the optimal placement of the badge over the camera feed to guide users (worked well in beta and field testing) and I think but am not sure that we had an auto-cropping. I think the scaled bitmap should be around lines 999 -1016 here https://github.com/publiclab/SmART-Form/blob/master/Android/app/src/main/java/edu/osu/siyang/smartform/Fragment/TestFragment.java |
|
Hi @lohitha02 actually yes, there is supposed to be a "drag to select" interface which is currently broken -- @publiclab/is-reviewers any ideas what happened here? I opened an issue at #987 For the working demo, we should be able, as @shapironick says, to have an overlay to guide people. Thanks Nick. This would change for different types of colorimetric tests, but this is a good initial set to work with. And different tests might compare the 2 patches in different ways - how red they are, say, or how dark they are. And thanks Nick, indeed here it averages RGB channels and compares the brightness of the two patches, so our code should do the same: https://github.com/publiclab/SmART-Form/blob/master/Android/app/src/main/java/edu/osu/siyang/smartform/Fragment/TestFragment.java#L965-L1009 The overlay would be pretty easy to add. The other thing we could do later is to add QR codes at 3 positions around the patches, and use those to auto-crop, to smooth things out even more. |
|
Hi @jywarren !
|
|
I think we could do this in an independent demo, built on top of IS, and
displaying in HTML the ratio output, instead of trying to build everything
in -- and provide a really simple UI to help with this. But yeah, you have
it right!
Mostly at this point, we will need to debug and build good tests around the
needed parts so that we can be sure we can rely on the system to be stable
enough to support this application.
Thanks!!!
…On Sun, Apr 7, 2019 at 5:33 PM Slytherin ***@***.***> wrote:
Hi @jywarren <https://github.com/jywarren> !
I would love to work upon it!!!
So basically what I have understood from the previous discussions is that
we can have a sequence defined in the sequencer where we can have the badge
image set to following steps:
1. Crop the left part and average the pixles of resulting image.
2. Crop the right part and average the pixels of resulting image.
3. Finally we can output the ratio of the red channel of both the
results and display it to the user.
Just want to ask one thing how can we display the ratio, like if we
have to build some UI for it?
Also I think meta-modules can be uselful for this use-case.
What do you think?
—
You are receiving this because you were mentioned.
Reply to this email directly, view it on GitHub
<#979 (comment)>,
or mute the thread
<https://github.com/notifications/unsubscribe-auth/AABfJ0XymaL12C7BhUzwPX4Y_tNKJTpnks5vemQagaJpZM4cZV8U>
.
|
|
@jywarren Yes, I believe making a separate micro service for this would be ideal. Passing in images (encoded or otherwise) and using two IS instances to process and then output the comparison would make this easy to implement AND easy to use. |
|
@jywarren I have made some changes to the proposal to include the calorimetric issue to my proposal which I really find is a strong use case for our organisation to proceed with. |
|
@Divy123 Could we collaborate here? This task requires breaking down into multiple issues, I think it'll speed up things this way :D |
|
Ya sure @VibhorCodecianGupta !! |
|
Crop fixed in #1019!!! |
|
@jywarren proceeding further with this one. |
|
Cool idea. Let's have a Public Lab repo, a separate colourimetry tool. |
|
Sure, we can collaborate.. |
|
Sure, go ahead! This could also be developed as a sub-demo, at
/examples/colorimetry/, if we want to... either way!
…On Thu, Apr 18, 2019 at 12:34 PM Slytherin ***@***.***> wrote:
Sure, we can collaborate..
—
You are receiving this because you were mentioned.
Reply to this email directly, view it on GitHub
<#979 (comment)>,
or mute the thread
<https://github.com/notifications/unsubscribe-auth/AAAF6J7VU7YALNBZ6A4CINDPRCPHZANCNFSM4HDFL4KA>
.
|
|
@jywarren don't think we have access to creating a repo, you'll have to do that I'm afraid. |
|
Oh, ok! what shall we call it? "colorimetry" is a bit simple, but could
work... "is-colorimetry" is not so catchy...
…On Thu, Apr 18, 2019 at 2:18 PM Vibhor Gupta ***@***.***> wrote:
@jywarren <https://github.com/jywarren> don't think we have access to
creating a repo, you'll have to do that I'm afraid.
—
You are receiving this because you were mentioned.
Reply to this email directly, view it on GitHub
<#979 (comment)>,
or mute the thread
<https://github.com/notifications/unsubscribe-auth/AAAF6JYAXFN7QTOA63CJZU3PRC3OVANCNFSM4HDFL4KA>
.
|
|
This is just the name of thr repo right? Doesn't have to be technical? Should it have the |
|
:-) yeah we can also name an "app" or "website" differently later. I like
the idea... maybe we should keep it basic until we know more about it, and
we can call it `colorimetry` for now.
…On Thu, Apr 18, 2019 at 3:35 PM Harsh Khandeparkar ***@***.***> wrote:
This is just the name of thr repo right? Doesn't have to be technical?
Should it have the colorimetry in its name or can it be called something
like rainbowmetry.js?
—
You are receiving this because you were mentioned.
Reply to this email directly, view it on GitHub
<#979 (comment)>,
or mute the thread
<https://github.com/notifications/unsubscribe-auth/AAAF6J6OEPOBT54U5UP7JE3PRDEN3ANCNFSM4HDFL4KA>
.
|
|
… On Thu, Apr 18, 2019 at 3:38 PM Jeffrey Warren ***@***.***> wrote:
:-) yeah we can also name an "app" or "website" differently later. I like
the idea... maybe we should keep it basic until we know more about it, and
we can call it `colorimetry` for now.
On Thu, Apr 18, 2019 at 3:35 PM Harsh Khandeparkar <
***@***.***> wrote:
> This is just the name of thr repo right? Doesn't have to be technical?
> Should it have the colorimetry in its name or can it be called something
> like rainbowmetry.js?
>
> —
> You are receiving this because you were mentioned.
> Reply to this email directly, view it on GitHub
> <#979 (comment)>,
> or mute the thread
> <https://github.com/notifications/unsubscribe-auth/AAAF6J6OEPOBT54U5UP7JE3PRDEN3ANCNFSM4HDFL4KA>
> .
>
|
|
@jywarren so to proceed forward with this, what I was thinking is we can provide a UI such that it includes:
What do you think upon this? |
|
I can work on the UI. |
|
I can also help with the algorithm. |
|
I can also GPU accelerate it if needed. |
|
If we have similar images, we can select settings for one of them using the UI, we can parallelize colorimetry on all the images including the forst one after that. Paralellization can be done on a gpu. Thoughts? @jywarren please transfer this issue to the colorimetry repo so that we can discuss there. |
|
Ya sure @harshkhandeparkar !! |
|
@jywarren please share your opinion !! |
|
I left some notes in publiclab/colorimetry#1 that may be relevant! Let's try to stay in sync by opening a few issues over there? I think it's possible to do a bare-bones UI with an image select and a display of the 2 numbers (and the ratio maybe?), with an example image of how you should photo the test badge. Let's build out some issues over there! Thanks! |
|
@jywarren GitHub has a transfer issue feature. Transfer this issue there. |
|
Discussion shifted to publiclab/colorimetry#2 |
|
Closing... |
|
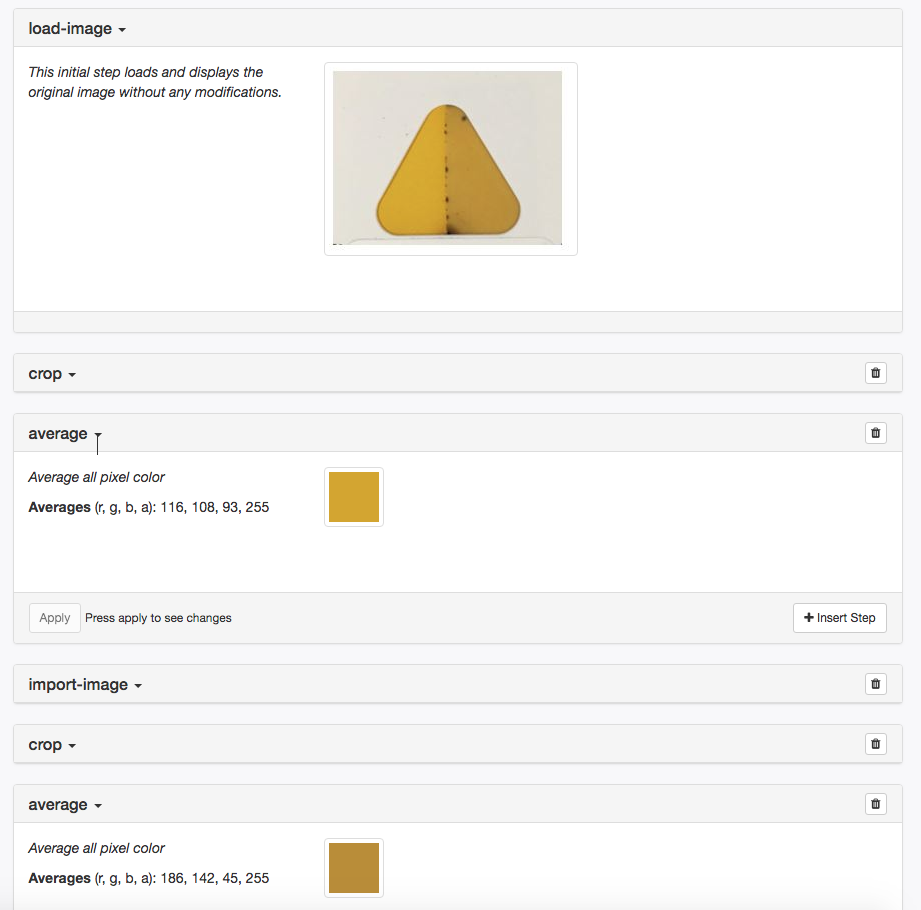
OK just updating here -- and re-opening so there is a place to continue discussion within Image Sequencer -- Here's the final functional sequence for the triangular badge:
I've also made a Gist of the entire thing (it's a very long URL) using data-urls, so you don't have to download and re-upload the image: https://gist.github.com/jywarren/16d055b3b2d2678fee52a12145cb5018 This would be easier as a full demo, with a locally provided image at a simple URL. But this at least demonstrates it functioning with the test image! |
|
Hi @Divy123 @VibhorCodecianGupta , would you be able to arrive 30 minutes early to next week's Code Open Call to have some dedicated time to meet other people (@gbathree @julianstirling @rwb27) interested in and working on colorimetry form other angles? Pasting in from an email, Richard and Julian have done
|
|
Yes sure!! That would be really great.. |
|
Hi @Divy123 -- I was thinking about this (and your proposal and I think we're ready to start making an interface design for this. What do you think of this sequence of steps, which USES
|

|
Sure, I think these exemplary guides can be much useful than the documentation part and I will start working on it asap. |
|
@jywarren can you please provide me with these sample images as seen in the screenshot? |
|
Actually i think it's at the top of the page! Or did you mean another? |
|
Yeah I mean those which I am able to see in the screenshot. |
|
Hm, i think it's the same one, no? Can you specify exactly which image you need? Sorry for not understanding! |
|
https://user-images.githubusercontent.com/24359/60537023-8d0e4300-9cd5-11e9-8448-f9c22d90d30c.png Actually I am talking about the smaller images with red square and the example card. Hope I am getting it right. |
|
Ah, i see! Well, they are about as good as you'll get in the image i've embedded above. They are originally from the Mockups document though! https://docs.google.com/presentation/d/1TCZoTfuhamRVrUak8aDgqJAwSgyhRtZg2Pgacl2_4zc/edit#slide=id.g5a9109bb88_1_4 |
|
Accha oh! |
|
This is working really well here now! https://divy123.github.io/colorimetry/public/ @Divy123 i'll go to https://github.com/publiclab/colorimetry/issues to post feedback, but great work here! |
I'm documenting all of the steps required to go through a dual color analysis sequence for one of the #707 real-world use cases: colorimetric comparison!
Working from this post, i found a sample image of a colorimetric badge that reacted to formaldehyde, where one side got darker over a few hours.
Here's the test image:
Note: we assume that we can guide people to photograph the badge with consistent framing. That may be its own design challenge! We can show examples, and we can also show an overlay on the initial step's preview, so people can tell if their images are properly framed.
My process was to crop the image so that we see only color from one of the two sides, so I used the crop module, but it had some bugs (that I think we can solve and then protect with better tests!).
The issues were mostly to do with the units in the
xandyvalues I input. The image is 244x184 pixels, but here are the values I had to enter to get the left and right sides nicely cropped:So,
130for the left, and500for the right. Which can't be quite right!Process
So, I think we could basically approach this use case in 2 ways:
import-imagemodule to re-import the original image, then run the right side. At the end, we look back and fetch the outputs from the twoaveragesteps (left and right), and compare the red channels of each.In both case we display the ratio of the red channel (for example) between the two sides.
Doing this manually, i get:
Left:
Right:
Next steps
So to list out the bugs we need to address, i think:
Then, I think we can try making a new demo file in
/examples/, which displays the ratio from the above process!The text was updated successfully, but these errors were encountered: