Windows development environment
This article discusses how to configure your Windows to retrieve sources, build and debug a project like this one:
Windows doesn't have standard system locations for libraries as Linux and Mac OS X have. In consequence, to obtain the Gtk and OpenCV libraries, you need to use some non-standard procedure that involves installing a special package manager called pacman and a special Linux-like development environment called MinGW.
The easiest way to obtain pacman and MinGW is through an open source project called MSYS2. Go to MSYS2 homepage and download the M2SYS installer that best corresponds to your system (probably the 64 one, as the i686 is actually 32 bits).
Install it with all default options, in C:\msys64 folder.
After installation you'll have:
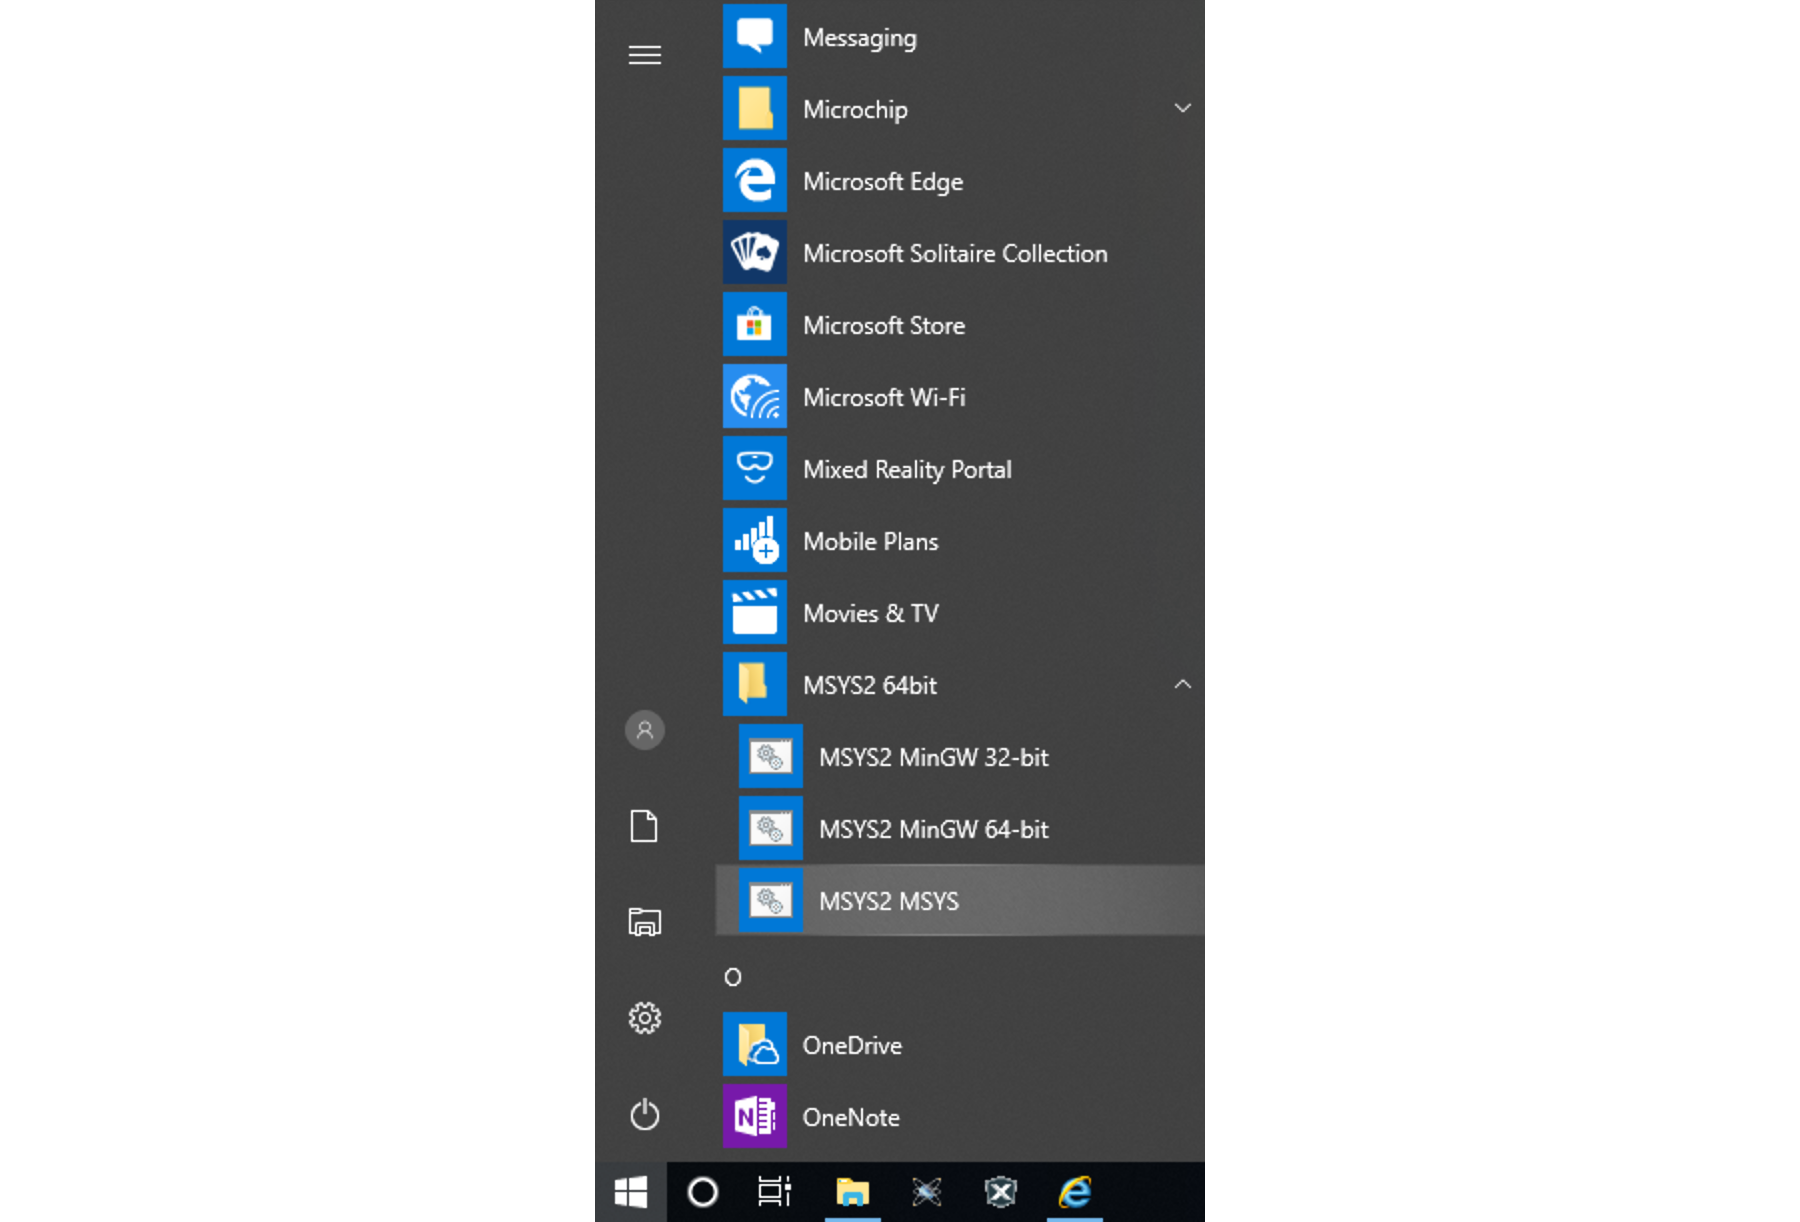
- The MSYS2 MSYS environment, where you can use pacman to install components.
- The MSYS2 MinGW 64-bit environment, which stands for Minimal GNU for Windows, and where you can use all tools and libraries installed via pacman.
- You also get the MSYS2 MinGW32, to access 32 bit tools; you shouldn't need any of those if your system is 64 bits.
As explained in the download instructions, the first thing to do is to upgrade the package database. Open the MSYS2 MSYS and type the following command:
pacman -SyuuShould you encounter the message below, close the MSYS2 MSYS window with your mouse, open it again, and run the same command, until it terminates normally.
warning: terminate MSYS2 without returning to shell and check for updates again
warning: for example close your terminal window instead of calling exit
If you're looking for a particular package, you can use a command similar to the following. Assuming you look for CMake:
pacman -Ss cmakeInspired by Alexey Pavlov's gist, I advise to install the following packages and tools so you have a development environment very similar to the one present in Linux machines. With it you can compile applications for windows using Linux tools:
pacman -S base base-devel net-utils git ruby wget man
pacman -S msys/openssh msys/vim msys/bc nano msys/tmux
pacman -S gzip zip unzip msys/p7zip tar msys/tree
pacman -S msys/winpty msys/ed msys/pwgen msys/zsh
pacman -S mingw64/mingw-w64-x86_64-jq
pacman -S msys/screenfetch
pacman -S mingw-w64-x86_64-toolchain
pacman -S mingw64/mingw-w64-x86_64-cmake
After downloading and installing all those packages, you can verify if they're present testing some. To do this, open the MSYS2 MingGW 64 bit environment, and test some commands:
git --version
make --version
cmake --version
gcc --version
pkg-config --version
See also:
You can install the Gtk and OpenCV libraries using pacman in MSYS2 MSYS, with the following commands:
pacman -S mingw64/mingw-w64-x86_64-gtkmm3
pacman -S mingw64/mingw-w64-x86_64-opencvTo build the project, open the MSYS2 MinGW 64-bit, locate an appropriate folder (the drive units are mapped to the root folder, for example C:\Users\me\Document\Development\ would be /c/Users/me/Development):
cd navigate/to/your/project/folder
git clone https://github.com/cpp-tutorial/raspberry-cpp-gtk-opencv.git
cd raspberry-cpp-gtk-opencv
mkdir build
cd build
cmake -G"Unix Makefiles" ../src/
make
./racapp.exe
If you want to debug with gdb, you can use slightly different cmake command. If you already built the project, do not hesitate in deleting the build folder and creating it again:
cd ..
rm -rf build
mkdir build
cd build
cmake -G"Unix Makefiles" -DCMAKE_BUILD_TYPE=Debug ../src
make
gdb ./rascapp.exe
After that you're in gdb. To find your way, look in Linux instructions.
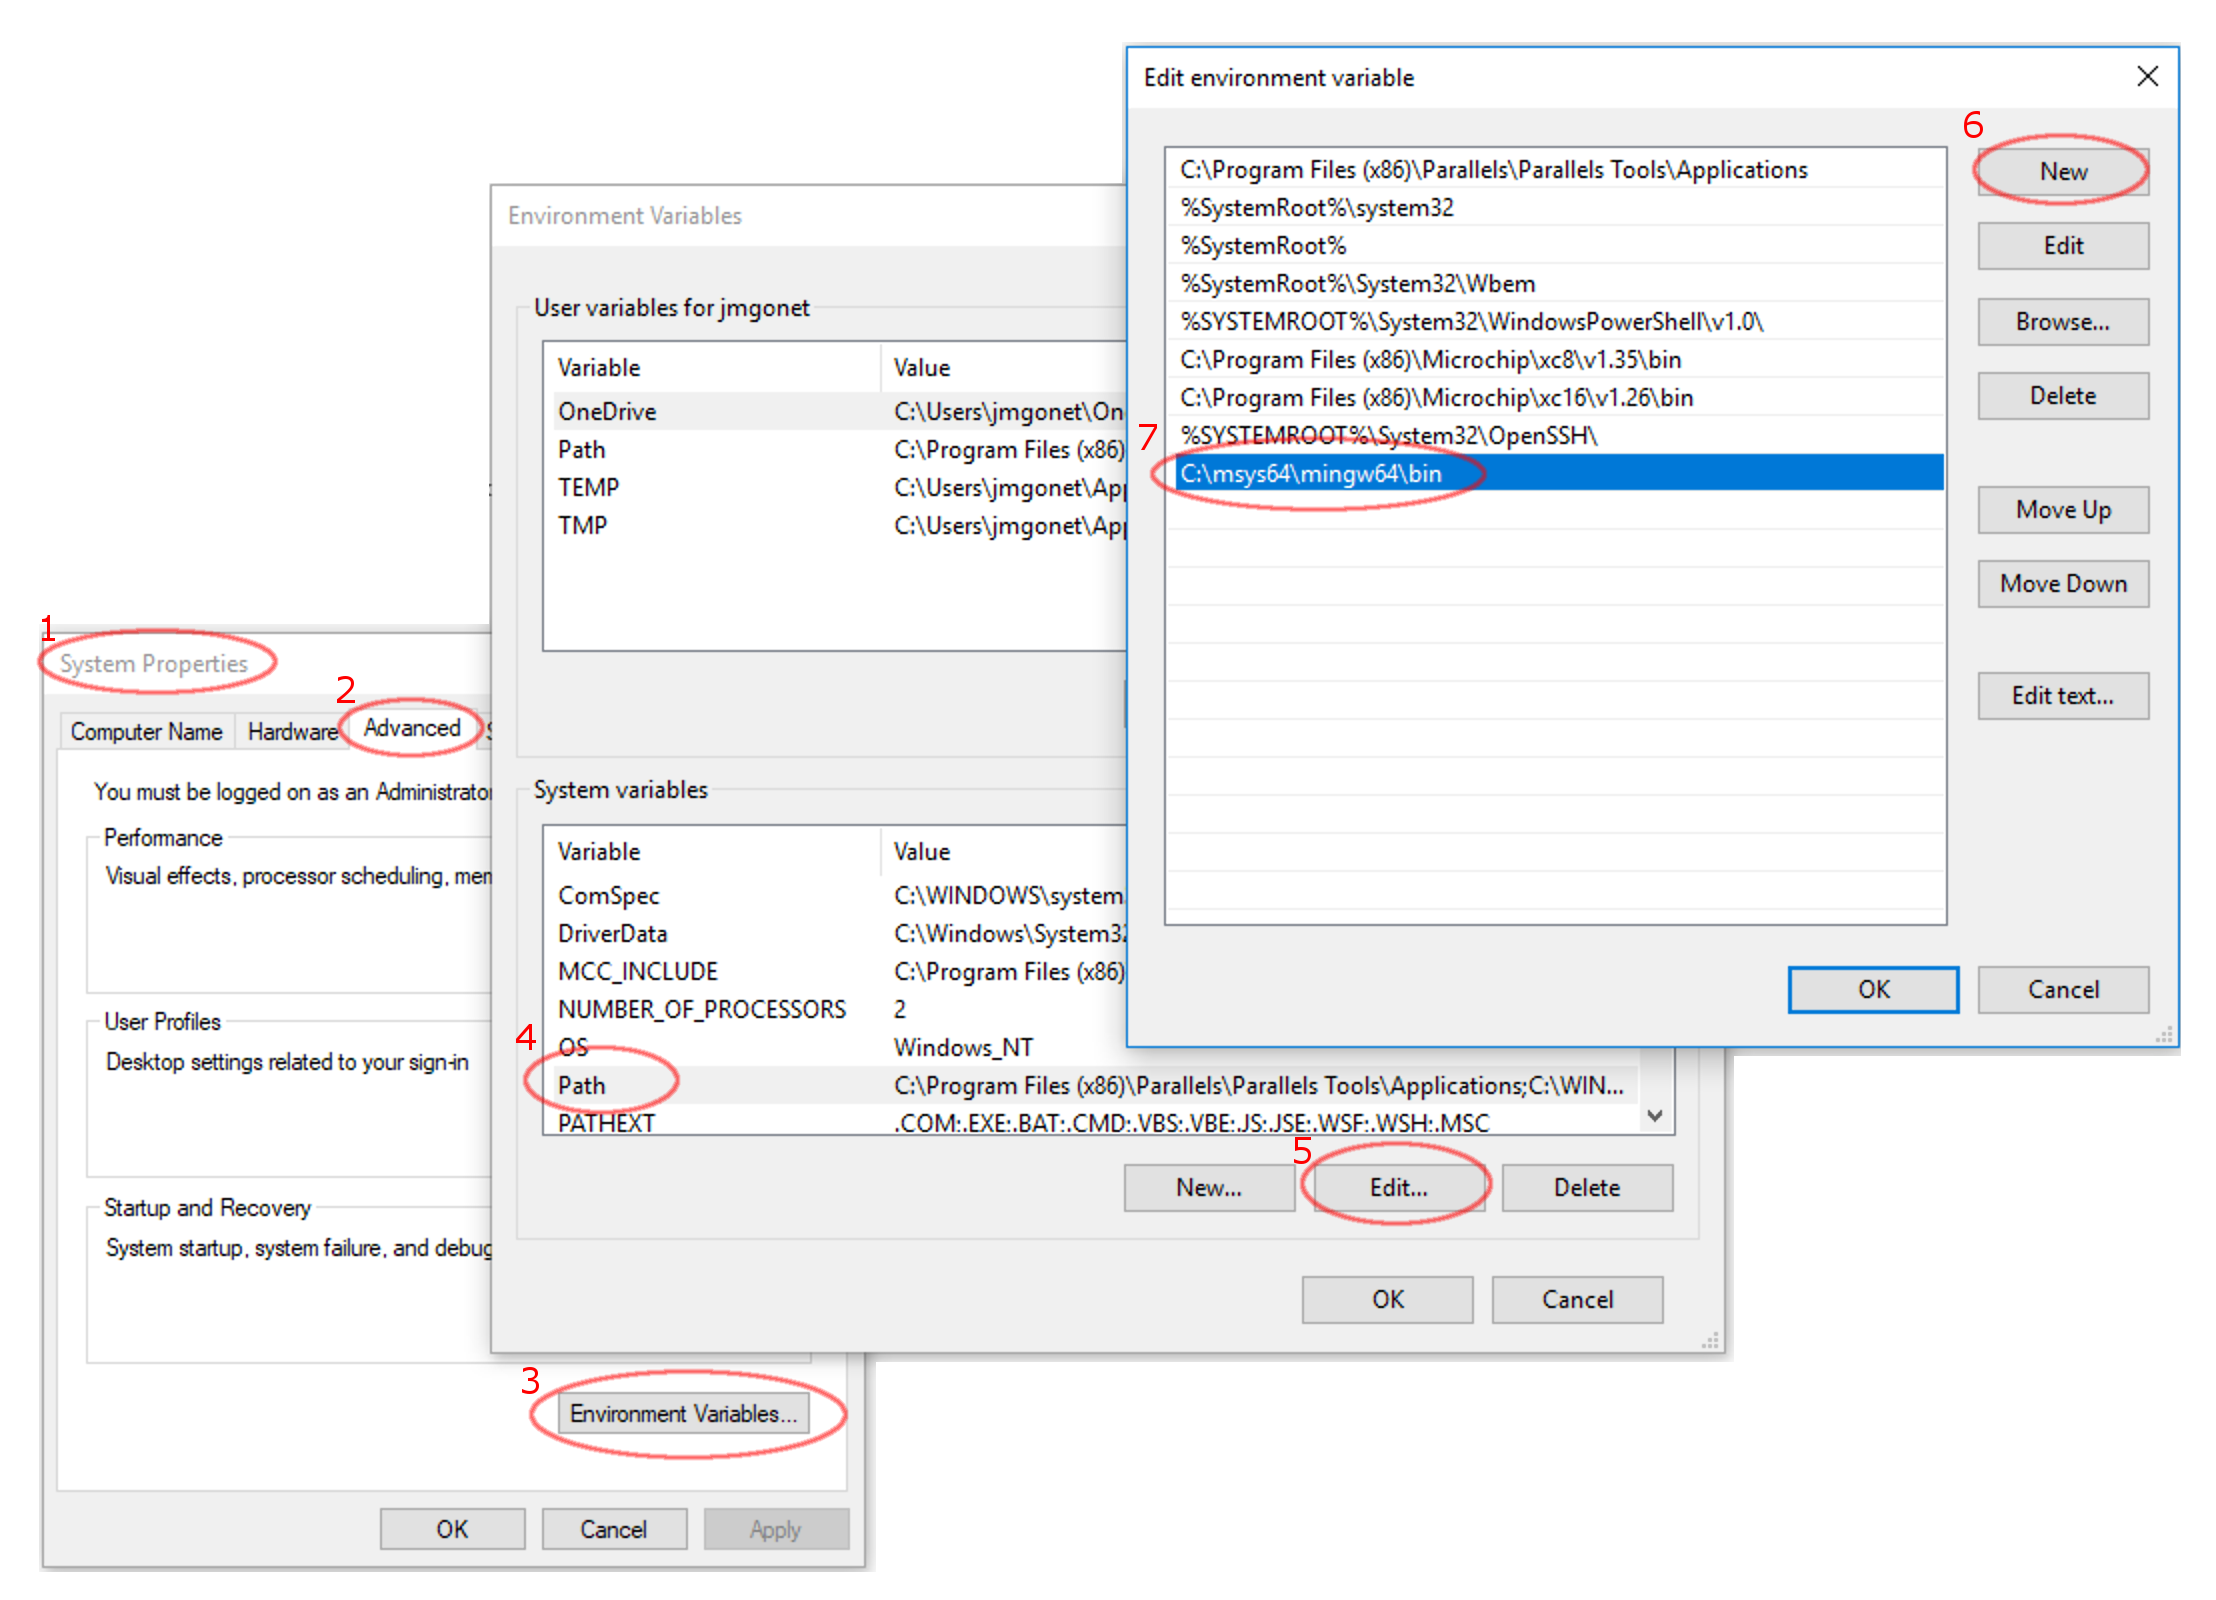
By default, MSYS2 installs libraries and tools in the C:\Msys2\MinGW64\bin folder. Add it to the PATH environment variable, so that all applications can find the tools:
Once you're done, you can open the Windows command line, and verify if the same tools are available from it:
pkg-config --version
pkg-config gtkmm-3.0 --cflags --libs
pkg-config opencv-3.0 --cflags --libs
This step is not strictly necessary if you're going to use Code::Blocks, but it doesn't hurt either.
The default IDE in Windows is Visual Studio. However, Visual Studio expects a special format for debugging symbols that is not the one produced by gcc and g++ in MinGW. In a cross platform project, if you don't want to make your life miserable following hyper complex installation procedures, is better to leave it out.
I chose Code::Blocks because:
- It exists in all three major platforms, so you can use it everywhere, including Raspberry Pi, with similar configuration.
- It's pretty popular, so you can look for instructions and community support.
- It has a Windows installation wizard that takes cares of all configuration details.
The installation procedure is completely straight forward, at least in Windows 10
- Install a Windows binary release of Code::Blocks from official site: http://www.codeblocks.org/downloads.
- Among all versions, chose the normal setup (you already installed the mingw toolchain in the previous step).
- Install it with all default options.
- Launch application
If there are no error messages, you're done. Otherwise, look at the troubleshooting.
The easiest path is to use CMake to prepare a Code::Blocks project for you. Assuming that you already cloned the project in a known location, and your MSYS2 MinGW 64-bits terminal is already there, this is the sequence of commands:
mkdir codeb
cd codeb
cmake -DCMAKE_BUILD_TYPE=Debug -G"CodeBlocks - Unix Makefiles" ../src/
Follow the rest of the procedure from Code::Blocks:
- From the menu, File → Open..., look for the
codebfolder that you just created, and for therascam.cbpproject file in it (note that the name of the project is the same as specified inCMakeLists.txt). - If you like, go to Project → Project Tree and modify Display folders as on disk and Hide folder name.
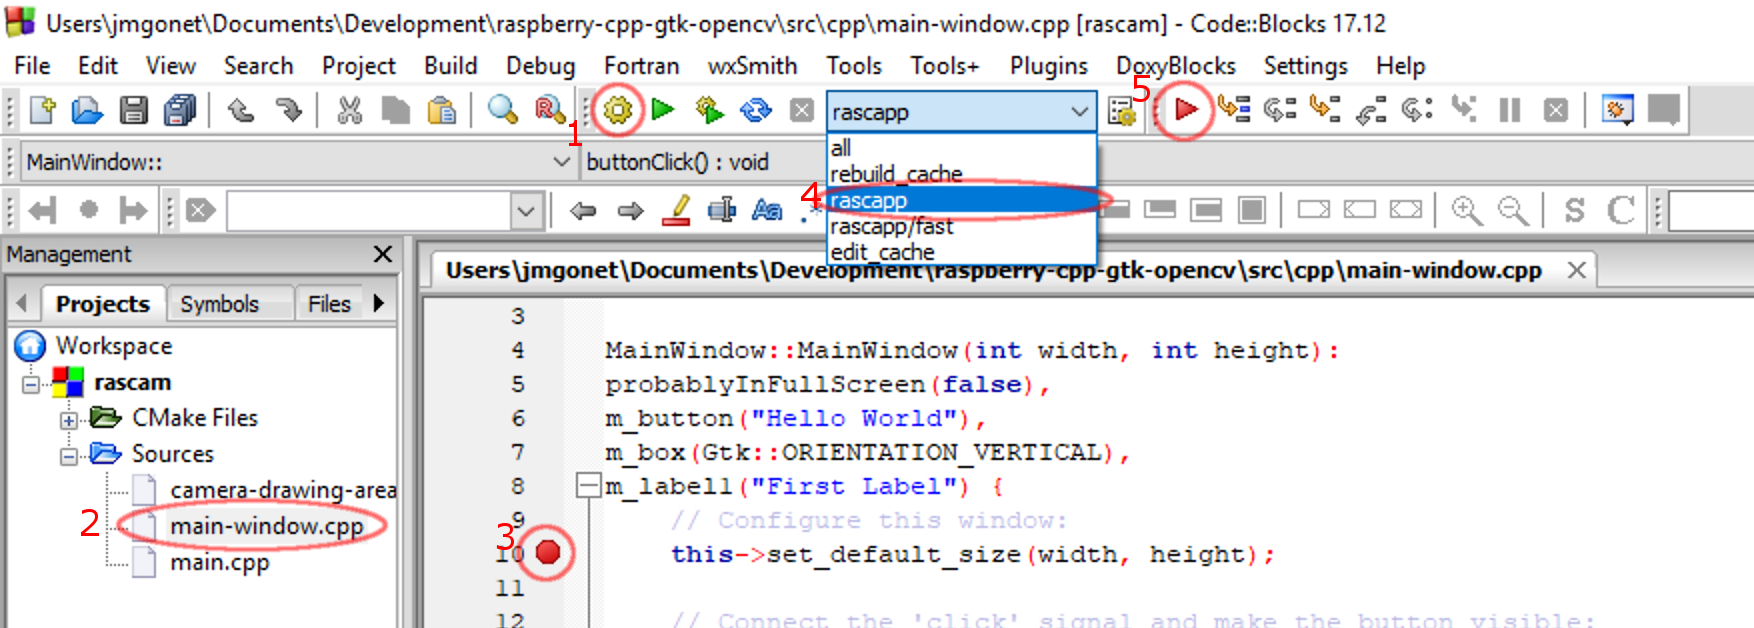
- Select one of the source files and place a break point on it by clicking in the gray area.
- In the toolbar, select the
rascapptarget. - In the toolbar, launch the debugger.
- It should launch, and stop at the breakpoint.
- To see the variables, go to Debug → Debugging windows → Watches.
If you execute cmake ../src in MinGW-64 without any additional options, you will encounter the following error message:
cmake ../src/
-- Building for: NMake Makefiles
-- The CXX compiler identification is unknown
CMake Error at CMakeLists.txt:5 (project):
  The CMAKE_CXX_COMPILER:

    cl

  is not a full path and was not found in the PATH.

  To use the NMake generator with Visual C++, cmake must be run from a shell
  etc...
  etc...
The same message will show even if you remember to add the correct options to the cmake command afterwards. To fix it, you need to completely delete the build folder, and start again:
cd ..
rm -rf build
mkdir build
cd build
cmake -G"Unix Makefiles" -DCMAKE_BUILD_TYPE=Debug ../src
The CMAKE_BUILD_TYPEoption is to enable debug symbols, so you can skip it if you don't intend to debug the application.
Occasionally you may found the following error message when downloading, updating or upgrading with pacman:
(4/4) checking package integrity                                                                                 [###################################################################] 100%
error: jsoncpp: signature from "Alexey Pavlov (Alexpux) "
is invalid
:: File /var/cache/pacman/pkg/jsoncpp-1.8.4-1-any.pkg.tar.xz is
corrupted (invalid or corrupted package (PGP signature)).
It is a transitory problem related with authoring websites being unavailable, and you can solve it by just waiting (see a discussion about signature problems from "Alexey Pavlov (Alexpux)"). Alternatively, you can deactivate the signature checking by editing /etc/pacman.conf (use Vim from MinGW64) and changing the following entry:
SigLevel = NeverAt launching, Code::Blocks may complain that it doesn't find the compiler toolchain. If you have installed it with MSYS2 as described above, it is just a matter of configuration:
- At launching, just accept the dialog requiring you to choose an existing toolchain.
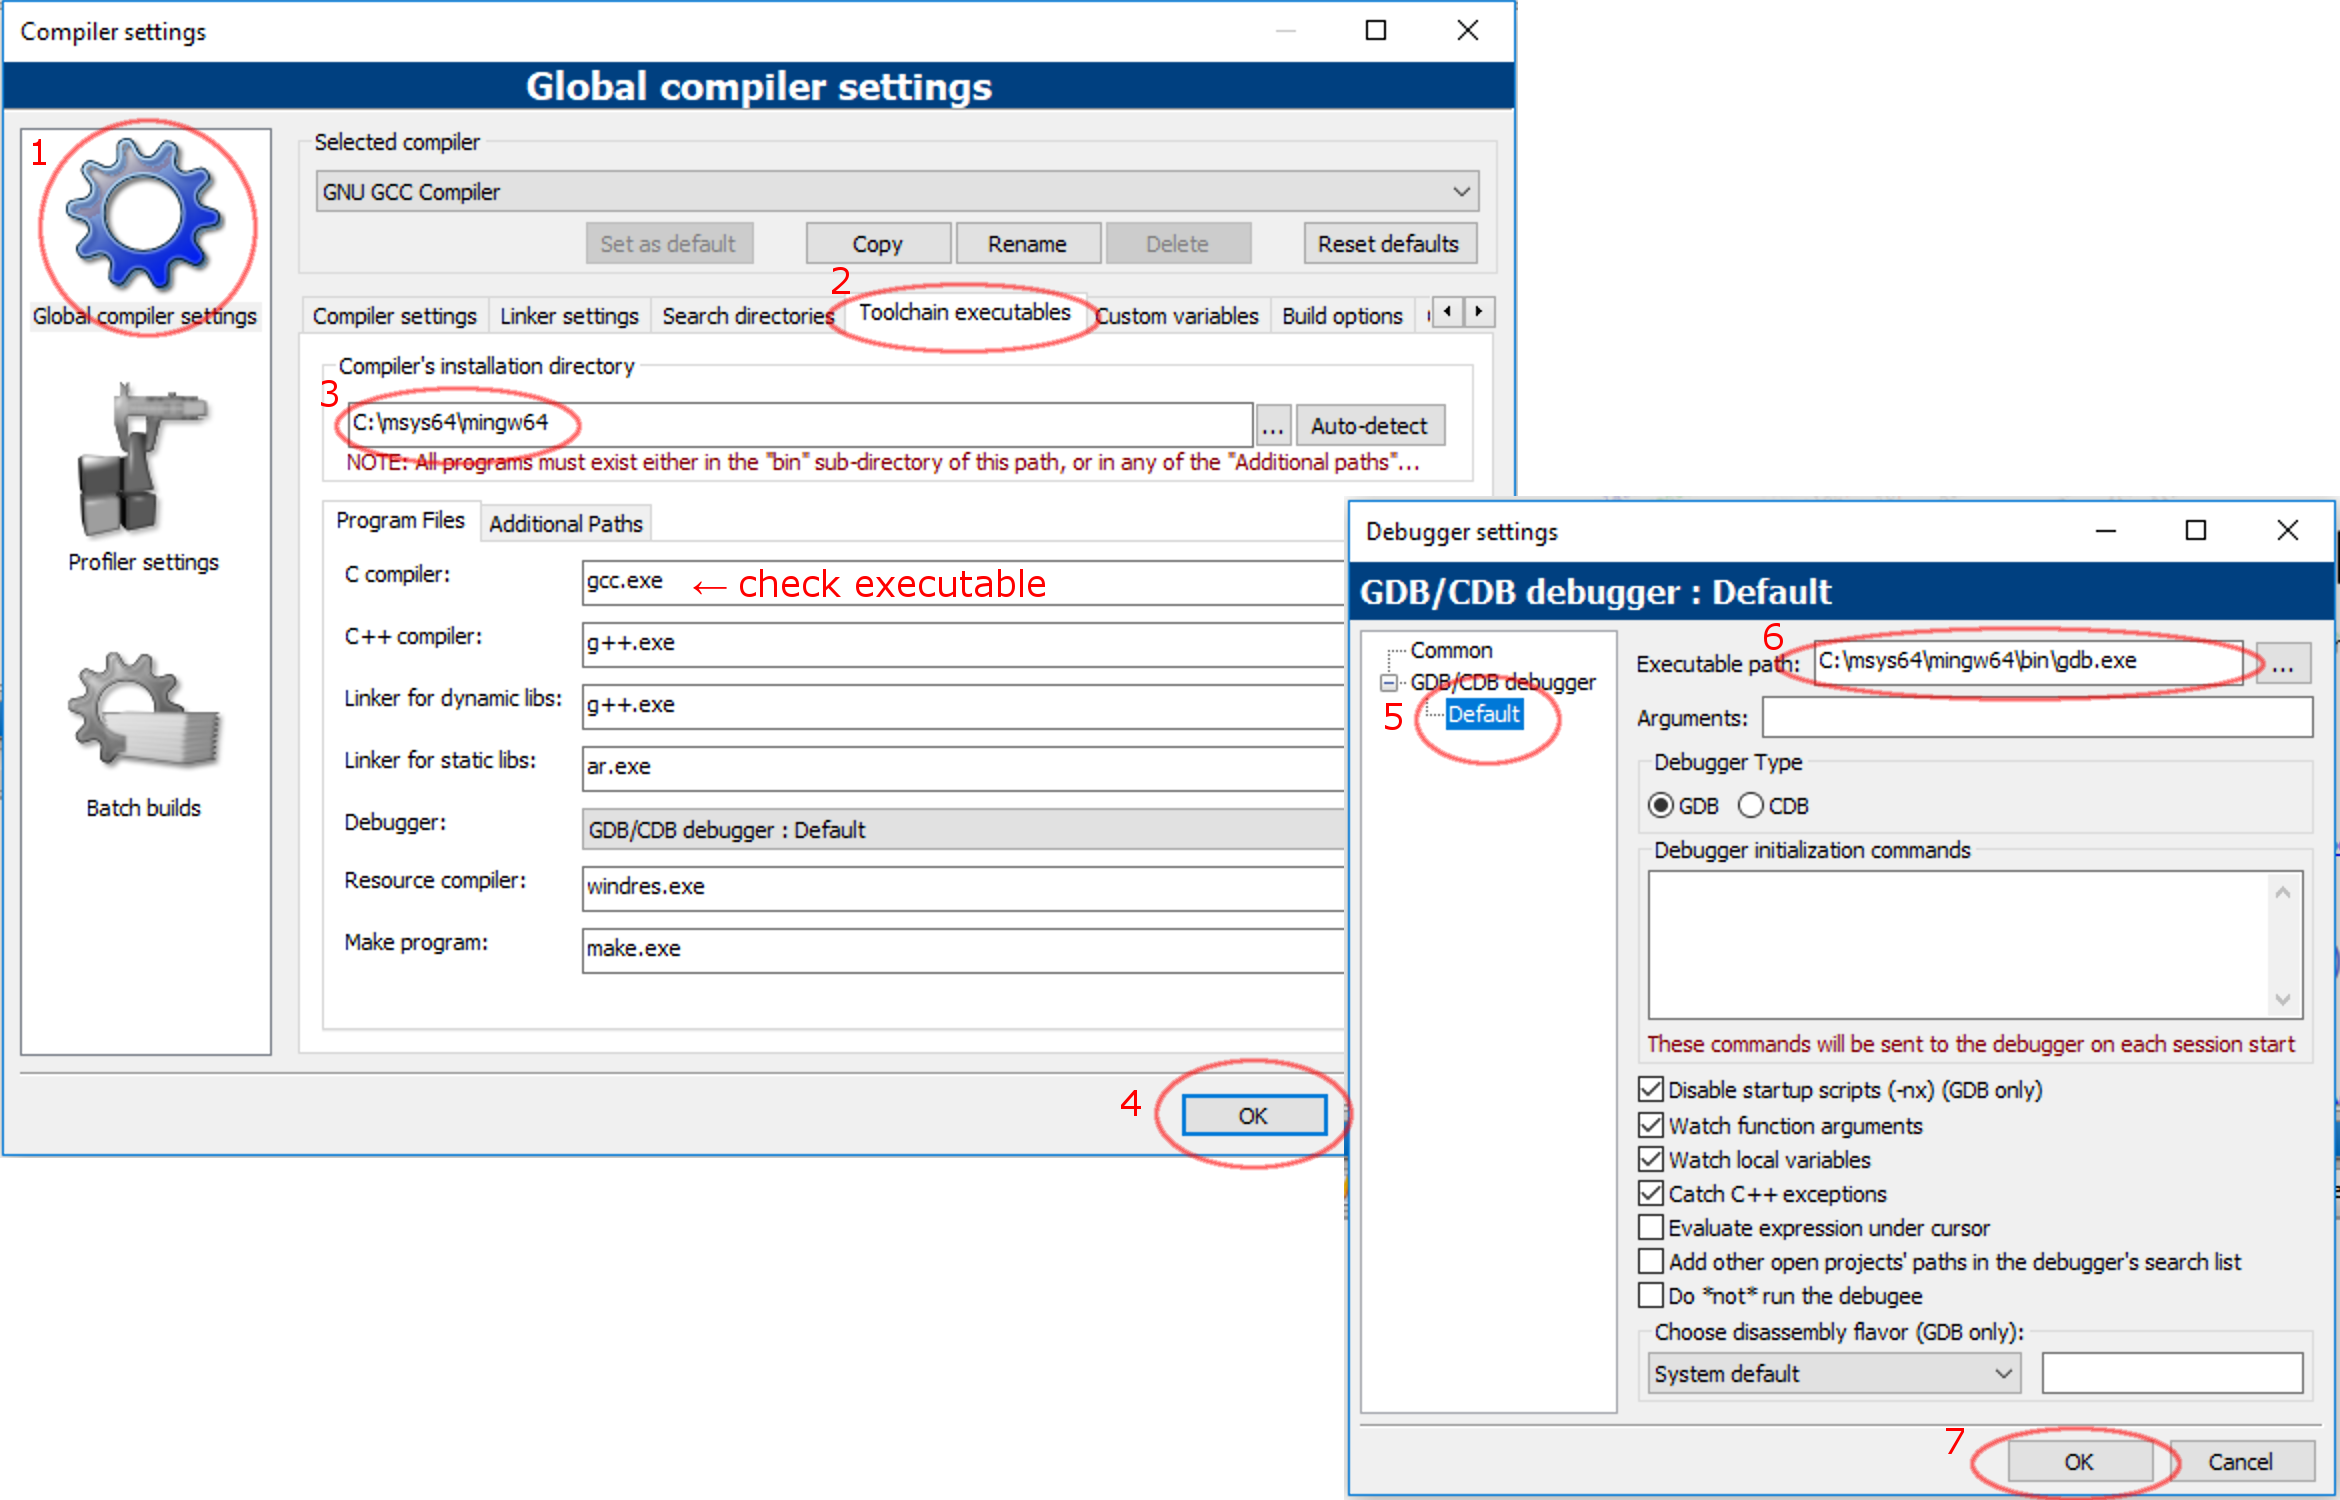
- In the main menu, open Settings → Compiler...
- In the dialog, look for Global compiler settings section, and Toolchain executables tab.
- Ensure that the path is correct. If you installed MSYS2 with default options, it should be
C:\msys64\mingw64. - Also ensure that all mentioned program files correspond to existing executables in that folder.
- Accept everything, and do the same with Settings → Debugger...
Note: I had this problem when I installed Code::Blocks with mingw-setup. I guess it expects a standard MinGW installation, and not the MSYS2 one.
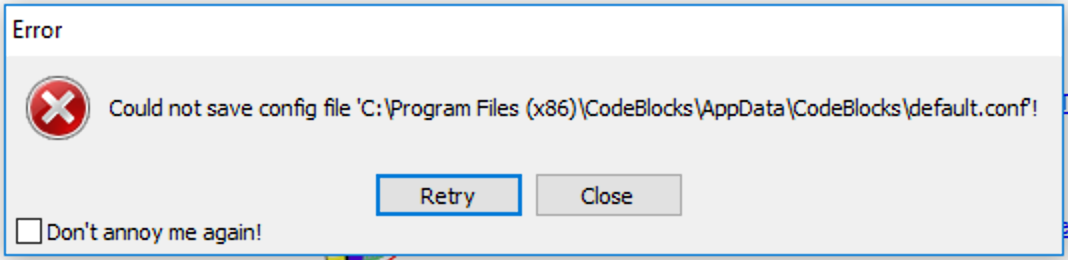
When closing the application, or when saving all data, Code::Blocks may complain that it cannot save configuration, and display an error message. To solve this:
- Take note of the path where it tries to save the configuration file.
- Create the same path, and an empty file with the same name.
- Make this file writable.
Note: I had this problem when I installed Code::Blocks with mingw-setup. I guess it expects a standard MinGW installation, and not the MSYS2 one.