This system is designed to enhance the data management, access and analysis of Google Scholar Alerts sent to emails by integrating several automated processes. The core functionalities are described below.
Gmail and Outlook Connectivity: The system connects to your Gmail or Outlook accounts to retrieve Google Scholar alerts.
Google Scholar alerts are automatically fetched and parsed using Beautiful Soup and regular expressions: regex to extract relevant information such as titles, authors, publication dates, and links.
The parsed information is stored in an in-memory database using Sqlite3 for easy access and further processing.
The system employs clustering algorithms (such as KMeans, KMedoids, and Agglomerative Clustering) to group similar articles.
Jaccard similarity / Euclidean can be used to measure the similarity between different articles based on their references.
Interfaces built using customtkinter facilitate communication with the system.
Results Display: The system provides intuitive visualization tools to display clustering results and other analytical insights.
-
Python 3.10 or higher versions
Official website for download: https://www.python.org/doc/
-
pip (for instaling all related dependencies)
pip installation guide: https://pip.pypa.io/en/stable/installation/
-
your preferred IDE: Visual Studio Code or others.
VS Code download page: https://code.visualstudio.com/Download
(recommended) Python extension in VS Code Market place: https://code.visualstudio.com/docs/editor/extension-marketplace
-
a. Clone the repository: (git is required)
git clone https://github.com/rohra-mehak/ScienceSync.git
cd ScienceSyncNavigate to: https://github.com/rohra-mehak/ScienceSync
Click the
Codebutton.Select
Download ZIP.Extract the ZIP file to your desired location.
-
cd yourpath/to/ScienceSyncOn Linux , macOS or Windows Use the
mkdircommand followed by the name of the directory in the terminal of your IDE.mkdir secrets
mkdir database
-
In your IDE, make sure you are in the
ScienceSyncdirectory. go to the terminal window and run the following commandsExample for VS Code:
Create a virtual env directory called
venvin the rootScienceSyncdirectory1. python -m venv venv
This Execution Policy command is used in the context of a Windows PowerShell and is not applicable for other OS.
Set-ExecutionPolicy Unrestricted -Scope Process
Activate the Environment
Windows
2. .\venv\Scripts\activate
MacOS / Linux
2. source venv/bin/activateOnce it is activated, you may see the
(venv)prefix to your command line path. -
run the following command and wait for all dependencies to finish installing.
pip install -r requirements.txt
-
To ensure your IDE uses the correct Python interpreter from your virtual environment, you generally need to configure the IDE to recognize and use the virtual environment. Here’s a generalized approach for VS code
-
Open Command Palette:
- Press Cmd+Shift+P (macOS) or Ctrl+Shift+P (Windows/Linux) to open the command palette.
-
Select Interpreter:
- Type Python: Select Interpreter -> Enter Interpreter Path -> Find Interpreter.
-
Choose Virtual Environment:
- Select the interpreter located in your virtual environment
(venv)directory. It will typically look like./venv/bin/pythonor.\venv\Scripts\python.exeon Windows.
- Select the interpreter located in your virtual environment
-
To access your email account, you'll need to obtain your own client ID and client secret tokens. Depending on your email service (Outlook or Gmail), follow the appropriate steps below:
-
Register Your Application: Follow the process outlined in the Microsoft documentation to register your application and obtain the necessary tokens: Register an app). with Mail.Read , Mail.ReadWrite, User.Read API Permissions.
-
Save Credentials: Once you have your application ID and client secret, save them in a file named
credentials_msgraph.jsonin theScienceSync/secretsdirectory. The file should have the following format:{ "application_id": "your_app_id", "client_secret": "your_client_secret" }
-
Set Up Your Environment: Follow the steps mentioned in the Google documentation (Set up your Environment Section only) to register your application and obtain the necessary tokens: Set up your environment.
-
Download and Save Credentials: After registering, download the JSON file containing your credentials. Save this file as
credentials.jsonin theScienceSync/secretsdirectory.
Additional resources and information on working with Google APIs can be found here: Getting started with Google APIs.
By following the above instructions, you will successfully configure your credentials for accessing your email account using either MS Graph or Google API.
-
Navigate to
ScienceSync/app.pythere are various parameters that can be set before running the program. However it is recommended to leave the default values as they are.
days_ago(no of days to look back while going through the mailbox)table_name(the name of the table in your article database which will be created and referred by the system)n_clusters(number of groups [for clustering articles together] to divide the articles into)method(the clustering methodology -> KMedoids / KMedoids++ / Agglomerative (average linkage) / Agglomerative (complete linkage))metric(the similarity metric to use -> dice / jaccard / sokal and sneath)
After making sure all steps are successfully completed and all dependencies have been installed, Make sure you are in the root Science sync directory. To start the program, run the following command on your terminal
python app.pyArrows are simply illustrative indicators.
Depending on the service chosen and whether credentials could be located by the program, this part might be different.


The authorisation continues on your browser and this will depend on the service you chose. The initial screen keeps updating the user about progress of the system and errors encountered if any.
Logs can be used to identify any problem encountered. They provide the exact line, method and file where some exception or error occured.
Wait for the process to finish executing and for the results interface to load.
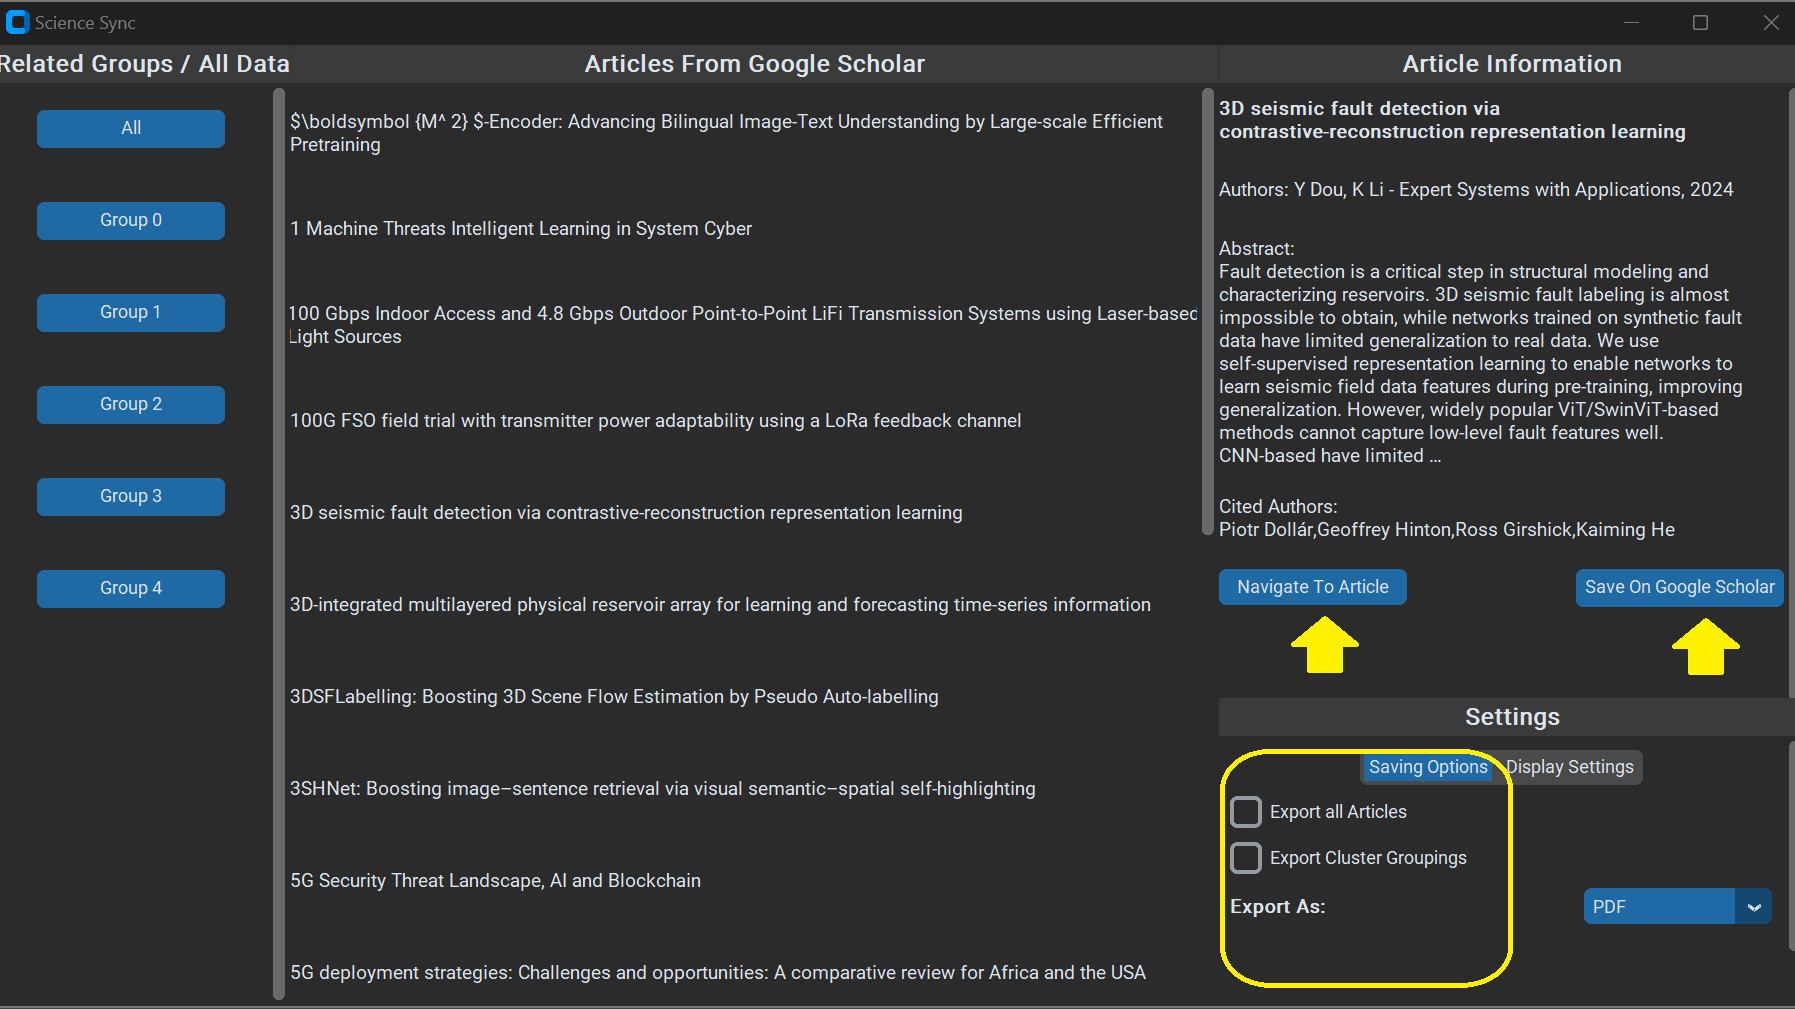
After finishing up the process -> Click on All Data to view an itemised list of all extracted articles

Viewing the scrollable itemised list of articles. Click on a single article to view more information

Article Information on the Right Hand Tab. This includes additional functionalities to Navigate to Article, Save on Google Scholar.