Functions
This function will get such information as hostname, software version, software type, model, etc.
Mandatory
-
-Device- The Junos device you wish to query.
-
-User- The username you want to connect as.
Optional
-
-Password- The password for the username specified. If you omit this, you will be prompted for the password instead (more secure).
-
-Display- If this option is specified, the information is displayed to the console/screen. If omitted, then the information is best suited as being stored in a variable.
Get-JunosFacts -Device firewall-1.company.com -User admin -Display
Password: ********

-- Output --

RE: node0
        Hostname: prod-fw
        Model: srx3600
        Software Version: 11.4R7.5
        Software Type: junos
RE: node1
        Hostname: prod-fw
        Model: srx3600
        Software Version: 11.4R7.5
        Software Type: junos
Store Results in a Variable
$results = Get-JunosFacts -Device firewall-1.company.com -User admin
Password: ********

-- $results will Output --

Name                           Value
----                           -----
node0                          {host-name, software-version, model, software-type}
node1                          {host-name, software-version, model, software-type}
This function allows you to execute any RPC command, such as "show, request, etc."
Mandatory
-
-Device- The Junos device you wish to execute the command on. You can also specify a text file with host names or IP addresses (one per line) if you wish to run the command on multiple devices.
Note: This assumes your credentials are the same across all of them, though.
-
-Command- The command that you want to execute. Please enclose in double quotes "". To execute multiple commands, separate them using a ; (see examples). You can also specify a file that has the commands you want to run (one per line). This is good for quick configuration of devices, also!
-
-User- The username you want to execute the command as.
Optional
-
-Password- The password for the username specified. If you omit this, you will be prompted for the password instead (more secure).
-
-File- This will allow you to save your results to the given file.
Single command
Invoke-JunosCommand -Device firewall-1.company.com -User admin -Command "show chassis routing-engine"

-- Output --

Password: ********
node0:
--------------------------------------------------------------------------
Routing Engine status:
    Temperature                 49 degrees C / 120 degrees F
    CPU temperature             47 degrees C / 116 degrees F
    Total memory              2048 MB Max  1249 MB used ( 61 percent)
      Control plane memory    1088 MB Max   598 MB used ( 55 percent)
      Data plane memory        960 MB Max   653 MB used ( 68 percent)
    CPU utilization:
      User                       9 percent
      Background                 0 percent
      Kernel                    10 percent
      Interrupt                  0 percent
      Idle                      81 percent
    Model                          RE-SRX240H2
    Serial ID                      AAFR9319
    Start time                     2014-03-26 04:20:16 EDT
    Uptime                         5 days, 5 hours, 19 minutes, 17 seconds
    Last reboot reason             Router rebooted after a normal shutdown.
    Load averages:                 1 minute   5 minute  15 minute
                                       0.44       0.40       0.37
Multiple commands
Multiple commands can be run by separating each command with a ;:
Invoke-JunosCommand -Device firewall-1.company.com -User admin -Command "show chassis routing-engine; show system storage"

-- Output --

Password: ********
Routing Engine status:
    Temperature                 49 degrees C / 120 degrees F
    CPU temperature             48 degrees C / 118 degrees F
    Total memory              2048 MB Max  1249 MB used ( 61 percent)
      Control plane memory    1088 MB Max   598 MB used ( 55 percent)
      Data plane memory        960 MB Max   653 MB used ( 68 percent)
    CPU utilization:
      User                      10 percent
      Background                 0 percent
      Kernel                     9 percent
      Interrupt                  0 percent
      Idle                      81 percent
    Model                          RE-SRX240H2
    Serial ID                      AAFR9319
    Start time                     2014-03-26 04:20:16 EDT
    Uptime                         5 days, 5 hours, 23 minutes, 37 seconds
    Last reboot reason             Router rebooted after a normal shutdown.
    Load averages:                 1 minute   5 minute  15 minute
                                       0.14       0.28       0.32
Filesystem              Size       Used      Avail  Capacity   Mounted on
/dev/da0s1a             610M       153M       408M       27%  /
devfs                   1.0K       1.0K         0B      100%  /dev
/dev/md0                 20M       6.4M        12M       36%  /junos
/cf/packages            610M       153M       408M       27%  /junos/cf/packages
devfs                   1.0K       1.0K         0B      100%  /junos/cf/dev
/dev/md1                405M       405M         0B      100%  /junos
/cf                      20M       6.4M        12M       36%  /junos/cf
devfs                   1.0K       1.0K         0B      100%  /junos/dev/
/cf/packages            610M       153M       408M       27%  /junos/cf/packages1
procfs                  4.0K       4.0K         0B      100%  /proc
/dev/bo0s3e              46M        70K        42M        0%  /config
/dev/bo0s3f             618M       216M       352M       38%  /cf/var
/dev/md2                336M        29M       280M        9%  /mfs
/cf/var/jail            618M       216M       352M       38%  /jail/var
/cf/var/log             618M       216M       352M       38%  /jail/var/log
devfs                   1.0K       1.0K         0B      100%  /jail/dev
/dev/md3                 63M       4.0K        58M        0%  /mfs/var/run/utm
/dev/md4                1.8M       4.0K       1.7M        0%  /jail/mfs
Executing commands from a file
Say you have a file named commands.txt and it has the following commands:
configure
set system host-name firewall-1
set system ntp server 192.168.1.2
commit and-quit
You can quickly configure the device by executing the following command:
Invoke-JunosCommand -Device firewall-1.company.com -User admin -Command commands.txt`

-- Output --

Password: ********
Entering configuration mode
commit complete
Exiting configuration mode
Allows the configuration of Junos devices (Juniper Networks) using a template-based configuration format so that you can specify different values unique to each device, if you wish.
Mandatory
-
-ConfigFile- Specifies the text file that has the configuration template (commands) that you wish to deploy. Please make sure that your commands are in 'set' format.
-
-DeviceList- Specifies the .CSV file that has all of the devices, credentials, and configurable items if necessary.
Optional
-
-File- If specified, all logging will be sent to the file specified here, instead of to the default location (current working directory where the script is run, named "junos-config.log").
All of the commands must be in set format, and the custom value that you want to configure must be referenced by using the following format:
{<number>}
This variable will be referenced in the .CSV file (see the section below for details) that will hold our configuration for that item. The number must start at 0, and can continue for as many items as you wish to configure.
For example, say we want to configure logging on a few devices, but each of them will be sourced from a different IP address. We create a configuration file that looks like the following:
configure
set system syslog source-address {0}
set system syslog host 1.1.1.1 port 514
commit
NOTE:
The configuration file must start with
configureand end withcommit.
Now we move ahead to the .CSV file, and how we reference this value.
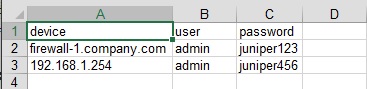
First off, you must have a header row in your .CSV file, as it will help determine what items you want to configure. The format is typical of any .CSV file, except for the fact that the first three columns must be device, user, password.
- All subsequent column names must NOT contain the following characters:
- _ <space>. I recommend using "camelCase" style naming. - If you have values that contain a space, such as an interface description...please enclose them in double-quotes
"".
NOTE:
If you just want to configure the devices with the same configuration, no templating, then in the .CSV file all you have to do is have the
device, user, passwordcolumns like the above screenshot. And your configuration file should have all of the commands that you want to issue, without any{0}type variables.
After these three columns, then you can place any other configurable items you wish. If you remember back in our example configuration file, our first variable started with {0}. This number references the first column that you can use to store your configurable items. So basically it's the 4th column, as the first three are reserved.
For example, you are configuring a source IP address for logging, so you could name your column sourceIP and your .CSV file would look like the following:

If you have a lot more items, then in your configuration file just be sure to match the columns in sequential order. So {1} would be column E, {2} would be column F, etc.
If you specified sending your logs to a file, then the file will look like something similar to this:
[03/28/2014 10:05:07] Starting configuration on firewall-1.company.com...
[03/28/2014 10:05:08] ERROR: Couldn't establish a connection to firewall-1.company.com.
[03/28/2014 10:05:08] Please verify your credentials, and that the device is reachable.

[03/28/2014 10:05:22] Starting configuration on 192.168.1.254...
warning: Clustering enabled; using private edit
warning: uncommitted changes will be discarded on exit
Entering configuration mode
node0:
configuration check succeeds
node1:
commit complete
node0:
commit complete
Exiting configuration mode
[03/28/2014 10:06:31] Closing connection to 192.168.1.254.
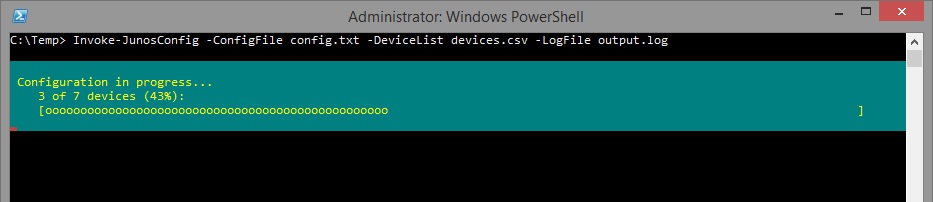
Here is a screenshot of the progress indicator when you configure multiple devices.
This function will allow you to create the necessary configuration to add multi proxy-ID support to your IPsec VPN tunnel. Juniper calls this "traffic-selectors."
Mandatory
-
-Local- Specify the local (your) IP addresses or subnets. Please include the subnet mask in CIDR notation, and separate multiple entries with a comma.
-
-Remote- Specify the remote end IP addresses or subnets. Please include the subnet mask in CIDR notation, and separate multiple entries with a comma.
-
-VPN- Specify the VPN that you want to add these traffic-selectors to. Must match the name you have defined under your IPsec VPN configuration.
Optional
-
-File- This will allow you to save your results to the given file.
New-TrafficSelector -Local 192.168.1.0/24, 10.1.1.55/32 -Remote 172.18.0.0/24 -VPN Vendor-ABC

-- Output --

-- Copy & Paste into SRX --

set security ipsec vpn Vendor-ABC traffic-selector TS1 local-ip 192.168.1.0/24 remote-ip 172.18.0.0/24
set security ipsec vpn Vendor-ABC traffic-selector TS2 local-ip 10.1.1.55/32 remote-ip 172.18.0.0/24