Usage and parameters
This pipeline takes as input a set of FastQ files from NGS sequencers. It then performs a QC using the well-known FastQC tools. Since this is multi-samples analysis, the tool MultiQC is then applied. Finally, we create a summary file (summary.json) and a summary HTML (summary.html) ready to use.
By default, the pipeline looks for FastQ files ending in .fastq.gz files in the current directory. Paired or single-end data are handled transparently if your paired data are tagged with the R1/R2 strings (see later for other cases).
If you are in a hurry, go to the directory that contains your file and type:
sequana_fastqc --run
and wait and see. Depending on the size and number of you input data sets, it may take time. On a test file, this should take less than a minute with a few samples. We recommend to go in 3 steps though.
First, prepare the pipeline without the --run option:
sequana_fastqc
This step prepares the pipeline. If everything went well, you should see something like that:
INFO   [sequana.pipelines_common]:  Welcome to Sequana pipelines suite (sequana.readthedocs.io)
INFO   [sequana.pipelines_common]:  Found 12 files matching your input pattern (*fastq.gz)
INFO   [sequana.pipelines_common]:  readtag: _R[12]_
INFO   [sequana.pipelines_common]:  Found 6 projects/samples
INFO   [sequana.pipelines_common]: Your input data seems to be made of paired reads
Once ready execute the script fastqc.sh using
    cd fastqc; sh fastqc.sh
Second, check that the information are correct. In particular go into the fastqc directory and check the content of the config.yaml file.
cd fastqc
finally, on a local computer, execute the pipeline as follows:
sh fastqc.sh
This command executes a snakemake pipeline locally. If you are on a SLURM cluster, the script fastqc.sh should already incorporate the slurm options. If so, run the script as follows:
cd fastqc
srun -c 1 sh fastqc.sh
# or sbatch -c 1 --wrap "sh fastqc.sh"
In both cases, once done, go to the output directory and open the summary.html file. If everything is fine, you can clean up the directory as follows:
make clean
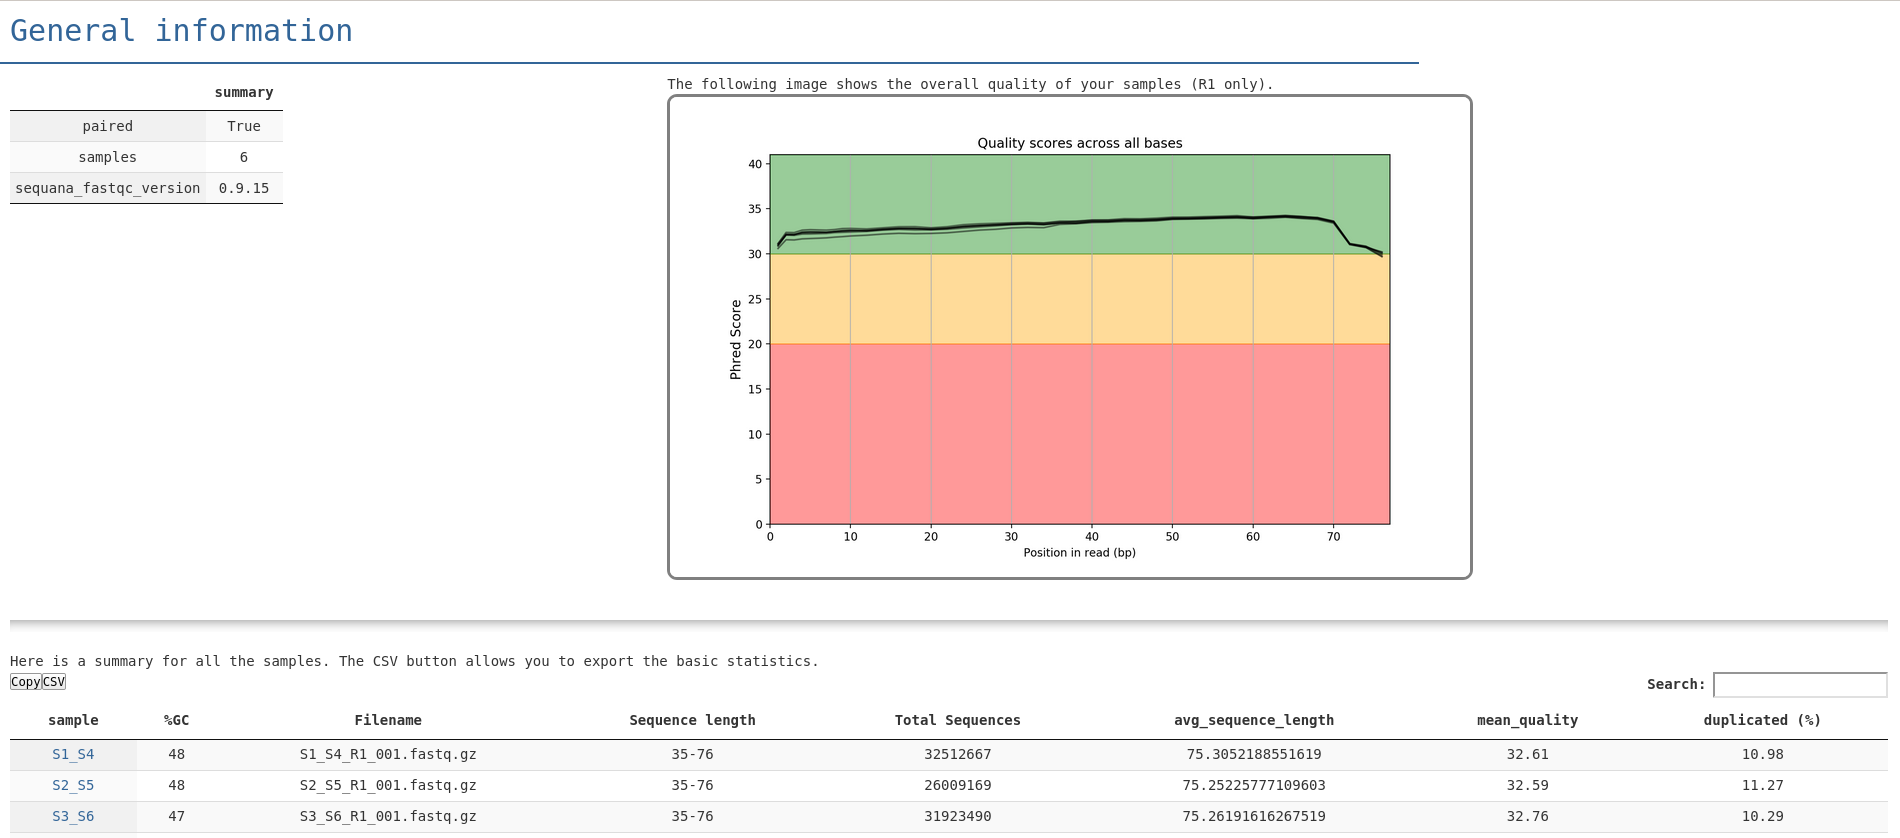
In the summary.html file, you entry point looks like in the following image. From there you get a quick overview of the quality of the run. You can find links to individual FastQC reports as well as a MultiQC report:
Here is a full HTML example
sequana_fastqc --input ~/data/project1 --output ~/my_fastqc/project1_qc
cd project1_qc
sh fastqc.sh
If the paired data are recognised by another pattern, you may use the --input-readtag option. By default this option is set to R[12] meaning consider the string R1 and R2 as the strings to recognise a paired of FastQ files. If your filenames are sample_1.fq.gz and sample_2.fq.gz then use
--input-pattern "_[12]."
Note the dot at the end and the quotes. The dot allows you to differentiate a filename where _1 is present in the sample name.
By default, if the sbatch command is found, the pipeline will consider that you are on a SLURM cluster and will set default options for you (e.g. memory of 4Gb). This will be super-seed by the pipeline requirements, which can be found in the file cluster_config.json
By default, locally we will use 4 jobs. On a cluster, we define the number of jobs to 40. If you wish to use more, just use the --jobs options when initialising the pipeline:
sequana_fastqc --jobs 100
Note that by default fastqc tool will use 4 cores per job. So here, you will be able to analyse 100 samples launching 100 fastqc, each of them asking for 4 cores.