BUILD LOG: https://github.com/skaman82/2.4GHz-Fatshark-Module/wiki

RX28 based Fatshark RX module
- 8 channels (2414, 2432, 2450, 2468, 2490, 2510, 2390, 2370 MHz)
- RSSI display
- Fatshark button control
- Bandscan
- Finder mode
- RSSI calibration
- OSD menus
- OLED screen
Tested with following VTX models:
• TBS Unify 2G4
• Lawmate 2.4
• FuriousFPV 2.4 VTX
• Cheap low power chinese transmitter modules
(no audio compatibility issues unlike the latest RX 2.4 module on the market)
HOME SCREEN: You can change the channels by pressing the UP/DOWN keys - it works also with the google buttons (if the feature is active). If using the joystick you have to press UP/DOWN once to bring the OSD up - then you can change the channel. After no button press is registered the OSD will automatically disappear.
By pressing the CENTER button you can bring up the MENU. With UP/DOWN you can switch between different menu items. Select EXIT to return to the home screen.
GOGGLE CONTROL: Enables fatshark button control.
BANDSCAN: Scans all channels and displays the RSSI values in a graph.
LOCK MODE: If activated (lock icon in the home screen) the module will lock up after approx. 10 seconds. All controls are disabled to prevent chanel changes on acidental button press. You can temporarily UNLOCK the module by pressing the CENTER button for 3-5 seconds (the lock icon will open). After unlocking the module it will return to locked state after approx. 10 seconds.
FIND MODE:Will show the RSSI value in a BAR (oled) or a plot (OSD). Depending on the RSSI value the beeper will beep more often and the OSD LED will blink as well indicating the direction. You can change the channel in the FIND MODE - so be sure you have the correct one. Use a directional antenna to find your model with this function.
AUTOSEARCH: Press the CENTER button for 2 seconds to call the autosearch function. Autosearch will find the strongest channel and switch to it automatically.
CALIBRATION: You have to run calibration to have the correct RSSI values. Just follow the instructions in the wizzard.
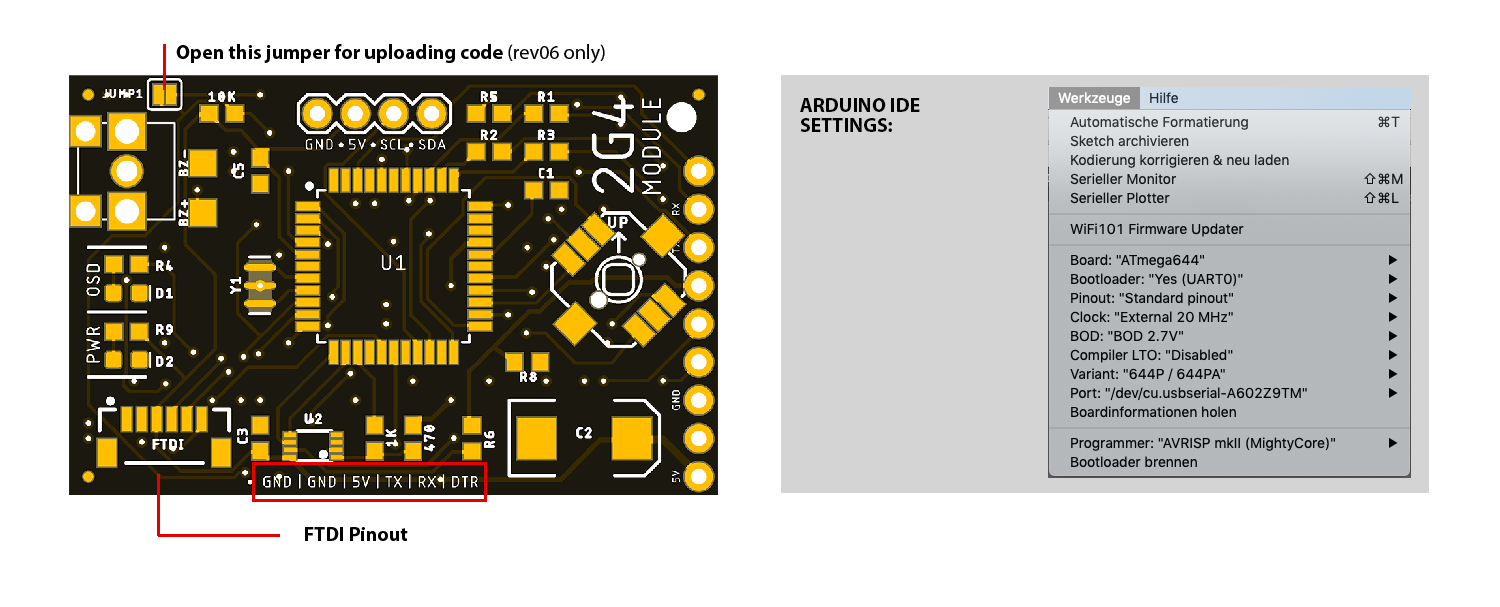
You will need a FTDI to USB adapter to upload the module firmware. You may need to install the FTDI driver for it. Set the FTDI to 5V.
Steps to upload new firmware
- Install Arduino IDE
- Install the Arduino Libraries from the "Libs" folder.
- Install the MightyCore hardware package from here: https://github.com/MCUdude/MightyCore (just follow the instructions)
- Download the firmware and open the Code.INO file from the "Code" folder in Arduino
- Select the hardware settings in Arduino IDE as shown in the image below
- Connect the FTDI tool according to the plug pinout as shown in the picture and select the COM port in Arduino IDE
- If you have the rev 06 PCB open the JUMP1 jumper on the PCB to upload code (solder it together after your upload is done).
- Upload the code
YOU ARE DONE :)