
- Author: Stef Schulz
- Repository: https://github.com/slothsoft/example-gaugebar
- Open Issues: https://github.com/slothsoft/example-gaugebar/issues
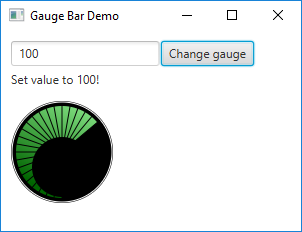
This example shows percent value inside a gaugebar like this:
Content of this file:
You need at least Java 11 or above to run the code. But a Java 7 version is still in the branches, if you need it.
Checkout this project and run the MainApplication. The other two classes (GaugeBar and GaugeBarSkin) are the ones you want to copy if you like what you see.
| Version |
|---|
| Java 11 |
| Java 7 |
Yes, you can just copy the classes. But if you want to know why I implemented them the way I did, read the following paragraphs.
Because today I want to show how to create custom controls with JavaFX, while honoring separation of layout and logic. Additionally I'll show how to use programmatic skinning and a CSS file.
The gauge bar is like the speedometer on a car - it shows a value on an arc from 0 to a max value.
It should not really matter if we want to create the logic or the layout first, I'll usually start with logic. So after setting up a JavaFX project (you are free to copy this reactor) we'll add a very simple gauge class looks like this:
public class GaugeBar extends Control {

    int maxValue = 100;
    int value = this.maxValue;

    public void setMaxValue(int maxValue) {
        if (maxValue < this.value)
            throw new IllegalArgumentException("Max value must be bigger than value!");
        this.maxValue = maxValue;
    }

    // other getters and setters
}
Since we named this "the logic, it might a good idea to add some unit tests. Yes, even if the getter and setter are simple. Hell, because they are.
The tests work as some kind of contract in this case. If we assume that value cannot be negative for the layout, we should throw an IllegalArgumentException and test it gets thrown. That way, if we one day decide to remove the exception we get test errors and hopefully get reminded that our layout cannot display negative values. The same goes double for other people working on our code.
Now that we have our control logic, we will add our layout class. JavaFX uses javafx.scene.control.Skin for that, an interface with only three methods to be overriden:
public class GaugeBarSkin implements Skin<Gaugebar> {
    private final GaugeBar gaugeBar;
    private Group rootNode;

    public GaugeBarSkin(GaugeBar gaugeBar) {
        this.gaugeBar = gaugeBar;
    }

    @Override
    public GaugeBar getSkinnable() {
        return this.gaugeBar;
    }

    @Override
    public Node getNode() {
        if (this.rootNode == null) {
            this.rootNode = new Group();
           redraw();
        }
        return this.rootNode;
    }

    protected void redraw() {
        List<node> rootChildren = new ArrayList<node>();
        rootChildren.add(createBackground());
        rootChildren.add(createGauge());
        rootChildren.add(createTicks());
        rootChildren.add(createGaugeBlend());
        rootChildren.add(createBorder());
        this.rootNode.getChildren().setAll(rootChildren);
    }

    // all the createXYZ() methods

    @Override
    public void dispose() {
        // nothing to do
    }
}
I might be especially stupid, but it took me a long time to figure out that you should always return the same node in getNode() and modify it according to your wishes. All the node children are observable lists, so modifying them will throw events and the GUI will react to them.
Speaking of which... how does the control interact with the skin? First it should set the skin somewhere, for simplicity I choose the constructor:
    public GaugeBar() {
        setSkin(new GaugeBarSkin(this));
    }
After that, the gauge bar could inform the skin on each change personally. But that would be stupid and unnecessary. What if we added a new skin? Both skins would need to implement a common interface, that would have many, many methods, because each skin could react to different property changes. There is a much cleaner way, that is called the listener pattern.
Every property change on the Gaugebar should be honored by firing an event. Each skin can now add itself to the events it wants to react to. In practice it looks like this:
public class GaugeBar extends Control {
    public static final EventType<Event> EVENT_TYPE_CHANGE_MAX_VALUE = new EventType<>(EventType.ROOT,
			"de.slothsoft.gaugebar.GaugeBar.EVENT_TYPE_CHANGE_MAX_VALUE");

    public void setMaxValue(int maxValue) {
        if (maxValue < this.value)
            throw new IllegalArgumentException("Max value must be bigger than value!");
        this.maxValue = maxValue;
        fireEvent(new Event(Integer.valueOf(maxValue), this, EVENT_TYPE_CHANGE_MAX_VALUE));
    }

    // ...
}
public class GaugeBarSkin implements Skin<GaugeBar> {

    public GaugeBarSkin(GaugeBar gaugeBar) {
        this.gaugeBar = gaugeBar;
        this.gaugeBar.addEventHandler(GaugeBar.EVENT_TYPE_CHANGE_VALUE, event -> redraw());
    }
}
This appoach decouples the skin from the control. That way we could add an entirely new skin (e.g. for a healthbar or a simple label showing "80%"), but we are also free to extend the control and still use the same skin.
I'm not going to copy the entire skin code, if you want it, you can download the entire project. I think if you are here it's probably because you want to create your very own control yourself, so my code won't help you anyway.
So how to go about drawing a complex figure? Well for starters it's somewhat like programming: You need to break up your control into smaller parts. Imagine the gauge bar above (if you can't, scroll up) - my first reacting was "I'll never be able to draw something like that". Now take a look at this dissection:

It's almost too easy, isn't it? The only real problem was to calculate the angle of the arc correctly.
To add support for styling via CSS files, we have to add CSS classes to specific nodes. For now, we will only make the green part stylable. First we add the CSS class "gauge" to the skin:
private Node createGauge() {
    Stop[] stops = new Stop[] { new Stop(0, Color.LIGHTGREEN), new Stop(1, Color.DARKGREEN) };
    Circle circle = new Circle(this.size, this.size, this.size - 2 * GAUGE_BORDER);
    circle.setFill(new LinearGradient(1, 0, 0.5, 1, true, CycleMethod.NO_CYCLE, stops));
    circle.getStyleClass().add(\"gauge\"); // <- CSS class
    return circle;
}
Now we create a CSS file like this:
.gauge {
    -fx-fill: #FF0000;
}
And make it known to the JavaFX scene:
Scene scene = new Scene(group, 240, 120);
scene.getStylesheets().add("style.css"); // etc
When we start our application now, our green gauge will be red. You can test this out by uncommenting the line in MainApplication (it's line 56 right now, but that might change).
In the end we should have a control with nicely tested logic and one skin that could be customized via CSS. We know how to go about painting complex figures and we used the listener pattern. If there are still questions, I'd love to hear them. And if you want to see the entire project, that's why it's on GitHub in the first place.
This project is licensed under the MIT License - see the MIT license for details.