

-
Quick Setup - Quickly setup and configure your application.
-
Fully integrated Typeorm - Any applications requires database, so we have integrated Typeorm (why?).
-
Migration & Seeding - Easy and elegant support for migration and seedind data.
-
Support for authentication & Authorization - We have added built in api, guards and decorators, so you don't need to worry about.
cd workspace

git clone https://github.com/solutelabs/nestjs-boilerplate your_project_name
cd your_project_name
node setup.js#ENVIRONMENTS
PORT=
#DATABASE ENVs
DATABASE_URL=
#JWT
JWT_SECRET=
JWT_EXPIRES_IN_DAYS=
WEBHOOK_SECRET=
#password length
MIN_PASSWORD_LENGTH=
MAX_PASSWORD_LENGTH=
RESET_PASSWORD_SLUG=
INVITE_SLUG=
ENVIRONMENT=$ sudo docker build -t app-name .$ sudo docker run --network=host app-name$ npm install# development
$ npm run start
# watch mode
$ npm run start:dev
# production mode
$ npm run start:prod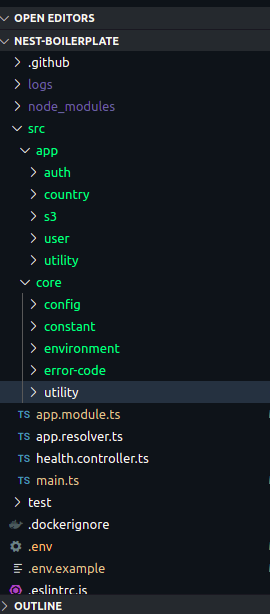
- Application is divided in 2 parts
- app - this contains APIs related code
- core - this contains code related to scaffolding the app.(like logger, guards, validator, etc)
- even if we don’t add any module in app folder the application will bootstrap as it is loosely coupled.
- Module are plug and play. for ex: add S3 module in app module if u want to have S3 related api’s in your app.
- Module like Auth and user needs to instantiated together as both are dependent on each other.
commitizen is a command line utility that makes it easier to create commit messages following the conventional commit format specification.
npm install -g commitizenUse git cz instead of git commit to use commitizen.

Configuration file: .czrc.
commitlint checks if your commit messages meet the conventional commit format.
In general the pattern mostly looks like this:
type(scope?): subject #scope is optionalAre you a good commitizen ?
branch-name-lint Validates and lints the git branch name. Create a config file or use the default configuration file. Use it in husky config file to make sure that your branch will not be rejected by some pesky Jenkins branch name conventions. You may use it as part of a CI process or just as an handy npx command.
This application comes with built in support for authorization. It comes with built-in api's like
- Login
- Forget and Change password
- Send and Verify otp
Extended support with gaurds for authentication
- Auth Gaurd
- Role Gaurd
- Webhook Gaurd
- Throttler Guard
Use this when you want to make your api secure/ unauthenticated user can't access it
@Query(() => String)
@UseGuards(JwtAuthGuard)
async test() {
    return 'test'
  }
Use this when you want to make your api accessible to a certain set user with specific role
@Query(() => String)
@UseGuards(JwtAuthGuard, RolesGuard)
@Role('role')
async test() {
    return 'test'
  }
Use this when you want to secure your webhook created using hasura
@Query(() => String)
@UseGuards(WebhookAuthGuard)
async test() {
    return 'test'
  }
Use this when you want to limit your api to be hit not more than n no of times
@Query(() => String)
@UseGuards(GqlThrottlerGuard)
async test() {
    return 'test'
  }
This application comes with built in services for communication via.
- Mail (Postmark)
- Message (Twillio)
- Notification (One Signal)
To use, inject the mail service and call the desired method
  // inject email service
  constructor(
    private readonly emailService: EmailService,
  ) {}

  // call method
  await this.emailService.sendInvitation(payload)
To use, inject the message service and call the desired method
  // inject message service
  constructor(
    private readonly smsService: SmsService,
  ) {}

  // call method
  await this.smsService.sendSms(contactNumber: string, message: string)
To use, inject the notification service and call the desired method
  // inject email service
  constructor(
    private readonly onesignalService: OnesignalService,
  ) {}

  // call method
  await this.onesignalService.createNotificatioBaseOnExternalId(payload)
-
Before starting the application start hasura's docker container for connecting to DB.
-
To use GqlThrottlerGuard add it to imports array in app.module.ts like this:
ThrottlerModule.forRoot({
      ttl: 60,
      limit: 5,
    })
- To use mail, message and notification service add it to providers array for respective modules in which this services are going to be used
- Repository is basically use to create contract between your application with database. that means for each table you can create repository. syntax will be following:
@Entity('<YOUR_TABLE_NAME>')
export class UserEntity extends BaseEntity  {
  @Column('text')
  email: string;
}
-
in this example @Entity decorator is use to connect your table with the repository and the parameter defines the table name.
-
BaseEntity is the parent class so all the common column which are used in every table will be written over there so just we need to extend this example, already shown in the above example.